
 Database
Mysql Tutorial
MySQL - Detailed explanation of dual-machine HA based on Keepalived (picture and text)
Database
Mysql Tutorial
MySQL - Detailed explanation of dual-machine HA based on Keepalived (picture and text)
MySQL - Detailed explanation of dual-machine HA based on Keepalived (picture and text)

1. Environment description:
OS: CentOS6.5_X64
MASTER: 192.168.0.202
BACKUP: 192.168.0.203
VIP: 192.168.0.204
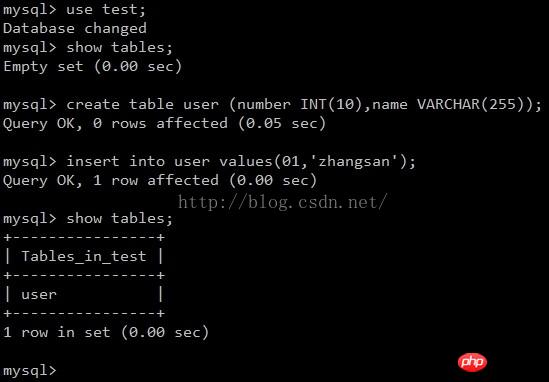
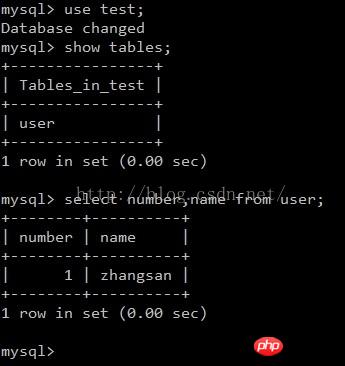
2. Configure two MysqlMaster-Master Synchronization
Regarding the installation of MySQL, you can also refer to "MySQL - CentOS6.5 Compile and Install MySQL5.6.16", the main Master synchronization configures the slave server as the master of the previous master server based on master-slave synchronization. It is equivalent to setting the original slave as the master of the original master based on the original master-slave synchronization. You can also refer to "MySQL - —MS master-slave replication (read-write separation) implementation》
, after setting A as B's Master and B as A's Slave, then set B as A's Master and A as B's Slave.
[root@masterr ~]# yum install mysql-server mysql -y
[root@masterr ~]# service mysqld start
[root@masterr ~]# mysqladmin -u root proot
[root@masterr ~]# vi /etc/my.cnf  #开启二进制日志,设置id
[mysqld]
server-id = 1                    #backup这台设置2
log-bin = mysql-bin
binlog-ignore-db = mysql,information_schema       #忽略写入binlog日志的库
auto-increment-increment = 2             #字段变化增量值
auto-increment-offset = 1              #初始字段ID为1
slave-skip-errors = all                       #忽略所有复制产生的错误
[root@masterr ~]# service mysqld restart
#First check the log bin log and pos value location
[root@ master ~]# mysql -u root -proot
mysql> GRANT  REPLICATION SLAVE ON *.* TO 'replication'@'192.168.0.%' IDENTIFIED  BY 'replication';
mysql> flush  privileges;
mysql> change  master to
    ->  master_host='192.168.0.203',
    ->  master_user='replication',
    ->  master_password='replication',
    ->  master_log_file='mysql-bin.000002',
    ->  master_log_pos=106;  #对端状态显示的值
mysql> start slave; #启动同步[root@backup ~]# mysql -u root -proot
mysql> GRANT REPLICATION SLAVE ON *.* TO 'replication'@'192.168.0.%' IDENTIFIED BY 'replication';
mysql> flush privileges;
mysql> change master to
-> master_host='192.168.0.202',
-> master_user='replication',
-> master_password='replication',
-> master_log_file='mysql-bin.000002',
-> master_log_pos=106;
mysql> start slave;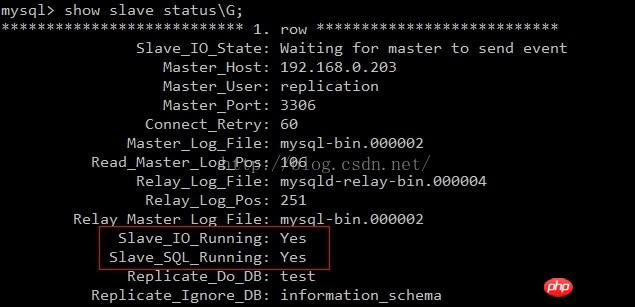
[root@backup ~]# yum install -y pcre-devel openssl-devel popt-devel #安装依赖包
Copy after login[root@masterr ~]# wget http://www.php.cn/
[root@masterr ~]# tar zxvf keepalived-1.2.7.tar.gz
[root@masterr ~]# cd keepalived-1.2.7
[root@masterr ~]#./configure --prefix=/usr/local/keepalived
make
Copy after login
#Configure keepalived as a system service[root@backup ~]# yum install -y pcre-devel openssl-devel popt-devel #安装依赖包
[root@masterr ~]# wget http://www.php.cn/
[root@masterr ~]# tar zxvf keepalived-1.2.7.tar.gz
[root@masterr ~]# cd keepalived-1.2.7
[root@masterr ~]#./configure --prefix=/usr/local/keepalived
make
[root@masterr ~]# cp /usr/local/keepalived/etc/rc.d/init.d/keepalived /etc/init.d/
[root@masterr ~]# cp /usr/local/keepalived/etc/sysconfig/keepalived /etc/sysconfig/
[root@masterr ~]# mkdir /etc/keepalived/
[root@masterr ~]# cp /usr/local/keepalived/etc/keepalived/keepalived.conf /etc/keepalived/
[root@masterr ~]# cp /usr/local/keepalived/sbin/keepalived /usr/sbin/
[root@masterr ~]# vi /etc/keepalived/keepalived.conf
! Configuration File forkeepalived
global_defs {
notification_email {
test@sina.com
 }
notification_email_from  admin@test.com
smtp_server 127.0.0.1
smtp_connect_timeout 30
router_id MYSQL_HA      #标识,双主相同
 }
vrrp_instance VI_1 {
 state BACKUP           #两台都设置BACKUP
 interface eth0
 virtual_router_id 51       #主备相同
 priority 100           #优先级,backup设置90
 advert_int 1
 nopreempt             #不主动抢占资源,只在master这台优先级高的设置,backup不设置
 authentication {
 auth_type PASS
 auth_pass 1111
 }
 virtual_ipaddress {
 192.168.0.204
 }
}
virtual_server 192.168.0.204 3306 {
 delay_loop 2
 #lb_algo rr              #LVS算法,用不到,我们就关闭了
 #lb_kind DR              #LVS模式,如果不关闭,备用服务器不能通过VIP连接主MySQL
 persistence_timeout 50  #同一IP的连接60秒内被分配到同一台真实服务器
 protocol TCP
 real_server 192.168.0.202 3306 {   #检测本地mysql,backup也要写检测本地mysql
 weight 3
 notify_down /usr/local/keepalived/mysql.sh    #当mysq服down时,执行此脚本,杀死keepalived实现切换
 TCP_CHECK {
 connect_timeout 3    #连接超时
 nb_get_retry 3       #重试次数
 delay_before_retry 3 #重试间隔时间
  }
}[root@masterr ~]# vi /usr/local/keepalived/mysql.sh #!/bin/bash pkill keepalived [root@masterr ~]# chmod +x /usr/local/keepalived/mysql.sh [root@masterr ~]# /etc/init.d/keepalived start
#The backup server only changes the priority to 90. Nopreempt is not set, real_server sets the local IP.
#Authorize two Mysql servers to allow root remote login for testing on other servers!
mysql> grant all on *.* to'root'@'192.168.0.%' identified by 'root';
mysql> flush privileges;
2) Stop the master mysql service and check whether it can switch to it normally. You can use the ip addr command to check which server the VIP is on. 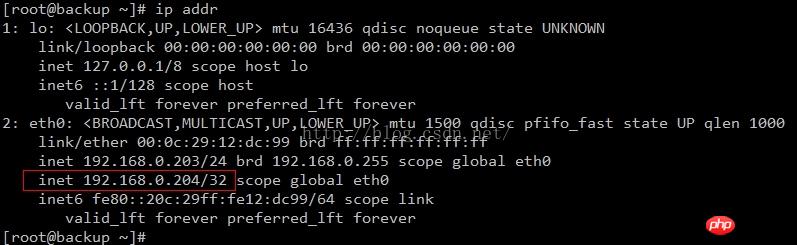 3) You can see the master/backup switching process by checking the /var/log/messges log
4) After the master server recovers from a fault, whether it actively seizes resources and becomes an active server.
Note: The order of service startup: start MySQL first, then Keepalived.
The above is the detailed content of MySQL - Detailed explanation of dual-machine HA based on Keepalived (picture and text). For more information, please follow other related articles on the PHP Chinese website!

Hot AI Tools

Undresser.AI Undress
AI-powered app for creating realistic nude photos

AI Clothes Remover
Online AI tool for removing clothes from photos.

Undress AI Tool
Undress images for free

Clothoff.io
AI clothes remover

Video Face Swap
Swap faces in any video effortlessly with our completely free AI face swap tool!

Hot Article
Hot Tools

Notepad++7.3.1
Easy-to-use and free code editor

SublimeText3 Chinese version
Chinese version, very easy to use

Zend Studio 13.0.1
Powerful PHP integrated development environment

Dreamweaver CS6
Visual web development tools

SublimeText3 Mac version
God-level code editing software (SublimeText3)
Hot Topics
 1658
1658
 14
1415
52
1309
25
1257
29
1231
24
14
1415
52
1309
25
1257
29
1231
24

 MySQL's Role: Databases in Web Applications
Apr 17, 2025 am 12:23 AM
MySQL's Role: Databases in Web Applications
Apr 17, 2025 am 12:23 AM
The main role of MySQL in web applications is to store and manage data. 1.MySQL efficiently processes user information, product catalogs, transaction records and other data. 2. Through SQL query, developers can extract information from the database to generate dynamic content. 3.MySQL works based on the client-server model to ensure acceptable query speed.
 How to start mysql by docker
Apr 15, 2025 pm 12:09 PM
How to start mysql by docker
Apr 15, 2025 pm 12:09 PM
The process of starting MySQL in Docker consists of the following steps: Pull the MySQL image to create and start the container, set the root user password, and map the port verification connection Create the database and the user grants all permissions to the database
 Laravel Introduction Example
Apr 18, 2025 pm 12:45 PM
Laravel Introduction Example
Apr 18, 2025 pm 12:45 PM
Laravel is a PHP framework for easy building of web applications. It provides a range of powerful features including: Installation: Install the Laravel CLI globally with Composer and create applications in the project directory. Routing: Define the relationship between the URL and the handler in routes/web.php. View: Create a view in resources/views to render the application's interface. Database Integration: Provides out-of-the-box integration with databases such as MySQL and uses migration to create and modify tables. Model and Controller: The model represents the database entity and the controller processes HTTP requests.
 Solve database connection problem: a practical case of using minii/db library
Apr 18, 2025 am 07:09 AM
Solve database connection problem: a practical case of using minii/db library
Apr 18, 2025 am 07:09 AM
I encountered a tricky problem when developing a small application: the need to quickly integrate a lightweight database operation library. After trying multiple libraries, I found that they either have too much functionality or are not very compatible. Eventually, I found minii/db, a simplified version based on Yii2 that solved my problem perfectly.
 MySQL and phpMyAdmin: Core Features and Functions
Apr 22, 2025 am 12:12 AM
MySQL and phpMyAdmin: Core Features and Functions
Apr 22, 2025 am 12:12 AM
MySQL and phpMyAdmin are powerful database management tools. 1) MySQL is used to create databases and tables, and to execute DML and SQL queries. 2) phpMyAdmin provides an intuitive interface for database management, table structure management, data operations and user permission management.
 Laravel framework installation method
Apr 18, 2025 pm 12:54 PM
Laravel framework installation method
Apr 18, 2025 pm 12:54 PM
Article summary: This article provides detailed step-by-step instructions to guide readers on how to easily install the Laravel framework. Laravel is a powerful PHP framework that speeds up the development process of web applications. This tutorial covers the installation process from system requirements to configuring databases and setting up routing. By following these steps, readers can quickly and efficiently lay a solid foundation for their Laravel project.
 MySQL vs. Other Programming Languages: A Comparison
Apr 19, 2025 am 12:22 AM
MySQL vs. Other Programming Languages: A Comparison
Apr 19, 2025 am 12:22 AM
Compared with other programming languages, MySQL is mainly used to store and manage data, while other languages such as Python, Java, and C are used for logical processing and application development. MySQL is known for its high performance, scalability and cross-platform support, suitable for data management needs, while other languages have advantages in their respective fields such as data analytics, enterprise applications, and system programming.
 MySQL vs. Other Databases: Comparing the Options
Apr 15, 2025 am 12:08 AM
MySQL vs. Other Databases: Comparing the Options
Apr 15, 2025 am 12:08 AM
MySQL is suitable for web applications and content management systems and is popular for its open source, high performance and ease of use. 1) Compared with PostgreSQL, MySQL performs better in simple queries and high concurrent read operations. 2) Compared with Oracle, MySQL is more popular among small and medium-sized enterprises because of its open source and low cost. 3) Compared with Microsoft SQL Server, MySQL is more suitable for cross-platform applications. 4) Unlike MongoDB, MySQL is more suitable for structured data and transaction processing.
