Install mysql-5.7.21 under windows
This article describes the specific steps to install the mysql service under windows. I hope it will be helpful to everyone.
Preface
This is the first time I installed MySQL on my computer, because MySQL has been disabled since version 5.6. Changes have been made. After decompression in the downloaded installation-free package, there is no data folder and mydefault.ini file. Therefore, some installation methods on the Internet are no longer effective.
Recommended related mysql video tutorials: "mysql tutorial"
Download
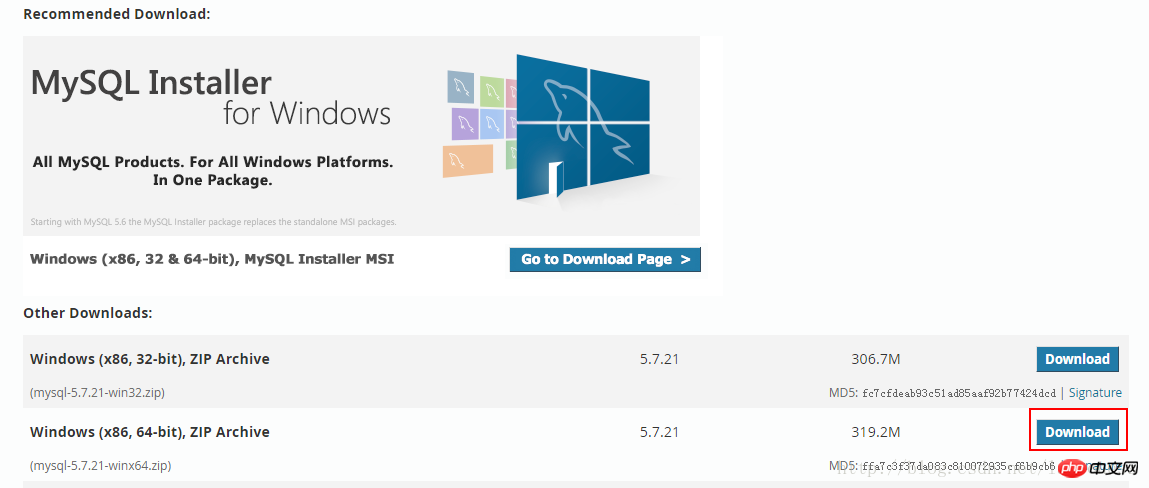
Enter the MySQL official website, find the download link, and download as shown in the picture:

##Installation
Direct Unzip the downloaded installation package to the installation path (I put it under D:\mysql); In the decompressed D:\mysql\mysql-5.7.21-winx64 directory, create it manually The my.ini file I created using Notepad has the following content:[mysql] # 设置mysql客户端默认字符集 default-character-set=utf8 [mysqld] skip-name-resolve skip-grant-tables #设置3306端口 port = 3306 # 设置mysql的安装目录 basedir=D:\mysql\mysql-5.7.21-winx64 # 设置mysql数据库的数据的存放目录 datadir=D:\mysql\mysql-5.7.21-winx64\data # 允许最大连接数 max_connections=200 # 服务端使用的字符集默认为8比特编码的latin1字符集 character-set-server=utf8 # 创建新表时将使用的默认存储引擎 default-storage-engine=INNODB


The above are the steps I have compiled to install mysql. I hope it can help those who don’t know how to install it yet.
Related articles:
About PHP - Interaction between AJAX and MySQL
Related knowledge about PHP MySQL prepared statements
Solution to PHP MySQL high concurrency locking transaction processing problem
The above is the detailed content of Install mysql-5.7.21 under windows. For more information, please follow other related articles on the PHP Chinese website!

Hot AI Tools

Undresser.AI Undress
AI-powered app for creating realistic nude photos

AI Clothes Remover
Online AI tool for removing clothes from photos.

Undress AI Tool
Undress images for free

Clothoff.io
AI clothes remover

Video Face Swap
Swap faces in any video effortlessly with our completely free AI face swap tool!

Hot Article

Hot Tools

Notepad++7.3.1
Easy-to-use and free code editor

SublimeText3 Chinese version
Chinese version, very easy to use

Zend Studio 13.0.1
Powerful PHP integrated development environment

Dreamweaver CS6
Visual web development tools

SublimeText3 Mac version
God-level code editing software (SublimeText3)

Hot Topics
 1664
1664
 14
14
 1422
1422
 52
52
 1316
1316
 25
25
 1267
1267
 29
29
 1239
1239
 24
24
 Can vs code run in Windows 8
Apr 15, 2025 pm 07:24 PM
VS Code can run on Windows 8, but the experience may not be great. First make sure the system has been updated to the latest patch, then download the VS Code installation package that matches the system architecture and install it as prompted. After installation, be aware that some extensions may be incompatible with Windows 8 and need to look for alternative extensions or use newer Windows systems in a virtual machine. Install the necessary extensions to check whether they work properly. Although VS Code is feasible on Windows 8, it is recommended to upgrade to a newer Windows system for a better development experience and security.
 How to solve complex BelongsToThrough relationship problem in Laravel? Use Composer!
Apr 17, 2025 pm 09:54 PM
In Laravel development, dealing with complex model relationships has always been a challenge, especially when it comes to multi-level BelongsToThrough relationships. Recently, I encountered this problem in a project dealing with a multi-level model relationship, where traditional HasManyThrough relationships fail to meet the needs, resulting in data queries becoming complex and inefficient. After some exploration, I found the library staudenmeir/belongs-to-through, which easily installed and solved my troubles through Composer.
 How to run sublime after writing the code
Apr 16, 2025 am 08:51 AM
There are six ways to run code in Sublime: through hotkeys, menus, build systems, command lines, set default build systems, and custom build commands, and run individual files/projects by right-clicking on projects/files. The build system availability depends on the installation of Sublime Text.
 vscode cannot install extension
Apr 15, 2025 pm 07:18 PM
The reasons for the installation of VS Code extensions may be: network instability, insufficient permissions, system compatibility issues, VS Code version is too old, antivirus software or firewall interference. By checking network connections, permissions, log files, updating VS Code, disabling security software, and restarting VS Code or computers, you can gradually troubleshoot and resolve issues.
 laravel installation code
Apr 18, 2025 pm 12:30 PM
To install Laravel, follow these steps in sequence: Install Composer (for macOS/Linux and Windows) Install Laravel Installer Create a new project Start Service Access Application (URL: http://127.0.0.1:8000) Set up the database connection (if required)
 Recommended system maintenance and optimization tools in Mac system
Apr 12, 2025 pm 04:45 PM
Mac system maintenance includes: disk management (use OmniDiskSweeper to clean disk space, use disk tools to check disk errors) memory management (use Activity Monitor to monitor memory usage, end over-occupying processes) startup item management (use Linc or LaunchControl to manage startup items, disable unnecessary startup items) system cache cleaning (use CleanMyMac X or manually clean system cache) software update (timely update system and applications) regular backup (use Time Machine to backup data regularly) good usage habits (not installing applications excessively, cleaning files regularly, and monitoring system logs)
 Which operating systems are supported by Tigervnc in Debian
Apr 12, 2025 pm 10:15 PM
The open source VNC tool Tigervnc is compatible with a wide range of operating systems, including Windows, Linux, and macOS. This article will introduce in detail the application of Tigervnc on the Debian system. Tigervnc is integrated in the application system of Debian system: In the Debian system, Tigervnc is integrated into the system as a VNC server component. Users can start VNC services through command line tools such as vncserver and customize display settings such as resolution and color depth. Cross-platform connection: Tigervnc client supports Windows, Linux, and macOS, which means users can run this from any
 git software installation
Apr 17, 2025 am 11:57 AM
Installing Git software includes the following steps: Download the installation package and run the installation package to verify the installation configuration Git installation Git Bash (Windows only)


