How to install MySQL 8.0 in Ubuntu 18.04
MySQL Community Server is a free, open source, popular, cross-platform database management system. It supports both SQL and NoSQL and has a pluggable storage engine architecture. Additionally, it provides multiple database connectors for different programming languages, allowing you to develop applications using any known language and many other features.

It has many use cases in areas such as document storage, cloud computing, high availability systems, IoT, hadoop, big data, data warehouses, LAMP or LEMP stacks, etc. for Support large-capacity websites/applications, etc.
Recommended reference study: "mysql tutorial"http://www.php.cn/course/list/51.html
In this article, we will explain the fresh installation of MySQL 8.0 database system on Ubuntu 18.04 Bionic Beaver.
Step 1: Add MySQL Apt Repository
There is an APT repository for installing MySQL server, client and other components. You need to add this MySQL repository to your system's list of package sources; first download the repository package using the wget tool from the command line.
$ wget -c https://dev.mysql.com/get/mysql-apt-config_0.8.10-1_all.deb
Then use the following dpkg command to install the MySQL repository package.
$ sudo dpkg -i mysql-apt-config_0.8.10-1_all.deb
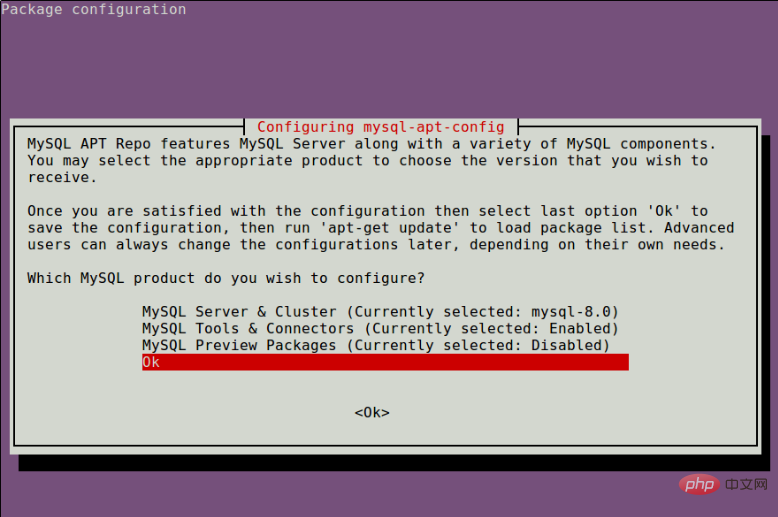
Please note that during the package installation process, you will be prompted to select the MySQL server version and other components such as clustering, shared client libraries, or MySQL workbench to configure for installation.
mysql-8.0 will automatically select the MySQL server version, then scroll down to the last option Ok and click [Enter] to complete the configuration and installation of the release package as shown in the screenshot.
Step 2: Install MySQL Server in Ubuntu 18.04
Next, download the Recently added MySQL repositories) download the latest package information.
$ sudo apt update
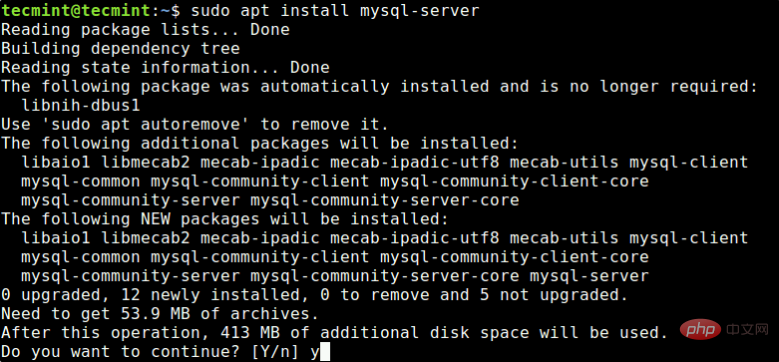
Then run the following commands to install packages for MySQL community server, client and database common files.
$ sudo apt-get install mysql-server
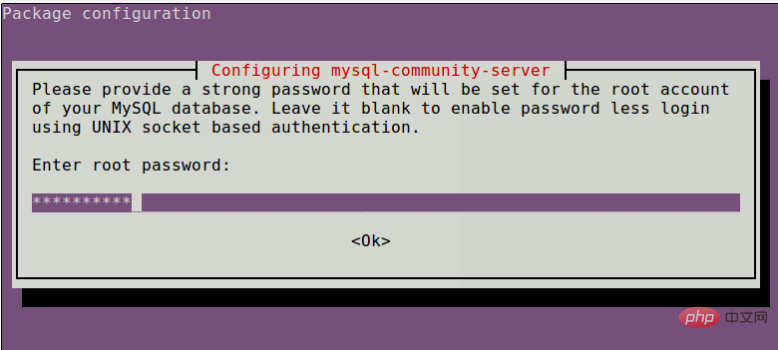
Through the installation process, you will be asked to enter the password for the root user of your MySQL server, please re-enter the password to confirm and press [Enter].
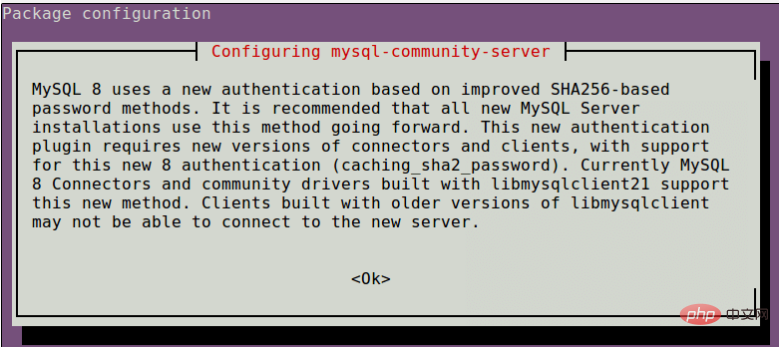
Next, the MySQL Server Authentication Plugin Configuration message will be displayed, read through it and use the right arrow to select Ok and press [Enter] to continue.
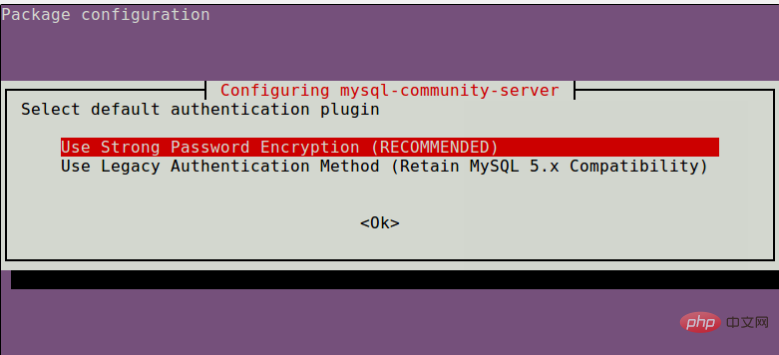
You will then be asked to select the default authentication plugin to use, then use the right arrow to select Ok and press [Enter] to complete the package configuration.
Step 3: Securing MySQL Server Installation
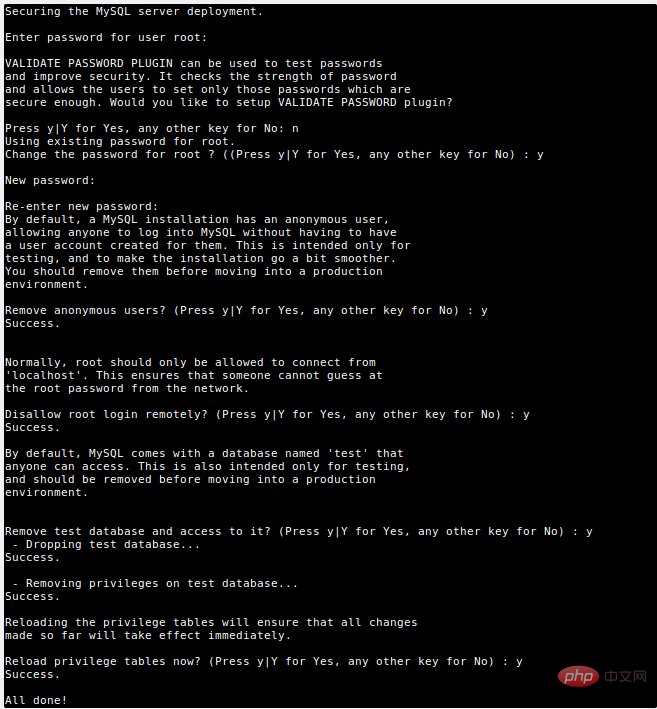
By default, MySQL installation is not secure. To secure it, run the security script included with the binary package. You will be asked to enter the root password you set during installation. Then also choose whether to use the VALIDATE PASSWORD plug-in.
You can also change the root password you set previously (as we did in this example). Then enter yes/y the following security question:
Delete anonymous user? (Press y | Y for yes, any other key for no): y
Remote login prohibited? (Press y|Y for yes, any other key for no):y
Delete the test database and access it? (Press y|Y for yes, any other key for no): y
Now reload the permissions table? (Press y|Y for yes, any other key for no):y
Start the script by issuing the following command.
$ sudo mysql_secure_installation
Step 4: Manage MySQL Server via Systemd
On Ubuntu, after installing the package, once the package is configured , its service will usually start automatically. You can check if the MySQL server is up and running using the following command.
$ sudo systemctl status mysql
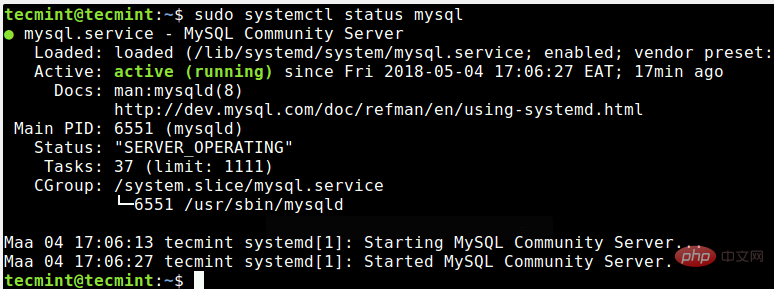
If for some reason, it does not start automatically, use the following command to start it and enable it to start on system startup as shown below.
$ sudo systemctl status mysql $ sudo systemctl enable mysql
第5步:安装额外的MySQL产品和组件
此外,您可以安装额外的MySQL组件,以便与服务器一起使用,例如mysql-workbench-community,libmysqlclient18和许多其他组件。
$ sudo apt-get update
$ sudo apt-get install mysql-workbench-community libmysqlclient18
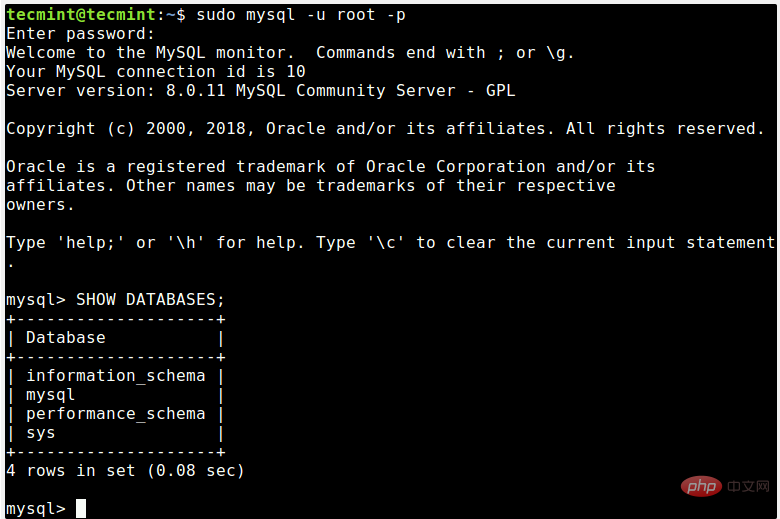
最后,要访问MySQL shell,请发出以下命令。
$ sudo mysql -u root -p
本篇文章就是关于在Ubuntu 18.04中安装MySQL 8.0的安装步骤介绍,希望对需要的朋友有所帮助!
The above is the detailed content of How to install MySQL 8.0 in Ubuntu 18.04. For more information, please follow other related articles on the PHP Chinese website!

Hot AI Tools

Undresser.AI Undress
AI-powered app for creating realistic nude photos

AI Clothes Remover
Online AI tool for removing clothes from photos.

Undress AI Tool
Undress images for free

Clothoff.io
AI clothes remover

Video Face Swap
Swap faces in any video effortlessly with our completely free AI face swap tool!

Hot Article

Hot Tools

Notepad++7.3.1
Easy-to-use and free code editor

SublimeText3 Chinese version
Chinese version, very easy to use

Zend Studio 13.0.1
Powerful PHP integrated development environment

Dreamweaver CS6
Visual web development tools

SublimeText3 Mac version
God-level code editing software (SublimeText3)

Hot Topics
 1664
1664
 14
14
 1422
1422
 52
52
 1316
1316
 25
25
 1266
1266
 29
29
 1239
1239
 24
24
 When might a full table scan be faster than using an index in MySQL?
Apr 09, 2025 am 12:05 AM
Full table scanning may be faster in MySQL than using indexes. Specific cases include: 1) the data volume is small; 2) when the query returns a large amount of data; 3) when the index column is not highly selective; 4) when the complex query. By analyzing query plans, optimizing indexes, avoiding over-index and regularly maintaining tables, you can make the best choices in practical applications.
 MySQL: Simple Concepts for Easy Learning
Apr 10, 2025 am 09:29 AM
MySQL is an open source relational database management system. 1) Create database and tables: Use the CREATEDATABASE and CREATETABLE commands. 2) Basic operations: INSERT, UPDATE, DELETE and SELECT. 3) Advanced operations: JOIN, subquery and transaction processing. 4) Debugging skills: Check syntax, data type and permissions. 5) Optimization suggestions: Use indexes, avoid SELECT* and use transactions.
 MySQL: The Ease of Data Management for Beginners
Apr 09, 2025 am 12:07 AM
MySQL is suitable for beginners because it is simple to install, powerful and easy to manage data. 1. Simple installation and configuration, suitable for a variety of operating systems. 2. Support basic operations such as creating databases and tables, inserting, querying, updating and deleting data. 3. Provide advanced functions such as JOIN operations and subqueries. 4. Performance can be improved through indexing, query optimization and table partitioning. 5. Support backup, recovery and security measures to ensure data security and consistency.
 MySQL's Role: Databases in Web Applications
Apr 17, 2025 am 12:23 AM
The main role of MySQL in web applications is to store and manage data. 1.MySQL efficiently processes user information, product catalogs, transaction records and other data. 2. Through SQL query, developers can extract information from the database to generate dynamic content. 3.MySQL works based on the client-server model to ensure acceptable query speed.
 MySQL: An Introduction to the World's Most Popular Database
Apr 12, 2025 am 12:18 AM
MySQL is an open source relational database management system, mainly used to store and retrieve data quickly and reliably. Its working principle includes client requests, query resolution, execution of queries and return results. Examples of usage include creating tables, inserting and querying data, and advanced features such as JOIN operations. Common errors involve SQL syntax, data types, and permissions, and optimization suggestions include the use of indexes, optimized queries, and partitioning of tables.
 Explain the role of InnoDB redo logs and undo logs.
Apr 15, 2025 am 12:16 AM
InnoDB uses redologs and undologs to ensure data consistency and reliability. 1.redologs record data page modification to ensure crash recovery and transaction persistence. 2.undologs records the original data value and supports transaction rollback and MVCC.
 MySQL's Place: Databases and Programming
Apr 13, 2025 am 12:18 AM
MySQL's position in databases and programming is very important. It is an open source relational database management system that is widely used in various application scenarios. 1) MySQL provides efficient data storage, organization and retrieval functions, supporting Web, mobile and enterprise-level systems. 2) It uses a client-server architecture, supports multiple storage engines and index optimization. 3) Basic usages include creating tables and inserting data, and advanced usages involve multi-table JOINs and complex queries. 4) Frequently asked questions such as SQL syntax errors and performance issues can be debugged through the EXPLAIN command and slow query log. 5) Performance optimization methods include rational use of indexes, optimized query and use of caches. Best practices include using transactions and PreparedStatemen
 Why Use MySQL? Benefits and Advantages
Apr 12, 2025 am 12:17 AM
MySQL is chosen for its performance, reliability, ease of use, and community support. 1.MySQL provides efficient data storage and retrieval functions, supporting multiple data types and advanced query operations. 2. Adopt client-server architecture and multiple storage engines to support transaction and query optimization. 3. Easy to use, supports a variety of operating systems and programming languages. 4. Have strong community support and provide rich resources and solutions.


