
 Backend Development
PHP Tutorial
Build Apache, PHP, MySQL5.6.22, phpMyAdmin development environment on MAC OSX10.10
Backend Development
PHP Tutorial
Build Apache, PHP, MySQL5.6.22, phpMyAdmin development environment on MAC OSX10.10
Build Apache, PHP, MySQL5.6.22, phpMyAdmin development environment on MAC OSX10.10

I am used to using an appserv or phpStudy compressed package on Windows, but I am not used to creating a PHP development environment on MAC. But there is still something to gain from setting up the environment yourself. As we all know, OSX comes with apache and php, so these two are relatively smooth. Installing the latest version of MySQL, version 5.6.22, is quite difficult, and this article records it in detail.
apache configuration
apache already comes with it, you only need the following three commands.
Start the apache service sudo apachectl start
Stop the apache service sudo apachectl stop
Restart the service httpd -v
After manually opening the apache service, enter localhost in the browser and you will see Go to the following:
The root directory of the program is under /Library/WebServer/Documents/. This It works is printed out by the info.php inside. The following describes how to change the default directory of apache to the user directory. 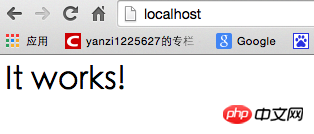 1. Create a new Sites folder in your own user directory. My user directory is yanzi
2. Go to the cd /etc/apache2/users/ directory and sudo vim username.conf. The content is:
<Directory "/Users/yanzi/Sites/">
AllowOverride AllOptions Indexes MultiViews FollowSymLinks
Require all granted
</Directory>
sudo chmod 644 username.conf
3, go to the /etc/apache2/ directory, sudo vim httpd.conf and remove the comments of the following three sentences:
LoadModule authz_core_module libexec/apache2/ mod_authz_core.so
LoadModule userdir_module libexec/apache2/mod_userdir.so
The first two sentences should be uncommented. Uncomment the third sentence.
Then find the Include /private/etc/apache2/extra/httpd-userdir.conf comment and release it.
PS: Just switch to command mode under vim and enter /"words you need find" to quickly find the words you need to find.
4. Go to the /etc/apache2/extra/ directory,
sudo vim httpd-userdir.conf
Then enter in the terminal: sudo apachectl restart to restart apache, enter in the browser: loacal/~yanzi/ and you will see the effect. (yanzi is the name of my user directory,
No need to add /Sites after it
After the above steps, apache is ready. PHP configuration
Install MySQL5.6.22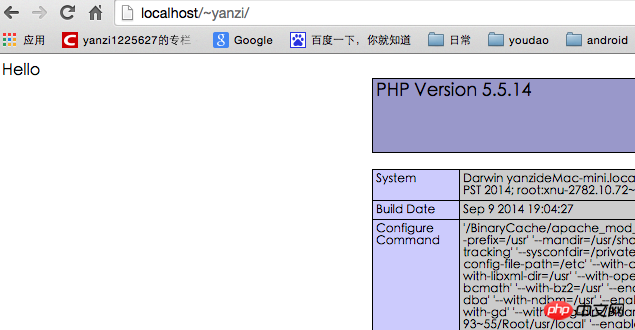
1. When double-clicking to install, do not check the StartUp Item:
After the installation is completed, in the settings - --MySQL Manually start the MySQL service. 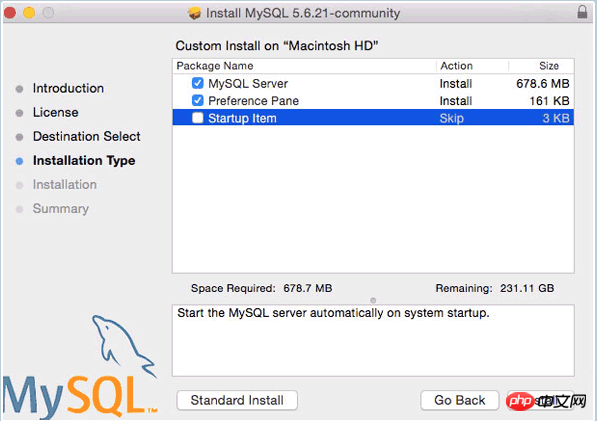
I have opened the MySQL service here. Next, set it to start automatically at boot. 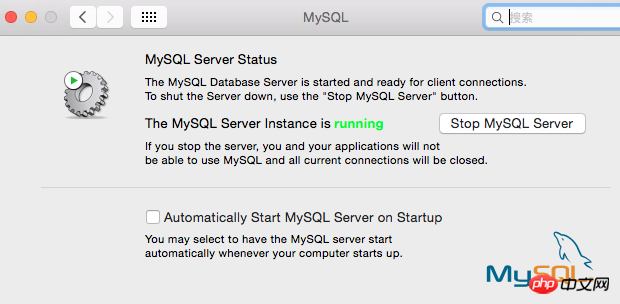 2. By default, we must enter the full path every time we use the mysql command, such as sudo /usr/local/mysql/support-files/mysql.server start to start the mysql service, /usr/local/mysql/bin /mysql -v To view the mysql version, you must first add the bin directory to the environment variable. Switch to the user root directory, vim .bash_profile, enter:
export PATH="/usr/local/mysql/bin:$PATH"
Finally, set the password for the mysql root user through mysqladmin -u root password ‘yourpasswordhere’. The content in single quotes is the password to be set.
Note: Sometimes the above command cannot modify the root password, and you need to use phpmyadmin to modify it. In fact, the default root password for this version of mysql is root.
3, fix the socket error problem. There is a socket file responsible for communication between the mysql server and client. This version of mysql places it in the /tmp directory, but OSX looks for the /var/mysql directory by default, so a soft link must be created. Create a new directory /var/mysql, then sudo ln -s /tmp/mysql.sock /var/mysql/mysql.sock and it will be ok.
4. Let mysql start automatically when booting.
sudo vim /Library/LaunchDaemons/com.mysql.mysql.plist, enter the content:
KeepAlive
Label
com.mysql.mysqld
ProgramArguments
/usr/local/mysql/bin/mysqld_safe
–user=mysql
After saving, modify permissions:
sudo chown root:wheel /Library/LaunchDaemons/com.mysql.mysql.plist
sudo chmod 644 /Library/LaunchDaemons/com.mysql.mysql.plist
sudo launchctl load -w /Library/LaunchDaemons/com.mysql.mysql.plist
This way mysql will be ok!
Installation of phpMyAdmin
Download from http://www.phpmyadmin.net/home_page/downloads.php. I downloaded the version phpMyAdmin-4.4.2-all-languages.zip and unzipped it. Then change the name of the outermost folder to phpmyadmin, go to the directory ~/Sites/phpmyadmin, create a new folder: mkdir config, modify the read and write permissions: chmod o+w config
Then enter the browser: http://localhost/~ yanzi/phpmyadmin/setup/ (Note that yanzi in the middle is replaced with your own user name) 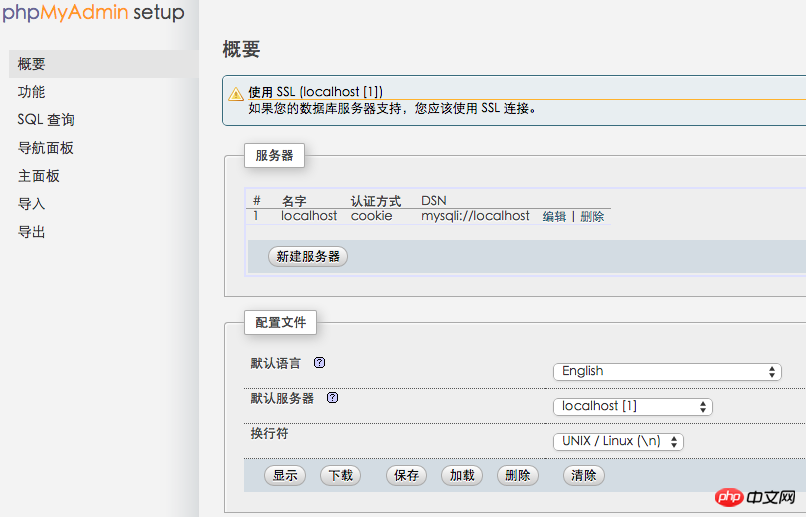
Click "New Server", I have already created it above, and then enter the mysql root user password in this interface: 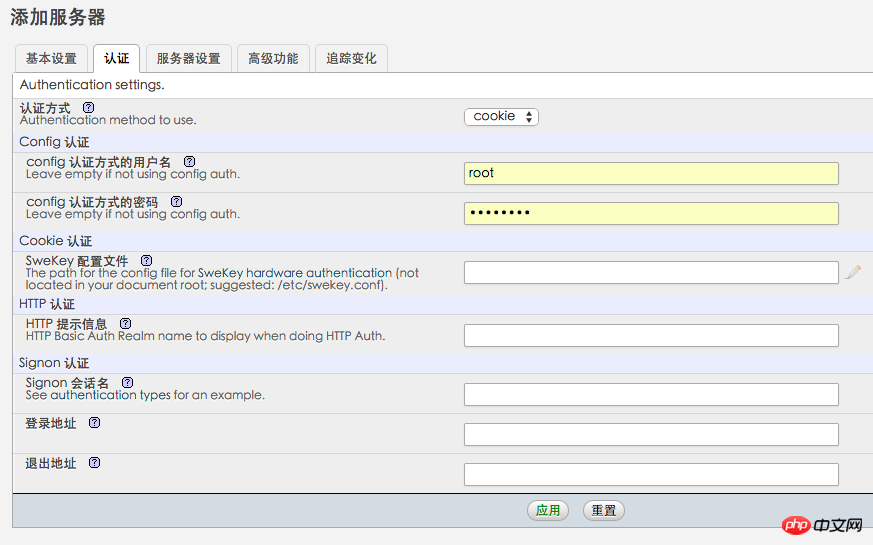
Password . Then click "Apply", remember to click the save button on the following interface so that config.inc.php is generated in the config folder, and copy the file to the root directory of phpmyadmin. 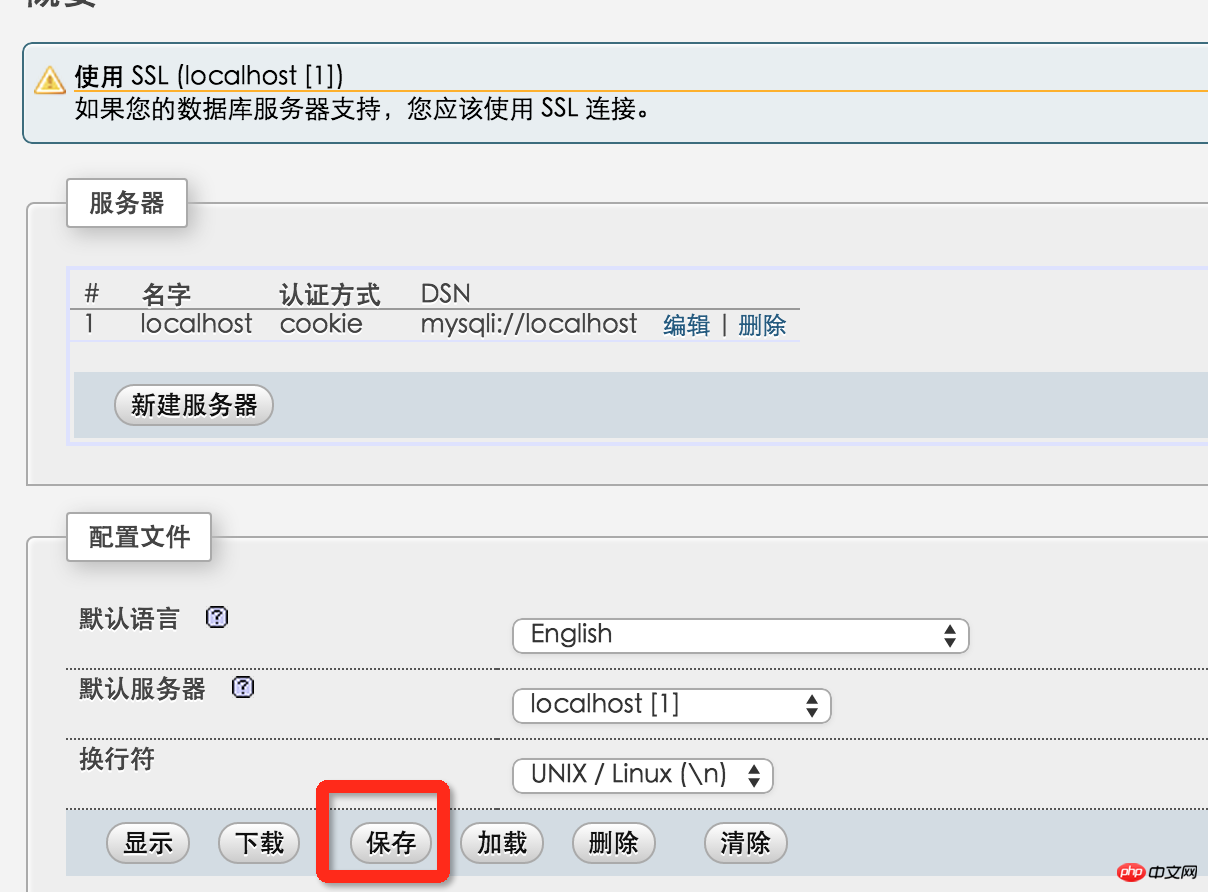
Then delete the entire config folder. Enter http://localhost/~yanzi/phpmyadmin/ to see the interface for logging in to phpmyadmin. So, phpMyAdmin does it.
Reading and writing permissions and grouping issues
The last remaining issue is reading and writing permissions and ownership. If you develop and test locally, this step can be ignored. If you want your mac to actually function as a server, then this needs to be set up. This step is equivalent to making everything in the public_html folder writable and belonging to www when uploading Alibaba Cloud code. Assume that there is a project of its own under the Sites folder: testsite
sudo chmod -R a+w ~/Sites/testsite Set that everyone can read and write
sudo chown -R _www ~/Sites/testsite Set that the testsite folder only belongs to _www group.
OK, this is the end of setting up PHP on MAC.
References:
1.http://coolestguidesontheplanet.com/get-apache-mysql-php-phpmyadmin-working-osx-10-10-yosemite/
2.http://blog.csdn.net/henry121212 /article/details/9210193 (Refer to this without success)
Attached is a link to set up a php virtual host:
http://coolestguidesontheplanet.com/set-virtual-hosts-apache-mac-osx-10-10-yosemite /#apacheuser
In addition, if you accidentally installed it wrong, you can refer to the following to delete mysql:
http://www.cnblogs.com/TsengYuen/archive/2011/12/06/2278574.html
I am used to using an appserv or phpStudy compressed package on Windows, but I am not used to creating a PHP development environment on MAC. But there is still something to gain from setting up the environment yourself. As we all know, OSX comes with apache and php, so these two are relatively smooth. Installing the latest version of MySQL, version 5.6.22, is quite difficult, and this article records it in detail.
apache configuration
apache already comes with it, you only need the following three commands.
Start the apache service sudo apachectl start
Stop the apache service sudo apachectl stop
Restart the service httpd -v
After manually opening the apache service, enter localhost in the browser and you will see Go to the following:
The root directory of the program is under /Library/WebServer/Documents/. This It works is printed out by the info.php inside. The following describes how to change the default directory of apache to the user directory. 1. Create a new Sites folder in your own user directory. My user directory is yanzi
2. Go to the cd /etc/apache2/users/ directory and sudo vim username.conf. The content is:
<Directory "/Users/yanzi/Sites/">
AllowOverride AllOptions Indexes MultiViews FollowSymLinks
Require all granted
</Directory>
sudo chmod 644 username.conf
3, go to the /etc/apache2/ directory, sudo vim httpd.conf and remove the comments of the following three sentences:
LoadModule authz_core_module libexec/apache2/ mod_authz_core.so
LoadModule userdir_module libexec/apache2/mod_userdir.so
The first two sentences should be uncommented. Uncomment the third sentence.
Then find the Include /private/etc/apache2/extra/httpd-userdir.conf comment and release it.
PS: Just switch to command mode under vim and enter /"words you need find" to quickly find the words you need to find.
4. Go to the /etc/apache2/extra/ directory,
sudo vim httpd-userdir.conf
Then enter in the terminal: sudo apachectl restart to restart apache, enter in the browser: loacal/~yanzi/ and you will see the effect. (yanzi is the name of my user directory,
No need to add /Sites after it
After the above steps, apache is ready. PHP configuration
Install MySQL5.6.22
1. When double-clicking to install, do not check the StartUp Item:
After the installation is completed, in the settings - --MySQL Manually start the MySQL service.
I have opened the MySQL service here. Next, set it to start automatically at boot. 2. By default, we must enter the full path every time we use the mysql command, such as sudo /usr/local/mysql/support-files/mysql.server start to start the mysql service, /usr/local/mysql/bin /mysql -v To view the mysql version, you must first add the bin directory to the environment variable. Switch to the user root directory, vim .bash_profile, enter:
export PATH="/usr/local/mysql/bin:$PATH"
Finally, set the password for the mysql root user through mysqladmin -u root password ‘yourpasswordhere’. The content in single quotes is the password to be set.
Note: Sometimes the above command cannot modify the root password, and you need to use phpmyadmin to modify it. In fact, the default root password for this version of mysql is root.
3, fix the socket error problem. There is a socket file responsible for communication between the mysql server and client. This version of mysql places it in the /tmp directory, but OSX looks for the /var/mysql directory by default, so a soft link must be created. Create a new directory /var/mysql, then sudo ln -s /tmp/mysql.sock /var/mysql/mysql.sock and it will be ok.
4. Let mysql start automatically when booting.
sudo vim /Library/LaunchDaemons/com.mysql.mysql.plist, enter the content:
KeepAlive
Label
com.mysql.mysqld
ProgramArguments
/usr/local/mysql/bin/mysqld_safe
–user=mysql
After saving, modify permissions:
sudo chown root:wheel /Library/LaunchDaemons/com.mysql.mysql.plist
sudo chmod 644 /Library/LaunchDaemons/com.mysql.mysql.plist
sudo launchctl load -w /Library/LaunchDaemons/com.mysql.mysql.plist
This way mysql will be ok!
Installation of phpMyAdmin
Download from http://www.phpmyadmin.net/home_page/downloads.php. I downloaded the version phpMyAdmin-4.4.2-all-languages.zip and unzipped it. Then change the name of the outermost folder to phpmyadmin, go to the directory ~/Sites/phpmyadmin, create a new folder: mkdir config, modify the read and write permissions: chmod o+w config
Then enter the browser: http://localhost/~ yanzi/phpmyadmin/setup/ (Note that yanzi in the middle is replaced with your own user name)
Click "New Server", I have already created it above, and then enter the mysql root user password in this interface:
Password . Then click "Apply", remember to click the save button on the following interface so that config.inc.php is generated in the config folder, and copy the file to the root directory of phpmyadmin.
Then delete the entire config folder. Enter http://localhost/~yanzi/phpmyadmin/ to see the interface for logging in to phpmyadmin. So, phpMyAdmin does it.
Reading and writing permissions and grouping issues
The last remaining issue is reading and writing permissions and ownership. If you develop and test locally, this step can be ignored. If you want your mac to actually function as a server, then this needs to be set up. This step is equivalent to making everything in the public_html folder writable and belonging to www when uploading Alibaba Cloud code. Assume that there is a project of its own under the Sites folder: testsite
sudo chmod -R a+w ~/Sites/testsite Set that everyone can read and write
sudo chown -R _www ~/Sites/testsite Set that the testsite folder only belongs to _www group.
OK, this is the end of setting up PHP on MAC.

Hot AI Tools

Undresser.AI Undress
AI-powered app for creating realistic nude photos

AI Clothes Remover
Online AI tool for removing clothes from photos.

Undress AI Tool
Undress images for free

Clothoff.io
AI clothes remover

Video Face Swap
Swap faces in any video effortlessly with our completely free AI face swap tool!

Hot Article
Hot Tools

Notepad++7.3.1
Easy-to-use and free code editor

SublimeText3 Chinese version
Chinese version, very easy to use

Zend Studio 13.0.1
Powerful PHP integrated development environment

Dreamweaver CS6
Visual web development tools

SublimeText3 Mac version
God-level code editing software (SublimeText3)
Hot Topics
 1666
1666
 14
1425
52
1327
25
1273
29
1252
24
14
1425
52
1327
25
1273
29
1252
24

 Explain secure password hashing in PHP (e.g., password_hash, password_verify). Why not use MD5 or SHA1?
Apr 17, 2025 am 12:06 AM
Explain secure password hashing in PHP (e.g., password_hash, password_verify). Why not use MD5 or SHA1?
Apr 17, 2025 am 12:06 AM
In PHP, password_hash and password_verify functions should be used to implement secure password hashing, and MD5 or SHA1 should not be used. 1) password_hash generates a hash containing salt values to enhance security. 2) Password_verify verify password and ensure security by comparing hash values. 3) MD5 and SHA1 are vulnerable and lack salt values, and are not suitable for modern password security.
 PHP and Python: Comparing Two Popular Programming Languages
Apr 14, 2025 am 12:13 AM
PHP and Python: Comparing Two Popular Programming Languages
Apr 14, 2025 am 12:13 AM
PHP and Python each have their own advantages, and choose according to project requirements. 1.PHP is suitable for web development, especially for rapid development and maintenance of websites. 2. Python is suitable for data science, machine learning and artificial intelligence, with concise syntax and suitable for beginners.
 PHP in Action: Real-World Examples and Applications
Apr 14, 2025 am 12:19 AM
PHP in Action: Real-World Examples and Applications
Apr 14, 2025 am 12:19 AM
PHP is widely used in e-commerce, content management systems and API development. 1) E-commerce: used for shopping cart function and payment processing. 2) Content management system: used for dynamic content generation and user management. 3) API development: used for RESTful API development and API security. Through performance optimization and best practices, the efficiency and maintainability of PHP applications are improved.
 PHP: A Key Language for Web Development
Apr 13, 2025 am 12:08 AM
PHP: A Key Language for Web Development
Apr 13, 2025 am 12:08 AM
PHP is a scripting language widely used on the server side, especially suitable for web development. 1.PHP can embed HTML, process HTTP requests and responses, and supports a variety of databases. 2.PHP is used to generate dynamic web content, process form data, access databases, etc., with strong community support and open source resources. 3. PHP is an interpreted language, and the execution process includes lexical analysis, grammatical analysis, compilation and execution. 4.PHP can be combined with MySQL for advanced applications such as user registration systems. 5. When debugging PHP, you can use functions such as error_reporting() and var_dump(). 6. Optimize PHP code to use caching mechanisms, optimize database queries and use built-in functions. 7
 How does PHP type hinting work, including scalar types, return types, union types, and nullable types?
Apr 17, 2025 am 12:25 AM
How does PHP type hinting work, including scalar types, return types, union types, and nullable types?
Apr 17, 2025 am 12:25 AM
PHP type prompts to improve code quality and readability. 1) Scalar type tips: Since PHP7.0, basic data types are allowed to be specified in function parameters, such as int, float, etc. 2) Return type prompt: Ensure the consistency of the function return value type. 3) Union type prompt: Since PHP8.0, multiple types are allowed to be specified in function parameters or return values. 4) Nullable type prompt: Allows to include null values and handle functions that may return null values.
 The Enduring Relevance of PHP: Is It Still Alive?
Apr 14, 2025 am 12:12 AM
The Enduring Relevance of PHP: Is It Still Alive?
Apr 14, 2025 am 12:12 AM
PHP is still dynamic and still occupies an important position in the field of modern programming. 1) PHP's simplicity and powerful community support make it widely used in web development; 2) Its flexibility and stability make it outstanding in handling web forms, database operations and file processing; 3) PHP is constantly evolving and optimizing, suitable for beginners and experienced developers.
 PHP and Python: Code Examples and Comparison
Apr 15, 2025 am 12:07 AM
PHP and Python: Code Examples and Comparison
Apr 15, 2025 am 12:07 AM
PHP and Python have their own advantages and disadvantages, and the choice depends on project needs and personal preferences. 1.PHP is suitable for rapid development and maintenance of large-scale web applications. 2. Python dominates the field of data science and machine learning.
 PHP vs. Other Languages: A Comparison
Apr 13, 2025 am 12:19 AM
PHP vs. Other Languages: A Comparison
Apr 13, 2025 am 12:19 AM
PHP is suitable for web development, especially in rapid development and processing dynamic content, but is not good at data science and enterprise-level applications. Compared with Python, PHP has more advantages in web development, but is not as good as Python in the field of data science; compared with Java, PHP performs worse in enterprise-level applications, but is more flexible in web development; compared with JavaScript, PHP is more concise in back-end development, but is not as good as JavaScript in front-end development.
