Introduction
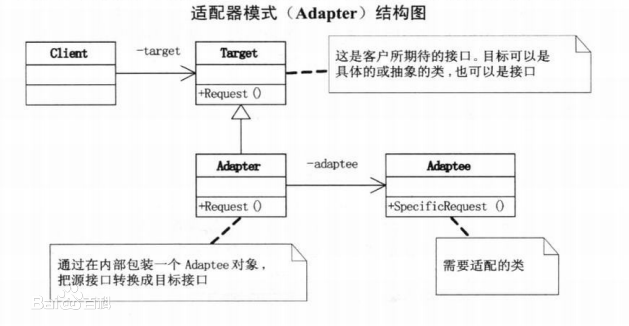
The adapter pattern (sometimes also called wrapper style or wrapper) adapts the interface of a class to what the user expects. An adaptation allows classes to work together that would normally not work together because of incompatible interfaces.
UML
Role
Target adaptation target: This role defines what interface to convert other classes to, which is our expected interface.
Adaptee: The interface that needs to be adapted.
Adapter adapter: The other two roles are existing roles, and the adapter role needs to be newly created. It is used to adapt the Adaptee and Target interfaces.

Application scenarios
If the program database is associated with mysql, mysqli, pdo, sqlite, postgresql and other operations, and you need to change the database operation according to the situation, you can use the adapter mode to unify the interface, so that in addition to the database configuration, the code Otherwise, there is no need to make any additional changes.
The same applies to the cache scenario. Whether using memcache or redis, etc., it will be very convenient and save time when replacing.
Note: This mode can be seen in some popular frameworks. Please refer to the framework source code for details.
Implementation
Code:
<?php
header('Content-Type:text/html;charset=utf-8');
/**
* 适配器模式演示代码
* Target适配目标: IDataBase接口
* Adaptee被适配者: mysql和mysql_i、postgresql的数据库操作函数
* Adapter适配器 :mysql类和mysql_i、postgresql类
*/
/**
* Interface IDatabase 适配目标,规定的接口将被适配对象实现
* 约定好统一的api行为
*/
interface IDatabase
{
// 定义数据库连接方法
public function connect($host, $username, $password, $database);
// 定义数据库查询方法
public function query($sql);
// 关闭数据库
public function close();
}
/**
* Class Mysql 适配器
*/
class Mysql implements IDatabase
{
protected $connect; // 连接资源
/**
* 实现连接方法
*
* @param $host host
* @param $username 用户名
* @param $password 密码
* @param $database 数据库名
*/
public function connect($host, $username, $password, $database)
{
$connect = mysql_connect($host, $username, $password);
mysql_select_db($database, $connect);
$this->connect = $connect;
//其他操作
}
/**
* 实现查询方法
*
* @param $sql 需要被查询的sql语句
* @return mi
*/
public function query($sql)
{
return mysql_query($sql);
}
// 实现关闭方法
public function close()
{
mysql_close();
}
}
/**
* Class Mysql 适配器
*/
class Mysql_i implements IDatabase
{
protected $connect; // 连接资源
/**
* 实现连接方法
*
* @param $host host
* @param $username 用户名
* @param $password 密码
* @param $database 数据库名
*/
public function connect($host, $username, $password, $database)
{
$connect = mysqli_connect($host, $username, $password, $database);
$this->connect = $connect;
//其他操作
}
/**
* 实现查询方法
*
* @param $sql 需要被查询的sql语句
*/
public function query($sql)
{
return mysqli_query($this->connect, $sql);
}
// 实现关闭
public function close()
{
mysqli_close($this->connect);
}
}
/**
* Class Postgresql 适配器
*/
class Postgresql implements IDatabase
{
protected $connect; // 连接资源
/**
* 实现连接方法
*
* @param $host
* @param $username
* @param $password
* @param $database
*/
public function connect($host, $username, $password, $database)
{
$this->connect = pg_connect("host=$host dbname=$database user=$username password=$password");
//其他操作
}
/**
* 实现查询方法
*
* @param $sql 需要被查询的sql语句
*/
public function query($sql)
{
// 其他操作
}
// 实现关闭方法
public function close()
{
}
}
/**
* 客户端使用演示
* 这里以mysql为例
* 只要模式设计好,不论有多少种数据库,实现和调用方式都是一样的
* 因为都是实现的同一个接口,所以都是可以随意切换的
*/
$host = 'localhost';
$username = 'root';
$password = 'root';
$database = 'mysql';
//$client = new Postgresql();
//$client = new Mysql();
$client = new Mysql_i();
$client->connect($host, $username, $password, $database);
$result = $client->query("select * from db");
while ($rows = mysqli_fetch_array($result)) {
var_dump($rows);
}
$client->close();Running result:
array(44) {
  [0]=>
  string(1) "%"
  ["Host"]=>
  string(1) "%"
  [1]=>
  string(4) "test"
  ["Db"]=>
  string(4) "test"
  [2]=>
  string(0) ""
  ["User"]=>
  string(0) ""
  [3]=>
  string(1) "Y"
  ["Select_priv"]=>
  string(1) "Y"
  [4]=>
  string(1) "Y"
  ["Insert_priv"]=>
  string(1) "Y"
  [5]=>
  string(1) "Y"
  ["Update_priv"]=>
  string(1) "Y"
  [6]=>
  string(1) "Y"
  ["Delete_priv"]=>
  string(1) "Y"
  [7]=>
  string(1) "Y"
  ["Create_priv"]=>
  string(1) "Y"
  [8]=>
  string(1) "Y"
  ["Drop_priv"]=>
  string(1) "Y"
  [9]=>
  string(1) "N"
  ["Grant_priv"]=>
  string(1) "N"
  [10]=>
  string(1) "Y"
  ["References_priv"]=>
  string(1) "Y"
  [11]=>
  string(1) "Y"
  ["Index_priv"]=>
  string(1) "Y"
  [12]=>
  string(1) "Y"
  ["Alter_priv"]=>
  string(1) "Y"
  [13]=>
  string(1) "Y"
  ["Create_tmp_table_priv"]=>
  string(1) "Y"
  [14]=>
  string(1) "Y"
  ["Lock_tables_priv"]=>
  string(1) "Y"
  [15]=>
  string(1) "Y"
  ["Create_view_priv"]=>
  string(1) "Y"
  [16]=>
  string(1) "Y"
  ["Show_view_priv"]=>
  string(1) "Y"
  [17]=>
  string(1) "Y"
  ["Create_routine_priv"]=>
  string(1) "Y"
  [18]=>
  string(1) "N"
  ["Alter_routine_priv"]=>
  string(1) "N"
  [19]=>
  string(1) "N"
  ["Execute_priv"]=>
  string(1) "N"
  [20]=>
  string(1) "Y"
  ["Event_priv"]=>
  string(1) "Y"
  [21]=>
  string(1) "Y"
  ["Trigger_priv"]=>
  string(1) "Y"
}From the above results, it can be seen that the database connection and query statement have been executed successfully.


