

Android UI control series: ImageButton (button with icon)

In addition to the Button button that comes with the Android system, it also provides a button with an icon ImageButton
To make a button with an icon, you must first define the ImageButton in the layout file, and then set the desired button through the setImageDrawable method. icon displayed.
Note:
We can set the icon of the button directly in the layout file, such as
android:src=”@drawable/icon1″
We can also Set a custom icon in the program
imgbtn3.setImageDrawable(getResources().getDrawable(R.drawable.icon2));
We can also use the system’s own icon
imgbtn4 .setImageDrawable(getResources().getDrawable(android.R.drawable.sym_call_incoming));
After setting the icon of the button, you need to set the listener setOnClickListener for the button to capture the event and handle the following
The example describes a layout composed of four icon buttons. The icons of three buttons are customized and the icon of the fourth button is system. When button 1 is clicked, a dialog pops up. When button 2 is clicked , after clicking OK, the icon of button 2 can be changed to the icon of button 3. When button 3 is clicked, the icon of button 3 changes to the icon of the system making a phone call. Clicking button 4 will display a prompt dialog
ImageButtonTest.java source code
package org.loulijun.imagebutton;

import android.app.Activity;
import android.app.AlertDialog;
import android.app.Dialog;
import android.content.DialogInterface;
import android.os.Bundle;
import android.view.View;
import android.widget.Button;
import android.widget.ImageButton;
import android.widget.TextView;

public class ImageButtonTest extends Activity {
    /** Called when the activity is first created. */
        TextView textview;
        ImageButton imgbtn1;
        ImageButton imgbtn2;
        ImageButton imgbtn3;
        ImageButton imgbtn4;
    @Override
    public void onCreate(Bundle savedInstanceState) {
        super.onCreate(savedInstanceState);
        setContentView(R.layout.main);

        textview=(TextView)findViewById(R.id.textview);
        //分别取得4个ImageButton对象
        imgbtn1=(ImageButton)findViewById(R.id.imagebutton1);
        imgbtn2=(ImageButton)findViewById(R.id.imagebutton2);
        imgbtn3=(ImageButton)findViewById(R.id.imagebutton3);
        imgbtn4=(ImageButton)findViewById(R.id.imagebutton4);

        //分别为ImageButton设置图标
        //imgbtn1已经在main.xml布局中设置了图标,所以就不在这里设置了(设置图标即可在程序中设置,也可在布局文件中设置)
        imgbtn2.setImageDrawable(getResources().getDrawable(R.drawable.icon));//在程序中设置图标
        imgbtn3.setImageDrawable(getResources().getDrawable(R.drawable.icon2));
        imgbtn4.setImageDrawable(getResources().getDrawable(android.R.drawable.sym_call_incoming));//设置系统图标

        //下面为各个按钮设置事件监听
        imgbtn1.setOnClickListener(new Button.OnClickListener()
        {
                        @Override
                        public void onClick(View v) {
                                // TODO Auto-generated method stub
                                Dialog dialog=new AlertDialog.Builder(ImageButtonTest.this)
                                .setTitle("提示")
                                .setMessage("我是ImageButton1")
                                .setPositiveButton("确定",new DialogInterface.OnClickListener() {

                                        @Override
                                        public void onClick(DialogInterface dialog, int which) {
                                                // TODO Auto-generated method stub
                                                //相应的处理操作
                                        }
                                }).create();
                                dialog.show();
                        }

        });

        imgbtn2.setOnClickListener(new Button.OnClickListener()
        {
                        @Override
                        public void onClick(View v) {
                                // TODO Auto-generated method stub
                                Dialog dialog=new AlertDialog.Builder(ImageButtonTest.this)
                                .setTitle("提示")
                                .setMessage("我是ImageButton2,我要使用ImageButton3的图标")
                                .setPositiveButton("确定",new DialogInterface.OnClickListener() {

                                        @Override
                                        public void onClick(DialogInterface dialog, int which) {
                                                // TODO Auto-generated method stub
                                                imgbtn2.setImageDrawable(getResources().getDrawable(R.drawable.icon2));
                                        }
                                }).create();
                                dialog.show();
                        }

        });

        imgbtn3.setOnClickListener(new Button.OnClickListener()
        {
                        @Override
                        public void onClick(View v) {
                                // TODO Auto-generated method stub
                                Dialog dialog=new AlertDialog.Builder(ImageButtonTest.this)
                                .setTitle("提示")
                                .setMessage("我是ImageButton3,我想使用系统打电话的图标")
                                .setPositiveButton("确定",new DialogInterface.OnClickListener() {

                                        @Override
                                        public void onClick(DialogInterface dialog, int which) {
                                                // TODO Auto-generated method stub
                                                imgbtn3.setImageDrawable(getResources().getDrawable(android.R.drawable.sym_action_call));
                                        }
                                }).create();
                                dialog.show();
                        }

        });

        imgbtn4.setOnClickListener(new Button.OnClickListener()
        {
                        @Override
                        public void onClick(View v) {
                                // TODO Auto-generated method stub
                                Dialog dialog=new AlertDialog.Builder(ImageButtonTest.this)
                                .setTitle("提示")
                                .setMessage("我是使用的系统图标")
                                .setPositiveButton("确定",new DialogInterface.OnClickListener() {

                                        @Override
                                        public void onClick(DialogInterface dialog, int which) {
                                                // TODO Auto-generated method stub
                                                //相应的处理操作
                                        }
                                }).create();
                                dialog.show();
                        }

        });
    }
}Layout file main.xml
<?xml version="1.0" encoding="utf-8"?>
<LinearLayout xmlns:android="http://schemas.android.com/apk/res/android"
    android:orientation="vertical"
    android:layout_width="fill_parent"
    android:layout_height="fill_parent"
    >
<TextView
        android:id="@+id/textview"
    android:layout_width="fill_parent"
    android:layout_height="wrap_content"
    android:text="ImageButton测试案例"
    />
<ImageButton
        android:id="@+id/imagebutton1"
        android:layout_width="wrap_content"
        android:layout_height="wrap_content"
        android:src="@drawable/icon1"
/>
<ImageButton
        android:id="@+id/imagebutton2"
        android:layout_width="wrap_content"
        android:layout_height="wrap_content"
/>
<ImageButton
        android:id="@+id/imagebutton3"
        android:layout_width="wrap_content"
        android:layout_height="wrap_content"
/>
<ImageButton
        android:id="@+id/imagebutton4"
        android:layout_width="wrap_content"
        android:layout_height="wrap_content"
/>
</LinearLayout>The running effect is as follows:

Click on the After one button

#After clicking OK, click the second button

Click OK, and you will see that the icon programming of button two is the same as the icon of button three

Click button three

After clicking OK, I found that the icon of button three changed to the icon of the system making a phone call

Click button four

The above is the content of the Android UI control series: ImageButton (button with icon). For more related content, please pay attention to the PHP Chinese website (www.php.cn)!

Hot AI Tools

Undresser.AI Undress
AI-powered app for creating realistic nude photos

AI Clothes Remover
Online AI tool for removing clothes from photos.

Undress AI Tool
Undress images for free

Clothoff.io
AI clothes remover

Video Face Swap
Swap faces in any video effortlessly with our completely free AI face swap tool!

Hot Article
Hot Tools

Notepad++7.3.1
Easy-to-use and free code editor

SublimeText3 Chinese version
Chinese version, very easy to use

Zend Studio 13.0.1
Powerful PHP integrated development environment

Dreamweaver CS6
Visual web development tools

SublimeText3 Mac version
God-level code editing software (SublimeText3)
Hot Topics
 1669
1669
 14
1428
52
1329
25
1273
29
1256
24
14
1428
52
1329
25
1273
29
1256
24

 New report delivers damning assessment of rumoured Samsung Galaxy S25, Galaxy S25 Plus and Galaxy S25 Ultra camera upgrades
Sep 12, 2024 pm 12:23 PM
New report delivers damning assessment of rumoured Samsung Galaxy S25, Galaxy S25 Plus and Galaxy S25 Ultra camera upgrades
Sep 12, 2024 pm 12:23 PM
In recent days, Ice Universe has been steadily revealing details about the Galaxy S25 Ultra, which is widely believed to be Samsung's next flagship smartphone. Among other things, the leaker claimed that Samsung only plans to bring one camera upgrade
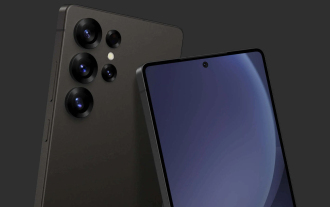 Samsung Galaxy S25 Ultra leaks in first render images with rumoured design changes revealed
Sep 11, 2024 am 06:37 AM
Samsung Galaxy S25 Ultra leaks in first render images with rumoured design changes revealed
Sep 11, 2024 am 06:37 AM
OnLeaks has now partnered with Android Headlines to provide a first look at the Galaxy S25 Ultra, a few days after a failed attempt to generate upwards of $4,000 from his X (formerly Twitter) followers. For context, the render images embedded below h
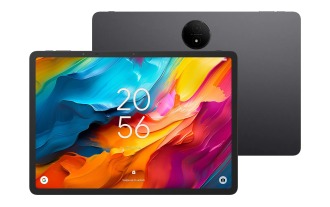 IFA 2024 | TCL\'s NXTPAPER 14 won\'t match the Galaxy Tab S10 Ultra in performance, but it nearly matches it in size
Sep 07, 2024 am 06:35 AM
IFA 2024 | TCL\'s NXTPAPER 14 won\'t match the Galaxy Tab S10 Ultra in performance, but it nearly matches it in size
Sep 07, 2024 am 06:35 AM
Alongside announcing two new smartphones, TCL has also announced a new Android tablet called the NXTPAPER 14, and its massive screen size is one of its selling points. The NXTPAPER 14 features version 3.0 of TCL's signature brand of matte LCD panels
 Vivo Y300 Pro packs 6,500 mAh battery in a slim 7.69 mm body
Sep 07, 2024 am 06:39 AM
Vivo Y300 Pro packs 6,500 mAh battery in a slim 7.69 mm body
Sep 07, 2024 am 06:39 AM
The Vivo Y300 Pro just got fully revealed, and it's one of the slimmest mid-range Android phones with a large battery. To be exact, the smartphone is only 7.69 mm thick but features a 6,500 mAh battery. This is the same capacity as the recently launc
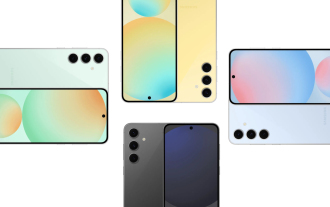 Samsung Galaxy S24 FE billed to launch for less than expected in four colours and two memory options
Sep 12, 2024 pm 09:21 PM
Samsung Galaxy S24 FE billed to launch for less than expected in four colours and two memory options
Sep 12, 2024 pm 09:21 PM
Samsung has not offered any hints yet about when it will update its Fan Edition (FE) smartphone series. As it stands, the Galaxy S23 FE remains the company's most recent edition, having been presented at the start of October 2023. However, plenty of
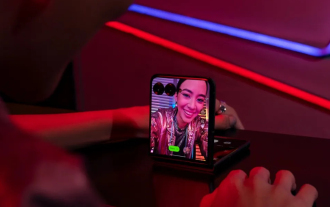 Motorola Razr 50s shows itself as possible new budget foldable in early leak
Sep 07, 2024 am 09:35 AM
Motorola Razr 50s shows itself as possible new budget foldable in early leak
Sep 07, 2024 am 09:35 AM
Motorola has released countless devices this year, although only two of them are foldables. For context, while most of the world has received the pair as the Razr 50 and Razr 50 Ultra, Motorola offers them in North America as the Razr 2024 and Razr 2
 iQOO Z9 Turbo Plus: Reservations begin for the potentially beefed-up series flagship
Sep 10, 2024 am 06:45 AM
iQOO Z9 Turbo Plus: Reservations begin for the potentially beefed-up series flagship
Sep 10, 2024 am 06:45 AM
OnePlus'sister brand iQOO has a 2023-4 product cycle that might be nearlyover; nevertheless, the brand has declared that it is not done with itsZ9series just yet. Its final, and possibly highest-end,Turbo+variant has just beenannouncedas predicted. T
 New report delivers damning assessment of rumoured Samsung Galaxy S25, Galaxy S25 Plus and Galaxy S25 Ultra camera upgrades
Sep 12, 2024 pm 12:22 PM
New report delivers damning assessment of rumoured Samsung Galaxy S25, Galaxy S25 Plus and Galaxy S25 Ultra camera upgrades
Sep 12, 2024 pm 12:22 PM
In recent days, Ice Universe has been steadily revealing details about the Galaxy S25 Ultra, which is widely believed to be Samsung's next flagship smartphone. Among other things, the leaker claimed that Samsung only plans to bring one camera upgrade
