
Segues Introduction
It’s time to add more ViewControllers to our storyboard. We will create a scenario for the user to add new players to the program.
Drag a BarButtonItem to the right end of the navigation bar in the Players scene. Change its Identifier to Add through the properties panel so that it becomes a standard + button. When you click this button we will pop up a new modal window where you can enter the new player's information.
Drag a TableViewController into the canvas and place it on the right side of the Players scene. You can shrink the canvas by double-clicking so you have more room to work.
Select this TableViewController and embed it into a navigationController (via the menu "Editor\EmbedIn\Navigation Controller").
Next please note: Select the + button, hold down the ctrl key, and drag it to the newly added navigationController.

Release the mouse and select Modal in the pop-up menu. There will be an extra arrow between the Players scene and NavigationController:
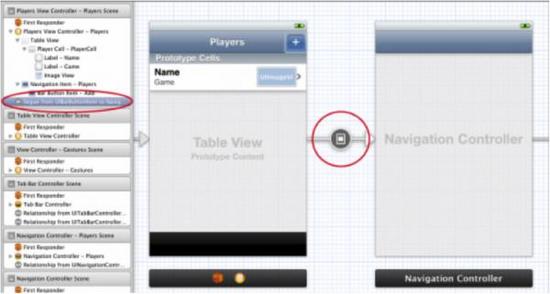
This connection is called segue (pronounced: seg-way), which means jumping from one ViewController to another. . This is different from a relationship, which is used to indicate that one ViewController contains another ViewController. In other words, a segue changes everything on the screen. Fired when a button, touch or gesture on the TableViewCell (and similar things).
The advantage of segue is that you don't need to write any code to render the new window. There is no need to connect the button to the IBAction. As we just did, it is enough to drag a line connecting the barButtonItem to the next scene. (If the control already has an IBAction connection, the segue will overwrite it).
Run the program and press the + button. A new TableView will pop up!
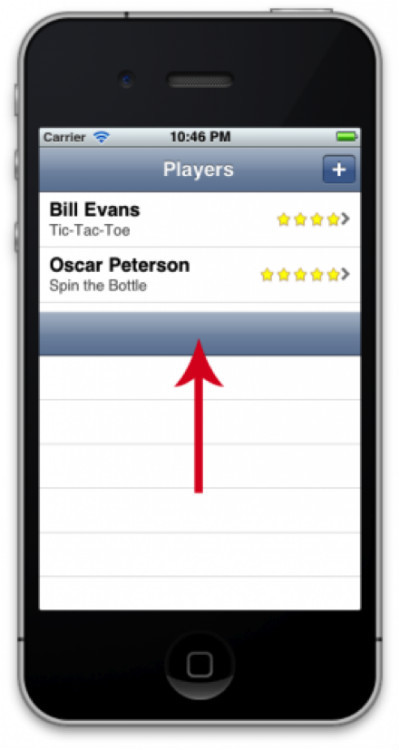
This is a "modal" segue. The new window completely covers the front window. The user cannot interact with the previous window unless the pop-up window is closed. We'll then demonstrate a "push" segue, which pushes a new window onto the navigation controller's stack.
This new ViewController isn't very useful - you can't even close it and go back to the main window!
Segue is only one-way, from the Players window to the new window. To return, you must use the delegate pattern. First, we must create a class for the new scene. Add a UITableViewController subclass to the project and name it PlayerDetailsViewController.
Return to the storyboard editor, select the new TableViewController, and change Class to PlayerDetailsViewController in the Identity panel. I often forget this step, so I remind you not to do the same as me.
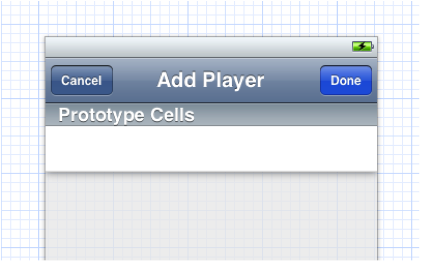
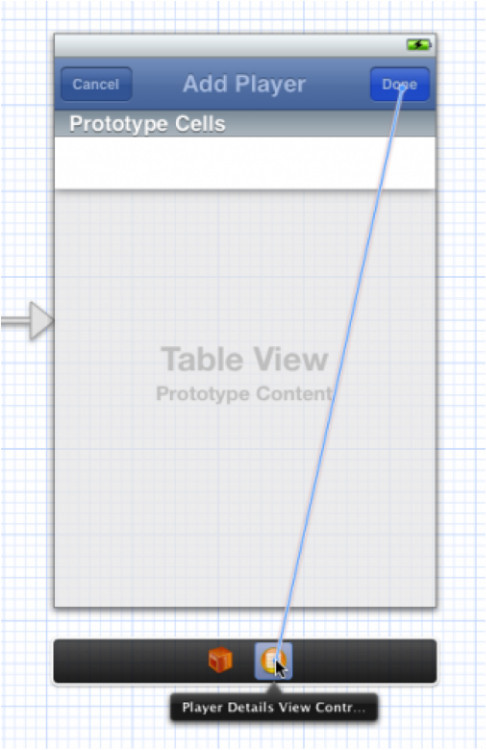
Change its title to "Add Player" (by double-clicking the navigation bar). Also add two BarButton Items to the navigation bar. In the Properties panel, set the left button's Identifier to Cancel and the right button's Identifier to Done.
@class PlayerDetailsViewController;
@protocol PlayerDetailsViewControllerDelegate <NSObject>
- ( void ) playerDetailsViewControllerDidCancel :    ( PlayerDetailsViewController *) controller;
- ( void ) playerDetailsViewControllerDidSave :    ( PlayerDetailsViewController *) controller;
@end

@interface PlayerDetailsViewController : UITableViewController
@property ( nonatomic, weak ) id <PlayerDetailsViewControllerDelegate> delegate;
- ( IBAction ) cancel :( id ) sender;
- ( IBAction ) done :( id ) sender;
@end
- ( IBAction ) cancel :( id ) sender {
        [ self.delegate playerDetailsViewControllerDidCancel : self ] ;
} - ( IBAction ) done :( id ) sender {
        [ self.delegate playerDetailsViewControllerDidSave : self ] ;
}#import "PlayerDetailsViewController.h" @interface PlayersViewController : UITableViewController <PlayerDetailsViewControllerDelegate>
#pragma mark - PlayerDetailsViewControllerDelegate
- ( void ) playerDetailsViewControllerDidCancel :    ( PlayerDetailsViewController *) controller {
        [ self dismissViewControllerAnimated : YES completion : nil ] ;
}
- ( void ) playerDetailsViewControllerDidSave :    ( PlayerDetailsViewController *) controller {
        [ self dismissViewControllerAnimated : YES completion : nil ] ;
}
这里只是简单地关闭 AddPlayer 窗口。稍后我们会做一些有趣的事情。
iOS5 中出现了新的dismissViewControllerAnimated:completion: 方法。你也可以用之前的老 dismissModalViewControllerAnimated: 方法。但新方法将更加优雅地关闭ViewController(它能给你一个机会在窗口被关闭后能执行额外的代码)。
剩下只有一件事情: Players 窗口需要告诉 PlayerDetailsViewController它将成为它的委托。你可能想,用故事版编辑器在二者间拖一条线不就完了吗?很不幸,这不行。在 segue 中,为了传递数据到下一个 ViewController ,我们仍然必须编写代码。
在PlayersViewController 中添加如下方法:
- ( void ) prepareForSegue :( UIStoryboardSegue *) segue sender :( id ) sender {
        if ([ segue.identifier isEqualToString : @ "AddPlayer" ]) {
               UINavigationController * navigationController =             segue.destinationViewController;
               PlayerDetailsViewController * playerDetailsViewController = [[ navigationController viewControllers ] objectAtIndex : 0 ] ;
               playerDetailsViewController.delegate = self;
        }
}
prepareForSegue 方法在即将发生 segue 之时触发。新的 ViewController 已经同故事版一起加载了,但它是不可见的,我们必须利用这个方法传递参数给它。(永远不要自己调用prepareForSegue 方法,它由 UIKit 调用以通知你正在触发一个 segue。)
注意 segue 的目标将是 NavigationController,它与我们的BarButtonItem 是关联的。为了得到 PlayerDetailsViewController实例,我们必须从 NavigationController 的 viewControllers 属性中将它找出来。
运行程序,按下 + 号按钮,尝试关闭 AddPlayer 窗口。居然没有效果!
那是因为我们并没有指定 segue 的 identifier 。而在prepareForSegue 方法中我们检查了 identifier 是否为 AddPlayer。在同一个 ViewController 中存在多个 segue 的情况下,建议你通过 identifier 来区分不同的 segue。
在故事版编辑器中,选择该 segue,注意 BarButtonItem 会被加亮显示以便你能清楚地知道是哪个控件触发这个segue。
在属性面板中,将 identifier 设为 AddPlayer。
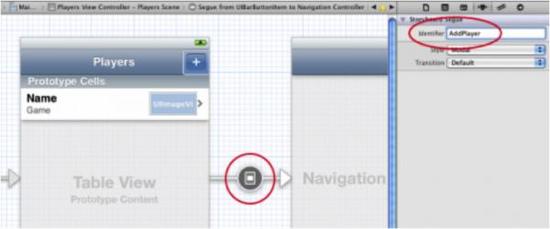
再次运行程序,触摸 Cancel 或 Done 按钮,现在都能关闭窗口并返回玩家列表了。
注意:也可以从模式窗口中调用 dismissViewControllerAnimated:completion:方法。不一定非要让代理对象来关闭。但如果你这样做,要留意一件事情:你原来使用的[self.parentViewController dismissModalViewControllerAnimated:YES] 不再有效。可以用 self.presentingViewController 替换 self.parentViewController,但这是在 iOS5 之后出现的新属性。
另外,在 segue 的属性面板中,有一个 Transition 字段,在此你可以选择不同的过渡动画。
你净可以尝试你最喜欢的设置。但不要改变 Style 属性。对于这个窗口,它只能是Modal——任何其他选项都会导致程序崩溃!
在本教程中,我们多次使用委托模式。在此我们列出了在两个场景中建立连接的步骤:
从源场景的按钮或其他控件创建 segue 到另一个场景。(如果你想呈现一个模式窗口,通常目标对象应该是一个 NavigationController)。
指定 segue 的 identifier。(对于同一源场景,identifier必须是唯一的;不同的源场景则可以有重复)。
为目标场景创建委托协议。
从 Cancel 按钮和 Done 按钮中调用委托方法,对于目标场景想回到源场景的任何地方,你都要这样做。
在源场景中实现委托协议。当 Cancel 按钮或 Done 按钮被触摸时,委托对象应当负责关闭目标 ViewController。
在源 ViewController 中实现 prepareForSegue 方法,并让目标场景的 delegate=self;
委托模式是必然的,因为没有“反向 segue”这样的东西。当 segue 被触发,它创建的都是新的目标ViewController 实例。你当然可以创建一个 segue 用于从目标返回到源场景,但这太想当然了。
打比方,你可以从 Cancel 按钮创建一个 segue 返回Players 窗口,但却无法关闭 Add Player 窗口回到 Players。除非你创建一个新的 Players 对象。这样你就创建了一个无尽循环直到耗净所有内存。
记住:Segue 只有一个方向,只能用于打开新窗口。要关闭它返回(或者将他从NavigationController 栈中弹出),通常使用委托模式。segue 只适用于源场景,目标 ViewController 根本不知道 segue是什么玩意。
静态Cell
最终的 Add Player 窗口如下图所示:
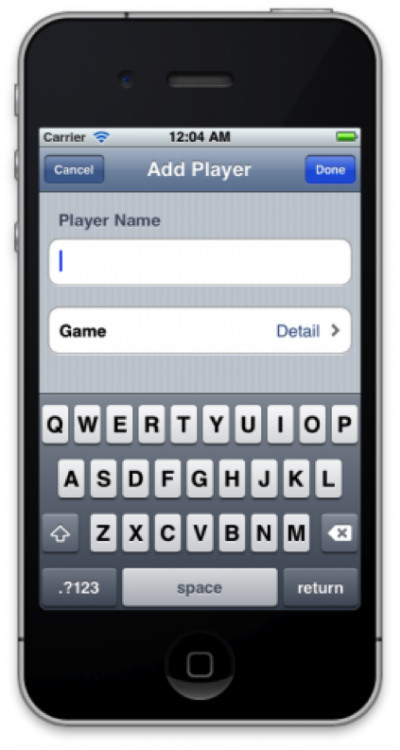
这是一个分组表视图,但这次我们不需要为它创建一个数据源。我们可以直接在故事版编辑器中设计它,不需要写cellForRowAtIndexPath 方法。这种新特性叫做静态cell。
在 Add Players 场景中选择 tableView,在属性面板修改Content 为 Static Cells。Style 则选择 Grouped,Sections 设置为 2。
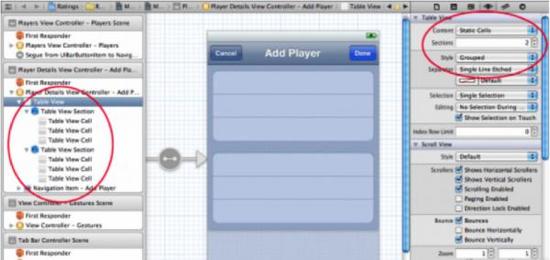
Sections 属性一旦改变,编辑器将克隆已有的 section。(你也可以从左边的文档树中选择某个 section 然后复制它)。
对于每个 section,我们只有一行。选择多余的行并删除。选择最上面的section ,通过属性面板,在 Header 字段中输入 Player Name。
拖一个新的 TextField 到这个 section 的仅有的 cell中。移除它的边框,这样你就看不到 textfield 的头和尾。设置字体为 System 17 ,反选Adjust to Fit。
我们将使用 Assistan Editor 创建 textField 的IBOutlet。打开 Assistant Editor,它将自动打开 PlayerDetailsViewController.h。选中 TextField 然后按住 ctrl 拖到 .h 文件中:
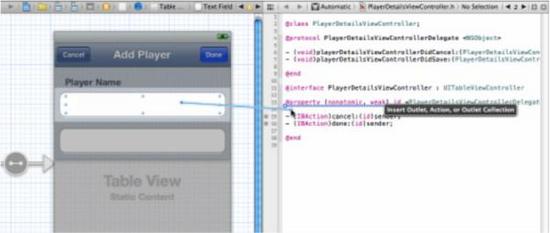
放开鼠标键,将弹出窗口:
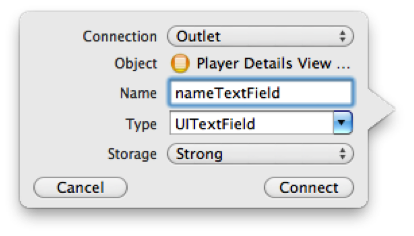
Name 设置为 nameTextField。点击 Connect,Xcode 将在PlayerDetailsViewController.h 中添加如下属性:
@property ( strong, nonatomic ) IBOutlet UITextField * nameTextField;
同时它也自动合成了属性,并在 viewDidUnload 方法中加入语句。
我说过这种方法不能在模板cell 上使用,但在静态 cell 中是可以的。每个静态cell 只有一个实例(与模板 cell 不同,它们不会被复制),因此将它们的 subview 与 ViewController的出口连接是完全可行的。
设置第二个section 的静态 cell 的 Style 为 RightDetail。这是一种标准的 cell 样式。将左边的 Label 文本设置为 Game,accessory 设置为 disclosure indicator。为右边的Label 创建一个出口,命名为 detailLabel。这两个 Label 都是通常的 UILabel 对象。
设计后的 Add Player 窗口最终如下图所示:
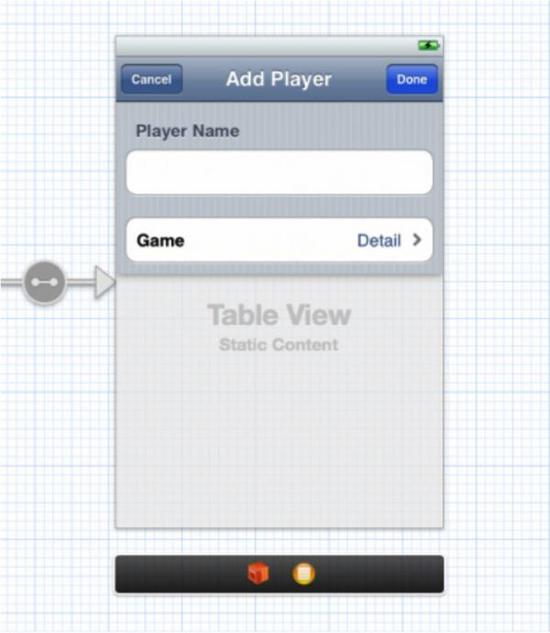
使用静态 cell 时,TableViewController 不用数据源。因为PlayerDetailsViewController 类是 Xcode 模板创建的,代码中会存在数据源的模板代码,我们需要删除它。删除在:
#pragma mark - Table view data source
和:
#pragma mark - Table view delegate
之间的所有行。这将消除 Xcode 在添加这个类时的一些警告。运行程序,查看静态cell 的效果。我们没有写一行代码——实际上反倒删除了一大堆的代码。
但我们免不了还是要写一些代码。在你想第一个单元格加入 textField 时,你可能会注意到它稍有些不妥,在它的周围会有一些多余的空间。用户看不见textField 的头和尾,因此当他们触摸到这些空处的时候,键盘不会弹出。这个很容易解决,覆盖tableView:didSelectRowAtIndexPath 方法代码如下所示:
- ( void ) tableView :( UITableView *) tableView    didSelectRowAtIndexPath :( NSIndexPath *) indexPath {
        if ( indexPath.section == 0 )
               [ self.nameTextField becomeFirstResponder ] ;
}
即用户触摸到第一个单元格时,我们激活 textField 焦点(在这个section 中只有一个 cell,因此我们只需要检查 section 的索引即可)。这将自动弹出软键盘。这只是微不足道的工作,但能降低用户的不满。
你还应该在属性面板中将 cell 的 selection style 设置为None,否则用户触摸在文本框附近时,整个行将变成蓝色。
好了,这就是 AddPlayer 窗口的设计了。现在我们要让它真正发挥作用。
以上就是iOS 5 故事板入门(3)的内容,更多相关内容请关注PHP中文网(www.php.cn)!
 What does the rm-rf command mean in linux?
 What is the main difference between c language and python?
 What is mobile HD
 letter-spacing
 The difference between mac air and pro
 How to buy and sell Bitcoin on okex
 value function usage
 Solution to the problem that the input is not supported when the computer starts up


