The content of this article is shared with you about PHP editor installation and environment construction. It has certain reference value. Friends in need can refer to it
Introduction: PHP (foreign name: PHP: Hypertext Preprocessor, Chinese name: "Hypertext Preprocessor") is a general open source scripting language. The syntax absorbs the characteristics of C language, Java and Perl, which is easy to learn and widely used. It is mainly suitable for the field of Web development.
1. PHP development tools
The integrated development environment is an integrated development environment that integrates everything in the software development process. An integrated development environment that requires major tools, its functions include but are not limited to code brightness, code completion, debugging, building, version control, etc. Common PHP IDEs (Integrated Development Environments) are as follows:
a) Zend Studio: Commercial version, officially produced by Zend, based on eclipse
b) Eclipse with PDT: Free
c) Coda: Commercial version, for Mac users
d) NetBeans: Free, powerful
e) PHP Storm: Commercial version
f ) Aptana Studio: Free
g) PhpEd: Commercial version
h) Komodo IDE/Edit: IDE is the commercial version, Edit is free to use
i) Adobe Dreamweaver: Commercial version
Note: In addition to integrated development environments, common text editors with code highlighting functions are often chosen as development tools because of their lightness and flexibility, such as: Notepad , Editplus, SublimeText, Everedit (developed by Chinese), etc.
2. Build a PHP development environment
Select the phpStudy integrated development environment to integrate PHP, MySQL, and Apache to facilitate the deployment of the developer environment. You only need to install the integration package to deploy the PHP development environment.
Building steps:
Step1. Download the phpStudy installation package. I personally downloaded a phpStudy2018 version. The download address is: http://www.phpstudy. net/ is the official website of phpstudy.
Step2: Install the downloaded phpstudy2018 to the specified path. For example: D:\PHP\ phpstudy2018.
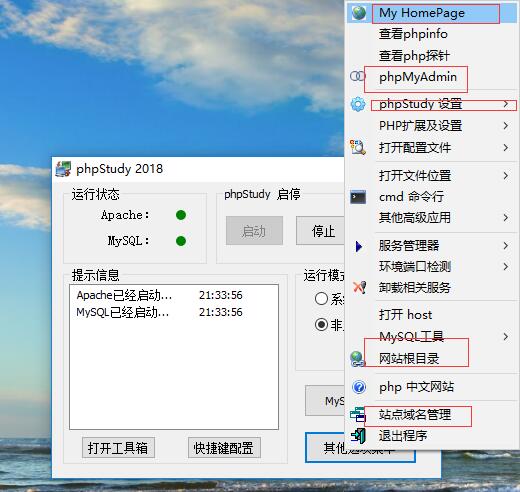
Step3: Start the software, the color of Apache and MySQL turns green, that is, the installation and startup are successful. You can click the software - "Other menu options -" Website root directory to view the website root Files in the directory,
You can also click Software -> Other menu options -> phpstudy settings -> General port settings, that is, set the website to access files under the specified file path.
Step4: The following picture shows the options of phpstudy:

3. Install integrated development tools
Here we take the installation of PhpStorm as an example, download PhpStorm, the download address is:
http://www.oyksoft.com/soft/40722.html?pc=1You can download the cracked version. Because phpstorm is a commercial version and not free, it is better to download the cracked version. Of course, you can first download it from the PhpStorm official website, and then download the cracking package to crack the previous PhpStorm software.
4. Put the project files developed by phpstorm in the path accessed by phpstudy, that is, you can access the developed program through the address in the browser in the future.
5. After setting up the development environment and installing the development tools, and deploying the relationship between the tools and the environment, you can develop PHP programs.
The above is the detailed content of PHP editor installation and environment construction. For more information, please follow other related articles on the PHP Chinese website!


