This article mainly introduces the implementation of the QQ third-party login function in the thinkPHP5 project. It analyzes in detail the specific steps and related operating skills of modifying the QQ login interface and integrating it into the thinkPHP5 project in the form of examples. Friends in need can refer to it. Next
The example of this article describes the implementation of QQ third-party login function in the thinkPHP5 project. I share it with you for your reference. The details are as follows:
Recently I used the thinkPHP 5 framework to build a bridal shop project. During the development process, a third-party login was required. The official case provided by Tencent is that several files interact with each other. It contains the implementation, and it is very sad to find that the expected function cannot be completed through include or require in the controller. If you want to use the Tencent officially sealed class, you must modify it. The modification is as follows:
1. Find the core file in the official SDK
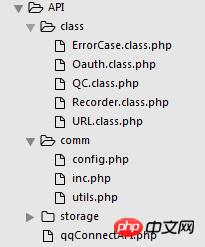
When used outside the framework, include 'qqConnectAPI.php' , when you open this file, you can see that it contains several other files. The files in the comm folder are nothing more than defining some constants and recording your APP KEY information. It doesn't matter. Just put the class Just put several class files in the folder into tp5, and if you look at the code carefully, you will find that the function can be fully realized as long as you get three classes.
2. Put it in the tp framework
#tp5 recommends putting third-party things that are not installed by composer into the extend directory. Next, because we may need to make other extensions in the future, here we will create a separate qqlogin folder related to qq login.

You can see that there are only three categories in it, I will remove them I have created a Recorder and an ErrorCase class. As the names suggest, the function of these two is to record some information, such as access_token, and exception handling. I will delete them directly here. Also note that according to the psr4 specification, the class name must be consistent with the file name, so you need to change the file name and add the namespace extend\qqlogin, tp5 All classes must have namespaces .
In addition, in order to prevent tp5 from finding the files we need, it is best to register a root namespace in the config.php file, on line 30:
// 注册的根命名空间
'root_namespace'  => [
 'extend\qqlogin' => '../extend/qqlogin/',
 'extend\baidu' => '../extend/bdlogin/'
],
Copy after login
3. Transform the source code
Because QC.php inherits Oauth.php, we change it from the latter and remove require_once. I won’t talk about adding the namespace. First, look at the member attributes. The class constant is the address of the Tencent platform. Don’t worry about it. There are three attributes. Recorder and error are not needed. Comment them out or delete them directly. The same is true below. You should imagine that you have a grudge against these two words, and comment or delete them when you see them.
// protected $recorder;
public $urlUtils;
// protected $error;
public $state;
public $appid = "****";
public $callback = "http://****/index/user/qqcallback";
public $scope = "get_user_info";
Copy after login
The following four attributes need to be added. State is used to prevent CSRF attacks. You will know what the following three attributes are by looking at the official documents. These are originally It is stored in inc.php under the comm folder. Now take it directly and turn it into a member attribute.
Then construct the function and instantiate three classes. Two of them no longer exist, and as mentioned above, there is a grudge against these two words. Comment or delete them when you see them.
Look at the first member method belowqq_login()
public function qq_login(){
 $appid = $this->recorder->readInc("appid");
 $callback = $this->recorder->readInc("callback");
 $scope = $this->recorder->readInc("scope");
 //---生成唯一随机串防CSRF攻击
 $state = md5(uniqid(rand(), TRUE));
 $this->recorder->write('state',$state);
 *
 *
 return $login_url;
 // header("Location:$login_url");
}
Copy after login
We already have a grudge against that These two lines of words have been deleted. We need these things again. Don’t forget that we added three member attributes above. We already have these values when using them below. $this->appidEnough. When verifying state, we can verify it through session. TP5 provides an assistant function to write session:
session('state',$this->state);
Copy after login
The last sentence is header jump, not for now Knowing why the jump effect cannot be seen in tp5, I directly return the url, and then use the redirect function of tp5 in the controller $this->redirect() to implement the jump.
Look below at qq_callback()
public function qq_callback(){
 // $state = $this->recorder->read("state");
 //---验证state防止CSRF攻击
 if(input('state') != session('state')){
  // $this->error("30001");
  exit('30001');
 }
 *
 *
 // return $params["access_token"];
 session('access_token',$params["access_token"]);
}
Copy after login
The two words that appear have been commented. We have written session in qq_login, here directly Just compare it with sessio. input() is also a helper function of tp5. You can get the parameters of get and post requests. The result is an array, but you can no longer dynamically add key-value pairs to it. If you want to add it, you must assign it to A variable, and then operate on the variable. If there is an error here, exit directly and print out the error number. The official document has detailed error number descriptions. At the end, the access_token obtained is directly written into the session.
The following get_openid() method is similar. The parameter list is constructed with session, and the return value is written directly into the session.
Then modify QC.php, just modify the construction method and give values to the three variables of the array.
$this->keysArr = array(
 "oauth_consumer_key" => (int)$this->appid,
 "access_token" => session('access_token'),
 "openid" => session('openid')
);
Copy after login
4. Controller call
The transformation is completed and can be done in the controller Used, attach the code below:
use extend\qqlogin\QC;
// 处理qq登录
public function qqlogin()
{
 $qq = new QC();
 $url = $qq->qq_login();
 $this->redirect($url);
}
// qq登录回调函数
public function qqcallback(UserModel $user)
{
 $qq = new QC();
 $qq->qq_callback();
 $qq->get_openid();
 $qq = new QC();
 $datas = $qq->get_user_info();
 * // 拿到用户信息后的处理
 *
}
Copy after login
切记:
在回调函数里面要实例化两次QC才能拿到用户信息,第二次实例化的时候才有openid和access_token两个参数。
相关推荐:
ThinkPHP实现图片上传操作的方法
基于thinkPHP实现的微信自定义分享功能
The above is the detailed content of Implementing QQ third-party login function in thinkPHP5 project. For more information, please follow other related articles on the PHP Chinese website!


![[Web front-end] Node.js quick start](https://img.php.cn/upload/course/000/000/067/662b5d34ba7c0227.png)


