
This article mainly introduces the detailed explanation of the socket communication case of PHP. Interested friends can refer to it. I hope it will be helpful to everyone.
Are you familiar with the words TCP/IP, UDP, and Socket programming? With the development of network technology, these words are flooding our ears.
So what are TCP/IP and UDP?
TCP/IP (Transmission Control Protocol/Internet Protocol) is an industrial standard protocol set designed for wide area networks (WANs).
UDP (User Data Protocol, User Datagram Protocol) is the protocol corresponding to TCP. It is a member of the TCP/IP protocol suite.
Here is a diagram showing the relationship between these protocols.
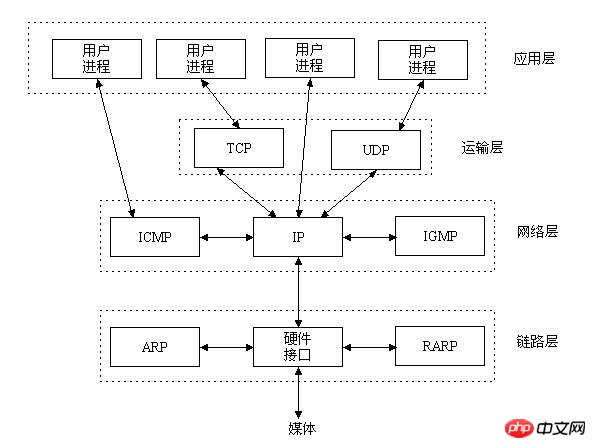
The TCP/IP protocol suite includes the transport layer, network layer, and link layer. Now you know the relationship between TCP/IP and UDP.
Where is Socket?
In Figure 1, we do not see the shadow of Socket, so where is it? Let’s use pictures to speak clearly.
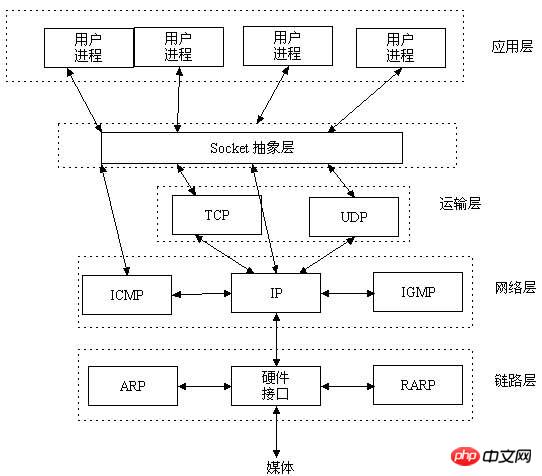
It turns out that the Socket is here.
What is Socket? Socket is an intermediate software abstraction layer for communication between the application layer and the TCP/IP protocol suite. It is a set of interfaces. In the design mode, Socket is actually a facade mode, which hides the complex TCP/IP protocol family behind the Socket interface. For users, a set of simple interfaces is all, allowing Socket to organize data to comply with the specified protocol.
Will you use them?
The predecessors have done a lot for us, and communication between networks has become much simpler, but after all, there is still a lot of work to be done. When I heard about Socket programming before, I thought it was relatively advanced programming knowledge, but as long as we understand the working principle of Socket programming, the mystery will be lifted.
A scene in life. If you want to call a friend, dial the number first. When the friend hears the ringing tone, he picks up the phone. At this time, you and your friend are connected and you can talk. Wait until the communication is over, hang up the phone and end the conversation. Scenes in life explain how this works. Maybe the TCP/IP protocol family was born in life, but this is not necessarily the case.
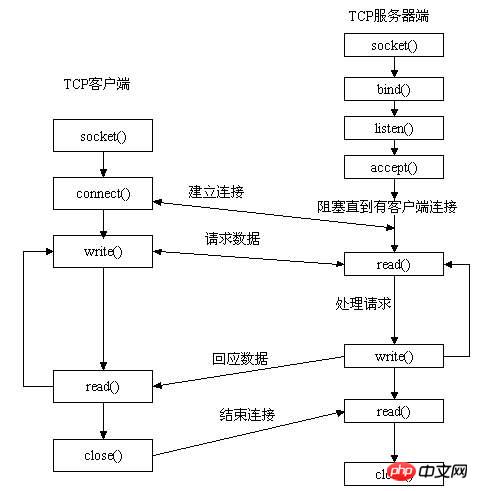
Let’s start with the server side. The server first initializes the Socket, then binds to the port, listens to the port, calls accept to block, and waits for the client to connect. At this time, if a client initializes a Socket and then connects to the server (connect), if the connection is successful, the connection between the client and the server is established. The client sends a data request, the server receives the request and processes the request, then sends the response data to the client, the client reads the data, and finally closes the connection, and the interaction ends.
socket related functions: ---------------------------------------- -------------------------------------------------- -------
socket_accept() accepts a Socket connection
socket_bind() binds the socket to an IP address and port
socket_clear_error() clears the socket error or last error code
socket_close() Closes a socket resource
socket_connect() Starts a socket connection
socket_create_listen() Opens a socket listening on the specified port
socket_create_pair() Generates a pair of indistinguishable sockets into an array
socket_create() generates a socket, which is equivalent to generating a socket data structure
socket_get_option() Gets the socket option
socket_getpeername() Gets the ip address of a remote similar host
socket_getsockname() Gets the ip of the local socket Address
socket_iovec_add() Adds a new vector to a scatter/aggregate array
socket_iovec_alloc() This function creates an iovec data structure capable of sending, receiving, reading and writing
socket_iovec_delete() Delete an already allocated iovec
socket_iovec_fetch() Returns the data of the specified iovec resource
socket_iovec_free() Releases an iovec resource
socket_iovec_set() Sets the new value of iovec data
socket_last_error() Gets the last error code of the current socket
socket_listen() Listen to all connections from the specified socket
socket_read() Read the data of the specified length
socket_readv() Read the data from the scatter/aggregate array
socket_recv() End the data from the socket To cache
socket_recvfrom() Accept data from the specified socket, if not specified, the current socket will be defaulted
socket_recvmsg() Receive messages from iovec
socket_select() Multiple selection
socket_send() This function Send data to the connected socket
socket_sendmsg() Send a message to the socket
socket_sendto() Send a message to the socket at the specified address
socket_set_block() Set the socket to block mode
socket_set_nonblock() socket Set to non-block mode
socket_set_option() Set socket options
socket_shutdown() This function allows you to close reading, writing, or the specified socket
socket_strerror() Returns the detailed error of the specified error number
socket_write() writes data to the socket cache
socket_writev() writes data to the scattered/aggregated array
Case 1: socket communication demonstration
Server side :
1 <?php 2 //确保在连接客户端时不会超时 3 set_time_limit(0); 4 5 $ip = '127.0.0.1'; 6 $port = 1935; 7 8 /* 9 +------------------------------- 10 * @socket通信整个过程 11 +------------------------------- 12 * @socket_create 13 * @socket_bind 14 * @socket_listen 15 * @socket_accept 16 * @socket_read 17 * @socket_write 18 * @socket_close 19 +-------------------------------- 20 */ 21 22 /*---------------- 以下操作都是手册上的 -------------------*/ 23 if(($sock = socket_create(AF_INET,SOCK_STREAM,SOL_TCP)) < 0) { 24 echo "socket_create() 失败的原因是:".socket_strerror($sock)."\n"; 25 } 26 27 if(($ret = socket_bind($sock,$ip,$port)) < 0) { 28 echo "socket_bind() 失败的原因是:".socket_strerror($ret)."\n"; 29 } 30 31 if(($ret = socket_listen($sock,4)) < 0) { 32 echo "socket_listen() 失败的原因是:".socket_strerror($ret)."\n"; 33 } 34 35 $count = 0; 36 37 do { 38 if (($msgsock = socket_accept($sock)) < 0) { 39 echo "socket_accept() failed: reason: " . socket_strerror($msgsock) . "\n"; 40 break; 41 } else { 42 43 //发到客户端 44 $msg ="测试成功!\n"; 45 socket_write($msgsock, $msg, strlen($msg)); 46 47 echo "测试成功了啊\n"; 48 $buf = socket_read($msgsock,8192); 49 50 51 $talkback = "收到的信息:$buf\n"; 52 echo $talkback; 53 54 if(++$count >= 5){ 55 break; 56 }; 57 58 59 } 60 //echo $buf; 61 socket_close($msgsock); 62 63 } while (true); 64 65 socket_close($sock); 66 ?>This is the server code of the socket. Then run cmd, pay attention to the storage path of your own program.
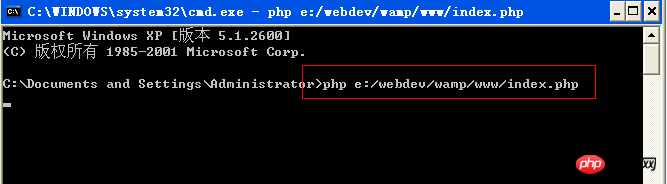
No response, the server program has started running and the port has started listening. Run netstat -ano to check the port status. Mine is port 1935
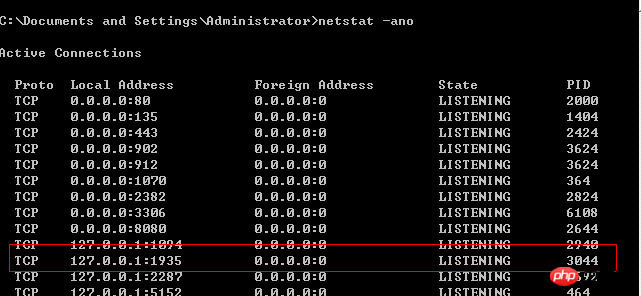
. Look, the port is already in the LISTENING state. Next we only need to run the client program to connect. Above code
1 <?php 2 error_reporting(E_ALL); 3 set_time_limit(0); 4 echo "<h2>TCP/IP Connection</h2>\n"; 5 6 $port = 1935; 7 $ip = "127.0.0.1"; 8 9 /* 10 +------------------------------- 11 * @socket连接整个过程 12 +------------------------------- 13 * @socket_create 14 * @socket_connect 15 * @socket_write 16 * @socket_read 17 * @socket_close 18 +-------------------------------- 19 */ 20 21 $socket = socket_create(AF_INET, SOCK_STREAM, SOL_TCP); 22 if ($socket < 0) { 23 echo "socket_create() failed: reason: " . socket_strerror($socket) . "\n"; 24 }else { 25 echo "OK.\n"; 26 } 27 28 echo "试图连接 '$ip' 端口 '$port'...\n"; 29 $result = socket_connect($socket, $ip, $port); 30 if ($result < 0) { 31 echo "socket_connect() failed.\nReason: ($result) " . socket_strerror($result) . "\n"; 32 }else { 33 echo "连接OK\n"; 34 } 35 36 $in = "Ho\r\n"; 37 $in .= "first blood\r\n"; 38 $out = ''; 39 40 if(!socket_write($socket, $in, strlen($in))) { 41 echo "socket_write() failed: reason: " . socket_strerror($socket) . "\n"; 42 }else { 43 echo "发送到服务器信息成功!\n"; 44 echo "发送的内容为:<font color='red'>$in</font> <br>"; 45 } 46 47 while($out = socket_read($socket, 8192)) { 48 echo "接收服务器回传信息成功!\n"; 49 echo "接受的内容为:",$out; 50 } 51 52 53 echo "关闭SOCKET...\n"; 54 socket_close($socket); 55 echo "关闭OK\n"; 56 ?> 
Now the client has connected to the server.
Case 2: Detailed code explanation
// 设置一些基本的变量
$host = "192.168.1.99";
$port = 1234;
// 设置超时时间
set_time_limit(0);
// 创建一个Socket
$socket = socket_create(AF_INET, SOCK_STREAM, 0) or die("Could not createsocket\n");
//绑定Socket到端口
$result = socket_bind($socket, $host, $port) or die("Could not bind tosocket\n");
// 开始监听链接
$result = socket_listen($socket, 3) or die("Could not set up socketlistener\n");
// accept incoming connections
// 另一个Socket来处理通信
$spawn = socket_accept($socket) or die("Could not accept incomingconnection\n");
// 获得客户端的输入
$input = socket_read($spawn, 1024) or die("Could not read input\n");
// 清空输入字符串
$input = trim($input);
//处理客户端输入并返回结果
$output = strrev($input) . "\n";
socket_write($spawn, $output, strlen ($output)) or die("Could not write
output\n");
// 关闭sockets
socket_close($spawn);
socket_close($socket);The following is a detailed description of each step:
1. The first step is to establish two variables To save the IP address and port of the server where the Socket is running. You can set it to your own server and port (this port can be a number between 1 and 65535), provided that this port is not in use.
[Copy to clipboard]
PHP CODE:
// 设置两个变量
$host = "192.168.1.99" ;
$port = 1234 ;
2. You can use the set_time_out() function on the server side to ensure that PHP will not time out while waiting for the client to connect.
[Copy to clipboard]
PHP CODE:
// 超时时间
set_time_limit ( 0 );
3. Based on the previous steps, it is time to create a Socket using the socket_creat() function - this function returns a Socket handle, which will be used in all future In the function.
[Copy to clipboard]
PHP CODE:
// 创建Socket
$socket = socket_create ( AF_INET , SOCK_STREAM , 0 ) or die( "Could not create
socket\n" );
The first parameter "AF_INET" is used to specify the domain name;
The second parameter "SOCK_STREM" Tell the function what type of Socket will be created (TCP type in this example)
So, if you want to create a UDP Socket, you can use the following code:
[Copy to clipboard]
PHP CODE:
// 创建 socket
$socket = socket_create ( AF_INET , SOCK_DGRAM , 0 ) or die( "Could not create
socket\n" );
4. Once a Socket handle is created, the next step is to specify or bind it to the specified address and port. This can be done through the socket_bind() function.
[Copy to clipboard]
PHP CODE:
// 绑定 socket to 指定地址和端口
$result = socket_bind ( $socket , $host , $port ) or die( "Could not bind to
socket\n" );
5. After the Socket is created and bound to a port, you can start listening for external connections. PHP allows You start a listener with the socket_listen() function, and you can specify a number (in this case the second parameter: 3)
[Copy to clipboard]
PHP CODE:
// 开始监听连接
$result = socket_listen ( $socket , 3 ) or die( "Could not set up socket
listener\n" );
6.到现在,你的服务器除了等待来自客户端的连接请求外基本上什么也没有做.一旦一个客户端的连接被收到,socket_accept()函数便开始起作用了,它接收连接请求并调用另一个子Socket来处理客户端–服务器间的信息.
[Copy to clipboard]
PHP CODE:
//接受请求链接
// 调用子socket 处理信息
$spawn = socket_accept ( $socket ) or die( "Could not accept incoming
connection\n" );
这个子socket现在就可以被随后的客户端–服务器通信所用了.
7.当一个连接被建立后,服务器就会等待客户端发送一些输入信息,这写信息可以由socket_read()函数来获得,并把它赋值给PHP的$input变量.
[Copy to clipboard]
PHP CODE:
// 读取客户端输入
$input = socket_read ( $spawn , 1024 ) or die( "Could not read input\n" );
?& gt ;
socker_read的第而个参数用以指定读入的字节数,你可以通过它来限制从客户端获取数据的大小.
注意:socket_read函数会一直读取壳户端数据,直到遇见\n,\t或者\0字符.PHP脚本把这写字符看做是输入的结束符.
8.现在服务器必须处理这些由客户端发来是数据(在这个例子中的处理仅仅包含数据的输入和回传到客户端).这部分可以由socket_write()函数来完成(使得由通信socket发回一个数据流到客户端成为可能)
[Copy to clipboard]
PHP CODE:
// 处理客户端输入并返回数据
$output = strrev ( $input ) . "\n" ;
socket_write ( $spawn , $output , strlen ( $output )) or die( "Could not write
output\n" );
9.一旦输出被返回到客户端,父/子socket都应通过socket_close()函数来终止
[Copy to clipboard]
PHP CODE:
// 关闭 sockets
socket_close ( $spawn );
socket_close ( $socket );
总结:以上就是本篇文的全部内容,希望能对大家的学习有所帮助。
相关推荐:
The above is the detailed content of Detailed explanation of php socket communication case. For more information, please follow other related articles on the PHP Chinese website!


![[Web front-end] Node.js quick start](https://img.php.cn/upload/course/000/000/067/662b5d34ba7c0227.png)


