

Implement user registration and login through Laravel

This article shows us in detail the methods and steps for using Laravel to implement user registration and login. Friends in need can refer to it
Laravel is the most elegant PHP framework, and there are many Friends who are learning PHP are often salivating over Laravel. Come realize your wish today. Let us start from scratch and use Laravel to implement the most common registration and login functions of web applications! All course source codes have been placed on Github: laravel-start. Race Start!
Recommended related mysql video tutorials: "mysql tutorial"
First of all we Let’s clarify what we need for this course:
Laravel 4.2
Bootstrap 3.3
Laravel is the core part we care about. Bootstrap is used to quickly set some front-end CSS styles.
1. Install Laravel
After a brief explanation, let’s go to the next step and install Laravel. Here we install it through Composer, open the command line terminal, and execute:
cd Sites
Sites is the root directory of the web application. You can change it to your own root directory as needed, and then execute:
composer create-project laravel/laravel laravel
laravel is the name of your application directory, you can choose one A name you like. After executing the above command, wait for a while (after all, Internet speed is a big problem in China). After installation, you will get this bunch of directories:

Our main operations Three directories: models, controllers and views: this is the composition of MVC!
2. Install Bootstrap
Then execute from the command line:
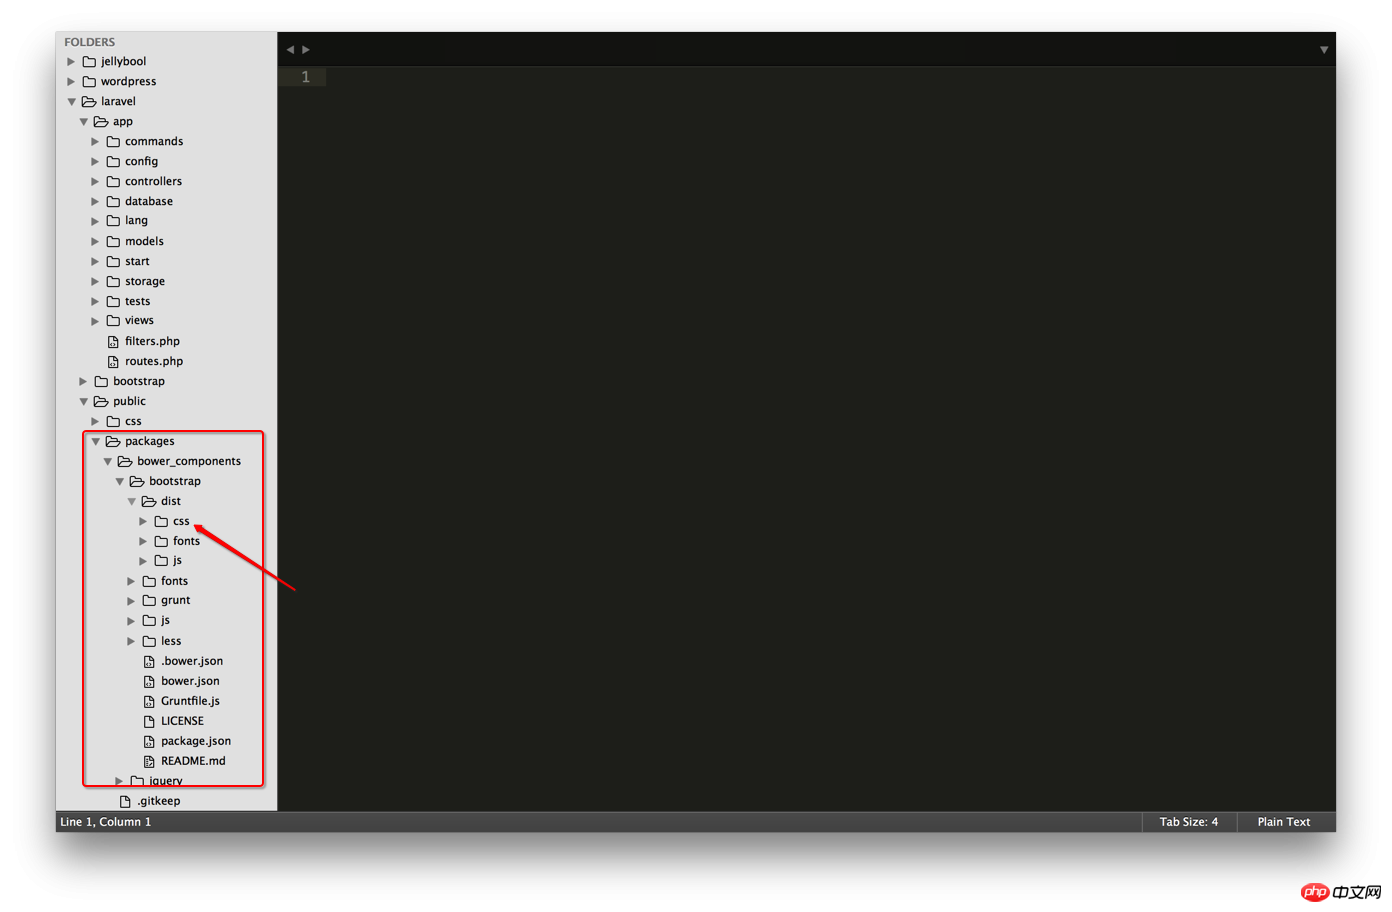
cd laravel/public/packages
The laravel here corresponds to the application directory above. If you are installing If you use another name, please change it accordingly. Go to the packages directory to install Bootstrap and execute it directly on the command line:
bower install bootstrap
This is faster, and after this is downloaded, you will get the latest stable version of Bootstrap. Bower_components/bootstrap/dist/ in the packages directory contains Bootstrap's css, js, and fonts, three style files, js, and font files that we often use during the development process. After success, you will see this:
Note: The bower tool used here is responsible for managing some front-end packages.
At this point, our preliminary work is ready. But before going to the next step, we must first ensure that our laravel/app/storage directory has corresponding write permissions, so return to the laravel directory. If you have not touched the command line after installing bower, you can directly pass:
cd ../../
Go back to the laravel directory, and then execute:
chmod -R 755 app/storage
After this step is completed, we can enter the real development stage.
3. Configure the database and create tables:
Before starting the configuration, we need to create a database for our laravel application, I named it laravel-start ,
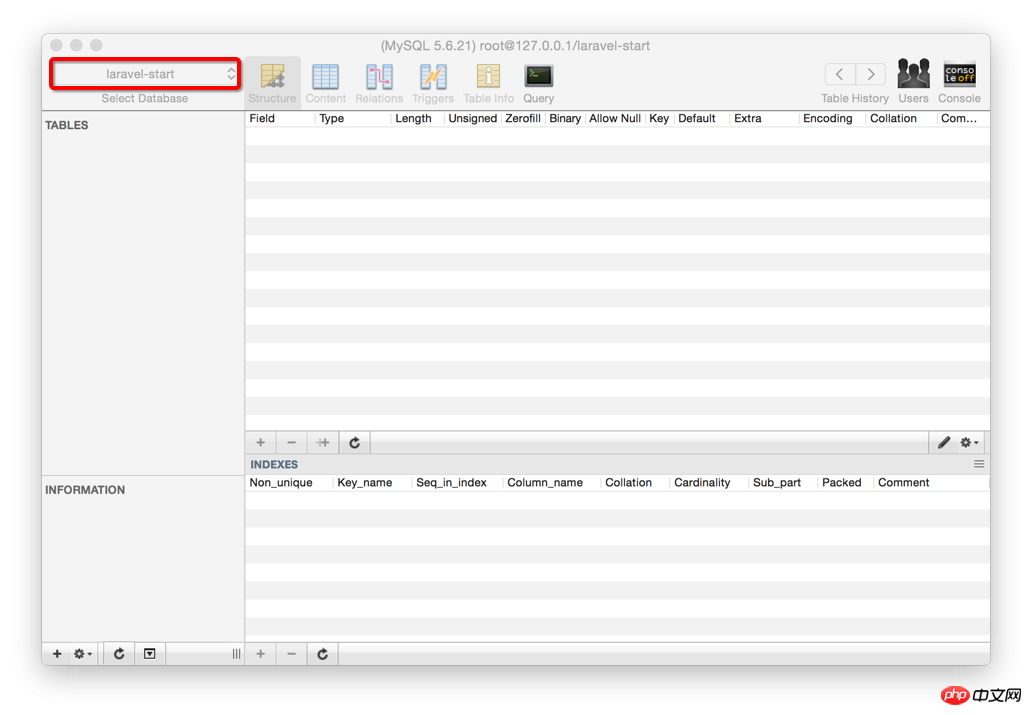
Then open the app/config/database.php file in the editor and fill in the corresponding database configuration items, such as:
'default' => 'mysql',
// 数据库连接
'connections' => array(
    'mysql' => array(
        'driver'    => 'mysql',
        'host'      => '127.0.0.1',
        'database'  => 'laravel-start',
        'username'  => 'root',
        'password'  => '',
        'charset'   => 'utf8',
        'collation' => 'utf8_unicode_ci',
        'prefix'    => '',
),Connection After completing the database, you have to create a Users table. You can create the Users table directly in the database, or you can use Laravel's artisan to create it. Here we use Laravel's artisan to build the table, and learn a little bit about Laravel migrate. Execute the following statement:
php artisan migrate:make create-users-table
The above command will create a migrate file (the file is located in the app/database/migrations directory). The name of this file is create-users -table, then we can create the Users table by editing the migrate file we just generated.
public function up() {
       Schema::create('users', function($table){
        $table->increments('id');
        $table->string('username', 20);
        $table->string('email', 100)->unique();
        $table->string('password', 64);
        $table->string('remember_token',62)->default('default');
        $table->timestamps();
        });
}The above method uses laravel's Schema Builder class. The above code uses the up() method to create a users table. There are 5 fields in this table: id auto-increment, username length within 20, The length of email should be within 100 and unique, and the length of password should be within 64. Remember_token is to make it more convenient and practical when logging in. Laravel will automatically fill in the token value, but at the beginning you must set a default value, timestamp the current timestamp. . One thing we need to pay attention to here is: It is best to add the following code to down() in case we need to delete the Users table one day.
public function down()
{
    Schema::drop('users');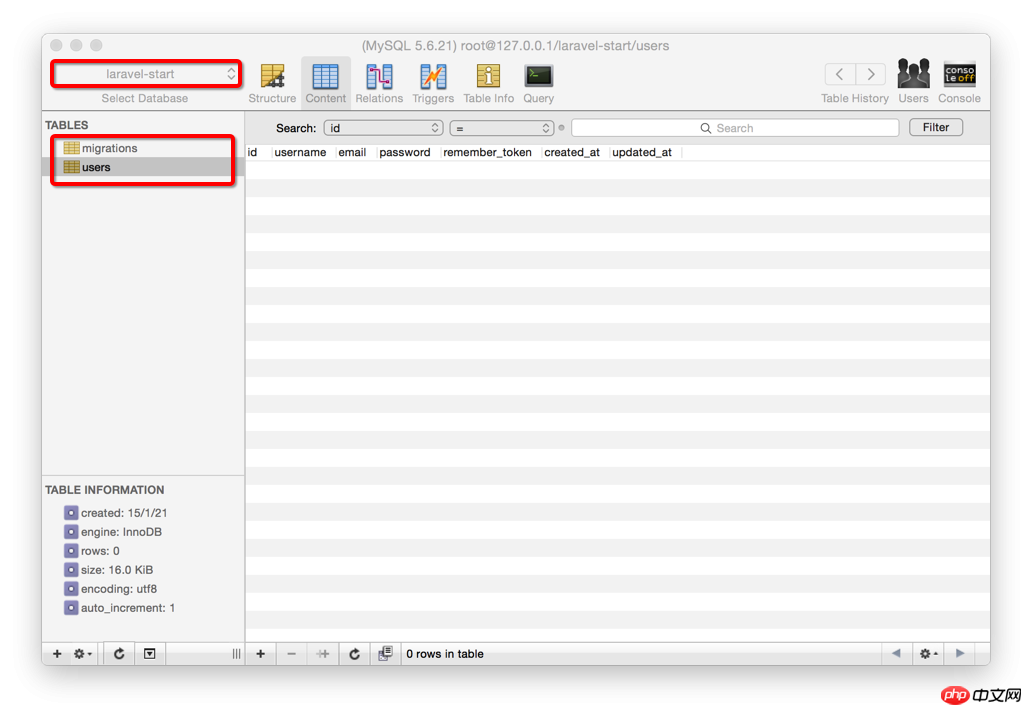
}After doing the above, execute the following magical command:
php artisan migrate
There are pictures and the truth:
Finally, we have finished the prelude and can officially come to Laravel.
4. Start the service and try it
Execute directly in the laravel directory:
php artisan serve
Open the browser, enter localhost:8000, and press Enter. Bingo!
OK, give yourself thirty seconds of applause first, if you have successfully reached this step. Congratulations, you have entered the door of Laravel, we will come with more surprises one by one...
5. Create a public view
好了,我们现在开始了,首先在app/views/文件夹下创建一个layouts文件夹,再再这个文件夹下新建一个php文件,命名为main.blade.php,在这个文件里写上下面这些代码:
<!DOCTYPE html>
<html lang="en">
    <head>
        <meta charset="utf-8">
        <meta name="viewport" content="width=device-width, initial-scale=1.0">
        <title>发现Laravel 4之美</title>
    </head>
    <body>
    </body>
</html>PS:layouts文件夹通常用来存放视图文件的功用部分,比如一些网页的头部
为视图文件添加CSS样式:
<!DOCTYPE html>
<html lang="en">
<head>
<meta charset="utf-8">
<meta name="viewport" content="width=device-width, initial-scale=1.0">
<title>发现Laravel 4之美</title>
{{HTML::style('packages/bower_components/bootstrap/dist/css/bootstrap.min.css') }}
{{ HTML::style('css/main.css')}}
</head>
<body>
</body>
</html>没错,就是在原来的main.blade.php的基础上添加两行代码;然后我们来创建我们的main.css,这个主要是用来放我们自己定义的样式。在public文件夹下创建css文件夹,在css文件夹创建main.css文件,大功告成。
添加导航栏。在main.blade.php文件的
标签中加上以下代码:<body>
<p class="navbar navbar-inverse navbar-fixed-top">
<p class="container">
<p class="navbar-header">
<a class="navbar-brand hidden-sm" href="/">Laravel新手上路</a>
</p>
<ul class="nav navbar-nav navbar-right hidden-sm">
<li>{{ HTML::link('users/register', '注册') }}</li>
<li>{{ HTML::link('users/login', '登陆') }}</li>
</ul>
</p>
</p>
</body>上面只是引用了一些简单的Bootstrap的class,也没什么难的,不用伤心。
到这里基本的功用部分就结束了,但是我们的追求从不会这么low,所以为了更好地与用户交互,我们希望在用户进行某个操作之后给出一些反馈,比如注册成功的时候说:少年,你已成功注册本站,恭喜恭喜。等,于是乎,我们再为main.blade.php添加一点点代码:
<p class="container">
@if(Session::has('message'))
<p class="alert">{{ Session::get('message') }}</p>
@endif
</p>为了现实这些反馈信息给用户,我们得使用Session::get('message')方法,当然,我们得首先从逻辑上判断一下这个message是否存在,所以这里用了一个简单的if判断。
在blade引擎的视图中if 的使用格式是
@if(conditions)
#code...@endif
到这里就结束了么?NO,如果到这里就结束的话,其他的视图文件是怎么插入main.blade.php的
之间的呢?所以,不要忘了还有一个重要的事:{{ $content }},于是乎,上面的代码就变成了这样: <p class="container">
@if(Session::has('message'))
<p class="alert">{{ Session::get('message') }}</p>
@endif
{{ $content }}
</p>{{ $content }}在这里就是表示其他的视图文件内容,你可以在理解上将其他的视图当作一个字符串来理解,只不过这个字符串很长,而且恰好包含了HTML标签而已。下面你将体会到这种想法。
创建完我们的公用视图main.blade.php后,我们先来为main.css添加我们的CSS样式:
body {
     padding-top: 60px;
 }
.form-signup, .form-signin {
     margin: 0 auto;
}因为我们在main.blade.php文件中使用了
终于要进入正题
我擦,前面搞这么久才进入正题?对的,我说的是从这里开始我们就开始进入Laravel的Controller世界了,别高潮那么快,更好的事情还在后头。
6.创建UsersController
来到app/controllers文件夹,并在这里创建UsersController.php文件并加入下面的代码:
<?php
class UsersController extends BaseController {
}
?>然后告诉我们的UsersController我们要使用main.blade.php作为我们的layouts,所以:
<?php
class UsersController extends BaseController {
    protected $layout = "layouts.main";
}
?>这里使用了路径别名,你不用layouts/main.blade.php,你只需要layouts.main,Laravel会自动帮你找到layouts下相应的文件。
7.实现注册
接着为我们的UsersController添加用户注册时访问到的方法:
public function getRegister() {
    $this->layout->content = View::make('users.register');
}这里我们将content制定为users/register.blade.php文件(我们等下会创建这个文件),如果你够细心的话,你可能就注意到了:这里的content就是上面我们在main.blade.php写的{{ $content }},也就是说等下渲染视图的时候,我们的users/register.blade.php文件会替换掉main.blade.php的{{ $content }}进行显示。现在,清晰了没?还不清晰?随时联系我....如果你不嫌我长得丑的话。
自然而然的,我们现在要做的就是创建users/register.blade.php这个文件了,来到views文件夹 ,创建一个新的文件夹users/,再在里面新建register.blade.php,写上下面这些内容:
{{ Form::open(array('url'=>'users/create', 'class'=>'form-signup')) }}
<p class="container">
<p class="row">
<p class="col-md-4 col-md-offset-4">
<p class="panel panel-default">
<p class="panel-heading">
<h3 class="panel-title">欢迎注册</h3>
</p>
<p class="panel-body">
{{ Form::open(array('url'=>'users/create', 'class'=>'form-signup')) }}
<ul>
@foreach($errors->all() as $error)
<li>{{ $error }}</li>
@endforeach
</ul>
<fieldset>
<p class="form-group">
{{ Form::text('username', null, array('class'=>'form-control', 'placeholder'=>'用户名')) }}
</p>
<p class="form-group">
{{ Form::text('email', null, array('class'=>'form-control', 'placeholder'=>'邮箱')) }}
</p>
<p class="form-group">
{{ Form::text('password', array('class'=>'form-control', 'placeholder'=>'密码')) }}
</p>
<p class="form-group">
{{ Form::text('password_confirmation', array('class'=>'form-control', 'placeholder'=>'确认密码')) }}
</p>
{{ Form::submit('马上注册',array('class'=>'btn btn-large btn-success btn-block')) }}
</fieldset>
{{ Form::close() }}
</p>
</p>
</p>
</p>
</p>这里我们使用了Laravel的Form类来创建我们的注册表单,首先调用open()方法,表示创建表单的开始,并且我们也为其通过数组的形式传人一些参数,url表示表到提交的地址,class就是表示CSS样式的类。接下来我们使用了:
@foreach($errors->all() as $error)
<li>{{ $error }}</li>
@endforeach@foreach循环将每个表单的错误信息输出。因为我们在让用户注册的时候总是要验证一下用户输入的数据是否满足我们设定的规则,比如邮箱这一栏我们规定它必须为正确的邮箱形式,而如果用户没有输入正确的邮箱格式,我们就会返回错误信息给用户看。That's it.
再下来需要说明的就是几个Form输入框的创建方式了:
{{ Form::text() }} //创建type=text 输入框
{{ Form::password() }}//创建type=password 输入框
{{ Form::submit() }}//创建type=submit 输入框各个输入框的值我们都设为null,因为我们用placeholder来更好的替代了,第三个参数是你可以通过一个数组来传人相应的HTML选项来实现我们的布局,比如上面的array('class'=>'form-control', 'placeholder'=>'确认密码')等。
最后别忘我们要用{{ Form::close() }}来结束表单。
到这里我们就把注册页面搞定了,紧接下来就是正确地设置好我们的路由以使我们能正确访问到我们的getRegister()方法。于是,带着神圣的使命感,我们打开app/routes.php这个文件,首先可以将里面的:
Route::get('/', function()
{
    return View::make('hello');
});这几行代码干掉(你可以注视掉或者直接删了,建议是注释),然后再添上下面这一行代码;
Route::controller('users', 'UsersController');
注意到第一个参数users没,这个告诉就是说我们在访问UsersController的方法的时候我们遵循下面这个格式:
/users/actionName
比如我们想访问UsersController的getRegister(),我们可以在浏览器地址栏输入的格式是:
/users/register
于是,打开你的浏览器,在地址栏输入:
http://localhost:8000/users/register
见证奇迹吧。是不是很爽!哈哈哈。
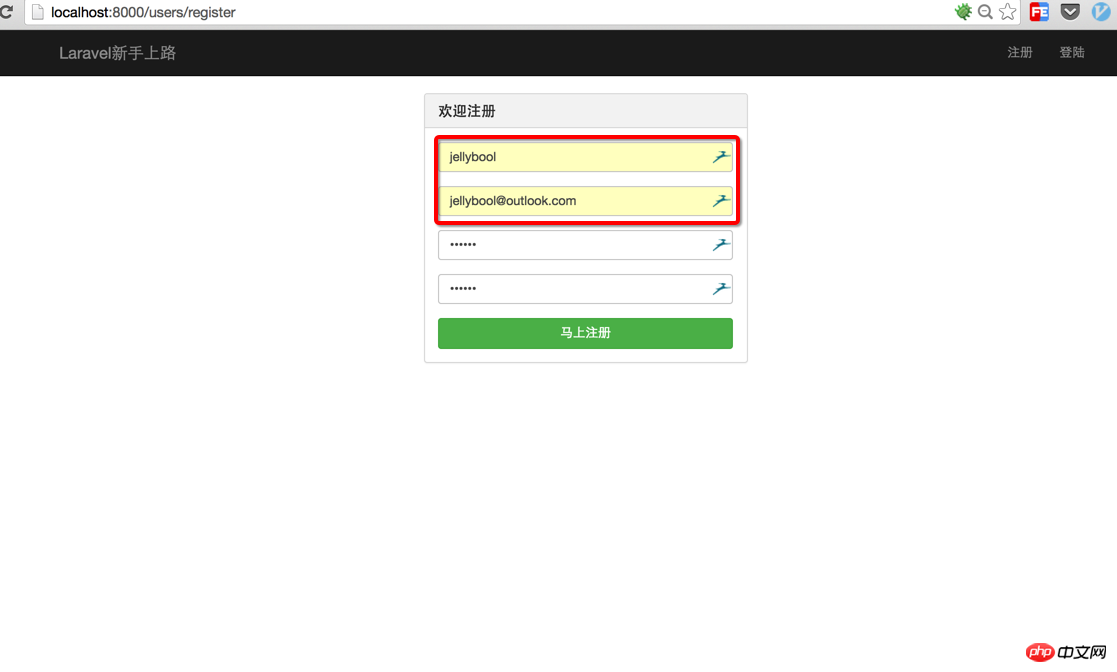
如果现在你在这个注册表单添上相应的注册信息,然后点击注册的话,你会得到一个意外的错误:NotFoundHttpException!那是因为我们还没有为注册表单写提交地址:users/create。所以我们自然要来到UsersController中,为其添上postCreate():
public function postCreate() {
}这样我们就把地址users/create正确地搞定了,只是我们还没有为其添加相应的条件判断语句,因为我们首先要在这里说明一点就是:getRegister()和postCreate()的不同,没错前面的get或post就是代表http的提交方式,我们在注册表单中使用的是post方法,所以这里要使用postCreate()。
说明上面的细节之后,我们还要做一件非常重要的事:表单验证。即是先在用户提交表单的时候验证其输入数据的合法性,以便于我们在数据库中能存储正确的数据,这里就联系到前面的:
@foreach($errors->all() as $error)
    <li>{{ $error }}</li>
@endforeach这里的$error就是我们在用户输入数据不合法的时候返回给用户的错误提示信息。所以,我们现在app/models/User.php中添加我们的表单验证规则(我一般将验证规则放在模型modal中):
public static $rules = array(
    'username'=>'required|alpha|min:2',
    'email'=>'required|email|unique:users',
    'password'=>'required|alpha_num|between:6,12|confirmed',
    'password_confirmation'=>'required|alpha_num|between:6,12'
);说明一下上面的一些规则表示什么意思:
required:必填的,不能为空
alpha:字母
email:邮件格式
unique:users:唯一,参考users表的设置
alpha_num:字母或数字
between:长度位于哪两个数字之间
confirmed:需要确认的
在我们有了验证规则,我们再来完善我们的postCreate(),即为其添加一些条件判断使用户在注册时可以保存用户的注册信息和进一步引导用户到登陆页面:
我们来一步一步地理清思路:首先判断用户提交的数据是否通过了验证
public function postCreate() {
    $validator = Validator::make(Input::all(), User::$rules);
    if ($validator->passes()) {
        // 验证通过就存储用户数据
    } else {
        // 验证没通过就显示错误提示信息
    }
}
}上面我们通过Input::all()来获取表单传过来的值,又调用User::$rules来获得验证规则,最后通过把这两个以参数的形式传入Validator::make()实现验证,下面的判断语句就很清晰了,验证通过后干嘛,没通过又该干嘛。思路清晰就OK。
接着我们再来完善我们的postCreate()代码:
if ($validator->passes()) {
$user = new User;//实例化User对象
$user->username = Input::get('username');
$user->email = Input::get('email');
$user->password = Hash::make(Input::get('password'));
$user->save();
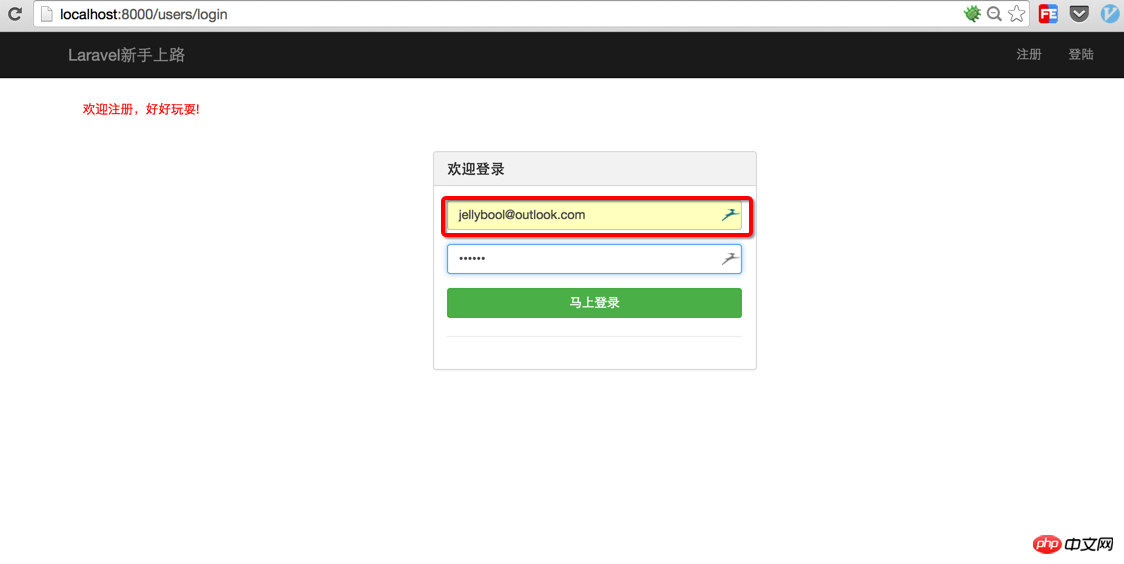
return Redirect::to('users/login')->with('message', '欢迎注册,好好玩耍!');
} else {
// 验证没通过就显示错误提示信息
}上面的我们通过Input::get('fieldName')来获得相应的表单输入框的值,这里需要注意的是我们对密码进行了加密,因为我们都是棒棒的工程师,不会像之前的CSDN一样保存明文密码的,所以在密码这一栏我们使用Hash::make()来加密传入的密码。然后我们通过$user->save()来将我们的数据保存到数据库中。数据保存之后,我们用Redirect::to()将页面跳转到users/login,并通过width将注册成功的信息返回给用户。
Redirect::to()的参数规则是:controller/action。前面是控制起,后面就是具体的方法名。
上面是验证通过的情况,现在我们看看验证没有通过的情况:
if ($validator->passes()) {
    $user = new User;//实例化User对象
    $user->username = Input::get('username');
    $user->email = Input::get('email');
    $user->password = Hash::make(Input::get('password'));
    $user->save();
    return Redirect::to('users/login')->with('message', '欢迎注册,好好玩耍!');
} else {
    return Redirect::to('users/register')->with('message', '请您正确填写下列数据')->withErrors($validator)->withInput();
}这里如果用户没有通过验证,我让其重定向到注册页,并通过withErrors($validator)将错误信息传到注册页面,通过withInput()将没有输错的数据也传给注册页面(正确来说是传给register方法,不过你可以根据上面那样理解,个人觉得也还OK),这样一来,我们就有了错误信息和一些正确的表单信息(不用用户多次输入),以提高整个过程的用户体验。
再进一步,我们在开发的时候永远不要忘记一件很重要的事:安全。那么在这里我们需要POST提交表单,我们就要保证它不会被CSRF攻击,解决这个问题我们需要在UsersController里添加下面的代码:
public function __construct() {
    $this->beforeFilter('csrf', array('on'=>'post'));
}构造方法请放在其他方法前面。
8.实现登录
接下来的一步就是创建login的视图文件了,我们依旧来到我们最熟悉的views/users/下,新建文件名为login.blade.php的文件,在里面放上以下的代码:
<p class="container">
<p class="row">
<p class="col-md-4 col-md-offset-4">
<p class="panel panel-default">
<p class="panel-heading">
<h3 class="panel-title">欢迎登录</h3>
</p>
<p class="panel-body">
{{ Form::open(array('url'=>'users/signin', 'class'=>'form-signin')) }}
<fieldset>
<p class="form-group">
{{ Form::text('email', null, array('class'=>'form-control', 'placeholder'=>'邮箱')) }}
</p>
<p class="form-group">
{{ Form::password('password', array('class'=>'form-control', 'placeholder'=>'密码')) }}
</p>
{{ Form::submit('马上登录',array('class'=>'btn btn-large btn-success btn-block')) }}
</fieldset>
{{ Form::close() }}
<hr/>
</p>
</p>
</p>
</p>
</p>这里的一些要点跟register.blade.php一样,你不明白的话可以看看前面的。然后我们需要在UsersController里面定义getLogin()方法:
public function getLogin() {
    $this->layout->content = View::make('users.login');
}这里也是指定了content的模版为users/login.blade.php,道理跟前面一样。
这时候我们就可以注册新用户了,如果你的浏览器还保留在http://localhost:8000/users/register你可以试着输入你的用户名,邮箱,密码来注册一个,当然你也可以故意输错,看看会有什么信息返回给你。enjoy!
正常情况下,你注册完之后就吼跳到登录界面(已经写好了),但是我们在登录的时候也需要验证,如果你仔细看上面的login.blade.php的话,你会发现我们在这里将用户的登录表单提交地址设置为
'url'=>'users/signin',所以接下来的一步就是为UsersController补充postSignin()方法:
public function postSignin() {
if (Auth::attempt(array('email'=>Input::get('email'), 'password'=>Input::get('password')))) {
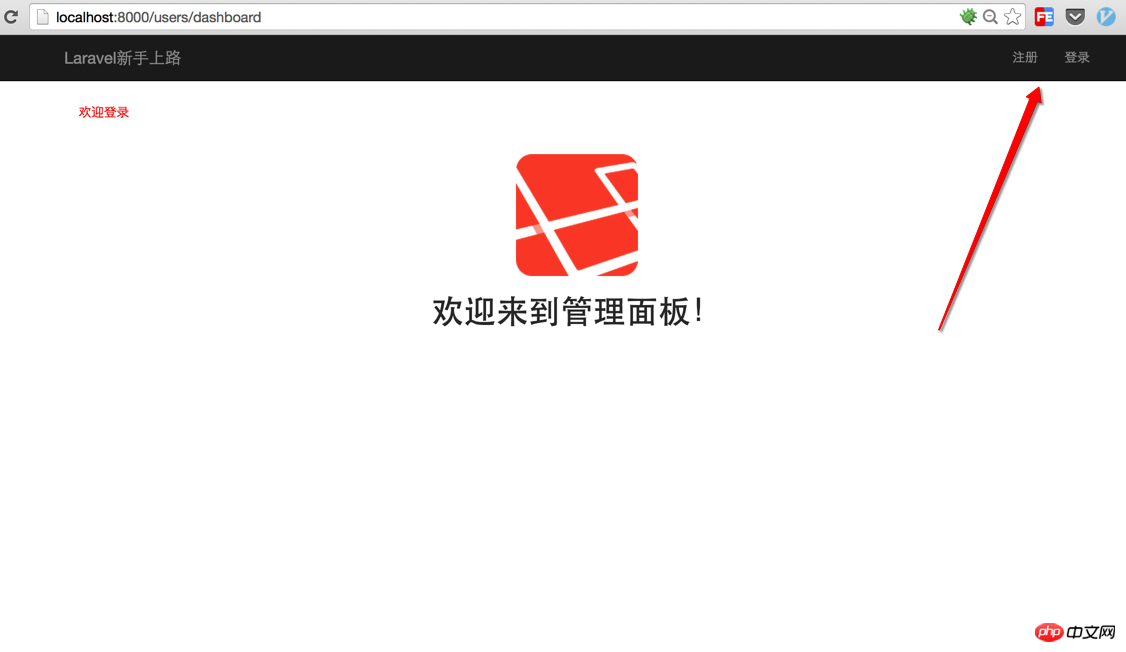
return Redirect::to('users/dashboard')->with('message', '欢迎登录');
} else {
return Redirect::to('users/login')->with('message', '用户名或密码错误')->withInput();
}
}这里我们使用Auth类来验证用户输入的信息是否和数据库的信息一致,如果验证通过,那么我们就将用户重定向到users/dashboard,如果没通过,就重新跳回登录页,情况跟注册时候几乎一模一样,我相信你看得懂。
既然是重定向到users/dashboard那么我们就来写写getDashboard()方法,到这里可能不用我说你都知道应该在UsersController添加下面的代码:
public function getDashboard() {
    $this->layout->content = View::make('users.dashboard');
}这里再多说一句,这个Dashboard的页面一般是在登录后才能看到的,为了限制一些没登录的人到处乱逛,我们只需要在UsersController中的构造函数加一行代码,变成这样的:
public function __construct() {
    $this->beforeFilter('csrf', array('on'=>'post'));
    $this->beforeFilter('auth', array('only'=>array('getDashboard')));
}现在逻辑是不是很清晰,我们接下来的一步自然是创建dashboard.blade.php文件了,这个从getDashboard()看出我们依然是将这个视图文件存在views/users/目录下,我们就简单地在dashboard.blade.php写上几行入门级的HTML:
<p class="welcome">
    <center>
    <a href="http://www.jellybool.com" target="_blank">
<img src="https://wt-prj.oss.aliyuncs.com/766e22da1e8c467a8af35d90c9185409/7680dd9d-c0e4-42ea-86b8-ddd63d07faa6.png" >
</a>
    </center>
    <center><h1>欢迎来到管理面板!</h1></center>
</p>写到这里我们还不能登录,因为在Laravel中auth过滤(filter)会默认将没登录的用户重定向到/login,但我们需要的是重定向到users/login,所以我们需要自定义我们的filter规则,打开app/filter.php,在代码的开始加上下面的代码:
Route::filter('auth', function()
{
    if (Auth::guest()) return Redirect::guest('users/login');
});到这里就大功告成了,如果你之前注册了一个用户,请用你的邮箱和密码到
http://localhost:8000/users/login
尝试登录一下,你会发现:Bingo!!!登录进去了!
9.实现退出
但是细心的你发现了没,我们还有一个需要完善的地方.....没错!就是我们的导航,我们已经登录进去了,它还是显示登录和注册,不科学啊!所以回到最初我们的main.blade.php在链接部分我们将它改为:
<ul class="nav navbar-nav navbar-right hidden-sm">
@if(!Auth::check())
<li>{{ HTML::link('users/register', '注册') }}</li>
<li>{{ HTML::link('users/login', '登陆') }}</li>
@else
<li>{{ HTML::link('users/logout', '退出') }}</li>
@endif
</ul>没错,我们为导航这里加入了条件判断语句,如果用户没有通过Auth::check(),也就是没有登录的话,我们显示登录和注册,如果登录了就显示退出,
既然有了users/logout这个链接,那么我们就会想到在UsersController写这个getLogout()方法,而且这个方法是负责清理用户的登录信息的,所以:
public function getLogout() {
        if(Auth::check())
        {
            Auth::logout();
        }
    return Redirect::to('users/login')->with('message','你现在已经退出登录了!');
}这里我们Auth::logout()将用户的登录信息(主要就是session信息)清除掉,然后再将用户重定向到登录界面。
10.最后的最后
这个小教程写到这里就基本结束了,希望各位玩的愉快。最后多说一句:编程是我们最容易学习的超能力,永远要相信自己可以改变世界!
以上就是本文的全部内容,希望对大家的学习有所帮助,更多相关内容请关注PHP中文网!
相关推荐:
The above is the detailed content of Implement user registration and login through Laravel. For more information, please follow other related articles on the PHP Chinese website!

Hot AI Tools

Undresser.AI Undress
AI-powered app for creating realistic nude photos

AI Clothes Remover
Online AI tool for removing clothes from photos.

Undress AI Tool
Undress images for free

Clothoff.io
AI clothes remover

Video Face Swap
Swap faces in any video effortlessly with our completely free AI face swap tool!

Hot Article
Hot Tools

Notepad++7.3.1
Easy-to-use and free code editor

SublimeText3 Chinese version
Chinese version, very easy to use

Zend Studio 13.0.1
Powerful PHP integrated development environment

Dreamweaver CS6
Visual web development tools

SublimeText3 Mac version
God-level code editing software (SublimeText3)
Hot Topics
 1664
1664
 14
1421
52
1315
25
1266
29
1239
24
14
1421
52
1315
25
1266
29
1239
24

 Laravel Introduction Example
Apr 18, 2025 pm 12:45 PM
Laravel Introduction Example
Apr 18, 2025 pm 12:45 PM
Laravel is a PHP framework for easy building of web applications. It provides a range of powerful features including: Installation: Install the Laravel CLI globally with Composer and create applications in the project directory. Routing: Define the relationship between the URL and the handler in routes/web.php. View: Create a view in resources/views to render the application's interface. Database Integration: Provides out-of-the-box integration with databases such as MySQL and uses migration to create and modify tables. Model and Controller: The model represents the database entity and the controller processes HTTP requests.
 Solve caching issues in Craft CMS: Using wiejeben/craft-laravel-mix plug-in
Apr 18, 2025 am 09:24 AM
Solve caching issues in Craft CMS: Using wiejeben/craft-laravel-mix plug-in
Apr 18, 2025 am 09:24 AM
When developing websites using CraftCMS, you often encounter resource file caching problems, especially when you frequently update CSS and JavaScript files, old versions of files may still be cached by the browser, causing users to not see the latest changes in time. This problem not only affects the user experience, but also increases the difficulty of development and debugging. Recently, I encountered similar troubles in my project, and after some exploration, I found the plugin wiejeben/craft-laravel-mix, which perfectly solved my caching problem.
 Laravel user login function
Apr 18, 2025 pm 12:48 PM
Laravel user login function
Apr 18, 2025 pm 12:48 PM
Laravel provides a comprehensive Auth framework for implementing user login functions, including: Defining user models (Eloquent model), creating login forms (Blade template engine), writing login controllers (inheriting Auth\LoginController), verifying login requests (Auth::attempt) Redirecting after login is successful (redirect) considering security factors: hash passwords, anti-CSRF protection, rate limiting and security headers. In addition, the Auth framework also provides functions such as resetting passwords, registering and verifying emails. For details, please refer to the Laravel documentation: https://laravel.com/doc
 Laravel framework installation method
Apr 18, 2025 pm 12:54 PM
Laravel framework installation method
Apr 18, 2025 pm 12:54 PM
Article summary: This article provides detailed step-by-step instructions to guide readers on how to easily install the Laravel framework. Laravel is a powerful PHP framework that speeds up the development process of web applications. This tutorial covers the installation process from system requirements to configuring databases and setting up routing. By following these steps, readers can quickly and efficiently lay a solid foundation for their Laravel project.
 How to learn Laravel How to learn Laravel for free
Apr 18, 2025 pm 12:51 PM
How to learn Laravel How to learn Laravel for free
Apr 18, 2025 pm 12:51 PM
Want to learn the Laravel framework, but suffer from no resources or economic pressure? This article provides you with free learning of Laravel, teaching you how to use resources such as online platforms, documents and community forums to lay a solid foundation for your PHP development journey from getting started to master.
 What versions of laravel are there? How to choose the version of laravel for beginners
Apr 18, 2025 pm 01:03 PM
What versions of laravel are there? How to choose the version of laravel for beginners
Apr 18, 2025 pm 01:03 PM
In the Laravel framework version selection guide for beginners, this article dives into the version differences of Laravel, designed to assist beginners in making informed choices among many versions. We will focus on the key features of each release, compare their pros and cons, and provide useful advice to help beginners choose the most suitable version of Laravel based on their skill level and project requirements. For beginners, choosing a suitable version of Laravel is crucial because it can significantly impact their learning curve and overall development experience.
 How to view the version number of laravel? How to view the version number of laravel
Apr 18, 2025 pm 01:00 PM
How to view the version number of laravel? How to view the version number of laravel
Apr 18, 2025 pm 01:00 PM
The Laravel framework has built-in methods to easily view its version number to meet the different needs of developers. This article will explore these methods, including using the Composer command line tool, accessing .env files, or obtaining version information through PHP code. These methods are essential for maintaining and managing versioning of Laravel applications.
 The difference between laravel and thinkphp
Apr 18, 2025 pm 01:09 PM
The difference between laravel and thinkphp
Apr 18, 2025 pm 01:09 PM
Laravel and ThinkPHP are both popular PHP frameworks and have their own advantages and disadvantages in development. This article will compare the two in depth, highlighting their architecture, features, and performance differences to help developers make informed choices based on their specific project needs.
