Create the simplest ThinkPhp project
Let’s talk about getting started with ThinkPhp and creating a project, which is the first step in starting ThinkPhp application programming.
Software environment:
1.phpstom, download link: click to open the link
2.ThinkPhp3.1 version
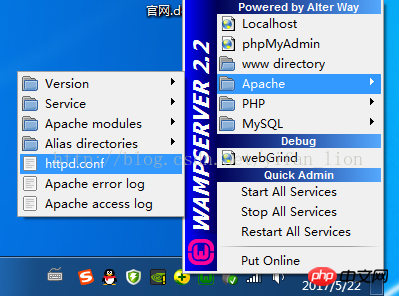
3 .wampserver, integrated development environment, windows apache mysql php development environment (local server), simple configuration, easy to use, download link: Baidu directly. . . There are too many download links. 360 Software Manager can also download them directly. After installation, you need to configure the Apache environment. Click the icon with the left mouse button, select Apache, click httpd.conf, and set the project path, as shown below:

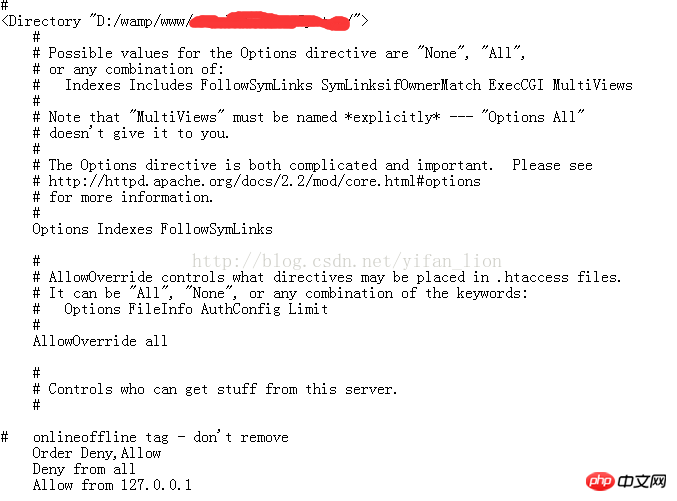
Configure the root directory and Directory


Test environment:
Personally recommend Firefox , easy to debug, with many very practical functions, but it feels a bit slow, which may be due to my computer. Of course, you can also use 360, which is more commonly used. If you want to test IE, you can use IEtest, which is not easy to use and I am too lazy to do it. Compatible with IE9 and before, the experience is too bad (it’s really not that I don’t have time or I’m lazy, what I said is true~, believe it or not, it’s up to you, anyway, I have been convinced by myself) ====== ==============================================Dividing line== ===============================================After the configuration is completed, it’s time to get down to business. First, go to the ThinkPhp official website to download the ThinkPhp framework package. It has been updated to tp5. I haven’t used it yet. There are tutorials on the Internet. I have little experience. It is recommended to use 3.2 first, so that it will be more convenient to ask for help when encountering problems. Download link: Click to open the link http://www.thinkphp.cn/down.html


<?php
header("Content-Type:text/html; charset=utf-8");
define('THINK_PATH', './ThinkPHP/'); //定义Thinkphp框架宝的文件路径
//定义项目名称和路径
define('IN_VICBANG', true);
define('APP_NAME', 'APP');//定义APP_NAME,其实就是项目文件夹
define('APP_PATH', './APP/');//定义项目路径
define('APP_DEBUG', true); //debug显示错误信息
//加载框架入口文件
require(THINK_PATH . "ThinkPHP.php");


The two sentences at the bottom of the picture are Deny from all, Allow from 127.0.0.1, which means that all are prohibited and 127.0.0.1 is allowed. Change Deny here to Allow, and then visit localhost. You will find that localhost can also be accessed now. .
This article explains the relevant content of creating the simplest ThinkPhp project. For more related content, please pay attention to the php Chinese website.
Related recommendations:
Some summaries on adding, deleting, modifying, and checking in ThinkPHP
Application of where method Explain
ThinkPHP double loop traversal output related content
The above is the detailed content of Create the simplest ThinkPhp project. For more information, please follow other related articles on the PHP Chinese website!

Hot AI Tools

Undresser.AI Undress
AI-powered app for creating realistic nude photos

AI Clothes Remover
Online AI tool for removing clothes from photos.

Undress AI Tool
Undress images for free

Clothoff.io
AI clothes remover

Video Face Swap
Swap faces in any video effortlessly with our completely free AI face swap tool!

Hot Article

Hot Tools

Notepad++7.3.1
Easy-to-use and free code editor

SublimeText3 Chinese version
Chinese version, very easy to use

Zend Studio 13.0.1
Powerful PHP integrated development environment

Dreamweaver CS6
Visual web development tools

SublimeText3 Mac version
God-level code editing software (SublimeText3)

Hot Topics
 1666
1666
 14
14
 1425
1425
 52
52
 1327
1327
 25
25
 1273
1273
 29
29
 1253
1253
 24
24
 How to run thinkphp project
Apr 09, 2024 pm 05:33 PM
To run the ThinkPHP project, you need to: install Composer; use Composer to create the project; enter the project directory and execute php bin/console serve; visit http://localhost:8000 to view the welcome page.
 There are several versions of thinkphp
Apr 09, 2024 pm 06:09 PM
ThinkPHP has multiple versions designed for different PHP versions. Major versions include 3.2, 5.0, 5.1, and 6.0, while minor versions are used to fix bugs and provide new features. The latest stable version is ThinkPHP 6.0.16. When choosing a version, consider the PHP version, feature requirements, and community support. It is recommended to use the latest stable version for best performance and support.
 How to run thinkphp
Apr 09, 2024 pm 05:39 PM
Steps to run ThinkPHP Framework locally: Download and unzip ThinkPHP Framework to a local directory. Create a virtual host (optional) pointing to the ThinkPHP root directory. Configure database connection parameters. Start the web server. Initialize the ThinkPHP application. Access the ThinkPHP application URL and run it.
 Which one is better, laravel or thinkphp?
Apr 09, 2024 pm 03:18 PM
Performance comparison of Laravel and ThinkPHP frameworks: ThinkPHP generally performs better than Laravel, focusing on optimization and caching. Laravel performs well, but for complex applications, ThinkPHP may be a better fit.
 Development suggestions: How to use the ThinkPHP framework to implement asynchronous tasks
Nov 22, 2023 pm 12:01 PM
"Development Suggestions: How to Use the ThinkPHP Framework to Implement Asynchronous Tasks" With the rapid development of Internet technology, Web applications have increasingly higher requirements for handling a large number of concurrent requests and complex business logic. In order to improve system performance and user experience, developers often consider using asynchronous tasks to perform some time-consuming operations, such as sending emails, processing file uploads, generating reports, etc. In the field of PHP, the ThinkPHP framework, as a popular development framework, provides some convenient ways to implement asynchronous tasks.
 How to install thinkphp
Apr 09, 2024 pm 05:42 PM
ThinkPHP installation steps: Prepare PHP, Composer, and MySQL environments. Create projects using Composer. Install the ThinkPHP framework and dependencies. Configure database connection. Generate application code. Launch the application and visit http://localhost:8000.
 How is the performance of thinkphp?
Apr 09, 2024 pm 05:24 PM
ThinkPHP is a high-performance PHP framework with advantages such as caching mechanism, code optimization, parallel processing and database optimization. Official performance tests show that it can handle more than 10,000 requests per second and is widely used in large-scale websites and enterprise systems such as JD.com and Ctrip in actual applications.
 Development suggestions: How to use the ThinkPHP framework for API development
Nov 22, 2023 pm 05:18 PM
Development suggestions: How to use the ThinkPHP framework for API development. With the continuous development of the Internet, the importance of API (Application Programming Interface) has become increasingly prominent. API is a bridge for communication between different applications. It can realize data sharing, function calling and other operations, and provides developers with a relatively simple and fast development method. As an excellent PHP development framework, the ThinkPHP framework is efficient, scalable and easy to use.


