

This article mainly introduces the analysis of Laravel5's fast authentication logic process. It has certain reference value. Now I share it with you. Friends in need can refer to it.
Laravel5 itself comes with a set of user authentication function, just use the command line php artisan make:auth and php artisan migrate under the new project to use the built-in fast authentication function.
The following is a logical analysis of the login function, which is based on Laravel 5.5 version.
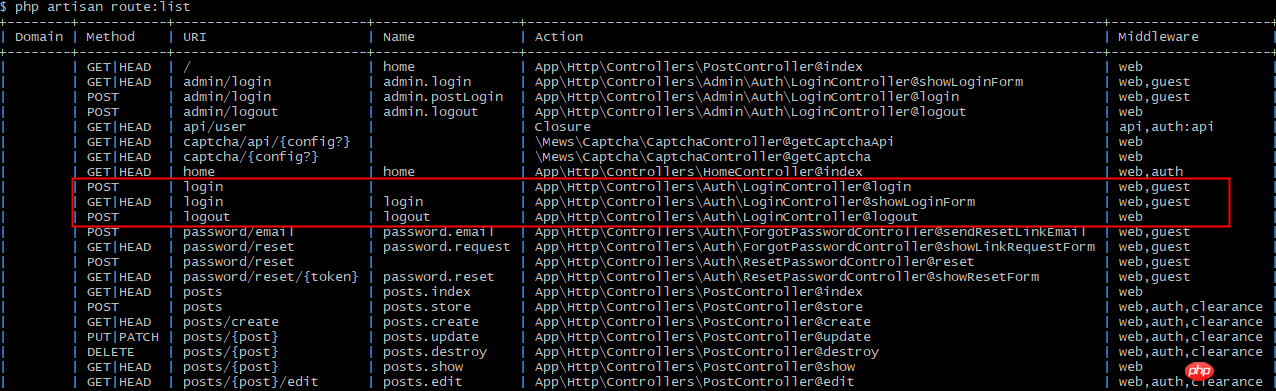
Get the login route (red box) through the command php artisan route:list:
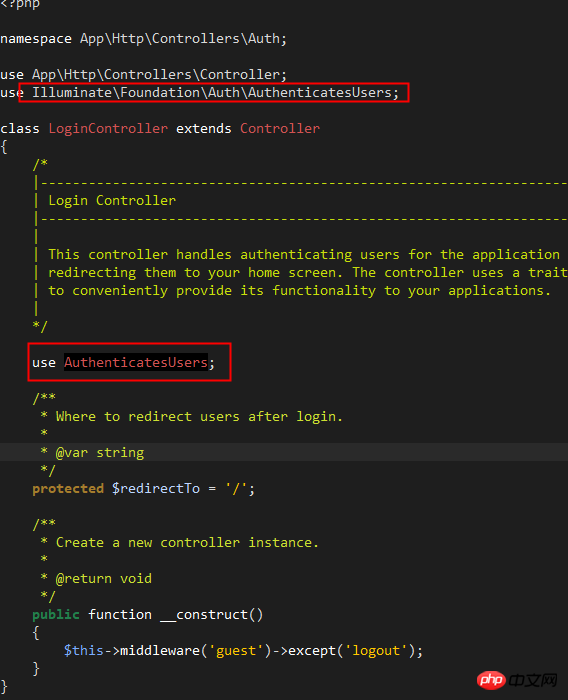
Open and view /app/Http/Controller/Auth/LoginController.php , the file code is very concise. In fact, the login logic and methods are integrated in the trait of Illuminate/Foundation/Auth/AuthenticatesUsers:
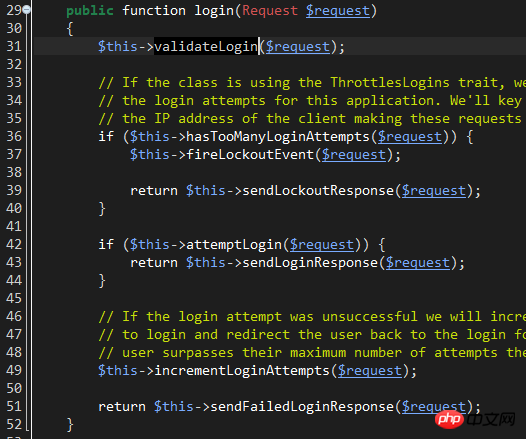
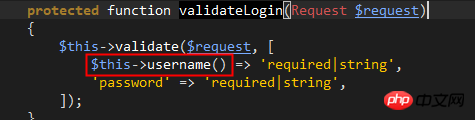
line31: The validateLogin method is responsible for calling The validate method of the controller itself verifies whether the username and password comply with simple rules. There is no need to go into this in depth.
line36: hasTooManyLoginAttempts method, used to check whether the number of account login attempts reaches the set maximum value.
This method refers to the trait of Illuminate\Foundation\Auth\ThrottlesLogins. Looking at the trait name, you can guess that it is responsible for avoiding violent logins.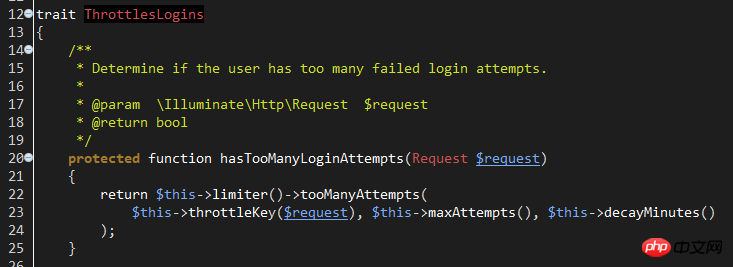
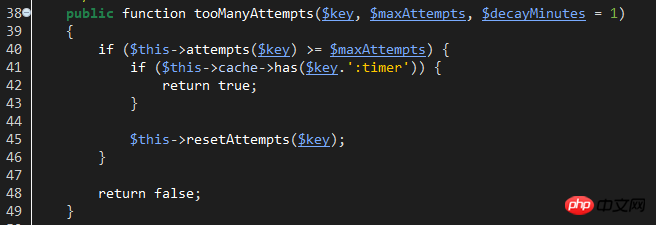
$key: The corresponding key used by cacche to save the login number of the current account. The key composition is like this:

$maxAttempts: Setting value for the maximum number of login attempts.
This value can be customized. You can write the custom maxAttempts attribute in LoginController. The default is 5 times:
$decayMinutes:The waiting time (minutes) for resuming login after reaching the maximum number of attempts.
This value is also customizable. Customize this property in LoginController. The default is 1 minute:
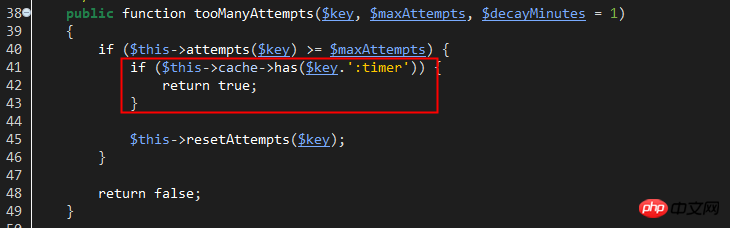

When hasTooManyLoginAttempts returns true, the Lockout event is initiated and the LockoutResponse response is returned. Users can generate a Lockout event monitor to process the logic related to the event, such as recording login logs, etc.
LockoutResponse response essentially throws a verification exception, which will be automatically interpreted by Laravel as a response with a 423 status code and accompanied by auth.throttle configuration information. The original language of this configuration is located at: /resources/lang/en/auth.php. Users can customize their own language information.
Then, return to line 42 of Illuminate\Foundation\Auth\AuthenticatesUsers and start to perform login verification:

attemptLogin method passes config/auth.php Configure the guard name, generate the corresponding guard object, and then call the object's attempt for login verification.

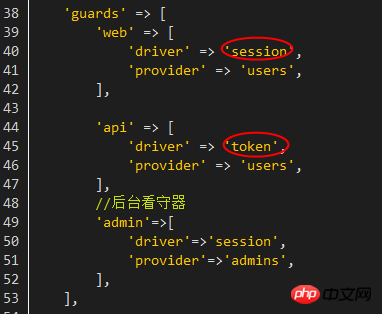
Laravel5 guard currently supports two types: SessionGuard and tokenGuard, both are saved in the Illuminate\Auth folder, and they are both implemented in the Illuminate\Contracts\Auth\Guard interface. So if you need to customize the watcher, please implement this interface.
If you want to implement a web guard, you can further implement the Illuminate\Contracts\Auth\StatefulGuard interface.
As for which guard to use under which circumstances, they are all configured in config/auth.php:
Since what I analyzed this time is Web login process, so check the attempt method of Illuminate\Auth\sessionGuard:
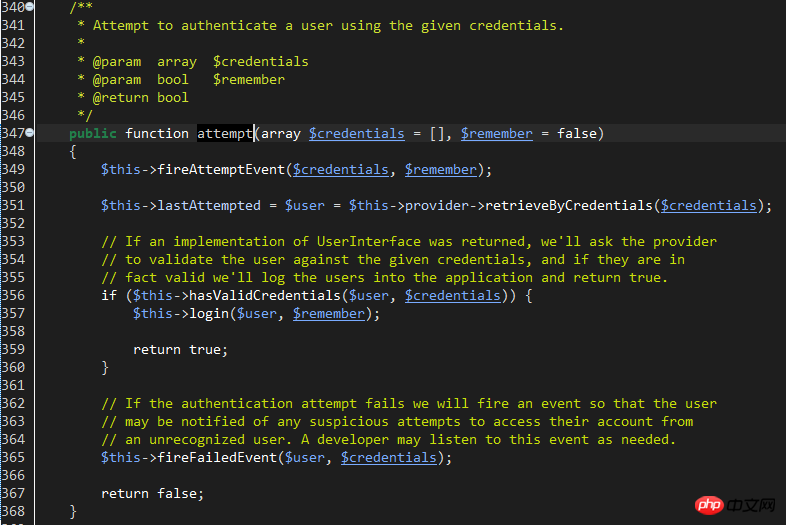
#line 351: The function of this line is to retrieve the account information through the configured provider provider. There are also two types of providers: DatabaseUserProvider and EloquentUserProvider. The file is located at: /Illuminate/Auth.
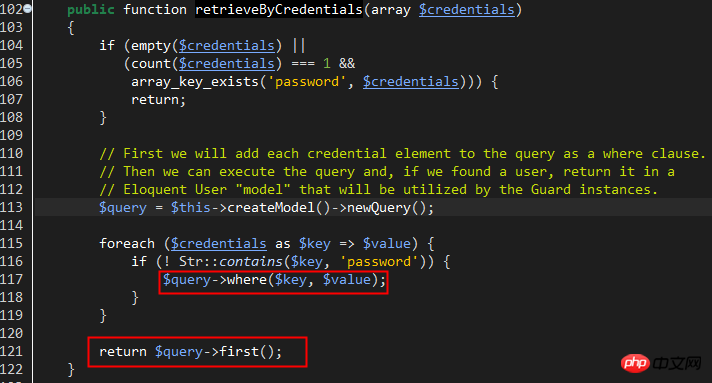
The specific provider to use is configured through the providers parameter of config/auth.php. After configuration, you also need to specify which provider to use in the 'guards' parameter. The provider essentially provides a way to query the database account table. Database directly uses the database Db facade to query, while eloquent uses a model to query.
Laravel uses EloquentUserProvider by default. Looking at the retrieveByCredentials method, it is obvious that the user information is retrieved directly by the account name:
Back The attempt method of Illuminate\Auth\sessionGuard and the hasValidCredentials method of line 356 verify the password, if the user information in the previous step can be retrieved normally.
As can be seen from the hasValidCredentials method body, it calls the provider's validateCredentials method for password verification. Check out the EloquentUserProvider::validateCredentials method:

This verification method uses the check method of the hash class implemented by the HasherContract contract. The specific implementation classes are: Illuminate\Hashing\BcryptHasher. Let's look at the check method of this class:
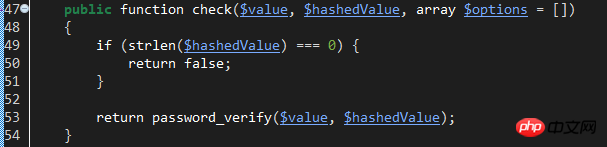
Obviously, it uses the password_verify function to compare the entered plaintext password with the hashed password value. This requires that the database passwords have been hashed using password_hash.
If the password verification is successful, return true. Return to sessionGuard and execute the login method of line357 to record the session and cookie login status.
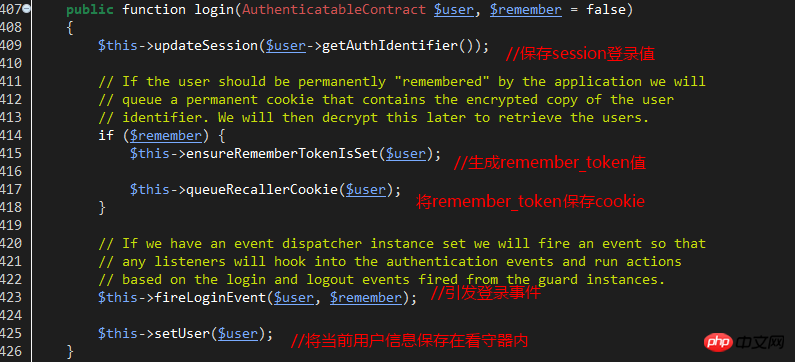
The key and value of the saved session are:
'key'=>'login_session_'.sha1(static::class) // static::class refers to the sessionGuard class itself
'value'=>The primary key value of the current user
If the remember_me option is used, the following cookie is saved, and the key and value are as follows:
'key'=>''remember_session_'.sha1(static::class) //static::class refers to the sessionGuard class itself
'value'=>User primary key value .'|'.The latest remembered_token value saved.'|'.User password hash value
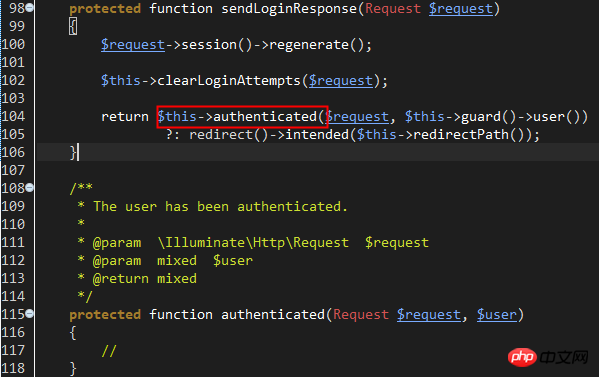
At this point, the user has successfully logged in, and the execution point finally returns to line 42 of Illuminate\Foundation\Auth\AuthenticatesUsers , attemptLogin has been executed and returned true, and then the sendLoginResponse method is called to jump to the main page after login or the last login page.
Note that the authenticated method is an empty method. You can redefine this method in LoginController to customize how to jump and process other logic after login.
If the login is unsuccessful, execute the incrementLoginAttempts($request) method of Illuminate\Foundation\Auth\AuthenticatesUsers to increase the number of failed logins. The method to increase the number of times is also to indirectly call the hit() method of the RateLimiter class.
Finally call sendFailedLoginResponse to return a login exception.
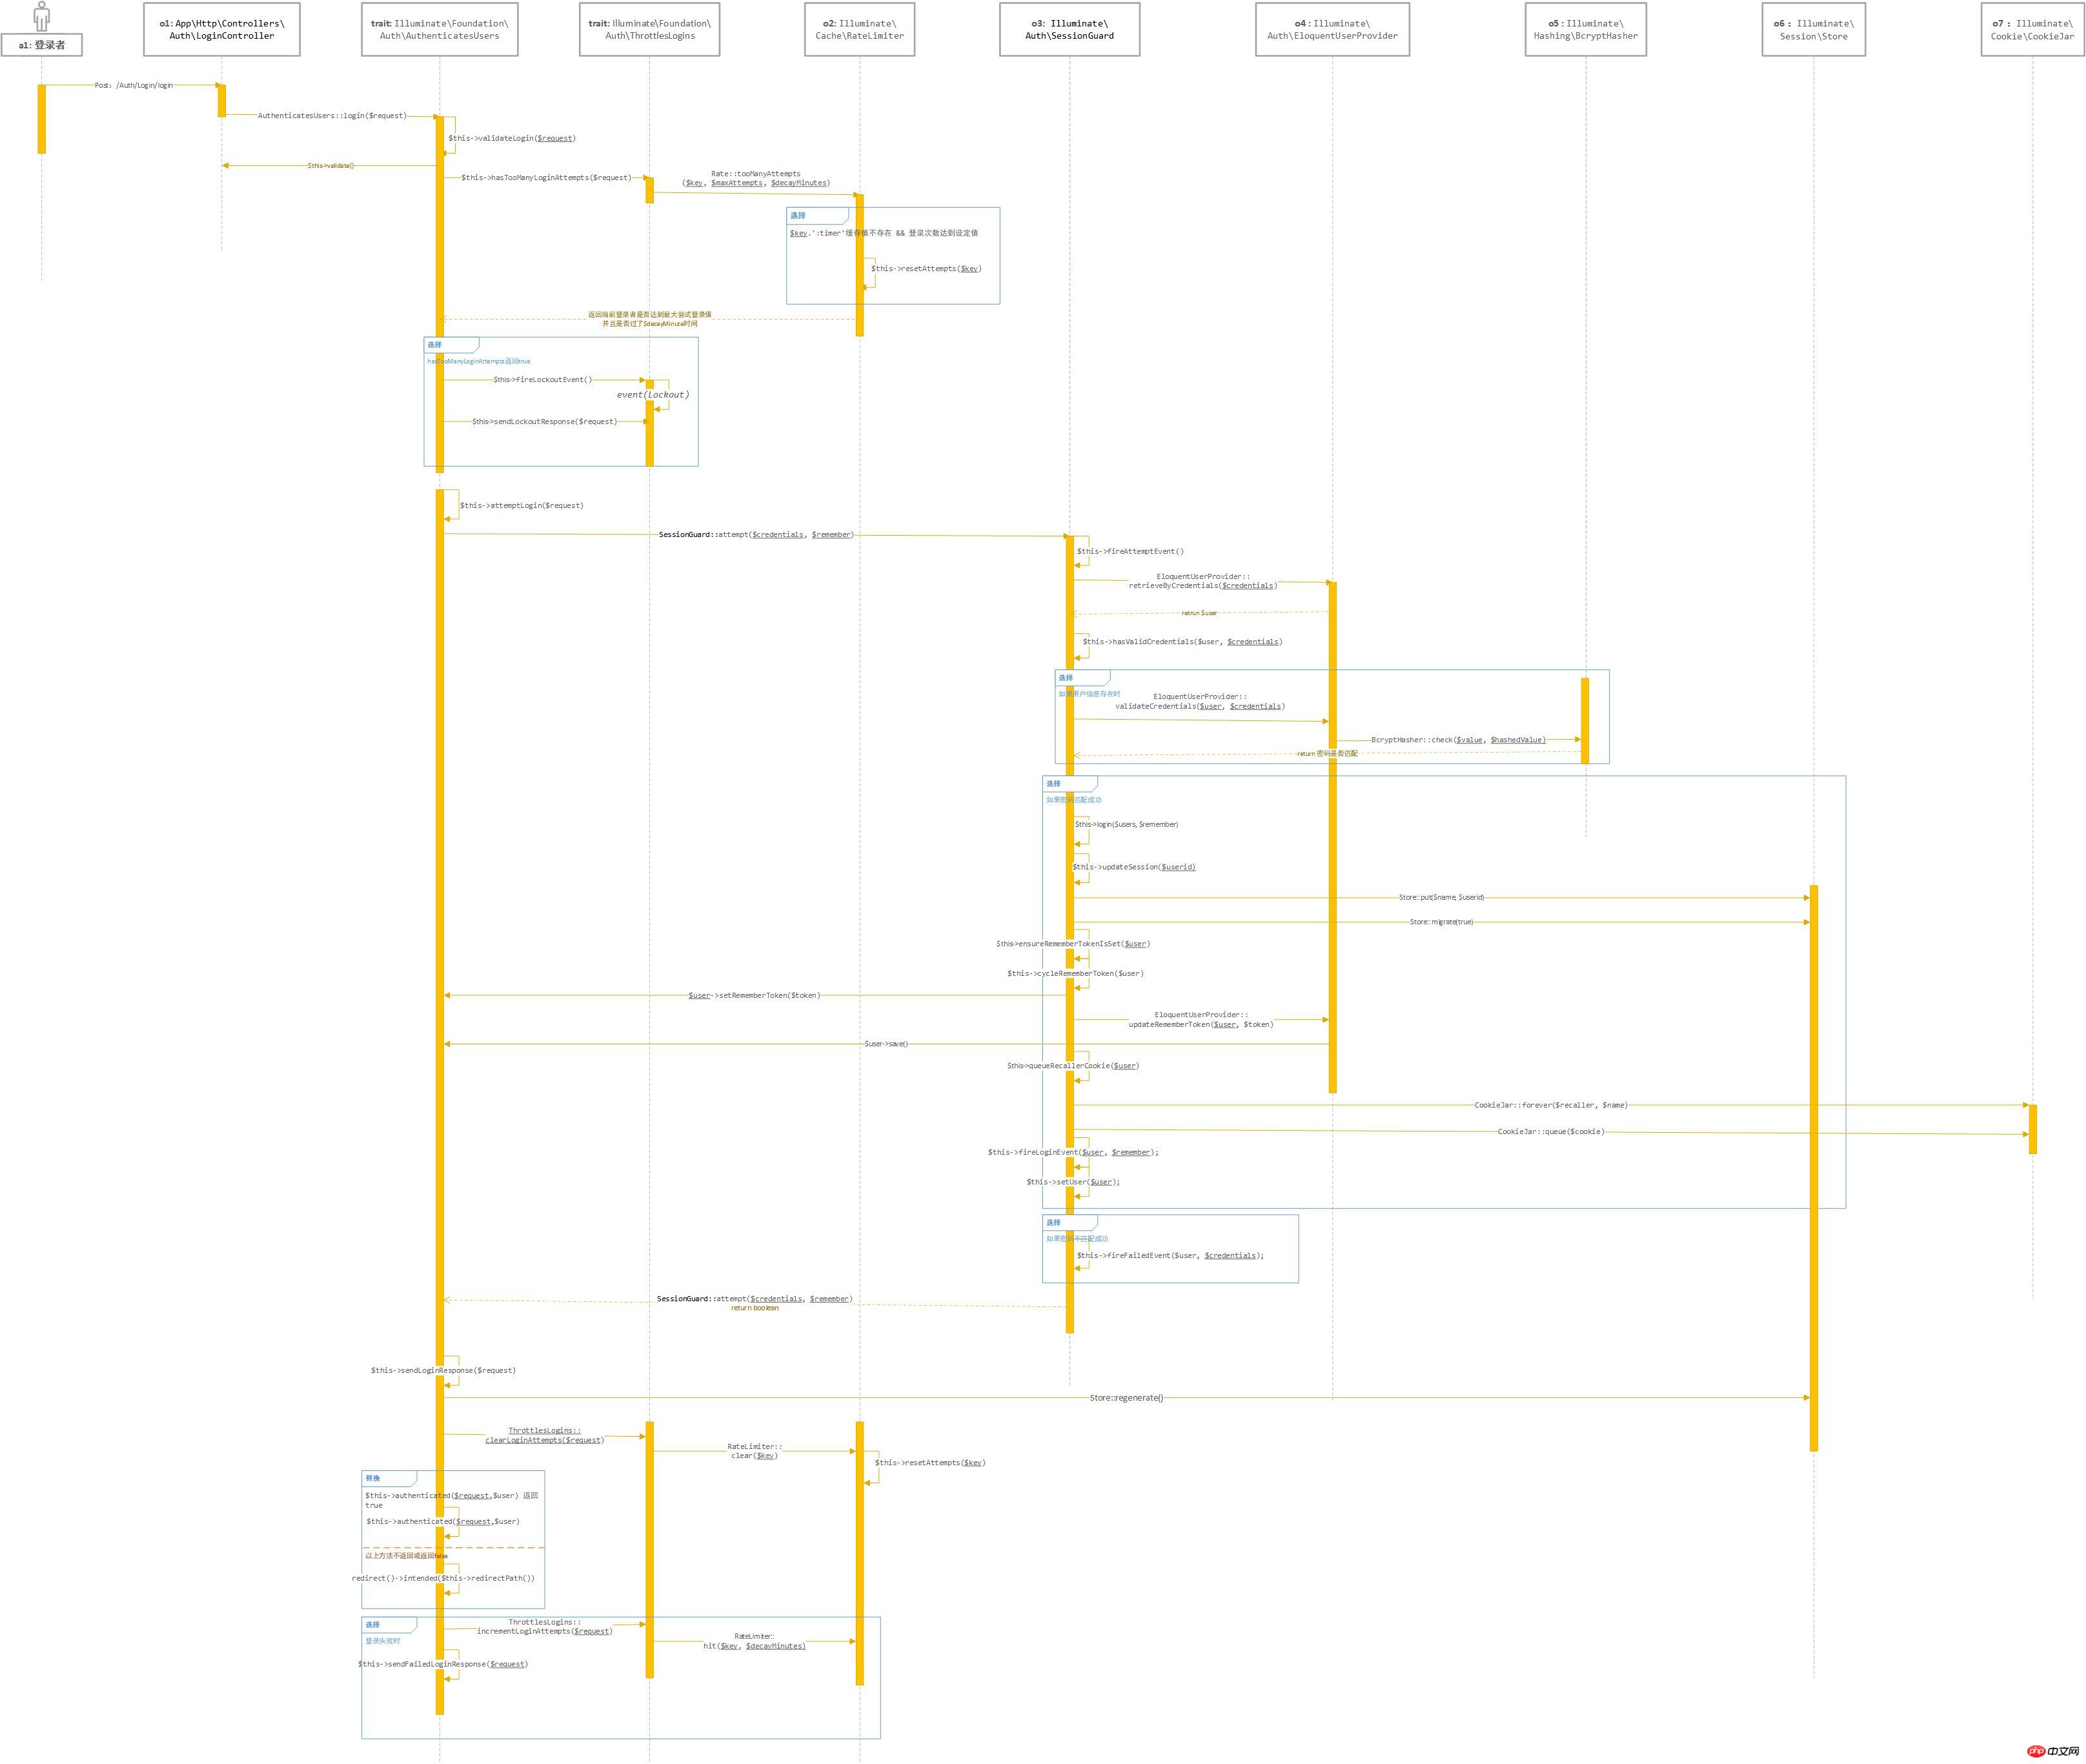
Finally, the timing diagram is attached. The drawing is average. Some UML concepts are not well grasped. Sorry:
That’s all. The entire content of this article is hoped to be helpful to everyone's study. For more related content, please pay attention to the PHP Chinese website!
Related recommendations:
Introduction to Laravel’s Eloquent model
How to use Wamp to build a Php local development environment and HBuilder debugging
The above is the detailed content of Analysis of Laravel5 quick authentication logic flow. For more information, please follow other related articles on the PHP Chinese website!


![[Web front-end] Node.js quick start](https://img.php.cn/upload/course/000/000/067/662b5d34ba7c0227.png)


