

This article mainly introduces the method of building database and table-configuration file-error log in PHP. It has certain reference value. Now I share it with you. Friends in need can refer to it.
Mainly:
Organization framework
Build database and table
Configuration file class
Error logging
--------------本篇后文件结构:--------------------------------------
blog
├─App
│  ├─Model 模型目录
│  ├─View 视图目录
│  │  ├─Admin后台目录
│  │  └─Home前台目录
│  ├─Common 配置目录
│  │  └─config.php  配置文件
│  ├─Log 日志目录
│  │  └─log.txt  日志文件
│  ├─Controller 控制器
│  │  ├─Admin后台
│  │  │  └─DemoController.class.php 测试控制器
│  │  └─Home前台
├─Public   静态公共文件(js,css,images)
│  ├─Plugins 插件
│  ├─Back后台
│  └─Home前台
├─Frame 公共使用的类
│   ├─BaseModel.class.php 数据库连接类
│   ├─BaseController.class.php 控制器公共操作(设置编码,信息跳转)
│   ├─FactoryModel.class.php  模型工厂类
│   ├─Log.class.php  日志厂类
│   ├─Config.class.php  配置文件读取类
│   ├─Init.class.php  初始化应用类
│   └─MySQLDB.class.php 数据库操作工具类
└─index.php  入口文件
-----------------------------------------------------------------------------------------------------
Using the mvc framework structure built in the previous article, we officially started developing the blog project. First create a data table, then start to build the backend, display the data on the frontend, and complete the display of the main modules of the blog.
Download and view the source code of the project: https://gitee.com/NewbiesYang/young_blog
1) The framework structure was built earlier, using the user login test page and the background home page. Remove them all here and start from scratch to build the front and backend pages. Similar to when we download a ThinkPHP or Laravel or other framework. Now let’s build our project on this micro-framework
2) For actual development, we will use static pages prepared by front-end personnel for development. Therefore, you can also download background templates and front-end blog static pages from [Template Home] or other websites. Then focus on backend development to speed things up. This project is for study and research, so there is no need to worry.
     原本是准备全部利用别人写好的前端页面(包括前端显示和后台页面),专注于后端逻辑的开发。而且已经把分类页面列表都做好了。还提交传送了。

     此刻,仔细想想,要是这样玩,那我直接用框架更好了。既然做后端开发,自己写个后端页面+程序处理,没什么问题吧..., 置于前端显示页面,那再用前辈写的前端页面倒是可以的

于是乎,卷起柚子,说干就干,先来整理框架,开始搭建博客。。。。。--------------清理后MVC框架文件结构:-------------------------------------- blog ├─App │ ├─Model 模型目录 │ ├─View 视图目录 │ │ ├─Back后台 │ │ └─Home前台 │ ├─Controller 控制器目录 │ │ ├─Back后台 │ │ └─Home前台 ├─Public 静态公共文件(js,css,images) │ ├─Plugins 插件 │ ├─Back后台 │ └─Home前台 ├─Frame 公共使用的类 │ ├─BaseModel.class.php 数据库连接类 │ ├─BaseController.class.php 控制器公共操作(设置编码,信息跳转) │ ├─FactoryModel.class.php 模型工厂类 │ ├─Init.class.php 初始化应用类 │ └─MySQLDB.class.php 数据库操作工具类 └─index.php 入口文件 -----------------------------------------------------------------
Subsequent development only needs to copy the directory structure file and can be carried out on this basis. developed.
Submit transmission code
git add -A
git commit -m "清理MVC结构"git push origin master
1) layui plug-in: Build the background program and prepare to use the layui front-end framework. I personally think this framework is the best The backend interface is pretty good. It also contains some comparison usage modules.
You can also use bootstrap, I prefer to use it for the front page.
Download URL: http://www.layui.com/
2) jQuery library: It is more convenient to operate DOM, especially when ajax requests are often used.
3) Other plug-ins: such as Ueditor editor, etc. Download them when you need to use them. Generally, plug-ins will have demo examples. If you follow the examples and manuals, you can basically use them if you understand web development.
It doesn’t matter if you are not familiar with the above plug-ins. There is a manual on the official website. If you need any modules, just check the manual and use it, just like building blocks. If you want to do better, of course you need to spend more time and practice more. . I intend it to be used by program administrators in the background, and it doesn’t have to be very beautiful, just practical.
Preparation: Create a branch
$ git checkout master
$ git checkout -b "start-admin-module"
Based on the blog template, start from the homepage Analysis: Analyze which dynamic data is needed in order to establish corresponding data tables.
User: Login, Register, Modify, Delete
Posts: Category management, blog post management, comment management
Role management: Administrator, ordinary user
Menu management: Personnel with different permissions have different corresponding menu bars
Table creation tools can be selected at will. In the initial stage, you write the table creation statements manually, and then use the tools directly after you become familiar with them. In this project, Navicat is used to create database and tables
1) Create database: php_blog
create database php_blog charset utf8
2) User table: y_users
CREATE TABLE `y_user` (
  `id` int(10) unsigned NOT NULL AUTO_INCREMENT COMMENT '用户主键',
  `username` varchar(20) NOT NULL COMMENT '用户名',
  `password` char(32) NOT NULL COMMENT '密码',
  `email` varchar(50) NOT NULL DEFAULT '' COMMENT '注册邮箱',
  `token_email` varchar(32) NOT NULL DEFAULT '' COMMENT '邮箱验证',
  `status` tinyint(1) unsigned NOT NULL DEFAULT '0' COMMENT '状态, 0-正常,1-禁用',
  `gid` tinyint(1) unsigned NOT NULL DEFAULT '0' COMMENT '角色id,1-管理员,2-普通用户,0-无效',
  `login_ip` varchar(20) NOT NULL DEFAULT '' COMMENT '最后登录的ip地址',
  `login_times` smallint(6) unsigned NOT NULL DEFAULT '0' COMMENT '登录次数',
  `created_at` int(10) unsigned NOT NULL DEFAULT '0' COMMENT '注册时间',
  `updated_at` int(10) unsigned NOT NULL DEFAULT '0' COMMENT '最后一次登录时间',  PRIMARY KEY (`id`),  UNIQUE KEY `username` (`username`),  UNIQUE KEY `email` (`email`)
) ENGINE=MyISAM AUTO_INCREMENT=6 DEFAULT CHARSET=utf8 COMMENT='用户表';
User table SQL
3) Role table: y_user_group
CREATE TABLE `y_user_group` (
  `id` int(10) unsigned NOT NULL AUTO_INCREMENT COMMENT '角色id',
  `name` varchar(20) NOT NULL DEFAULT '' COMMENT '角色名称',
  `auths` varchar(255) NOT NULL DEFAULT '' COMMENT '角色权限',  PRIMARY KEY (`id`)
) ENGINE=MyISAM DEFAULT CHARSET=utf8mb4 COMMENT='角色表';
Role table SQL
4 ) Menu table: y_menus
CREATE TABLE `y_menus` (
  `id` int(10) unsigned NOT NULL AUTO_INCREMENT COMMENT '菜单id',
  `title` varchar(20) DEFAULT '' COMMENT '菜单名称',
  `controller` varchar(30) DEFAULT '' COMMENT '控制器名称',
  `action` varchar(30) DEFAULT '' COMMENT '操作名称',
  `status` tinyint(1) unsigned DEFAULT '1' COMMENT '状态,1-正常,0-禁用',
  `is_hidden` tinyint(1) unsigned DEFAULT '0' COMMENT '是否隐藏,0-正常显示,1-隐藏',
  `sort` int(10) unsigned DEFAULT '0' COMMENT '排序',
  `pid` int(10) unsigned DEFAULT '0' COMMENT '上一级菜单',  PRIMARY KEY (`id`)
) ENGINE=MyISAM DEFAULT CHARSET=utf8mb4 COMMENT='菜单表';
Menu table SQL
5) Article table y_article
CREATE TABLE `y_article` (
  `id` int(10) unsigned NOT NULL AUTO_INCREMENT COMMENT '文章id',
  `title` varchar(60) NOT NULL DEFAULT '' COMMENT '标题',
  `description` varchar(200) NOT NULL DEFAULT '' COMMENT '文章简介',
  `content` text NOT NULL COMMENT '内容',
  `cid` int(10) unsigned NOT NULL COMMENT '文章类别',
  `pic` varchar(150) NOT NULL DEFAULT '' COMMENT '文章封面图',
  `pic_watermark` varchar(150) NOT NULL DEFAULT '' COMMENT '水印图',
  `pic_thumb` varchar(150) NOT NULL DEFAULT '' COMMENT '缩略图',
  `uid` int(10) unsigned NOT NULL COMMENT '作者',
  `clicks` int(10) unsigned NOT NULL DEFAULT '0' COMMENT '阅读数(点击数)',
  `updated_at` int(10) unsigned NOT NULL DEFAULT '0' COMMENT '更新时间',
  `created_at` int(11) NOT NULL DEFAULT '0' COMMENT '发布时间',  PRIMARY KEY (`id`),  KEY `title` (`title`),  KEY `uid` (`uid`),  KEY `clicks` (`clicks`),  KEY `cid` (`cid`) USING BTREE
) ENGINE=MyISAM AUTO_INCREMENT=4 DEFAULT CHARSET=utf8 COMMENT='文章表';
Article table SQL
6) Article category table y_category
CREATE TABLE `y_category` (
  `id` int(10) unsigned NOT NULL AUTO_INCREMENT COMMENT '分类id',
  `catename` varchar(15) NOT NULL COMMENT '分类名',
  `description` varchar(255) NOT NULL DEFAULT '' COMMENT '简介',  PRIMARY KEY (`id`)
) ENGINE=MyISAM AUTO_INCREMENT=15 DEFAULT CHARSET=utf8 COMMENT='文章类别表';
Article category table SQL
7) Comment (reply) table y_comment
CREATE TABLE `y_comment` (
  `id` int(10) unsigned NOT NULL AUTO_INCREMENT COMMENT '评论id',
  `uid` int(10) unsigned NOT NULL COMMENT '评论者',
  `created_at` int(11) DEFAULT NULL COMMENT '评论时间',
  `content` varchar(255) NOT NULL DEFAULT '' COMMENT '评论内容',
  `aid` int(10) unsigned NOT NULL COMMENT '被评论的文章',  PRIMARY KEY (`id`)
) ENGINE=MyISAM DEFAULT CHARSET=utf8 COMMENT='评论(回复)表';
Comment (reply) table SQL
8) Session data table y_session (In fact, this is not needed, the purpose is to operate "write session to the database")
CREATE TABLE `y_session` (
  `sess_id` varchar(50) NOT NULL DEFAULT '' COMMENT 'session id',
  `data` text NOT NULL COMMENT 'session数据',
  `created_at` int(11) NOT NULL COMMENT 'session创建时间',  PRIMARY KEY (`sess_id`)
) ENGINE=MyISAM DEFAULT CHARSET=utf8 COMMENT='session数据表';
Session data table SQL
In order to avoid making it too complicated, these data tables are temporarily created, and the fields can be adjusted later. If you need to add module functions, you can add the corresponding data table accordingly.
Modify the array information of the data connection in badeModel [Frame/BaseModel.class.php] (If you use the configuration file class, you can omit it here )
 1 class BaseModel {
 2     。。。
 3     。。。
 4     。。。
 5     function __construct(array $config=null)
 6     {
 7         $conf = array(
 8             'host'=>'localhost',
 9             'user'=>'root',
 10             'pwd'=>'root',
 11             'port'=>'3306',
 12             'charset'=>'utf8',
 13             'dbname'=>'php_blog',
 14         );
 15         $conf = empty($config)? $conf : array_merge($conf,$config);
 16         $this->db = Db::getDb($conf);
 17     }
18 }设置连接数据库信息
为了框架便于数据库连接以及方便读取配置文件。如 希望在 App/Common/config.php 做一些配置项,要求能读取这些配置并应用到项目
step 1:  创建文件  App/Common/config.php  并将数据库连接信息写入该配置文件

step 2:  在Frame/目录下创建读取配置文件类 Config.class.php

step 3: 设置自动加载 读取配置类

step 4: 基础模型类实例化 读取配置类。 操作数据库必须要经过基础模型类

step 5:  调整数据库工具类获取配置信息,既 其构造方法中通过传递进来的数据配置信息对象获取

step 6: 测试连接数据结果,验证获取配置
实现连接数据库-读取数据库配置信息思路
1) 创建配置文件config.php 【App/Common/Config.php】
<?php/**
* 配置文件
* User: young */return [ //数据库连接配置
'host'=>'localhost',
'user'=>'root',
'pwd'=>'root',
'port'=>'3306',
'charset'=>'utf8',
'dbname'=>'php_blog',];配置文件-数据库配置信息
2) 创建读取配置文件类 【Frame/Config.class.php】
1 <?php
2 /**
3 * 配置文件读取类
4 * User: young
5 */
6
7 class Config
8 {
9 protected static $ins = null; //本类实例
10 protected $cfg = array(); //存储配置项
11
12 /**
13 * 获取本类实例
14 * @access public
15 * @return object 本类的单例对象
16 */
17 public static function getIns() {
18 if(false === (self::$ins instanceof self)){
19 self::$ins = new self();
20 }
21 return self::$ins;
22 }
23
24 /**
25 * 构造方法: 读取配置项
26 * @access public
27 * @return void
28 */
29 final protected function __construct() {
30 require APP.'Common'.DS.'config.php'; //读取配置项
31 $this->cfg = $cfg;
32 }
33
34 /**
35 * 根据指定的配置项,返回该配置项的值
36 * @param string $k 配置项
37 * @return mixed|null 返回配置项的数据
38 */
39 public function __get($k) {
40 if(!isset($this->cfg[$k])) {
41 return null;
42 }
43 return $this->cfg[$k];
44 }
45
46
47 /**
48 * 根据指定的配置项,返回配置项的值
49 * @param string $k 配置项名称
50 * @param string $v 配置项对应的值
51 */
52 public function __set($k,$v) {
53 $this->cfg[$k] = $v;
54 }
55 }3) 自动加载配置类
需要自动加载该类, 该类在Frame目录下, 所以可以写入到 Init.class.php 类中的属性数组中 【Frame/Init.class.php】
<?php
/**
* 初始化应用类
* User: young
*/
class Init
{
protected static $frame = array('BaseController','BaseModel','Db','FactoryModel','Config');
。。。
。。。
。。。
自动加载配置类4)基础模型类实例化配置类【Frame/BaseModel.class.php】
<?php
/**
 * BaseModel.class.php 基础模型类
 *     连接数据库
 *  @author young
 */
class BaseModel
{
    protected $db = null;
    /**
     * 构造方法: 实例化数据库类
     * @access public
     */
    function __construct()
    {
       $conf =  Config::getIns(); //读取配置项实例
        $this->db = Db::getDb($conf);
    }
}5)数据库读取配置项信息 【Frame/Db.class.php】
<?php
/**
 * Db.class.php 数据库操作工具类
 * @author young
 */
class Db {
。。。
。。。
。。。
    /**
     * 构造方法: 保存数据库连接信息,连接数据库
     * @access private
     * @param array $conf 数据库连接信息
     */
    private function __construct($conf)
    {
        $this->host = $conf->host;
        $this->user = $conf->user;
        $this->pwd = $conf->pwd;
        $this->port = $conf->port;
        $this->charset = $conf->charset;
        $this->dbname = $conf->dbname;
        $this->connect();
    }
。。。
。。。
。。。
}
数据库工具类获取配置信息6) 测试 在App/Controller/Home/DemoController.class.php 用于测试数据库连接情况
<?php
/**
 * 测试控制器类
 * User: young
 */

class DemoController extends BaseController
{
    public function test()
    {
        $db = new BaseModel();
        $data = $db->db->getAllRows("select * from y_user");
        var_dump($data);
    }
}测试控制器类测试连接数据库
注: 前提,需要将BaseModel.class.php中的$db属性先临时修改为public公开,才能测试成功 (原因:在Demo控制器中实例化的基础模型类,数据库操作实例是放在类的属性db中,外部不能访问protected属性), 本节所有测试,可以临时将db设置为公开的。

还可以使用配置如: 上传目录,网站配置信息等,根据需求自定义配置需求,再通过读取配置类读取配置的数据
提交代码
git add -A
git commit -m "完成读取配置文件类"
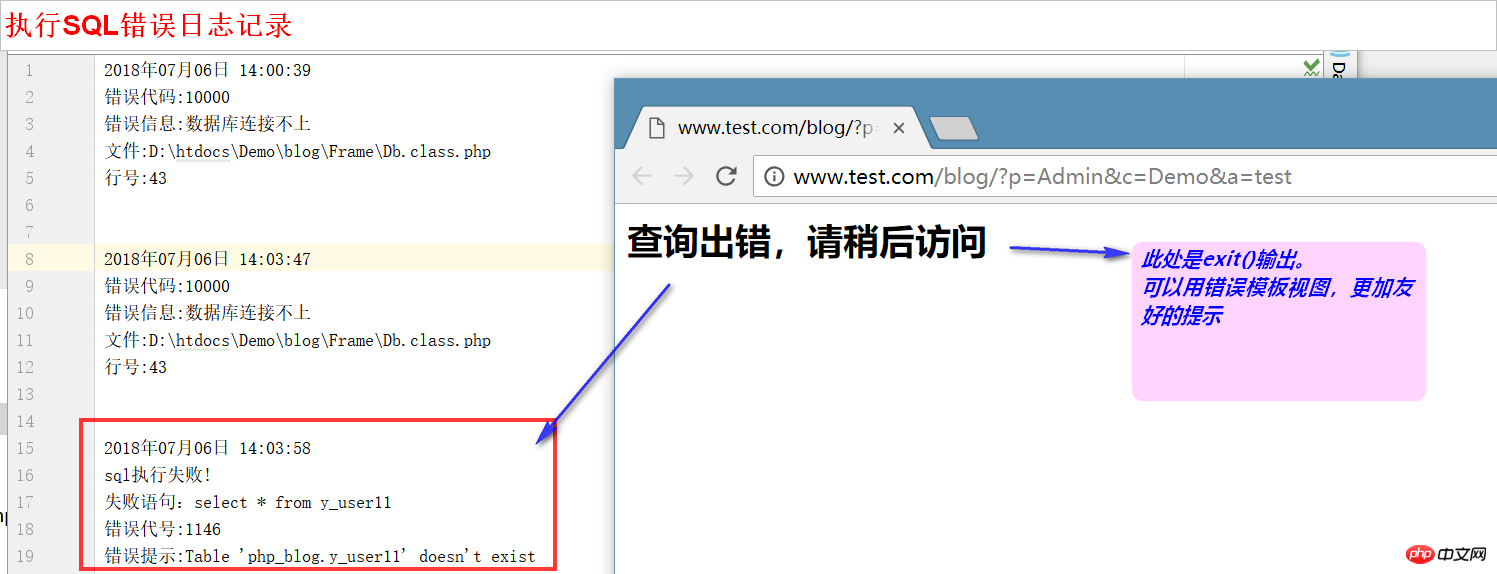
除了开发阶段调试错误, 项目上线一般会将错误信息写入指定文件中。安全性更好。
将错误写入日志文件中,这里暂时主要记录数据库操作的错误。 如:默认将错误记录在App/log/logError.txt。 如果在配置文件中进行了配置,则将日志信息写入到配置项log指定的目录中
step 1: 制作日志类Frame/Log.class.php, 用于将错误信息写入到指定文件中。  (设置日志文件位置,正好可以利用上面写的配置项,通过读取配置来实现)

step 2: 在基础模型类BaseModel中,读取配置项后, 可以将日志目录路径写入常量。 使用try..catch 捕捉异常,将错误写入日志

step 3: 实现日志类自动加载。Log类在Frame目录中,所以只要在初始化应用类Init中的属性$frame数组中加入 “Log”

step 4: 记录错误。 数据库连接可能失败, sql语句可能执行失败

step 5: 测试错误日志记录功
实现错误日志记录过程思路
代码实现
1) 制作错误日志类 【Frame/Log.class.php】
<?php
/**
 * Db.class.php 数据库操作工具类
 * @author young
 */
class Db {
。。。
。。。
。。。
    /**
     * 构造方法: 保存数据库连接信息,连接数据库
     * @access private
     * @param array $conf 数据库连接信息
     */
    private function __construct($conf)
    {
        $this->host = $conf->host;
        $this->user = $conf->user;
        $this->pwd = $conf->pwd;
        $this->port = $conf->port;
        $this->charset = $conf->charset;
        $this->dbname = $conf->dbname;
        $this->connect();
    }
。。。
。。。
。。。
}
数据库工具类获取配置信息 2) 读取日志位置,捕捉错误 【Frame/BaseModel.class.php】
发生错误记录后,这里只是简单使用exit(..)退出, 可以自定error错误页面会更好
<?php
/**
* BaseModel.class.php 基础模型类
* 连接数据库,捕捉记录错误
* @author young
*/
class BaseModel
{
Public $db = null;
/**
* 构造方法: 实例化数据库类
* @access public
*/
function __construct()
{
$conf = Config::getIns(); //读取配置项实例
//读取日志配置项目 并写成常量
$logPath = $conf->log;
$logPath = !isset($logPath) ? APP."log".DS : $logPath;
define('LOG',$logPath);
//监控数据库操作
try {
$this->db = Db::getDb($conf);
}catch(Exception $e) {
$err = '';
$err .= '错误代码:' . $e->getCode() . "\r\n";
$err .= '错误信息:' . $e->getMessage() . "\r\n";
$err .= '文件:' . $e->getFile() . "\r\n";
$err .= '行号:' . $e->getLine() . "\r\n\r\n";
Log::write($err);
exit("<h2>客官!页面暂时无法响应,请稍后访问</h2>");
}
}
}
点击查看【基础模型类中监测并记录错误】3)自动加载日志记录类 【Frame/Init.class.php】
<?php
/**
* 初始化应用类
* User: young
*/
class Init
{
protected static $frame = array('BaseController','BaseModel','Db','FactoryModel','Config','Log');
。。。
。。。
。。。
点击查看【自动加载日志类】4) 记录错误 【Frame/Db.class.php】
数据库连接可能发生错误处理
class Db
{
。。。
。。。
。。。
    /**
     * 连接数据库,设置编码,选库
     * @access private
     */
    private function connect()
    {
        $this->link = @ mysql_connect("{$this->host}:{$this->port}", "$this->user", "$this->pwd") ;
        if(!$this -> link) {
            $error = new Exception("数据库连接不上",10000);
            throw $error;
        }
        $this->setCharset($this->charset);
        $this->useDb($this->dbname);
    }
。。。
。。。
。。。
点击查看【数据库连接错误抛出】sql语句发生错误处理
class Db
{
。。。
。。。
。。。
    /**
     * 执行sql语句
     * @param  string $sql sql语句
     * @return mixed
     */
    private function query($sql)
    {
        $result = mysql_query($sql, $this->link);
//        if(false === $result) {
//            echo "<p>sql执行失败!<br>";
//            echo "<br>失败语句:".$sql;
//            echo "<br>错误代号".mysql_errno();
//            echo "<br>错误提示: ".mysql_error()."</p>";
//            exit();
//        }
        if(false === $result) {
            $err = "sql执行失败!\r\n失败语句:".$sql."\r\n错误代号:".mysql_errno()."\r\n错误提示:".mysql_error()."\r\n\r\n";
            Log::write($err);
            exit("<h2>查询出错,请稍后访问</h2>");
        }
        return $result;
    }
。。。
。。。
。。。
点击查看【执行SQL错误处理】可以在【App/Common/config.php】中配置日志文件目录。 如果不进行配置, 默认记录在App/log/目录中
<?php
/**
* 配置文件
* User: young
*/
return [
//数据库连接配置
。。。
、 。。。
。。。
//日志文件位置配置
'log' => APP,
];
点击查看【日志文件配置】 以下测试可以 开启配置项中的配置log 和关闭后分别测试。 注意: 如果没有做配置log, 则要首先在App目录下建立一个log目录
1. 在配置文件中故意写错数据库连接信息,如密码写错

2. 执行sql错误
最后说明: 配置目录,日志目录都是不希望浏览器直接访问的,所以需要将.htaccess文件放入目录中 (由于App目录中已经存在,故也可以省略)
提交传送代码
git add -A
git commit -m "完成日志类"git checkout master
git merge start-admin-module
git push origin master
小结: 本篇主要实现了 框架清理,博客数据库表搭建,创建配置读取类,日志记录类。
实际上,到此仍然只是更加完善了一下框架结构,增加了2个功能。正如前篇所提,还有很多是可以改进的。这里就暂时不再继续增加功能了。
1. 如何使用该自制框架搭建项目 ==> 用户操作+mvc实现
2. 如何着手使用ajax实现后台登录功能 ==> ajax应用
3. How to implement the classification module function, what operations does it have ==> Add, delete, modify and check
Next step: Backend template view production, backend login, article classification module function.
The above is the entire content of this article. I hope it will be helpful to everyone's study. For more related content, please pay attention to the PHP Chinese website!
Related recommendations:
php source code to implement the MVC structure micro-framework
Usage of PHP7.2 Data Structures
The above is the detailed content of PHP source code database building table-configuration file-error log method. For more information, please follow other related articles on the PHP Chinese website!
 How to implement jsp paging function
 The difference between php and js
 What does unsigned integer mean?
 Python re module usage
 How long does it take for Douyin recharge to arrive?
 The difference and connection between java and javascript
 Python crawler method to obtain data
 How Oracle creates a database


![[Web front-end] Node.js quick start](https://img.php.cn/upload/course/000/000/067/662b5d34ba7c0227.png)


