ps mask cutout
The material picture does not look complicated, but it is difficult to retain all the hair details, colors, etc. using a single cutout method. The author here used to adjust the edges to quickly cut out the subject, used the extraction filter to retain the details of the hair, and then used the channel to restore the color. The final effect was perfect. Final effect

Original image

1. Open the image , ctrl+j to copy a layer to get layer 1, click on the red circle to create a new layer 2, place it between layer 1 and the background layer, fill it with the color you like as a check effect and a new background layer.
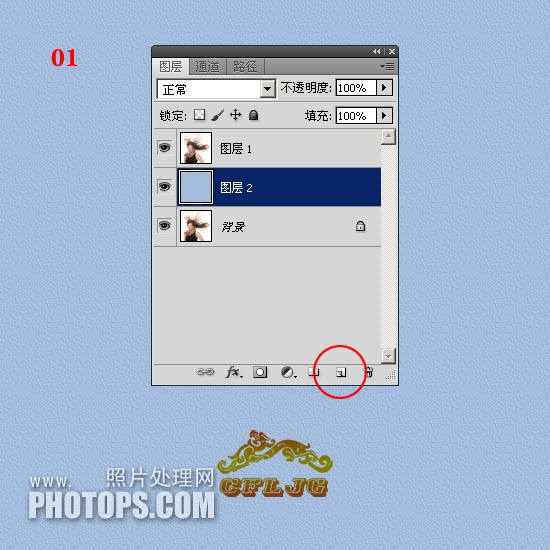
2. Click on layer 1 and use the "Quick Selection Tool" to roughly make a selection. After the selection is made, the "Adjust Edges" option will be activated.
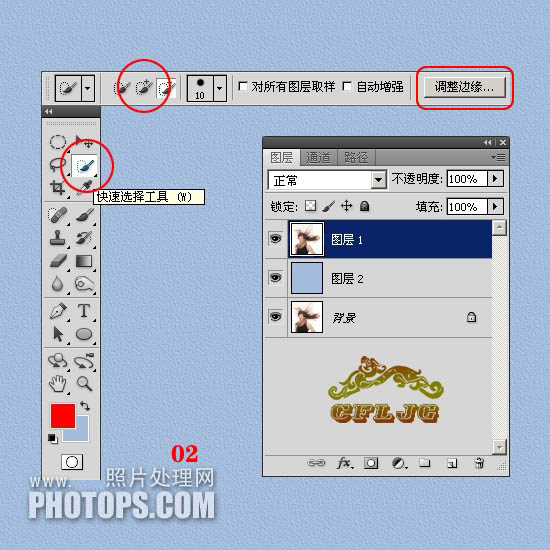
3. An ant line appears in the constituency.
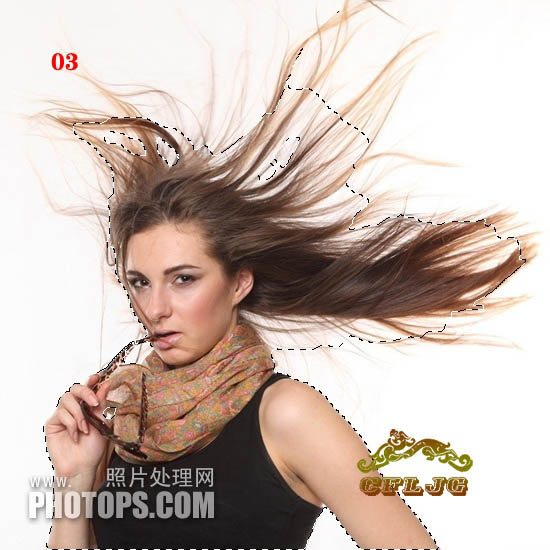
4. Click the Adjust Edge option to bring up the Adjust Edge dialog box. For the time being, refer to the settings of the icons for each parameter. Use the Adjust Radius tool to adjust the character's shape. Paint edges.
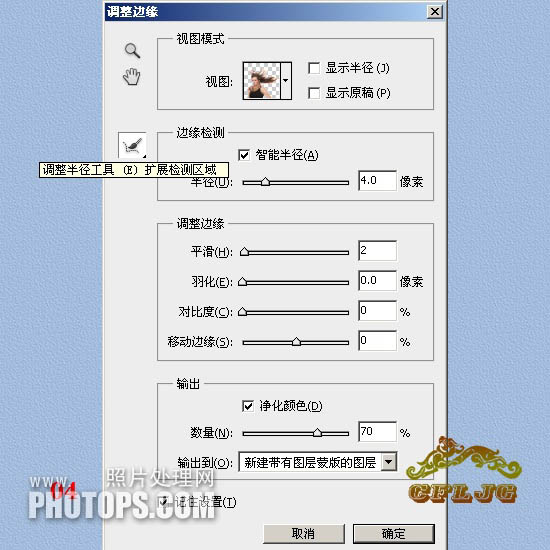
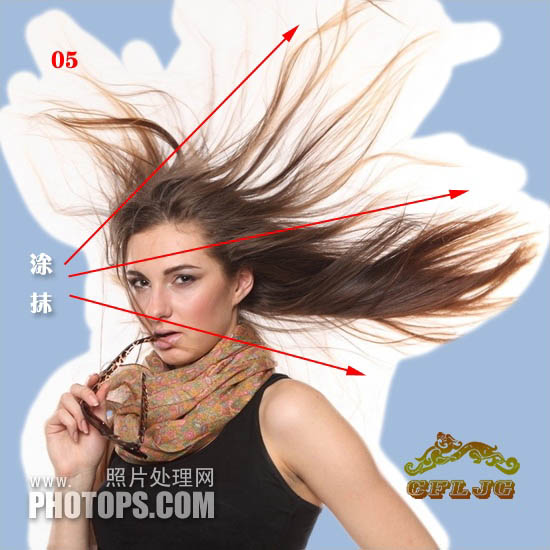
5. When applying, try to coat all the hair. If you find that there is something left that has not been coated, you can re-apply the missed areas. once, until all hair is shown. If you find that the original background color is still left between the hair strands, just apply it where it is and it will be resolved. Click OK when you are satisfied.
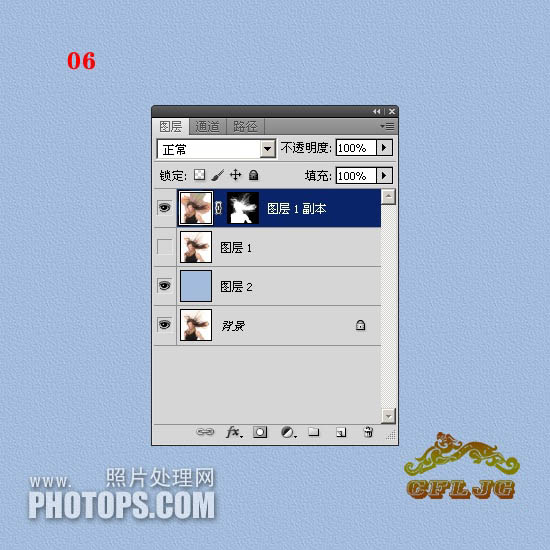
6. After confirmation, create a new copy of layer 1 with a layer mask.
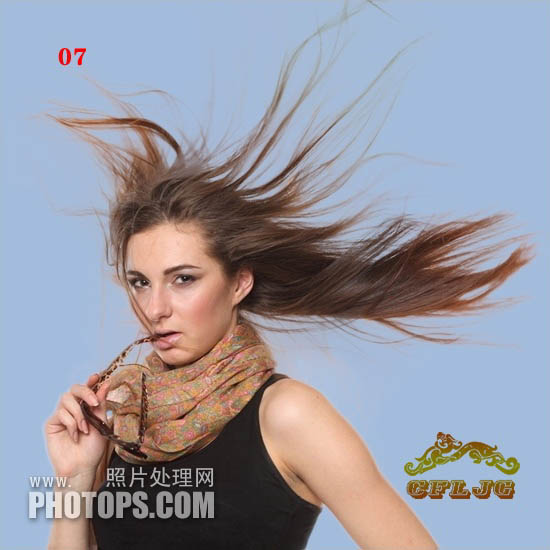
7. At this time, the distribution cutout is basically completed. This is the real "mask cutout", which is a new addition to the photoshop upgrade. Function, it is fast to cut out pictures, and the original color of the edge hair is basically retained. It is an excellent tool. However, we also see that a lot of scattered details are lost, so the edge mask cutout method is not a panacea, so don’t regard it as magical.
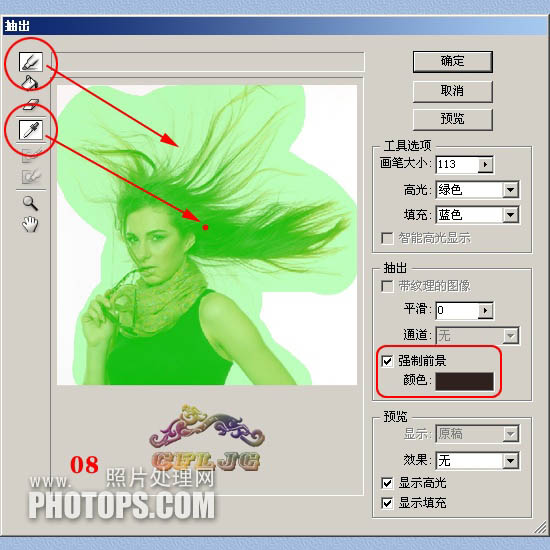
 8. What to do with the lost details? This requires an old tool, a tool abandoned by the new version of PS, to extract the filter to retrieve the lost details. Click on layer 1, turn off the small eyes of the copy layer of layer 1, execute filter in layer 1--extract--check the force foreground--take the eyedropper at the darkest red point of the hair in the picture Color - Use the highlighter tool to apply green as shown - OK.
9. Extract the details of the hair. Note that you must enlarge the picture after extracting it, and use an eraser or layer mask to remove the excess. Clean up the edge noise to keep the picture clear.
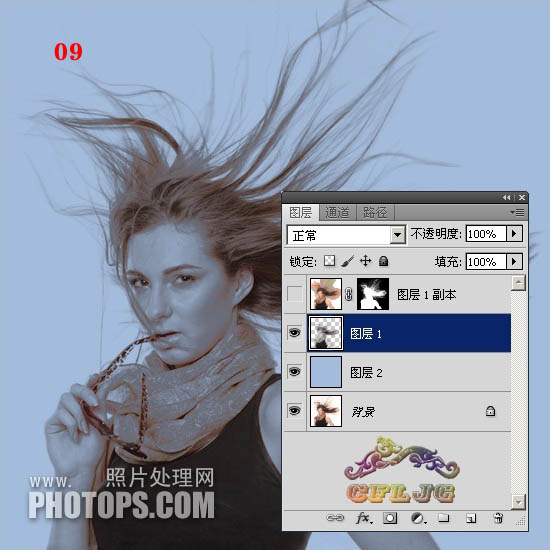
10. Compare and see if there is any obvious loss of details and whether they have been filled in.
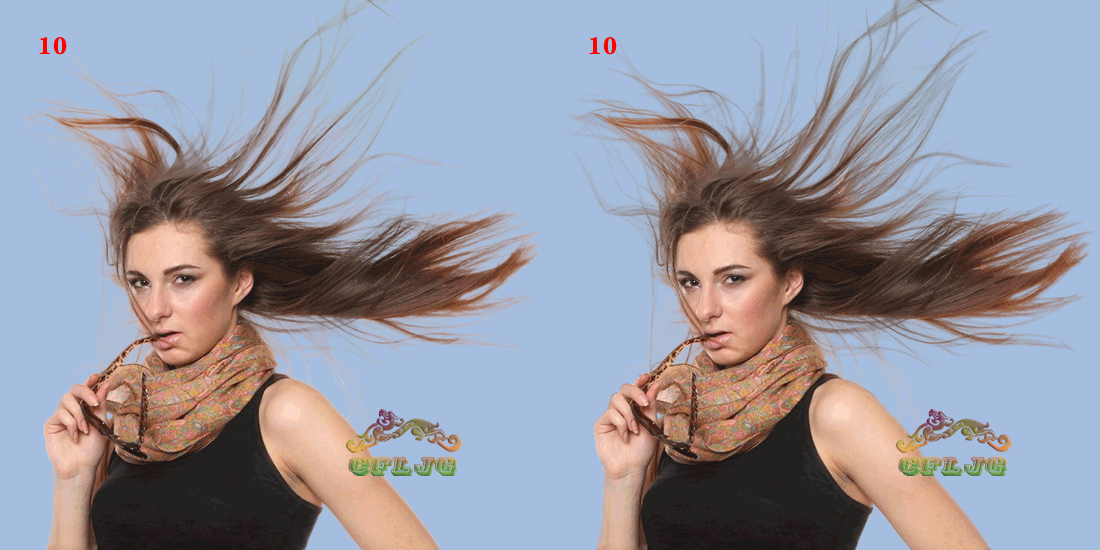
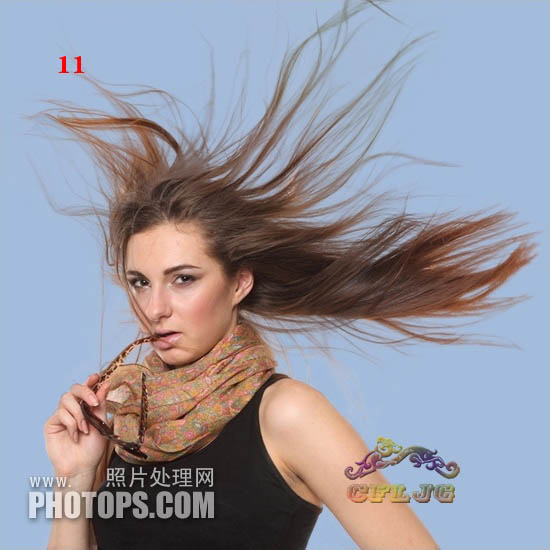
11. The details have been recovered. This is the indelible contribution of taking out the filter. However, new problems have appeared again, and the color of the hair has also been lost. Okay, what should I do? Don't worry, we'll figure it out later.
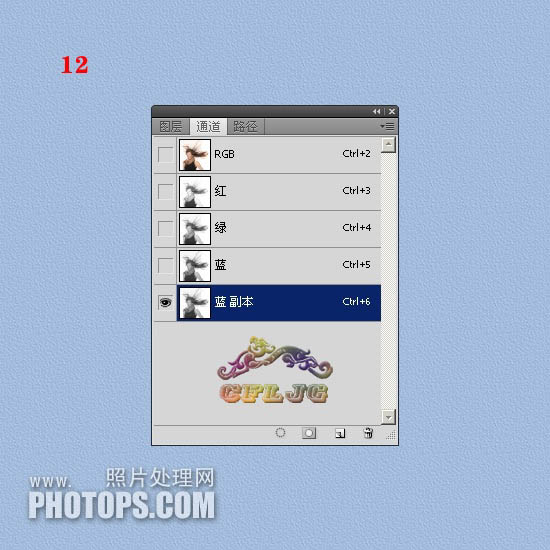
12. Click on the background layer, turn off the small eyes in front of the copy layer of layer 1, layer 2 and layer 1, and enter the channel , copy the blue channel to get a blue copy, because the blue channel has the richest details.
13. Execute Image--Adjustment--Levels in the blue copy, and set the parameters as shown in the figure.
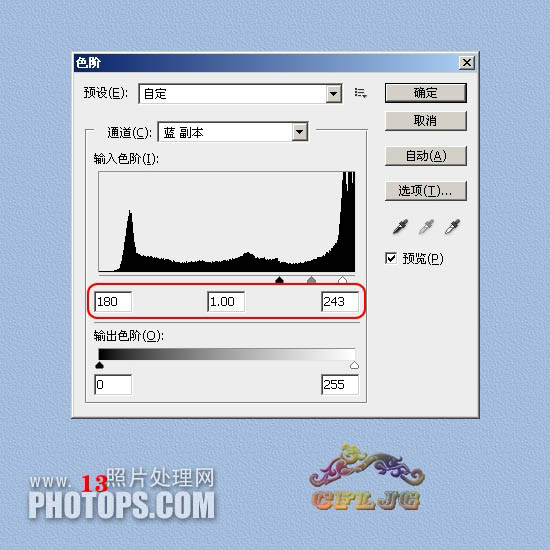
14. We can see that there are still variegated colors on the edge of the hair. Use a white paintbrush to clean it up. There is still white in the main body of the character. Paint solid with black paintbrush.
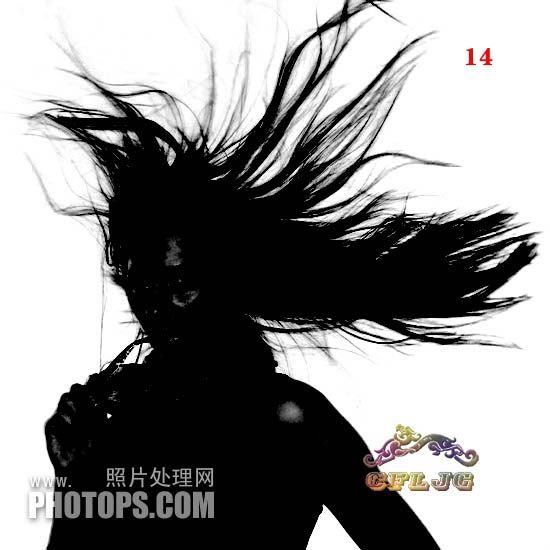
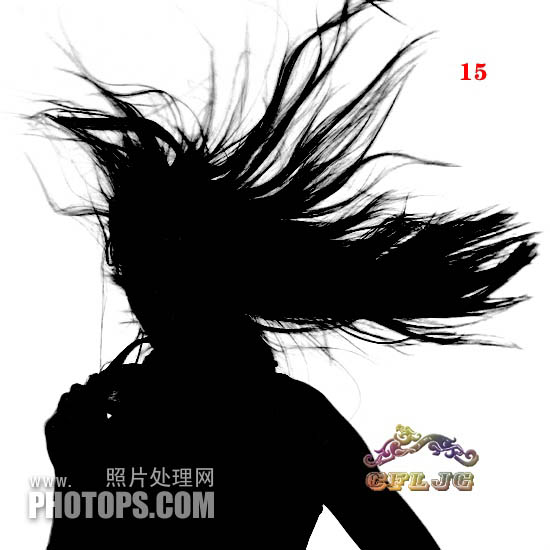
#15. After being painted and modified with a black and white brush, the result is like this.
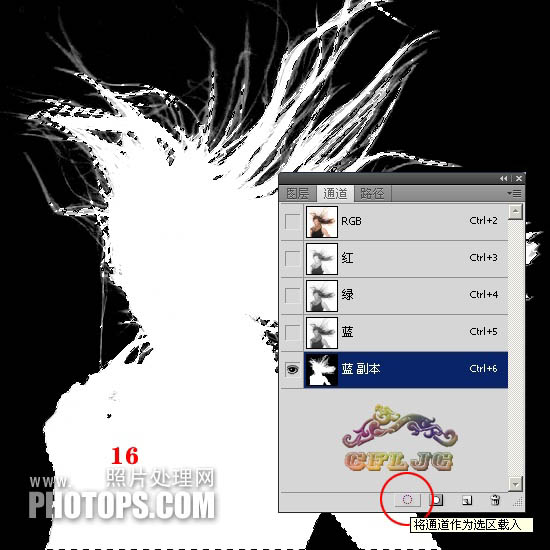
16. We use channels to make selections and extract the parts we want through the channels. The white color in the channels represents what we want to extract. For parts, black represents the part to be discarded, and gray represents the extracted translucent part. In other words, make the part you want white, the unwanted part black, and the translucent part gray. Use ctrl+i to invert, click on the red circle to make a selection, and an ant line will appear.
17. Click on the RGB channel, return to the background layer, ctrl+j to copy, and put layer 3 on the top level.
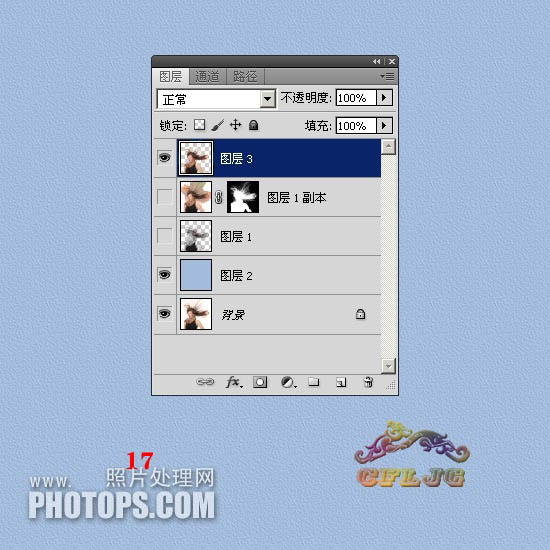
18. This is the channel cutout, and the cutout picture is like this.

19. Set the blending mode of layer 3 to color and turn on the small eyes of all layers.
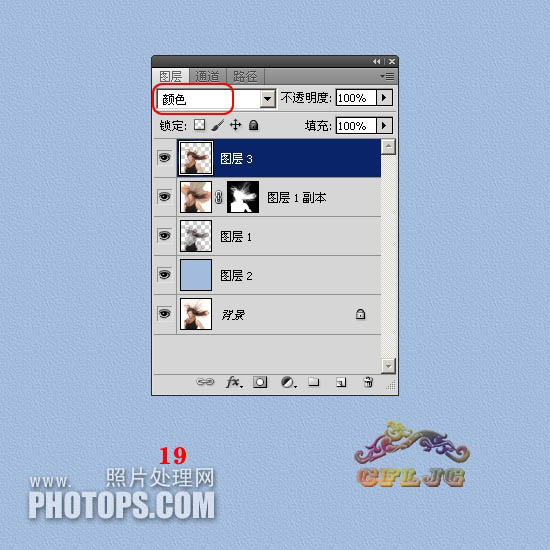
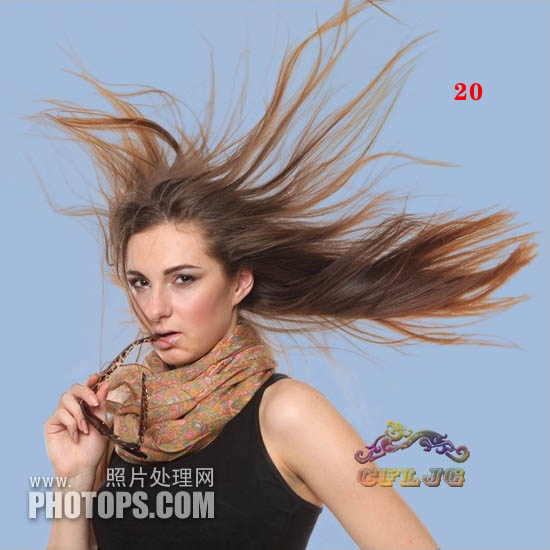
Twenty, wow! The lost color was found.
Twenty-one, ctrl+shift+alt+e stamp the layer to get layer 4, and do appropriate sharpening on layer 4 Add texture.
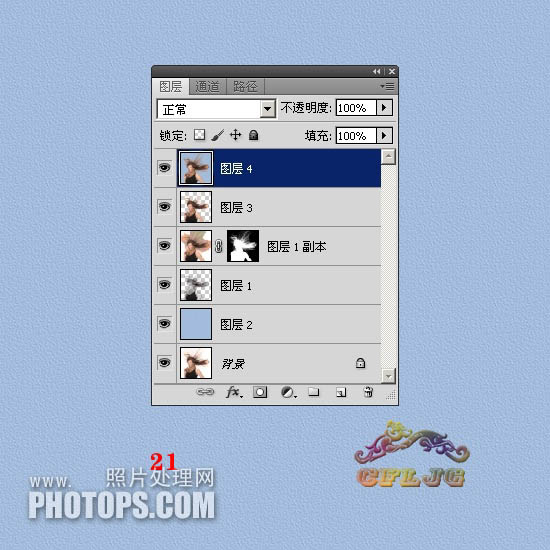
Final effect:

Please pay attention to more articles related to PS mask cutout PHP Chinese website!

Hot AI Tools

Undresser.AI Undress
AI-powered app for creating realistic nude photos

AI Clothes Remover
Online AI tool for removing clothes from photos.

Undress AI Tool
Undress images for free

Clothoff.io
AI clothes remover

Video Face Swap
Swap faces in any video effortlessly with our completely free AI face swap tool!

Hot Article

Hot Tools

Notepad++7.3.1
Easy-to-use and free code editor

SublimeText3 Chinese version
Chinese version, very easy to use

Zend Studio 13.0.1
Powerful PHP integrated development environment

Dreamweaver CS6
Visual web development tools

SublimeText3 Mac version
God-level code editing software (SublimeText3)

Hot Topics
 1672
1672
 14
14
 1428
1428
 52
52
 1333
1333
 25
25
 1277
1277
 29
29
 1257
1257
 24
24
 Advanced Photoshop Tutorial: Master Retouching & Compositing
Apr 17, 2025 am 12:10 AM
Photoshop's advanced photo editing and synthesis technologies include: 1. Use layers, masks and adjustment layers for basic operations; 2. Use image pixel values to achieve photo editing effects; 3. Use multiple layers and masks for complex synthesis; 4. Use "liquefaction" tools to adjust facial features; 5. Use "frequency separation" technology to perform delicate photo editing, these technologies can improve image processing level and achieve professional-level effects.
 Photoshop's Key Features: A Deep Dive
Apr 19, 2025 am 12:08 AM
Key features of Photoshop include layers and masks, adjustment tools, filters and effects. 1. Layers and masks allow independent editing of image parts. 2. Adjust tools such as brightness/contrast can modify image tone and brightness. 3. Filters and effects can quickly add visual effects. Mastering these features can help creative professionals achieve their creative vision.
 Using Photoshop: Creative Possibilities and Practical Uses
Apr 22, 2025 am 12:09 AM
Photoshop is very practical and creative in practical applications. 1) It provides basic editing, repairing and synthesis functions, suitable for beginners and professionals. 2) Advanced features such as content recognition fill and layer style can improve image effects. 3) Mastering shortcut keys and optimizing layer structure can improve work efficiency.
 Photoshop and Digital Art: Painting, Illustration, and Compositing
Apr 18, 2025 am 12:01 AM
Photoshop's applications in digital art include painting, illustration and image synthesis. 1) Painting: Using brushes, pencils and mixing tools, the artist can create realistic effects. 2) Illustration: With vector and shape tools, artists can accurately draw complex graphics and add effects. 3) Synthesis: Using mask and layer blending mode, artists can seamlessly blend different image elements.
 Using Photoshop for Graphic Design: Branding and More
Apr 16, 2025 am 12:02 AM
The steps to using Photoshop for brand design include: 1. Use the Pen tool to draw basic shapes, 2. Add shadows and highlights through layer styles, 3. Adjust colors and details, 4. Use smart objects and actions to automatically generate different versions of the design. Photoshop helps designers create and optimize brand elements with the flexibility of layers and masks, ensuring consistency and professionalism of designs, from simple logos to complex branding guides.
 Photoshop for Photographers: Enhancing and Retouching Images
Apr 25, 2025 am 12:01 AM
Enhance and retouching photos in Photoshop can be achieved by adjusting brightness and contrast, using the Repair Brush Tool. 1) Adjust brightness and contrast: Increase brightness and contrast to improve underexposed photos through the Image->Adjustments->Brightness/Contrast menu. 2) Use the Repair Brush Tool: Select HealingBrushTool in the toolbar and apply to remove miscellaneous points or scars in the image.
 What Photoshop Does Best: Common Tasks and Projects
Apr 23, 2025 am 12:06 AM
Photoshop is specialized in image editing, layering and masking, digital painting and a variety of design applications. 1) Image editing and repair: remove defects and adjust color and brightness. 2) Layers and masks: non-destructive editing and creation. 3) Digital paintings and illustrations: create art works. 4) Practical applications: graphic design, web design and digital art creation.
 Photoshop's Subscription Model: What You Get for Your Money
Apr 15, 2025 am 12:17 AM
Photoshop's subscription model is worth buying. 1) Users can access the latest version and use across devices at any time. 2) The subscription fee is low, and continuous updates and technical support are provided. 3) Advanced functions such as neural filters can be used for complex image processing. Despite the high long-term costs, its convenience and feature updates are valuable to professional users.


