 Web Front-end
 PS Tutorial
 PhotoShop algorithm principle analysis series - pixelation - fragmentation
PhotoShop algorithm principle analysis series - pixelation - fragmentation
Continuing with the popularity of the previous article, let’s continue talking about some slightly simpler algorithms.
This article will talk about the fragmentation algorithm. Let’s post a few renderings first:


This is a destructive filter. The reason for using beautiful women is that 90% of the people who create images are men, perverted men.
Regarding the principle of the fragment filter, the information available on the Internet is: Create four copies of the image that are offset from each other, producing an effect similar to ghosting.
With the above sentence, we can start.
Analysis: Through the comparison of the above images, especially the eyes, it can be seen that the processed image should look like a single eye has become 4 eyes. Therefore, the network The statement above is reliable.
So where is the center of the offset and what is the number of offsets? In which directions are the 4 offsets offsets? These questions are also very simple. You can Then PS for verification:
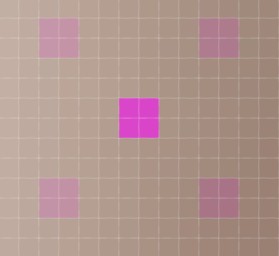
The specific steps are as follows: Open an image and fill a 2*2 pixel red area in the place where the color of the image is relatively monotonous (such as the arm of the above-mentioned beauty). , then copy the layer, apply a fragment filter to the copied layer, and adjust the layer transparency to 50%. You can get the following image by partially zooming in:
 ## With such an effect, you can easily draw the conclusion:
The center of the offset is centered on each pixel, and the four offsets are symmetrical about the center, with a slope of 45 Degrees are evenly arranged in a circle, with horizontal and vertical offsets of 45 degrees each, and an offset of 4 pixels.
Then the question of how to superimpose can be guessed, it is to take the average of the accumulated values after four offsets.
Based on this idea, I wrote the following algorithm:
private void CmdFragment_Click(object sender, EventArgs e)
{    int X, Y, Z, XX, YY;    int Width, Height, Stride;    int Speed, Index;    int SumR, SumG, SumB;
    Bitmap Bmp = (Bitmap)Pic.Image;    if (Bmp.PixelFormat != PixelFormat.Format24bppRgb) throw new Exception("不支持的图像格式.");

    Width = Bmp.Width; Height = Bmp.Height; Stride = (int)((Bmp.Width * 3 + 3) & 0XFFFFFFFC);    byte[] ImageData = new byte[Stride * Height];                                    // 用于保存图像数据,(处理前后的都为他)
    byte[] ImageDataC = new byte[Stride * Height];                                   // 用于保存克隆的图像数据
    int[] OffsetX = new int[] { 4, -4, -4, 4 };                                      // 每个点的偏移量
    int[] OffsetY = new int[] { -4, -4, 4, 4 };    fixed (byte* P = &ImageData[0], CP = &ImageDataC[0])
    {        byte* DataP = P, DataCP = CP;
        BitmapData BmpData = new BitmapData();
        BmpData.Scan0 = (IntPtr)DataP;                                              //  设置为字节数组的的第一个元素在内存中的地址
        BmpData.Stride = Stride;
        Bmp.LockBits(new Rectangle(0, 0, Bmp.Width, Bmp.Height), ImageLockMode.ReadWrite | ImageLockMode.UserInputBuffer, PixelFormat.Format24bppRgb, BmpData);

        Stopwatch Sw = new Stopwatch();                                             //  只获取计算用时        Sw.Start();
        System.Buffer.BlockCopy(ImageData, 0, ImageDataC, 0, Stride * Height);     //  填充克隆数据

        for (Y = 0; Y < Height; Y++)
        {
            Speed = Y * Stride;            for (X = 0; X < Width; X++)
            {
                SumB = 0; SumG = 0; SumR = 0;                for (Z = 0; Z < 4; Z++)                                           //  累积取样点的取样和                {
                    XX = X + OffsetX[Z];
                    YY = Y + OffsetY[Z];                    if (XX < 0)                                                    //   注意越界
                        XX = 0;                    else if (XX >= Width)
                        XX = Width - 1;                    if (YY < 0)
                        YY = 0;                    else if (YY >= Height)
                        YY = Height - 1;
                    Index = YY * Stride + XX * 3;
                    SumB += DataCP[Index];
                    SumG += DataCP[Index + 1];
                    SumR += DataCP[Index + 2];
                }

                DataP[Speed] = (byte)((SumB+2) >> 2);    //  求平均值(Sum+2)/4,为什么要+2,就为了四舍五入。比如如果计算结果为108.6,则取像素109更为合理
                DataP[Speed + 1] = (byte)((SumG + 2) >> 2);
                DataP[Speed + 2] = (byte)((SumR + 2) >> 2);
                Speed += 3;                                                     //  跳往下一个像素            }
        }
        Sw.Stop();        this.Text = "计算用时: " + Sw.ElapsedMilliseconds.ToString() + " ms";
        Bmp.UnlockBits(BmpData);                         //  必须先解锁,否则Invalidate失败     }
Pic.Invalidate();}In the algorithm, OffsetX and OffsetY are the offsets of the sampling point pixels respectively. Similarly, since this filter involves field operations, pixel backup needs to be done before processing, but the backup data is not expanded here. Therefore, the coordinates of the sampling point need to be verified in the internal code to see if it exceeds its range. If it exceeds the range, it is usually within the range of the image filter algorithm. There are 3 processing methods:
(1) If it exceeds, it is considered to be its closest boundary value, that is, repeated edge pixels. This part of the code is the if...else if part posted above.
(2) Return can be described by the following code:
while (XX >= Width)
    XX = XX - Width;while (XX < 0)
    XX = XX + Width;while (YY >= Height)
    YY = YY - Height;while (YY < 0)
YY = YY + Height;(3 ) Calculate only the pixels within the image range:
 if (XX >= 0 && XX < Width && YY >= 0 && YY < Height)
 {
       // 累加计算
}Of course, to do this, you must use a variable to record how much has been done qualifying calculations.
Friends who are interested can change the code and give it a try.
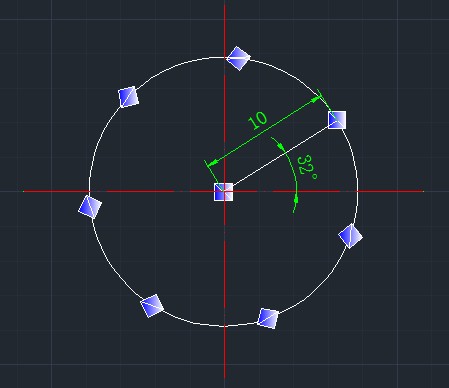
In the above code snippet, DataP[Speed] = (byte)((SumB+2) >> 2); The reason for adding 2 to SumB is to round the result, so that it is more accurate Reasonable. After testing, the above code is 100% consistent with the effect of PS processing. It shows that our guess is completely correct. You can also further expand the algorithm: Think further, why does it have to be 4 ghost images? It has to be an angle of 45 degrees. It has to be 4 The horizontal and vertical offset of pixels. I give the picture below for interested readers to develop on their own. In the picture, the angle is 32 degrees, the radius is 10, and the number of fragments is 7, which can produce an effect similar to the following (You can use my Imageshop to verify): 


Hot AI Tools

Undresser.AI Undress
AI-powered app for creating realistic nude photos

AI Clothes Remover
Online AI tool for removing clothes from photos.

Undress AI Tool
Undress images for free

Clothoff.io
AI clothes remover

Video Face Swap
Swap faces in any video effortlessly with our completely free AI face swap tool!

Hot Article

Hot Tools

Notepad++7.3.1
Easy-to-use and free code editor

SublimeText3 Chinese version
Chinese version, very easy to use

Zend Studio 13.0.1
Powerful PHP integrated development environment

Dreamweaver CS6
Visual web development tools

SublimeText3 Mac version
God-level code editing software (SublimeText3)

Hot Topics
 1653
1653
 14
14
 1413
1413
 52
52
 1304
1304
 25
25
 1251
1251
 29
29
 1224
1224
 24
24
 How to set password protection for export PDF on PS
Apr 06, 2025 pm 04:45 PM
Export password-protected PDF in Photoshop: Open the image file. Click "File"> "Export"> "Export as PDF". Set the "Security" option and enter the same password twice. Click "Export" to generate a PDF file.
 What are the common questions about exporting PDF on PS
Apr 06, 2025 pm 04:51 PM
Frequently Asked Questions and Solutions when Exporting PS as PDF: Font Embedding Problems: Check the "Font" option, select "Embed" or convert the font into a curve (path). Color deviation problem: convert the file into CMYK mode and adjust the color; directly exporting it with RGB requires psychological preparation for preview and color deviation. Resolution and file size issues: Choose resolution according to actual conditions, or use the compression option to optimize file size. Special effects issue: Merge (flatten) layers before exporting, or weigh the pros and cons.
 How to use PS Pen Tool
Apr 06, 2025 pm 10:15 PM
The Pen Tool is a tool that creates precise paths and shapes, and is used by: Select the Pen Tool (P). Sets Path, Fill, Stroke, and Shape options. Click Create anchor point, drag the curve to release the Create anchor point. Press Ctrl/Cmd Alt/Opt to delete the anchor point, drag and move the anchor point, and click Adjust curve. Click the first anchor to close the path to create a shape, and double-click the last anchor to create an open path.
 Photoshop's Value: Weighing the Cost Against Its Features
Apr 11, 2025 am 12:02 AM
Photoshop is worth the investment because it provides powerful features and a wide range of application scenarios. 1) Core functions include image editing, layer management, special effects production and color adjustment. 2) Suitable for professional designers and photographers, but amateurs may consider alternatives such as GIMP. 3) Subscribe to AdobeCreativeCloud can be used as needed to avoid high one-time spending.
 What is the reason why PS keeps showing loading?
Apr 06, 2025 pm 06:39 PM
PS "Loading" problems are caused by resource access or processing problems: hard disk reading speed is slow or bad: Use CrystalDiskInfo to check the hard disk health and replace the problematic hard disk. Insufficient memory: Upgrade memory to meet PS's needs for high-resolution images and complex layer processing. Graphics card drivers are outdated or corrupted: Update the drivers to optimize communication between the PS and the graphics card. File paths are too long or file names have special characters: use short paths and avoid special characters. PS's own problem: Reinstall or repair the PS installer.
 Photoshop for Professionals: Advanced Editing & Workflow Techniques
Apr 05, 2025 am 12:15 AM
Photoshop's advanced editing skills include frequency separation and HDR synthesis, and optimized workflows can be automated. 1) Frequency separation technology separates the texture and color details of images. 2) HDR synthesis enhances the dynamic range of images. 3) Automate workflows to improve efficiency and ensure consistency.
 How to solve the problem of loading when PS is always showing that it is loading?
Apr 06, 2025 pm 06:30 PM
PS card is "Loading"? Solutions include: checking the computer configuration (memory, hard disk, processor), cleaning hard disk fragmentation, updating the graphics card driver, adjusting PS settings, reinstalling PS, and developing good programming habits.
 How to speed up the loading speed of PS?
Apr 06, 2025 pm 06:27 PM
Solving the problem of slow Photoshop startup requires a multi-pronged approach, including: upgrading hardware (memory, solid-state drive, CPU); uninstalling outdated or incompatible plug-ins; cleaning up system garbage and excessive background programs regularly; closing irrelevant programs with caution; avoiding opening a large number of files during startup.


