Home > Web Front-end > PS Tutorial > body text

Photoshop利用通道快速从图片中抠出火焰

PHP中文网
Release: 2017-03-20 11:14:02
Original
1582 people have browsed it

PS抠图的相关教程相信大家已经看了很多了吧,今天小编接着来给大家讲解关于Photoshop利用通道快速从图片中抠出火焰的教程,下面我们一起来看看具体内容 首先来看看PS处理前后的对比效果图:
原图:
Photoshop利用通道快速从图片中抠出火焰
效果图:
 Photoshop利用通道快速从图片中抠出火焰
具体步骤如下:
步骤一、首先利用PS软件打开原图,然后点击通道按钮进入通道面板,如图所示:
Photoshop利用通道快速从图片中抠出火焰
步骤二、然后在通道面板中,我们按下键盘的【CTRL】,然后利用鼠标左键单击红色通道,将红色通道载入选区,如图所示:
Photoshop利用通道快速从图片中抠出火焰
步骤三、然后点击图层面板按钮,在图层面板中,我们选择背景图层,然后按下键盘的【CTRL+J】,这样我们就会得到一个新的图层,如图所示:
Photoshop利用通道快速从图片中抠出火焰
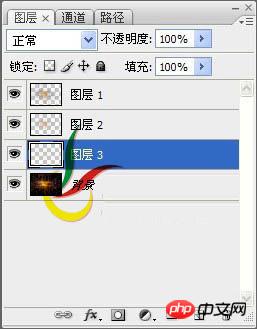
步骤四、然后和红色通道的方法一样,我们来处理绿色通道和蓝色通道,这样我们分别的图层2和图层3,如图所示:
Photoshop利用通道快速从图片中抠出火焰
步骤五、接着合并图层1,图层2,图层3,这样合并之后我们将得到一个图层,为图层1,如图所示:
Photoshop利用通道快速从图片中抠出火焰
步骤六、接着我们在图层面板中,选择背景图层,然后使用自己喜欢的颜色进行填充即可,如图所示:
Photoshop利用通道快速从图片中抠出火焰
步骤七、接着在图层面板中,我们选择图层1,然后点击菜单栏中的图像>>调整>>色阶,如图所示:
Photoshop利用通道快速从图片中抠出火焰
步骤八、在弹出的色阶窗口中,我们设置其参数为:0 5.66 147,如图所示:
Photoshop利用通道快速从图片中抠出火焰
最后,我们就将火焰给扣出来了,看看效果吧:
Photoshop利用通道快速从图片中抠出火焰

Related labels:
source:php.cn
Statement of this Website
The content of this article is voluntarily contributed by netizens, and the copyright belongs to the original author. This site does not assume corresponding legal responsibility. If you find any content suspected of plagiarism or infringement, please contact admin@php.cn
Popular Tutorials
More>
Latest Downloads
More>
Web Effects
Website Source Code
Website Materials
Front End Template
About us Disclaimer Sitemap
php.cn:Public welfare online PHP training,Help PHP learners grow quickly!