

Photoshop打造色彩丰富的曲线光影壁纸

光影壁纸的制作很讲究层次和图层的叠加。制作的时候我们需要逐步的去完成,先渲染背景色,用一些较暗的颜色铺上底色。然后再用柔和的曲线及填充色制作主体色,后期再用一些曲线及光点丰富画面即可。
最终效果
1、新建一个壁纸大小的文档如:1024 * 768 像素,背景填充黑色。用套索工具勾出下图所示的选区,按Ctrl + Alt + D 把选区羽化60个像素。
<图1>
2、新建一个图层填充颜色:#24205D,作为背景边缘色。
<图2>
3、新建一个图层,用钢笔勾出下图所示的选区,羽化20个像素后填充暗紫色:#582886,如下图。
<图3>
4、新建一个图层,用套索工具勾出图4所示的选区,羽化25个像素后填充颜色:#38CFF3,按Ctrl + D 取消选区后按Ctrl + Alt + G 与前一图层编组,效果如图5。
<图4> 
<图5>
5、新建一个图层,用钢笔工具勾出下图所示的选区,羽化10个像素后填充白色,作为中间的高光。
<图6>
6、新建一个图层,用套索工具勾出图7所示的选区,羽化30个像素后填充红色:#EA222D,按Ctrl + Alt + G ,效果如图8。
<图7> 
<图8>
7、新建一个图层,用钢笔勾出下图所示的选区,羽化15个像素后填充紫红色:#8B2D82,再按Ctrl + Alt + G 与前一图层编组,效果如下图。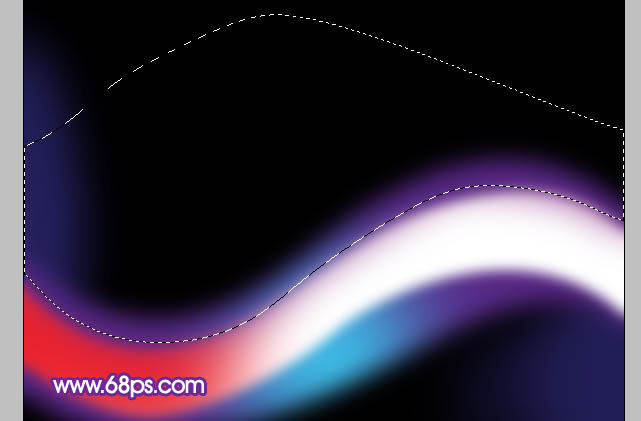
<图9>
8、新建一个图层,用套索勾出下图所示的选区,羽化20个像素后填充橙黄色:#F7AF45,按Ctrl + Alt + G,效果如下图。
<图10>
9、新建一个图层,用钢笔勾出下图所示的选区,羽化25个像素后填充黑色。
<图11>
10、新建一个图层,用钢笔勾出下图所示的选区,羽化25个像素后填充紫色:#8C51A9,到这一步背景部分的底色大致铺好,整体效果如图13。后面还需要增加一些曲线。
<图12> 
<图13>
11、新建一个图层,用钢笔勾出图14所示的大曲线路径,转为选区后选择渐变工具,颜色设置如图15,拉出图16所示的线性渐变。
<图14> 
<图15> 
<图16>
12、新建一个图层,用钢笔勾出下图所示的选区,羽化10个像素后填充颜色:#C68F39,按Ctrl + Alt + G 与前一个图层编组。
<图17>
13、在当前图层下面新建一个图层,用钢笔勾出下图所示的选区,羽化15个像素后填充颜色:#513F4C。
<图18>
14、新建一个图层,用钢笔勾出下图所示的选区,羽化15个像素后填充颜色:#799293。
<图19>
15、同上的方法勾出图20,21所示的选区,分别填充颜色:#AD9B9A,#E1C692。
<图20> 
<图21>
16、在图层的最上面新建一个图层,用钢笔勾出下图所示的选区,羽化25个像素后填充紫色:#693392。
<图22>
17、新建一个图层,用钢笔勾出第二条曲线的路径转为选区如图23,选择渐变工具,颜色设置如图24,拉出图25所示的线性渐变。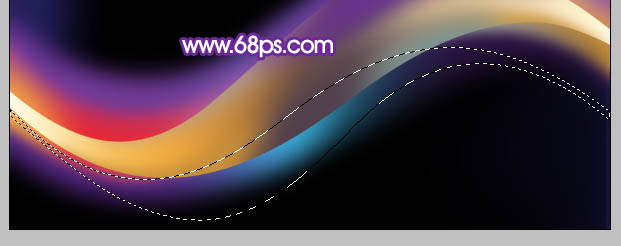
<图23> 
<图24> 
<图25>
18、同上的方法分别勾出图26,27,28所示的选区,羽化10个像素后依次填充颜色:#463C10,#413F66,#D1CCD0。
<图26> 
<图27> 
<图28>
19、新建一个图层,用钢笔勾出图29所示的曲线,转为曲选区后拉上渐变色,再把图层混合模式改为“正片叠底”,效果如图30。
<图29> 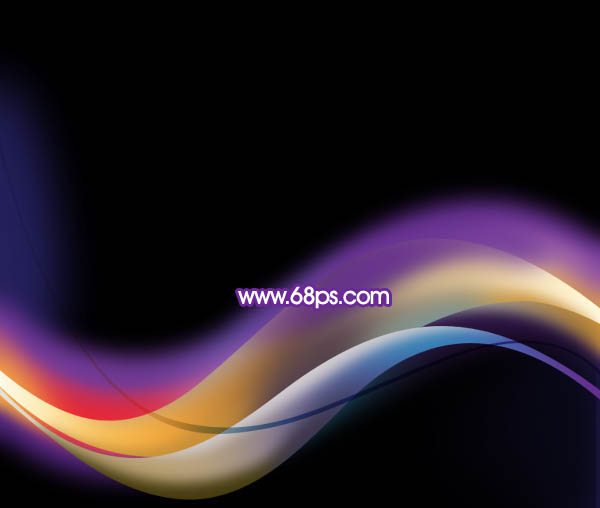
<图30>
20、新建一个图层,用钢笔勾出图31所示的曲线,转为选区后拉上渐变色,再把图层混合模式改为“正片叠底”,效果如图32。
<图31> 
<图32>
21、同上的方法勾出一组细曲线填充白色,效果如图33,图层混合模式改为“叠加”,效果如图34。
<图33> 
<图34>
22、新建一个图层,用钢笔勾出图35所示的选区,拉上白色至深灰的线性渐变,图层混合模式改为“叠加”,效果如图36。
<图35> 
<图36>
23、新建一个图层,用钢笔勾出下图所示的选区,填充白色,图层不透明度改为:15%。
<图37>
24、新建一个图层,同上的方法再制作几条小曲线,效果如下图。
<图38>
25、最后调整一下细节,再用调色工具调整一下整体颜色,完成最终效果。

Hot AI Tools

Undresser.AI Undress
AI-powered app for creating realistic nude photos

AI Clothes Remover
Online AI tool for removing clothes from photos.

Undress AI Tool
Undress images for free

Clothoff.io
AI clothes remover

AI Hentai Generator
Generate AI Hentai for free.

Hot Article
Hot Tools

Notepad++7.3.1
Easy-to-use and free code editor

SublimeText3 Chinese version
Chinese version, very easy to use

Zend Studio 13.0.1
Powerful PHP integrated development environment

Dreamweaver CS6
Visual web development tools

SublimeText3 Mac version
God-level code editing software (SublimeText3)
Hot Topics
 1378
1378
 52
52

 How to turn off automatic wallpaper change in Win11? Introduction to closing methods
Apr 24, 2024 pm 05:43 PM
How to turn off automatic wallpaper change in Win11? Introduction to closing methods
Apr 24, 2024 pm 05:43 PM
Some win11 users find that their desktop wallpaper always changes automatically, but you don't like to change wallpapers often, so how do you turn off automatic wallpaper change? Let’s take a look at the relevant introduction! To turn off the automatic wallpaper change function of Win11, you can follow the steps below: 1. Open the "Settings" application. You can find it by searching for "Settings" in the Start menu. 2. In the "Settings" window, click the "Personalization" option on the left. 3. In the "Personalization" window, select the "Background" option on the left. 4. Under the "Background" option, find the switch button next to "Picture" under "Background". 5. Switch the switch button to the off state, so that the automatic wallpaper change function of Win11 can be turned off. After closing
 Where are themes located in Windows 11?
Aug 01, 2023 am 09:29 AM
Where are themes located in Windows 11?
Aug 01, 2023 am 09:29 AM
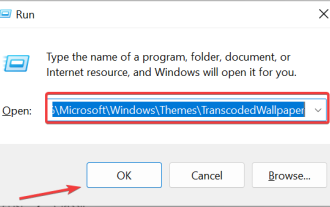
Windows 11 has so many customization options, including a range of themes and wallpapers. While these themes are aesthetic in their own way, some users still wonder where they stand in the background on Windows 11. This guide will show you the different ways to access the location of your Windows 11 theme. What is the Windows 11 default theme? The default theme background of Windows 11 is an abstract royal blue flower blooming with a sky blue background. This background is one of the most popular, thanks to the anticipation before the release of the operating system. However, the operating system also comes with a range of other backgrounds. Therefore, you can change the Windows 11 desktop theme background at any time. Themes are stored in Windo
 Where is the Win11 background image stored?
Dec 27, 2023 am 11:59 AM
Where is the Win11 background image stored?
Dec 27, 2023 am 11:59 AM
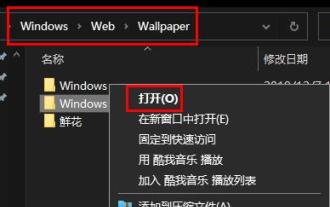
The win11 system has updated a lot of new wallpapers for everyone, so many users are curious about which folder the win11 wallpapers are in and want to open them to see the wallpapers inside. Therefore, we have brought a tutorial so that you can enter and view the wallpapers. . Which folder is the win11 wallpaper in: 1. The system comes with wallpaper: 1. First enter my computer, and then open the path: C:\Windows\Web\Wallpaper. 2. Then enter the windows folder and you can see the wallpapers that come with the system. 2. User-saved wallpapers: 1. Wallpapers installed by users will be saved in: C:\Users (user)\xx (current user name)\AppData\Local\Microso
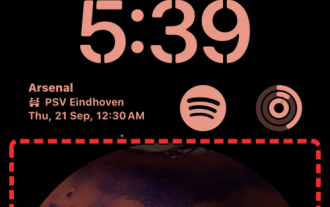
 How to show the time under the lock screen wallpaper on iPhone
Dec 18, 2023 am 11:27 AM
How to show the time under the lock screen wallpaper on iPhone
Dec 18, 2023 am 11:27 AM
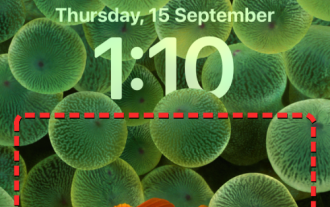
Depth Effect is a cool lock screen feature on iOS where part of the wallpaper covers the digital clock. This basically provides a mirage-like effect where the wallpaper appears to be interacting with lock screen elements. In this article, we will explain what the depth effect is all about and how to get the lock screen time/clock behind wallpaper on iPhone. What is the depth effect on iPhone lock screen? Depth effect adds multiple layers of depth to your wallpaper. When you apply a lock screen wallpaper, iOS uses the iPhone's neural network engine to detect depth information in the image you apply. If successful, your iPhone will be able to separate the subject you want to focus on from other elements of the wallpaper. Once a subject is detected, the depth of field effect will
 'Genshin Impact' version 4.4 wallpaper released, Xianyun and Jiaming have their own characteristics
Feb 24, 2024 pm 05:46 PM
'Genshin Impact' version 4.4 wallpaper released, Xianyun and Jiaming have their own characteristics
Feb 24, 2024 pm 05:46 PM
"Genshin Impact" brings players the computer and mobile phone wallpapers of the 4.4 version of the game's promotional images. Players can choose to use them according to their own needs~
 How to restore the default wallpaper in win10? One trick to quickly restore the default wallpaper in Windows 10 system
Jun 02, 2024 pm 02:07 PM
How to restore the default wallpaper in win10? One trick to quickly restore the default wallpaper in Windows 10 system
Jun 02, 2024 pm 02:07 PM
In Windows 10 system, if you want to return to the system default wallpaper, you can follow the following steps: 1. Right-click a blank space on the desktop and select Personalize in the pop-up menu. 2. This will open the Personalization window in Settings. In the left menu, click Background. 3. Under the "Background" settings, find and click the drop-down menu next to "Choosepicture", and then select Windows Default (Windows Default) or directly select a picture that looks like the default wallpaper in the picture preview below ( if there are multiple options). 4. If your system has multiple versions
 How to clear all desktop background images in Win7? Tips for deleting personalized background images in Win7
Jun 02, 2024 am 09:01 AM
How to clear all desktop background images in Win7? Tips for deleting personalized background images in Win7
Jun 02, 2024 am 09:01 AM
In Win7 system, many users want to delete personalized desktop background images, but do not know how to delete them. This article will show you how to delete personalized background images in Win7 system. 1. First, open the control panel interface of the Win7 system and click to enter the "Appearance and Personalization" settings; 2. Then, in the opened interface, click the "Change Desktop Background" setting; 3. Then, click below "Desktop background" option; 4. Then, select Select all, and then click Clear all. Of course, you can also use it under "Customize", right-click the theme you want to delete, and then click &q on the shortcut menu
 iOS 17: How to use Live Photos as lock screen wallpaper on iPhone
Sep 21, 2023 am 10:33 AM
iOS 17: How to use Live Photos as lock screen wallpaper on iPhone
Sep 21, 2023 am 10:33 AM
In the latest version of iOS17, Apple has integrated a new feature where you can use LivePhotos to decorate your iPhone’s lock screen background. The fascinating aspect is that these live photos come to life every time you light up your iPhone's display. Here's how to use Live Photos as your lock screen wallpaper on an iPhone running iOS 17. How to Apply Live Photos as Lock Screen Wallpaper on iPhone Required: iOS17 Update. (Check Settings > under General >Software Update). You can apply live photos you capture on your iPhone as its lock screen wallpaper in iOS17. Lock screen when using live photo as wallpaper
