
This article introduces the open source web application framework Django graphic tutorial
There are many different web frameworks under Python. Django is the most representative of the heavyweight players. Many successful websites and apps are based on Django. Django is an open source web application framework written in Python. Let’s learn it step by step.
This article is aimed at: Beginners who have a python foundation and are new to web frameworks.
Environment: windows7 python3.5.1 pycharm professional version Django 1.10 version pip3
1. Introduction to Django
Baidu Encyclopedia: Open source web application Framework, written in Python language...
Focus: A large and comprehensive framework that has everything considered for you.
1. Introduction to web framework
Before introducing Django in detail, concepts such as WEB framework must be introduced first.
Web framework: A web website template has been set by others. You learn its rules and then "fill in the blanks" or "modify" it to what you need.
The general web framework architecture is like this:
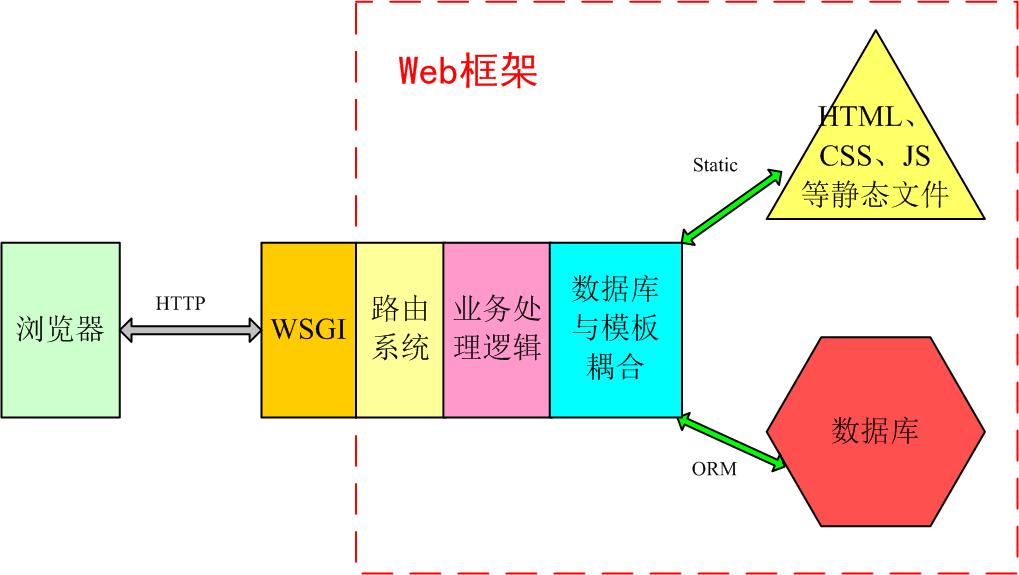
Other python-based web frameworks, such as tornado, flask, and webpy, are all developed within this scope Addition, deletion and cropping. For example, tornado uses its own asynchronous non-blocking "wsgi", while flask only provides the most streamlined and basic framework. Django uses WSGI directly and implements most of its functions.
2. Introduction to MVC/MTV
MVC Baidu Encyclopedia: The full name is Model View Controller, which is the abbreviation of model-view-controller, a kind of software The design model organizes the code in a way that separates business logic, data, and interface display, and gathers the business logic into one component. While improving and personalizing the interface and user interaction, there is no need to rewrite the business logic.
Popular explanation: a form of organization and management of files! Don't be scared by the abbreviation, this is actually a way to put different types of files in different directories, and then give them a fancy name. Of course, it brings many benefits, such as front-end and back-end separation, loose coupling, etc., so I won’t go into details.
Model (model): Defines database-related content, usually placed in the models.py file.
View: defines HTML and other static web page files, that is, those front-end things such as html, css, js, etc.
Controller: defines business logic, which is your main code.
MTV: Some WEB frameworks think the literal meaning of MVC is awkward, so they change it. View is no longer related to HTML, but the main business logic, which is equivalent to a controller. HTML was placed in Templates, called templates, so MVC became MTV. This is actually a word game. It is essentially the same as MVC. It just has a different name and method. It does not change the medicine.
3. Django’s MTV model organization
If the directories are separated, there must be a mechanism to couple them inside. In Django, urls, orm, static, settings, etc. play an important role. A typical business process is as shown below:
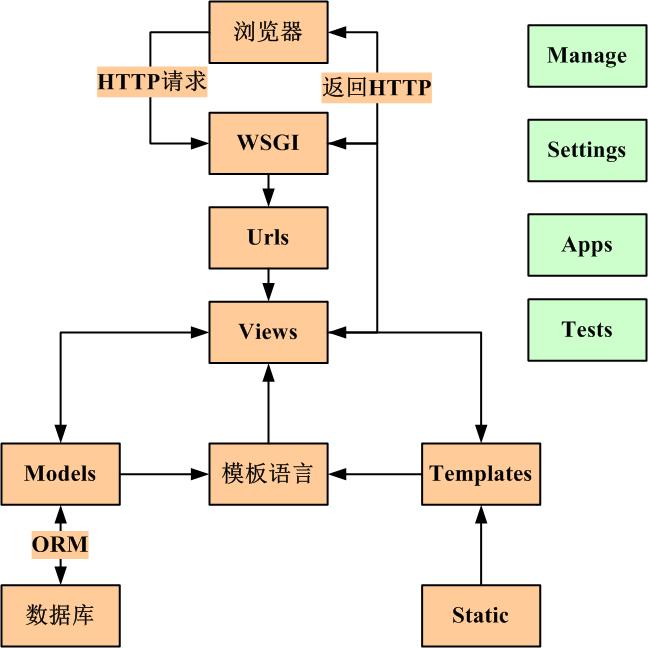
So what do we learn when we learn Django?
1. Directory structure specification
2. URLs routing method
3. settings configuration
4.ORM operation
5. Template rendering
6. Others
2. Django project example
1. Program installation
python3.5, pip3 and The professional version of pycharm is installed by itself.
(1) Install Django:
Here we only introduce the simpler pip3 command installation method.
Win+r, bring up cmd, run the command: pip3 install django, automatically install the latest version provided by Pypi.

After the installation is completed, it is shown in the figure below:

(2) Configure the system environment
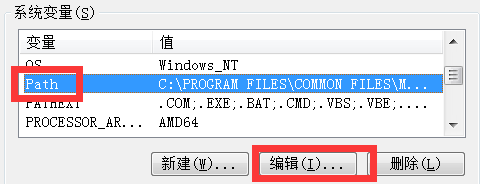
After successfully installing Django, you can find the django-admin.exe file in the path in the figure below and add it to the operating system environment variables. This will make future calls more convenient.
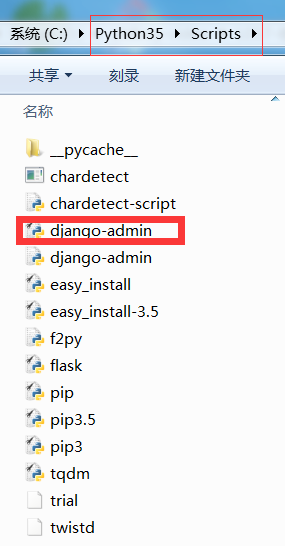
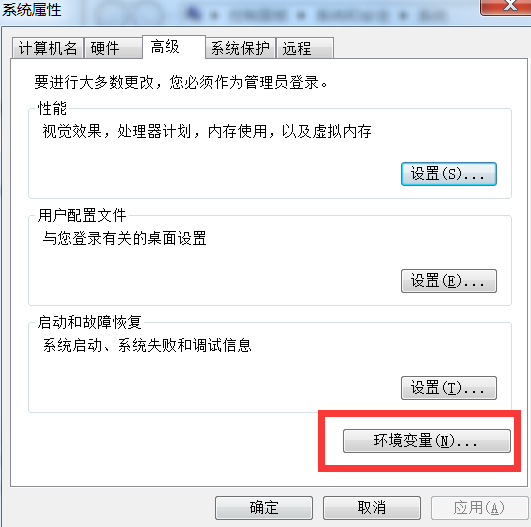
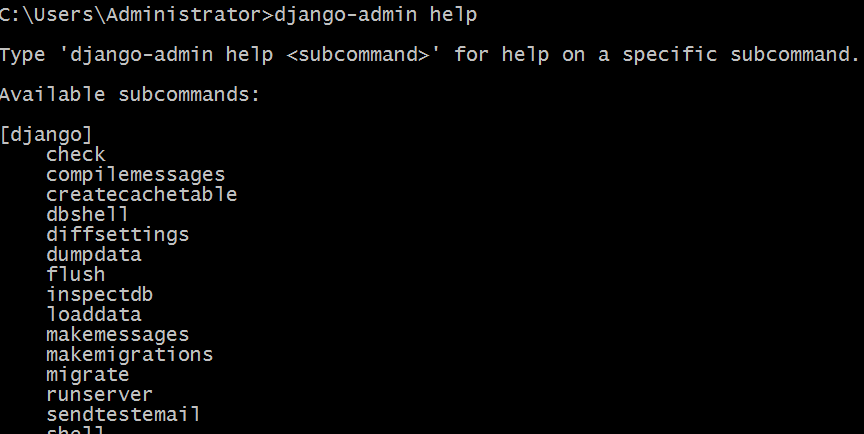
Run: django-admin help. If you see the following content, it means OK.
2. Create a django project
Under command line interfaces such as Linux, project development can also be carried out using the commands and vim provided by django. However, it is recommended to use pycharm, the best Python development IDE
at present. It has powerful functions and friendly interface. (All the following operations are performed in pycharm.)
Click: file-->new project, and the following dialog box appears.
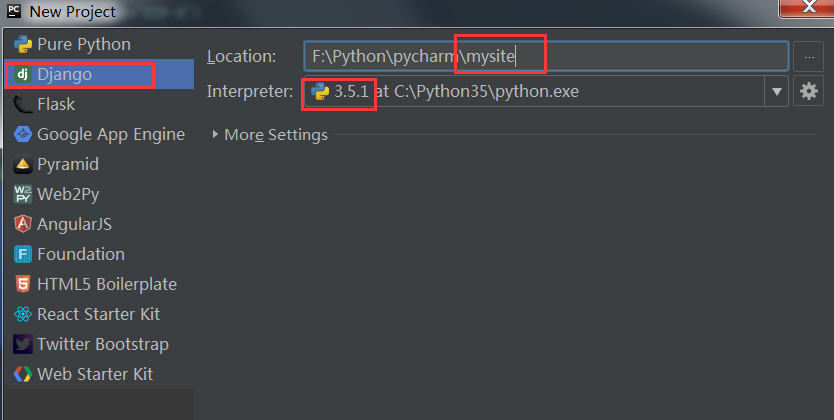
Select the Django column and enter the project name. The international practice of mysite is used here. Select the python interpreter version and click create.
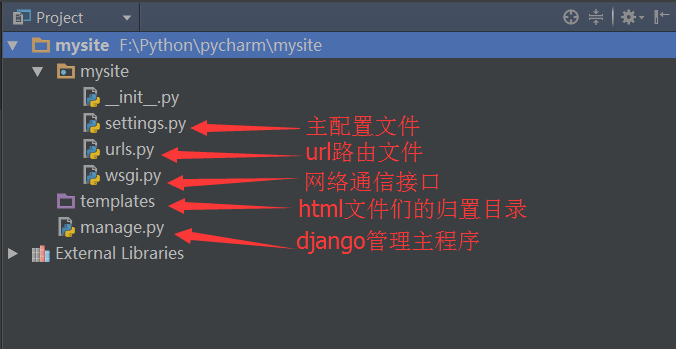
Django will automatically generate the following directory structure:
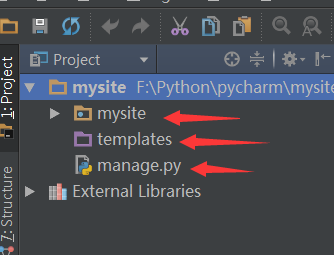
The directory with the same name as the project is the configuration file, and the templates directory is where the html files are stored, which is where MTV The T. manage.py is the django project management file.
3. Create APP
Each Django project can contain multiple APPs, which are equivalent to subsystems, submodules, Functional components, etc., are relatively independent of each other, but they are also related.
All APPs share project resources.
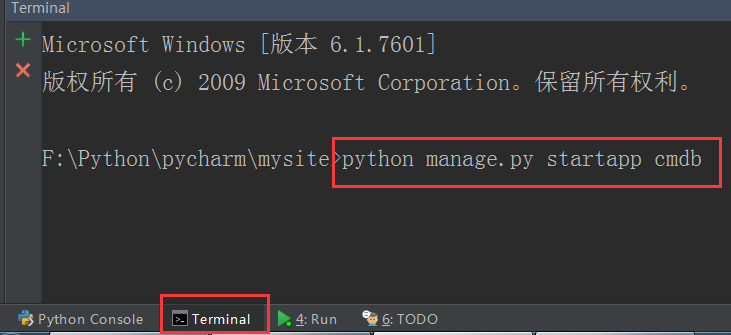
Enter the command in the terminal below pycharm:
python manage.py startapp cmdb
This creates an APP called cmdb, and django automatically generates "cmdb" folder.
4. Write routing
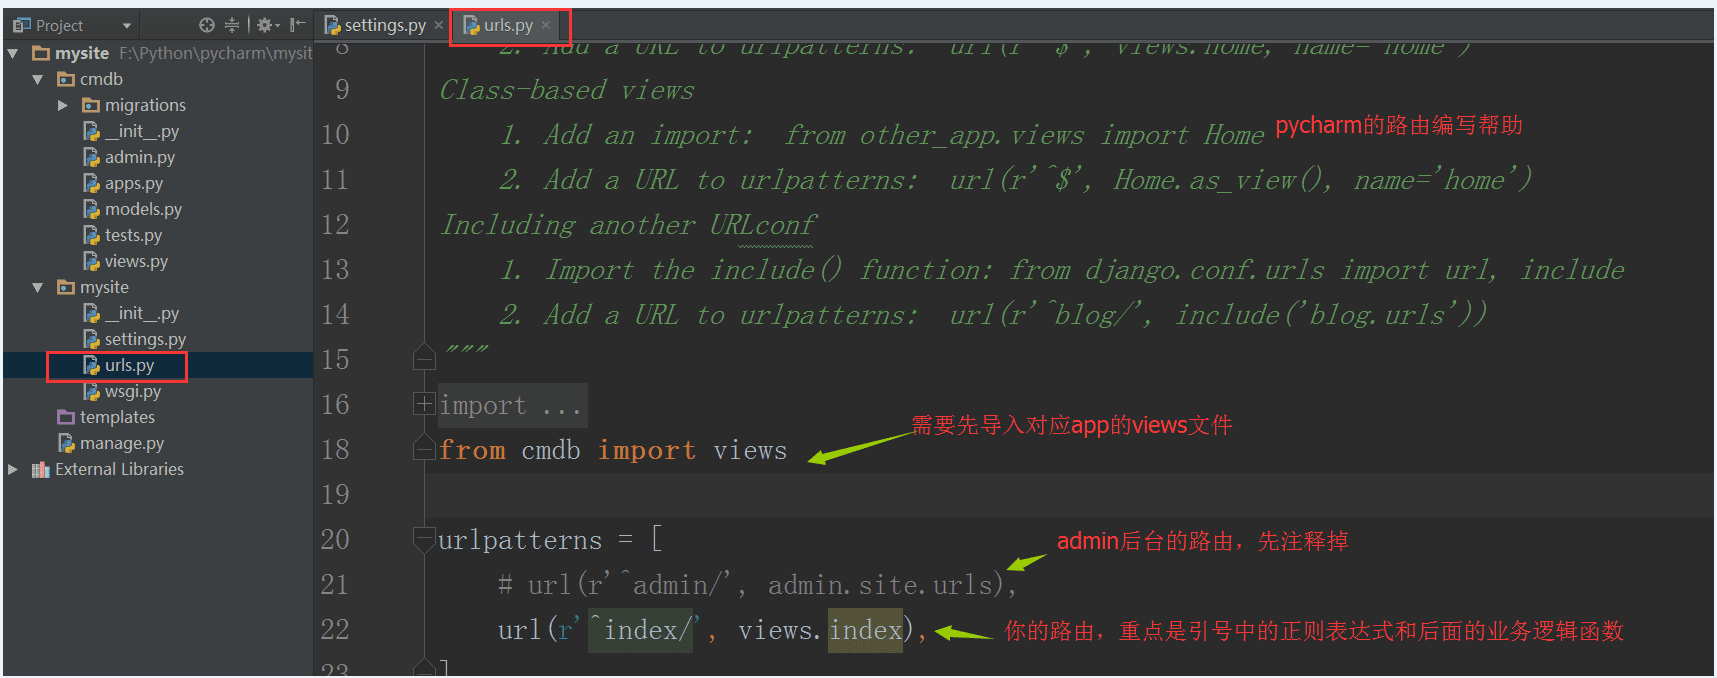
Routes are all in the urls file, which maps the URL entered by the browser to Corresponding business processing logic.
The simple method of writing urls is as follows:
5. Write business processing logic
The business processing logic is all in the views.py file inside.
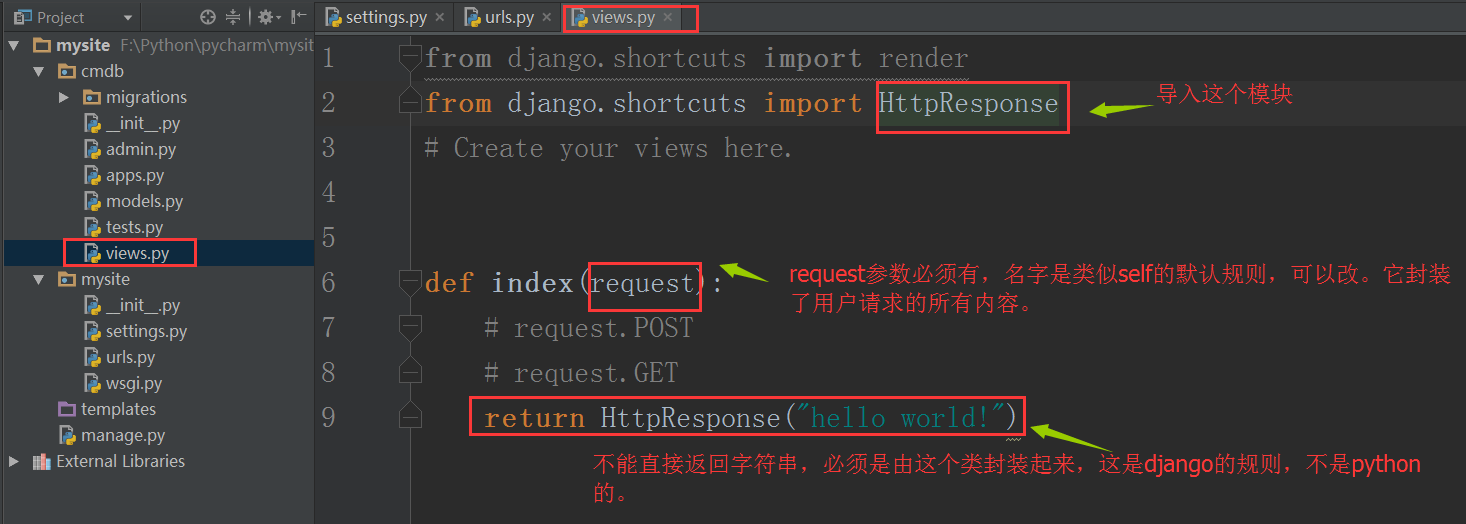
Through the above two steps, we point the index url to the index() function in views, which receives user requests and returns a "hello world" string .
6. Run the web service
Now we can run the web service.
The command line method is: python manage.py runserver 127.0.0.1:8000
But in pycharm, you can do this:
Found in the upper toolbar The icon shown below.

Click the drop-down arrow

Click edit configurations

Fill in host: 127.0.0.1 Fill in port: 8000
After OK, click the green triangle, and the web service will start.
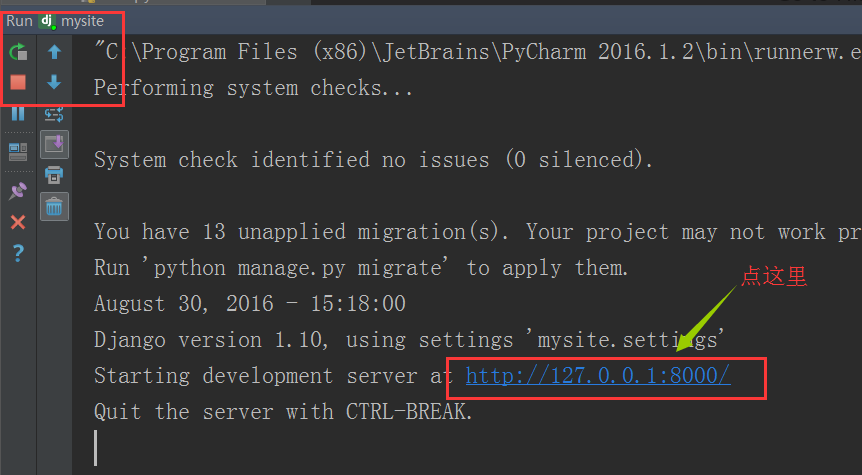
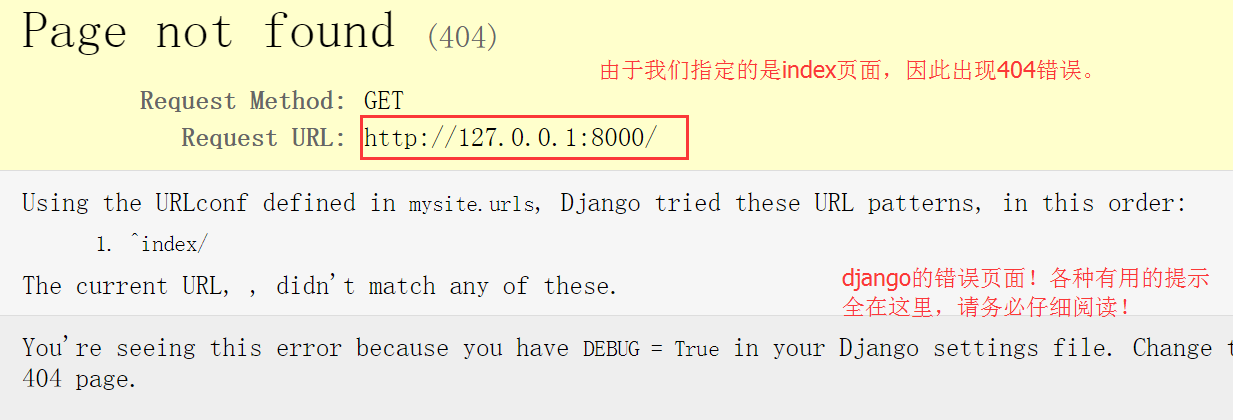
As shown in the picture, it will automatically jump to the browser program interface. What is displayed is the 404 page shown below:
Modify the url, add "/index", and everything will be ok!
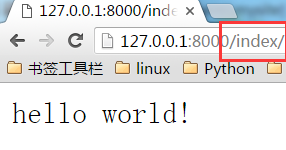
At this point, the simplest web service written in Django has been started successfully.
7. Return HTML file
What did we return to the user’s browser above? A string! In fact, this is definitely not possible. Usually we return the html file to the user.
Next, we write an index.html file like this:

Then modify the views file:
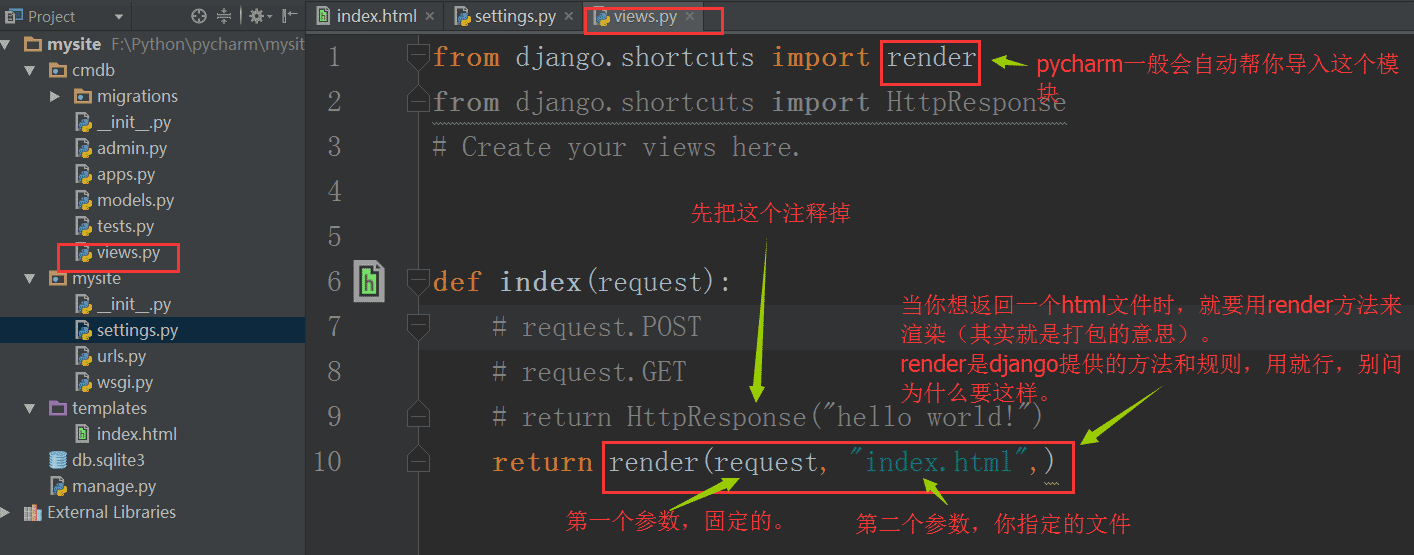
In order to let django know where our html file is, we need to modify the corresponding content of the settings file. But by default, it works just fine and you don't need to modify it.

Next, we can restart the web service. Refresh the browser and you will see "hello world" with style.
Note: Here is a little trick. When the service is restarted frequently, the service may not be started due to the port not being released. Just modify the port and it will be OK.
8. Use static files
We can already return html files to users, but it is not enough. The three major parts of the front end are html, css, js and various plug-ins. They are complete. It is a complete
page. In Django, static files are generally placed in the static directory. Next, create a new static directory in mysite.
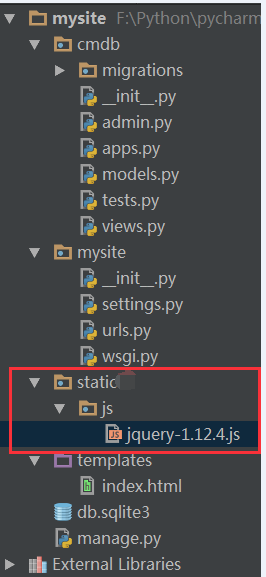
Your CSS, JS and various plug-ins can be placed in this directory.
In order for django to find this directory, settings still need to be configured:
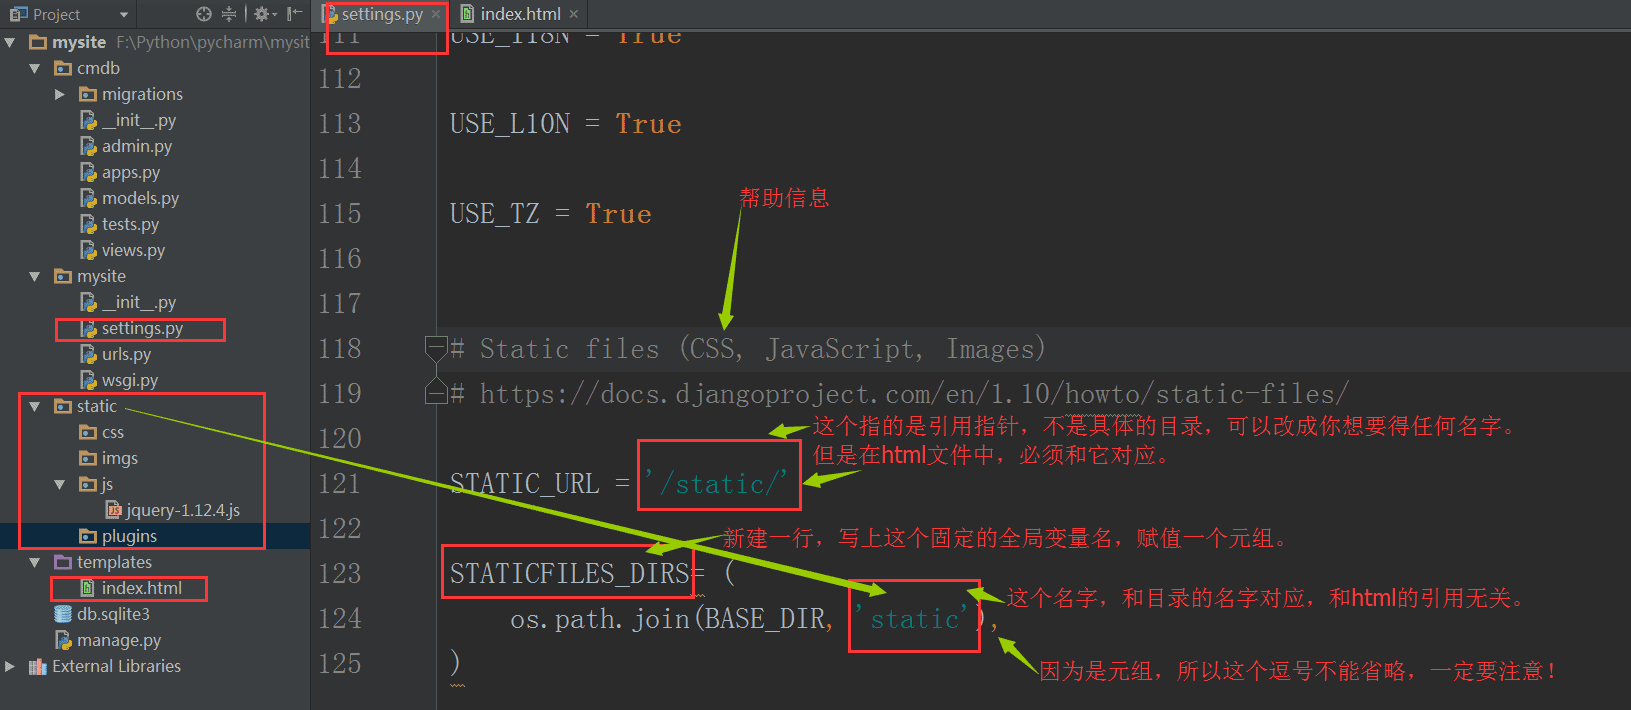
Similarly, in the index.html file, the js file can be introduced:
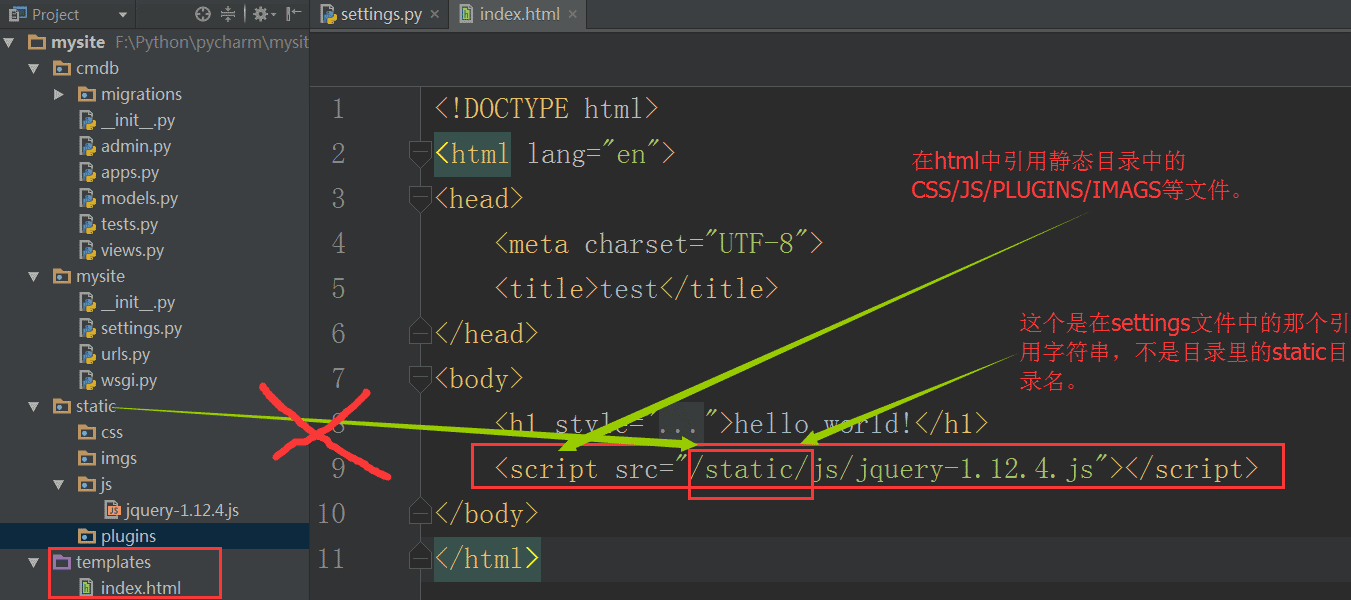
Restart the web service, refresh the browser, and view the results.
9. Receive data sent by the user
Above, we returned an html file with complete elements to the user's browser. But this is not enough because there is no dynamic interaction between the web server and the user.
Next we design a form to allow users to enter their username and password and submit it to the index URL, and the server will receive this data.
First modify the index.html file
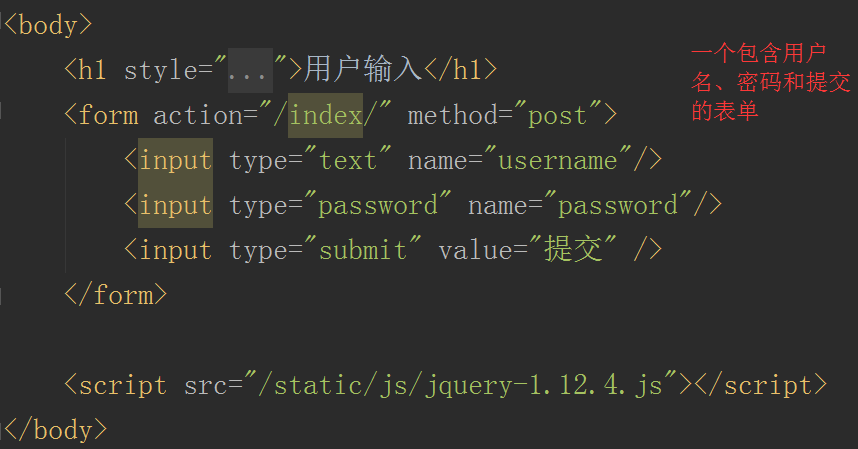
and then modify the views.py file

At this time , an error will occur when restarting the web service, because Django has a cross-site request protection mechanism, and we turn it off in the settings file.
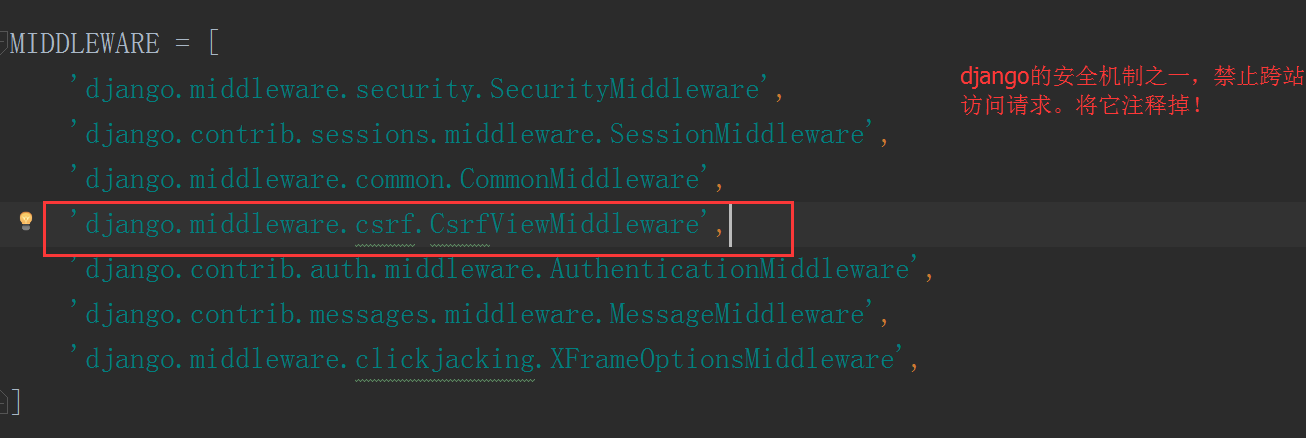
Enter the browser again and refresh the page:

Enter something, and then we can see it in pycharm corresponding data.
10. Return to the dynamic page
We have received the user's data, but what is returned to the user is still a static page. Usually we will process it based on the user's data and then return it to the user.
At this time, django uses its own template language, similar to jinja2, and replaces the corresponding parts of the html based on the provided data. After getting started with the detailed syntax, learn more about it.
First modify the views.py file:
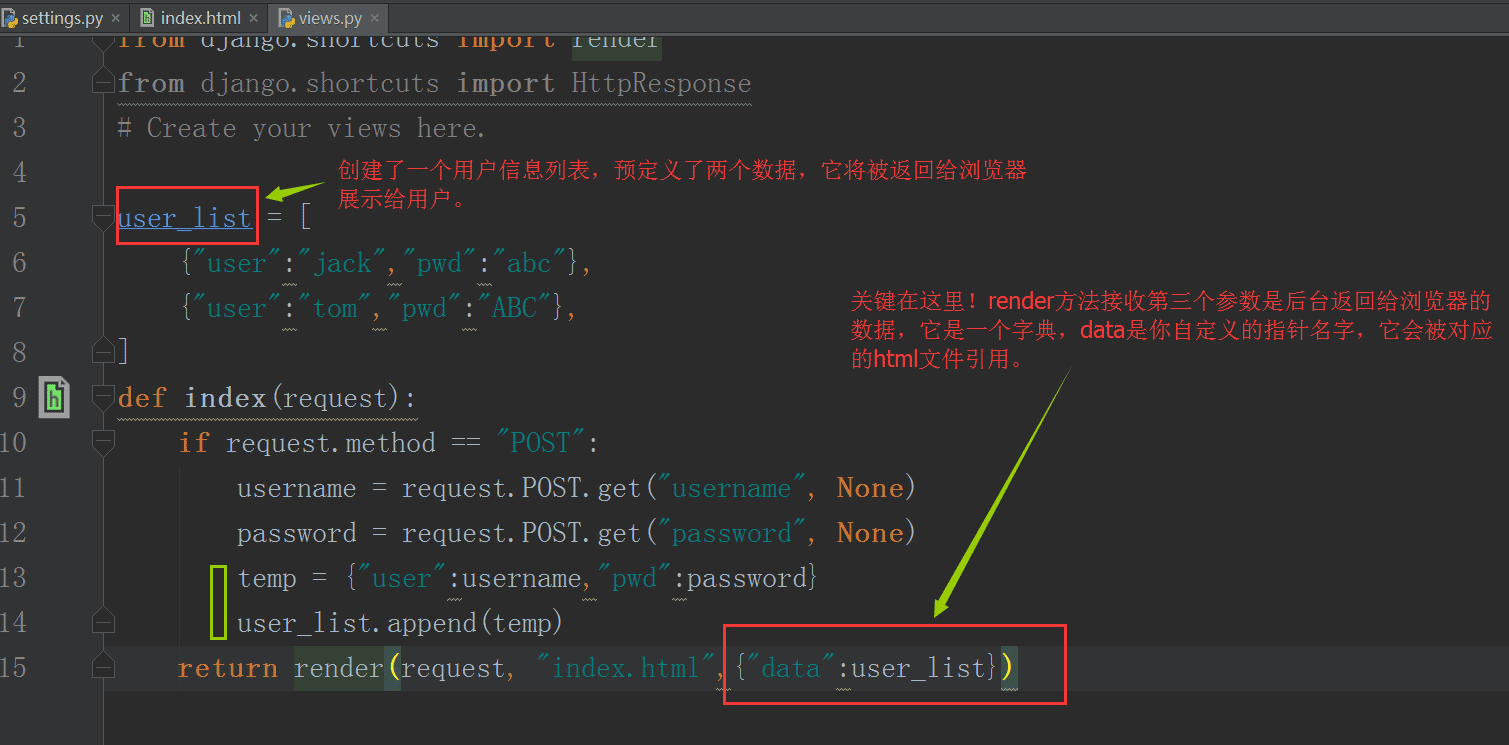
Remodel the index.html file:
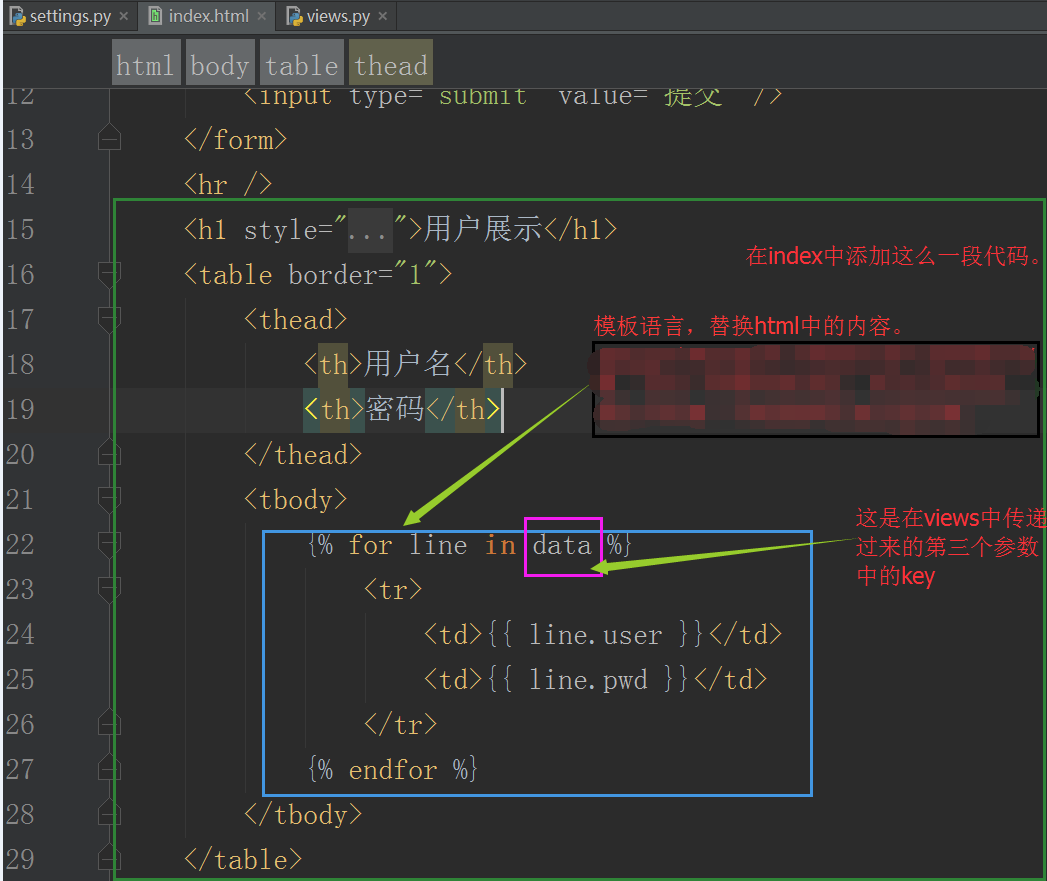
Restart the service and refresh the browser:
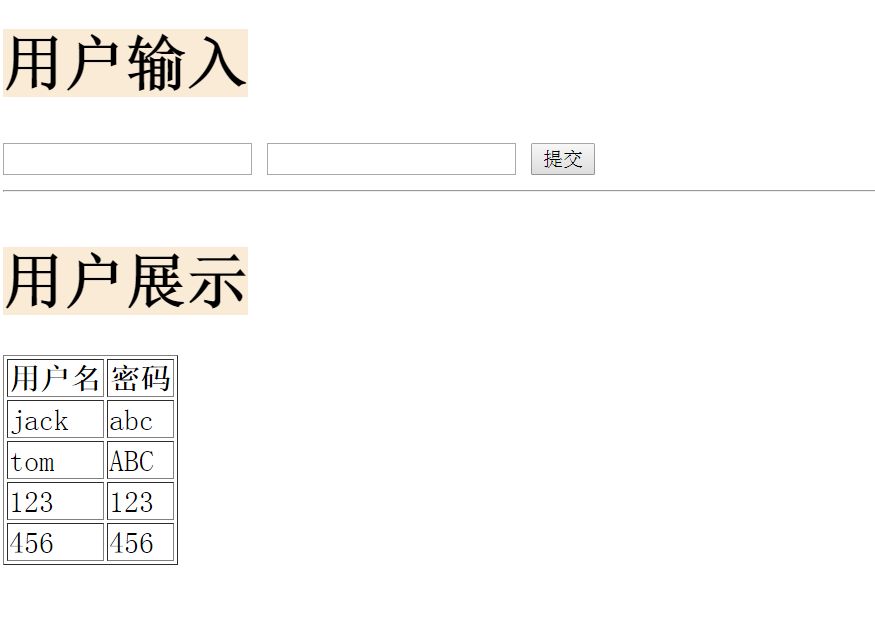
As you can see, we obtain the data entered by the user in real time and display it on the user page in real time. This is a good interactive process.
11. Using the database
At this point in the process, Django’s MTV framework has basically surfaced, leaving only the final database part.
Although we interacted well with the user above, we did not save any data. Once the page is closed or the server is restarted, everything will return to the original state.
There is no doubt about using the database. Django operates the database through its own ORM framework and comes with its own lightweight sqlite3 database. Let’s take a look below:
First, register the app:
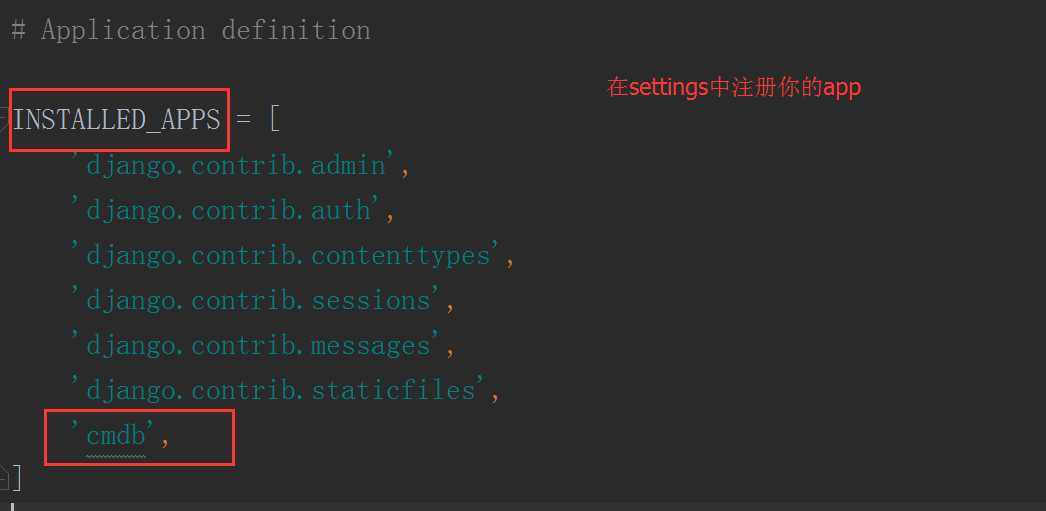
If you don’t register it, your database will not know which app to create a table for.
Then we configure the database-related parameters in settings. If you use the built-in sqlite, there is no need to modify it.
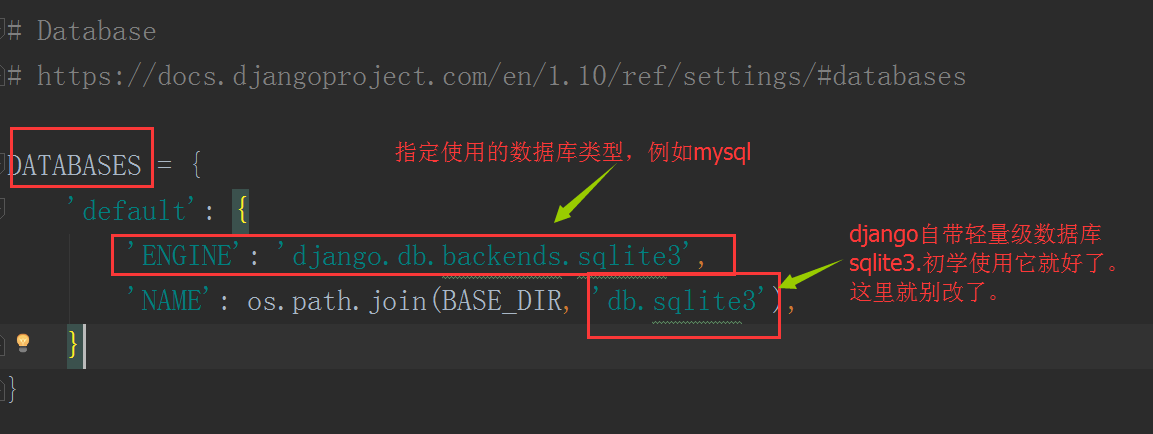
Then edit the models.py file, which is the M in MTV.
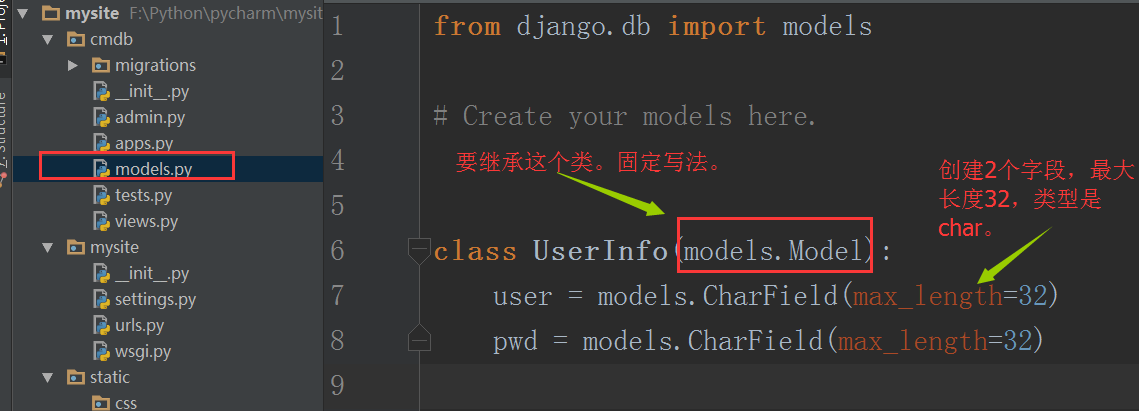
Here we create 2 fields to save the user's name and password respectively.
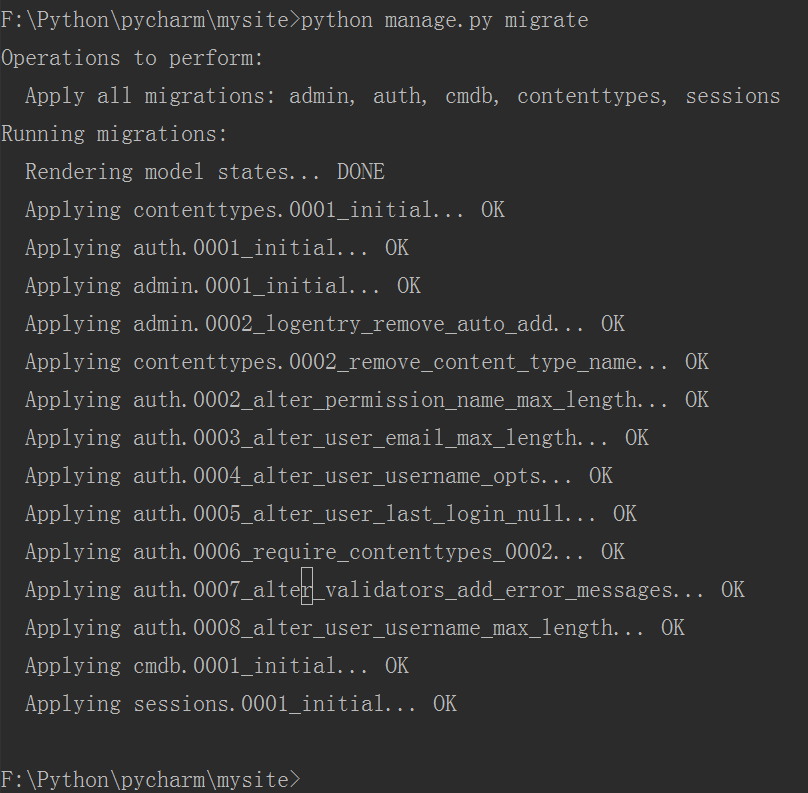
The next step is to create the database table through commands in pycharm's terminal. There are 2 commands, namely:
python manage.py makemigrations
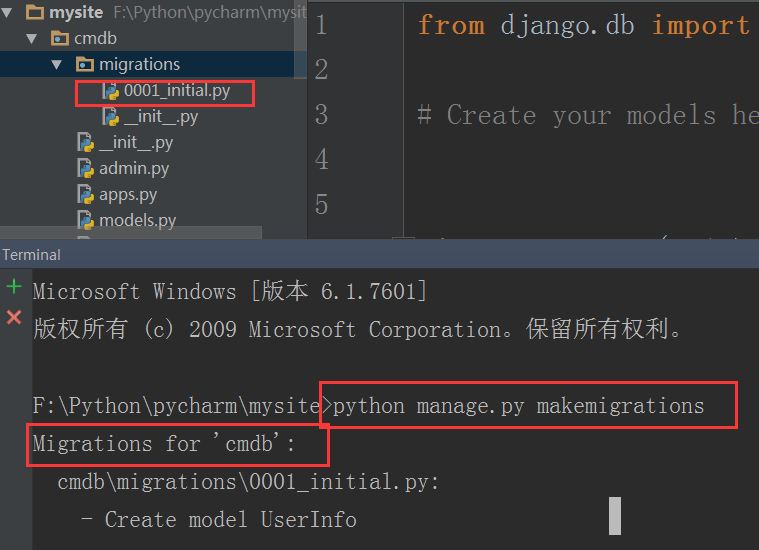
Then enter the command: python manage.py migrate
Modify the business logic in views.py
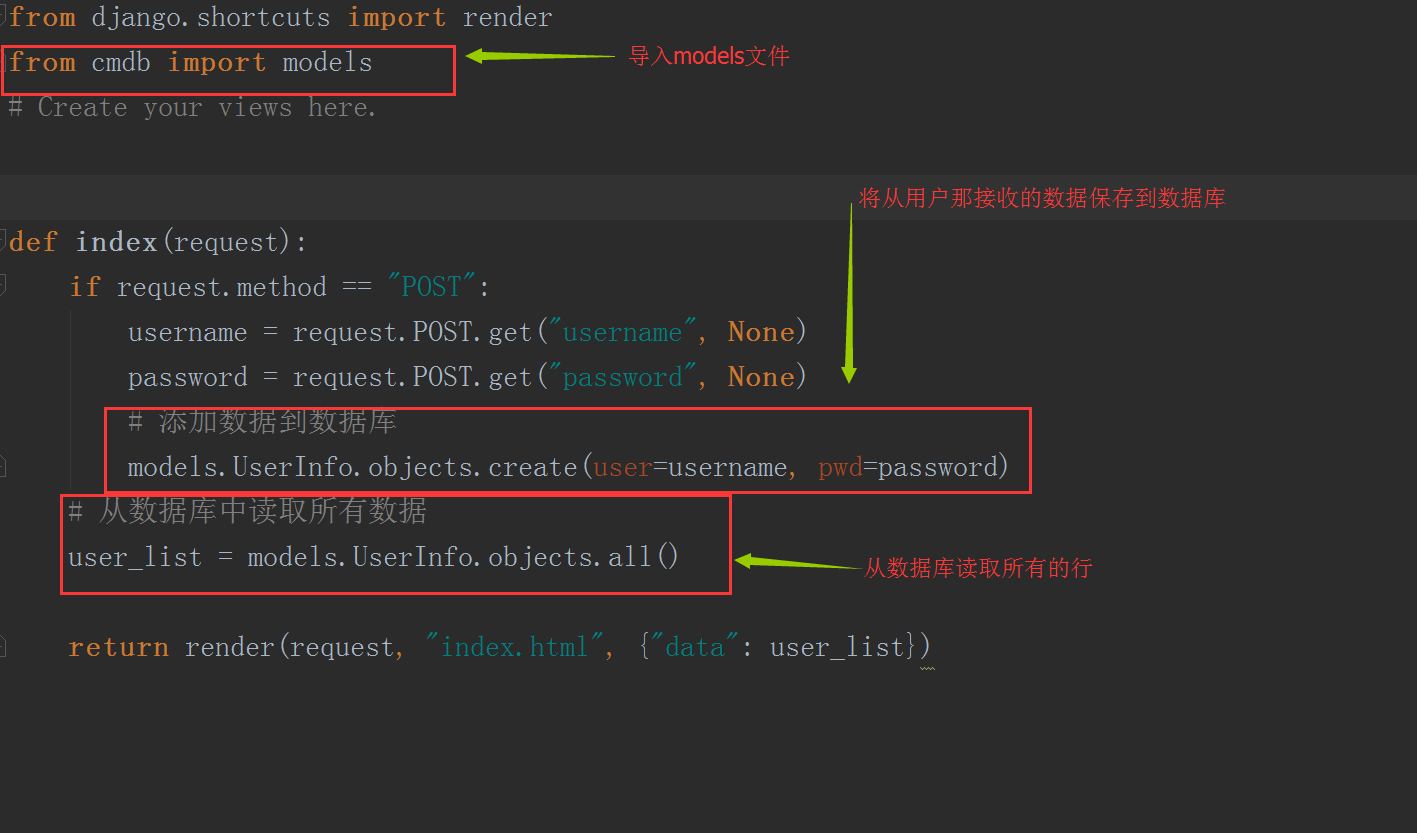
After restarting the web service, refresh the browser page, and the data interacted with the user will be saved. into the database. Data can be read from the database at any time and displayed on the page.
At this point, a Django project with complete elements and a clear main frame display is completed. It is actually very simple, right?
3. Summary of Django
As a necessary web framework for python, Django has powerful functions and comprehensive content, but it also means many restrictions and low flexibility. , poor modifiability, which means you can’t have your cake and eat it too. When we learn Django, we actually learn a software. We need to understand its basic principles, grasp its overall framework, and keep in mind some basic rules. The rest is to continue to delve into the details, and then practice makes perfect, and the amount of experience is a matter of it. There is no such thing as too advanced. Master the technology.
Suggestions on learning methods: When learning anything, don’t dive directly into the details. You should first understand its peripheral knowledge, look at its overall structure, then learn its basic content, and then study in depth. Polish your skills!
The above is the detailed content of Open source web application framework Django graphic tutorial. For more information, please follow other related articles on the PHP Chinese website!
 How to make charts and data analysis charts in PPT
 Android voice playback function implementation method
 AC contactor use
 The difference between vscode and visual studio
 The difference between Java and Java
 Introduction to hard disk interface types
 nagios configuration method
 How to delete a folder in linux


