This article is to introduce to youPythonExamples of implementing parse trees and implementing three traversals of binary trees, pre-order traversal, in-order traversal, and post-order traversal. It is very detailed and can be helpful if needed. Partners can refer to it.
Parse tree
After completing the implementation of the tree, now let's look at an example to tell you how to use the tree to solve some practical problems. In this chapter, we study parse trees. Parse trees are often used to represent real-world structures, such as sentences or mathematical expressions.
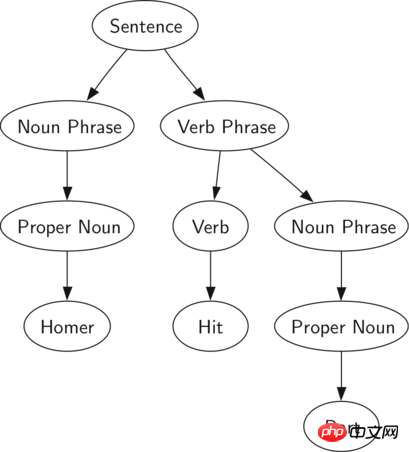
 Figure 1: Parse tree of a simple sentence
Figure 1 shows the hierarchical structure of a simple sentence. Representing a sentence as a tree allows us to handle each independent structure in the sentence by using subtrees.
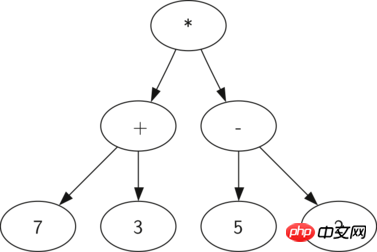
 Figure 2: The parse tree of ((7+3)*(5−2))
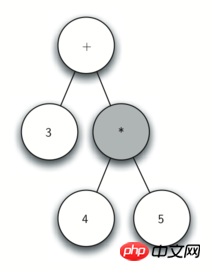
As shown in Figure 2, we can convert a A mathematical expression like ((7+3)*(5−2)) represents a parse tree. We've looked at full bracket expressions, so how do we understand this expression? We know that multiplication has higher priority than addition or subtraction. Because of the relationship between parentheses, we need to calculate the addition or subtraction within the parentheses before doing the multiplication operation. The hierarchical structure of the tree helps us understand the order of operations of the entire expression. Before calculating the topmost multiplication operation, we first need to calculate the addition and subtraction operations in the subtree. The result of addition to the left subtree is 10, and the result of subtraction to the right subtree is 3. Taking advantage of the tree's hierarchical structure, once we have computed the result of an expression in a child node, we can replace the entire subtree with a single node. Applying this substitution step, we obtain a simple tree as shown in Figure 3.
 Figure 3: Reduced parse tree of ((7+3)*(5−2))
In the rest of this chapter, We'll look at parse trees in more detail. In particular:
How to build the corresponding parse tree based on a full bracket mathematical expression
How to calculate the value of the mathematical expression in the parse tree
How to parse based on a Tree reduction mathematical expression
The first step in establishing a parse tree is to decompose the expression
stringinto symbols and save them in a list. There are four symbols we need to consider: the left parenthesis, the operator, and the operand. We know that when we read an opening parenthesis, we start a new expression, so we create a subtree corresponding to this new expression. Instead, whenever we read a closing parenthesis, we have to terminate the expression. Additionally, the operands will become leaf nodes and children of the operators they belong to. Finally, we know that each operator should have a left child and a right child. Through the above analysis, we define the following four rules: If the currently read character is
'(', add a new node as the left child node of the current node, and drop to the left At the child node. If the currently read character is in the list
, set the root value of the current node For the currently read character. Add a new node as the right child node of the current node and drop to the right child node. If the currently read character is a number, add the root value of the current node. Set to this number and return to its parent node.
If the character currently read is ')', return the parent node of the current node.
Before we write Python code, let’s look at the above example. We will use the expression (3+(4*5))
. We decompose the expression into a list of characters as follows:['(', '3', '+', '(', '4', '*', '5' ,')',')' ]
. Initially, we start with a parse tree that contains only an empty root node. Figure 4 illustrates the contents and structure of the parse tree as each new character is read. <p><img alt="Detailed graphic explanation of Python parsing tree and tree traversal" src="https://img.php.cn/upload/article/000/000/013/bb64251671a2876c672cd89025c91d17-3.png" style="max-width:90%" style="max-width:90%" title="Detailed graphic explanation of Python parsing tree and tree traversal"><br><img alt="Detailed graphic explanation of Python parsing tree and tree traversal" src="https://img.php.cn/upload/article/000/000/013/bb64251671a2876c672cd89025c91d17-4.png" style="max-width:90%" style="max-width:90%" title="Detailed graphic explanation of Python parsing tree and tree traversal"><br><img alt="Detailed graphic explanation of Python parsing tree and tree traversal" src="https://img.php.cn/upload/article/000/000/013/8be6abb03d320946c0c53c1a6ca5a35a-5.png" style="max-width:90%" style="max-width:90%" title="Detailed graphic explanation of Python parsing tree and tree traversal"><br><img alt="Detailed graphic explanation of Python parsing tree and tree traversal" src="https://img.php.cn/upload/article/000/000/013/8be6abb03d320946c0c53c1a6ca5a35a-6.png" style="max-width:90%" style="max-width:90%" title="Detailed graphic explanation of Python parsing tree and tree traversal"><br><img alt="Detailed graphic explanation of Python parsing tree and tree traversal" src="https://img.php.cn/upload/article/000/000/013/d02fa57b806db1f4194a9bb866107d11-7.png" style="max-width:90%" style="max-width:90%" title="Detailed graphic explanation of Python parsing tree and tree traversal"><br><img alt="Detailed graphic explanation of Python parsing tree and tree traversal" src="https://img.php.cn/upload/article/000/000/013/d02fa57b806db1f4194a9bb866107d11-8.png" style="max-width:90%" style="max-width:90%" title="Detailed graphic explanation of Python parsing tree and tree traversal"><br><img alt="Detailed graphic explanation of Python parsing tree and tree traversal" src="https://img.php.cn/upload/article/000/000/013/d3d9f311383347e2bfb259e774458859-9.png" style="max-width:90%" style="max-width:90%" title="Detailed graphic explanation of Python parsing tree and tree traversal"><br><img alt="Detailed graphic explanation of Python parsing tree and tree traversal" src="https://img.php.cn/upload/article/000/000/013/d3d9f311383347e2bfb259e774458859-10.png" style="max-width:90%" style="max-width:90%" title="Detailed graphic explanation of Python parsing tree and tree traversal"> </p>#Figure 4: Step diagram of parsing the tree structure <p></p>Observe Figure 4, let us go through it step by step: <p></p>
<ol class=" list-paddingleft-2">
<li>Create an empty tree. <p></p>
</li>
<li> Read as (as the first character, according to rule 1, create a new node as the left child node of the current node, and change the current node into this new child node . <p></p>
</li>##Read 3 as the next character. According to rule 3, assign the root value of the current node to 3 and return the parent node of the current node. <li>#Read + as the next character. According to rule 2, assign the root value of the current node to +, then add a new node as its right child node, and change the current node to this new child node. <p></p>
</li>
<li>Read (as the next character. According to rule 1, create a new node as the left child node of the current node, and change the current node into this new child node. <p></p>
</li>
<li>Read 4 as the next character. According to rule 3, assign the root value of the current node to 4 and return the parent node of the current node<p></p>
</li>
<li>Read * as the next character. According to rule 2, assign the root value of the current node to *, then add a new node as its right child node, and change the current node to this new child node. <p></p>
</li>#Read 5 as the next character. According to rule 3, assign the root value of the current node to 5 and return the parent node of the current node<li>
<p></p>## Read in) as the next character. According to rule 4, we change the current node to the parent node of the current node *. </li>
<li><p>## reads in) as the next character. According to rule 4, we change the current node to the parent node of the current node +, because the current node has no parent node, so we have completed the construction of the parse tree. </p></li>
<li>
<p>Through the example given above, it is obvious that we need to keep track of the current node and the parent node of the current node. The tree provides us with a way to get child nodes - through the </p>getLeftChild</li> and <li>getRightChild<p> methods, but how do we track the parent node of a node? A simple way to do this is to use a stack trace of the parent node as we traverse the entire tree. When we want to descend to a child of the current node, we first push the current node onto the stack. When we want to return the parent of the current node, we pop that parent off the stack. </p>
</li>Through the above rules, using stack and binary tree to operate, we now write </ol>function<p> to create a parse tree. The code for the parse tree generation function is as follows. <code>
from pythonds.basic.stack import Stack
from pythonds.trees.binaryTree import BinaryTree

def buildParseTree(fpexp):
  fplist = fpexp.split()
  pStack = Stack()
  eTree = BinaryTree('')
  pStack.push(eTree)
  currentTree = eTree
  for i in fplist:
    if i == '(':
      currentTree.insertLeft('')
      pStack.push(currentTree)
      currentTree = currentTree.getLeftChild()
    elif i not in ['+', '-', '*', '/', ')']:
      currentTree.setRootVal(int(i))
      parent = pStack.pop()
      currentTree = parent
    elif i in ['+', '-', '*', '/']:
      currentTree.setRootVal(i)
      currentTree.insertRight('')
      pStack.push(currentTree)
      currentTree = currentTree.getRightChild()
    elif i == ')':
      currentTree = pStack.pop()
    else:
      raise ValueError
  return eTree

pt = buildParseTree("( ( 10 + 5 ) * 3 )")
pt.postorder() #defined and explained in the next section这四条建立解析树的规则体现在四个 就像我们以前实现递归算法那样,我们将从基点来设计递归计算表达式值的函数。这个递归算法的自然基点是检查操作符是否为叶节点。在解析树中,叶节点总是操作数。因为数字变量如整数和浮点数不需要更多的操作,这个求值函数只需要简单地返回叶节点中存储的数字就可以。使函数走向基点的递归过程就是调用求值函数计算当前节点的左子树、右子树的值。递归调用使我们朝着叶节点,沿着树下降。 为了将两个递归调用的值整合在一起,我们只需简单地将存在父节点中的操作符应用到两个子节点返回的结果。在图 3 中,我们能看到两个子节点的值,分别为 10 和 3。对他们使用乘法运算得到最终结果 30。 递归求值函数的代码如 Listing1 所示,我们得到当前节点的左子节点、右子节点的参数。如果左右子节点的值都是 None,我们就能知道这个当前节点是一个叶节点。这个检查在第 7 行。如果当前节点不是一个叶节点,查找当前节点的操作符,并用到它左右孩子的返回值上。 为了实现这个算法,我们使用了字典,键值分别为 Listing 1 最后,我们将在图 4 中创建的解析树上遍历求值。当我们第一次调用求值函数时,我们传递解析树参数 现在,为了顶级调用 树的遍历 之前我们已经了解了树的基本功能,现在我们来看一些应用模式。按照节点的访问方式不同,模式可分为 3 种。这三种方式常被用于访问树的节点,它们之间的不同在于访问每个节点的次序不同。我们把这种对所有节点的访问称为遍历( 先序遍历 在先序遍历中,我们先访问根节点,然后递归使用先序遍历访问左子树,再递归使用先序遍历访问右子树。 中序遍历 在中序遍历中,我们递归使用中序遍历访问左子树,然后访问根节点,最后再递归使用中序遍历访问右子树。 后序遍历 在后序遍历中,我们先递归使用后序遍历访问左子树和右子树,最后访问根节点。 现在我们用几个例子来说明这三种不同的遍历。首先我们先看看先序遍历。我们用树来表示一本书,来看看先序遍历的方式。书是树的根节点,每一章是根节点的子节点,每一节是章节的子节点,每一小节是每一章节的子节点,以此类推。图 5 是一本书只取了两章的一部分。虽然遍历的算法适用于含有任意多子树的树结构,但我们目前为止只谈二叉树。 图 5:用树结构来表示一本书 设想你要从头到尾阅读这本书。先序遍历恰好符合这种顺序。从根节点(书)开始,我们按照先序遍历的顺序来阅读。我们递归地先序遍历左子树,在这里是第一章,我们继续递归地先序遍历访问左子树第一节 1.1。第一节 1.1 没有子节点,我们不再递归下去。当我们阅读完 1.1 节后我们回到第一章,这时我们还需要递归地访问第一章的右子树 1.2 节。由于我们先访问左子树,我们先看 1.2.1 节,再看 1.2.2 节。当 1.2 节读完后,我们又回到第一章。之后我们再返回根节点(书)然后按照上述步骤访问第二章。 由于用递归来编写遍历,先序遍历的代码异常的简洁优雅。Listing 2 给出了一个二叉树的先序遍历的 Python 代码。 Listing 2 我们也可以把先序遍历作为 Listing 3 内置和外置方法哪种更好一些呢?一般来说 Listing 4 我们已经见过了后序遍历的一般应用,也就是通过表达式树求值。我们再来看 Listing 1,我们先求左子树的值,再求右子树的值,然后将它们利用根节点的运算连在一起。假设我们的二叉树只存储表达式树的数据。我们来改写求值函数并尽量模仿后序遍历的代码,如 Listing 5 所示。 Listing 5 我们发现 Listing 5 的形式和 Listing 4 是一样的,区别在于 Listing 4 中我们输出键值而在 Listing 5 中我们返回键值。这使我们可以通过第 6 行和第 7 行将递归得到的值存储起来。之后我们利用这些保存起来的值和第 9 行的运算符一起运算。 在这节的最后我们来看看中序遍历。在中序遍历中,我们先访问左子树,之后是根节点,最后访问右子树。 Listing 6 给出了中序遍历的代码。我们发现这三种遍历的函数代码只是调换了输出语句的位置而不改动递归语句。 Listing 6 当我们对一个解析树作中序遍历时,得到表达式的原来形式,没有任何括号。我们尝试修改中序遍历的算法使我们得到全括号表达式。只要做如下修改:在递归访问左子树之前输出左括号,然后在访问右子树之后输出右括号。修改的代码见 Listing 7。 Listing 7if从句,它们分别在第 11,15,19,24 行。如上面所说的,在这几处你都能看到规则的代码实现,并需要调用一些BinaryTree和Stack的方法。这个函数中唯一的错误检查是在else语句中,一旦我们从列表中读入的字符不能辨认,我们就会报一个ValueError的异常。现在我们已经建立了一个解析树,我们能用它来干什么呢?第一个例子,我们写一个函数来计算解析树的值,并返回该计算的数字结果。为了实现这个函数要利用树的层级结构。重新看一下图 2,回想一下我们能够将原始的树替换为简化后的树(图 3)。这提示我们写一个通过递归计算每个子树的值来计算整个解析树的值。'+','-','*'和'/'。存在字典里的值是 Python 的操作数模块中的函数。这个操作数模块为我们提供了很多常用函数的操作符。当我们在字典中查找一个操作符时,相应的操作数变量被取回。既然是函数,我们可以通过调用函数的方式来计算算式,如function(param1,param2)。所以查找opers['+'](2,2)就等价于operator.add(2,2)。def evaluate(parseTree):
opers = {'+':operator.add, '-':operator.sub, '*':operator.mul, '/':operator.truep}
leftC = parseTree.getLeftChild()
rightC = parseTree.getRightChild()
if leftC and rightC:
fn = opers[parseTree.getRootVal()]
return fn(evaluate(leftC),evaluate(rightC))
else:
return parseTree.getRootVal()parseTree,作为整个树的根。然后我们获得左右子树的引用来确保它们一定存在。递归调用在第 9 行。我们从查看树根中的操作符开始,这是一个'+'。这个'+'操作符找到operator.add函数调用,且有两个参数。通常对一个 Python 函数调用而言,Python 第一件做的事情就是计算传给函数的参数值。通过从左到右的求值过程,第一个递归调用从左边开始。在第一个递归调用中,求值函数用来计算左子树。我们发现这个节点没有左、右子树,所以我们在一个叶节点上。当我们在叶节点上时,我们仅仅是返回这个叶节点存储的数值作为求值函数的结果。因此我们返回整数 3。operator.add函数,我们计算好其中一个参数了,但我们还没有完。继续从左到右计算参数,现在递归调用求值函数用来计算根节点的右子节点。我们发现这个节点既有左节点又有右节点,所以我们查找这个节点中存储的操作符,是'*',然后调用这个操作数函数并将它的左右子节点作为函数的两个参数。此时再对它的两个节点调用函数,这时发现它的左右子节点是叶子,分别返回两个整数 4 和 5。求出这两个参数值后,我们返回operator.mul(4,5)的值。此时,我们已经计算好了顶级操作符'+'的两个操作数了,所有需要做的只是完成调用函数operator.add(3,20)即可。这个结果就是整个表达式树 (3+(4*5)) 的值,这个值是 23。traversal)。这三种遍历分别叫做先序遍历(preorder),中序遍历(inorder)和后序遍历(postorder)。我们来给出它们的详细定义,然后举例看看它们的应用。
def preorder(tree):
  if tree:
    print(tree.getRootVal())
    preorder(tree.getLeftChild())
preorder(tree.getRightChild())BinaryTree类中的内置方法,这部分代码如 Listing 3 所示。注意这一代码从外部移到内部所产生的变化。一般来说,我们只是将tree换成了self。但是我们也要修改代码的基点。内置方法在递归进行先序遍历之前必须检查左右子树是否存在。def preorder(self):
print(self.key)
if self.leftChild:
self.leftChild.preorder()
if self.rightChild:
self.rightChild.preorder()preorder作为一个外置方法比较好,原因是,我们很少是单纯地为了遍历而遍历,这个过程中总是要做点其他事情。事实上我们马上就会看到后序遍历的算法和我们之前写的表达式树求值的代码很相似。只是我们接下来将按照外部函数的形式书写遍历的代码。后序遍历的代码如 Listing 4 所示,它除了将print语句移到末尾之外和先序遍历的代码几乎一样。def postorder(tree):
if tree != None:
postorder(tree.getLeftChild())
postorder(tree.getRightChild())
print(tree.getRootVal())def postordereval(tree):
opers = {'+':operator.add, '-':operator.sub, '*':operator.mul, '/':operator.truep}
res1 = None
res2 = None
if tree:
res1 = postordereval(tree.getLeftChild())
res2 = postordereval(tree.getRightChild())
if res1 and res2:
return opers[tree.getRootVal()](res1,res2)
else:
return tree.getRootVal()def inorder(tree):
if tree != None:
inorder(tree.getLeftChild())
print(tree.getRootVal())
inorder(tree.getRightChild())
def printexp(tree):
 sVal = ""
 if tree:
   sVal = '(' + printexp(tree.getLeftChild())
   sVal = sVal + str(tree.getRootVal())
   sVal = sVal + printexp(tree.getRightChild())+')'
 return sVal
我们发现printexp函数对每个数字也加了括号,这些括号显然没必要加。
The above is the detailed content of Detailed graphic explanation of Python parsing tree and tree traversal. For more information, please follow other related articles on the PHP Chinese website!


