Home Operation and Maintenance Windows Operation and Maintenance Webpack basics--installation tutorial

Webpack basics--installation tutorial

Jul 18, 2017 am 09:30 AM
web webpack share

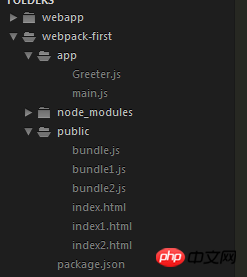
1. Create the webpack-first folder as the site, create the app folder to store the original js modules (main.js and Greeter.js), and create a public folder to store index.html and the packaged bundle. .js file

1. Find the directory of your project
 npm install -g webpack //Globally install webpack

2. Initialize package.json file
npm init
3. Install under the site Webpack establishes dependencies
npm install --save-dev webpack
4. Write the Greeter.js file

module. exports=function(){
 var greet = document.createElement("div");
greet.textContent = "Hi there and greetings";
return greet;
 }

//module.exports uses the function as a return value and becomes a shared module, which can be used as long as the Greeter file is introduced

5. Write the main.js file

var greeter = require("./Greeter.js?1.1.11");
document.getElementById("root").appendChild(greeter());

/ /Introduce require()----Greeter.js module
//Get the html-dom element and put the return value of the called method in the dom element

6. Execute the command Packaging,

webpack app/main.js public/bundle.js

//After installing webpack globally, you can write like this, app/main.js is the main entrance The file public/bundle.js packages the files in this namespace into public, that is, in the same directory as html.


html file code:


First webpack exercise


//What is called is the packaged bundle file


2.

If there are many modules like the above method, it will be very inconvenient. Then we need to execute the entry file and export the packaging directory every time, which is easy to make mistakes. . Is there any simple way for us to execute a word every time we package? Or is it simpler? Here is the method:

Define a configuration file. This configuration file is actually a simple one. JavaScript module, you can put all the information related to the build inside.

Let’s continue the above example to illustrate how to write this configuration file. Create a new file named in the root directory of the current practice folder. webpack.config.js file, and make the simplest configuration in it, as shown below, it Contains the entry file path and the location where the packaged file is stored

##The path of the party.

1. Configure it like this under webpack.config.js

module.exports = {

entry : __dirname + "/app/main.js?1.1.11",//The only entry file that has been mentioned many times

Output: {

Path: __dirname + "/public" ,//The place where the packaged files are stored

 filename: "bundle.js?1.1.11"//The file name of the packaged output file

 }

 }

Note: "__dirname" is a global variable in node.js, which points to the directory where the currently executing script is located. (If the configuration file is under app, then point to the app folder)

The above is the detailed content of Webpack basics--installation tutorial. For more information, please follow other related articles on the PHP Chinese website!

Statement of this Website
The content of this article is voluntarily contributed by netizens, and the copyright belongs to the original author. This site does not assume corresponding legal responsibility. If you find any content suspected of plagiarism or infringement, please contact admin@php.cn

Hot AI Tools

Undresser.AI Undress

Undresser.AI Undress

AI-powered app for creating realistic nude photos

AI Clothes Remover

AI Clothes Remover

Online AI tool for removing clothes from photos.

Undress AI Tool

Undress AI Tool

Undress images for free

Clothoff.io

Clothoff.io

AI clothes remover

AI Hentai Generator

AI Hentai Generator

Generate AI Hentai for free.

Hot Article

R.E.P.O. Energy Crystals Explained and What They Do (Yellow Crystal)
1 months ago By 尊渡假赌尊渡假赌尊渡假赌
R.E.P.O. Best Graphic Settings
1 months ago By 尊渡假赌尊渡假赌尊渡假赌
Will R.E.P.O. Have Crossplay?
1 months ago By 尊渡假赌尊渡假赌尊渡假赌

Hot Tools

Notepad++7.3.1

Notepad++7.3.1

Easy-to-use and free code editor

SublimeText3 Chinese version

SublimeText3 Chinese version

Chinese version, very easy to use

Zend Studio 13.0.1

Zend Studio 13.0.1

Powerful PHP integrated development environment

Dreamweaver CS6

Dreamweaver CS6

Visual web development tools

SublimeText3 Mac version

SublimeText3 Mac version

God-level code editing software (SublimeText3)

How to share Quark Netdisk to Baidu Netdisk? How to share Quark Netdisk to Baidu Netdisk? Mar 14, 2024 pm 04:40 PM

Quark Netdisk and Baidu Netdisk are very convenient storage tools. Many users are asking whether these two softwares are interoperable? How to share Quark Netdisk to Baidu Netdisk? Let this site introduce to users in detail how to save Quark network disk files to Baidu network disk. How to save files from Quark Network Disk to Baidu Network Disk Method 1. If you want to know how to transfer files from Quark Network Disk to Baidu Network Disk, first download the files that need to be saved on Quark Network Disk, and then open the Baidu Network Disk client. , select the folder where the compressed file is to be saved, and double-click to open the folder. 2. After opening the folder, click "Upload" in the upper left corner of the window. 3. Find the compressed file that needs to be uploaded on your computer and click to select it.

How to share NetEase Cloud Music to WeChat Moments_Tutorial on sharing NetEase Cloud Music to WeChat Moments How to share NetEase Cloud Music to WeChat Moments_Tutorial on sharing NetEase Cloud Music to WeChat Moments Mar 25, 2024 am 11:41 AM

1. First, we enter NetEase Cloud Music, and then click on the software homepage interface to enter the song playback interface. 2. Then in the song playback interface, find the sharing function button in the upper right corner, as shown in the red box in the figure below, click to select the sharing channel; in the sharing channel, click the "Share to" option at the bottom, and then select the first "WeChat Moments" allows you to share content to WeChat Moments.

How to share files with friends on Baidu Netdisk How to share files with friends on Baidu Netdisk Mar 25, 2024 pm 06:52 PM

Recently, Baidu Netdisk Android client has ushered in a new version 8.0.0. This version not only brings many changes, but also adds many practical functions. Among them, the most eye-catching is the enhancement of the folder sharing function. Now, users can easily invite friends to join and share important files in work and life, achieving more convenient collaboration and sharing. So how do you share the files you need to share with your friends? Below, the editor of this site will give you a detailed introduction. I hope it can help you! 1) Open Baidu Cloud APP, first click to select the relevant folder on the homepage, and then click the [...] icon in the upper right corner of the interface; (as shown below) 2) Then click [+] in the "Shared Members" column 】, and finally check all

Mango tv member account sharing 2023 Mango tv member account sharing 2023 Feb 07, 2024 pm 02:27 PM

Mango TV has various types of movies, TV series, variety shows and other resources, and users can freely choose to watch them. Mango TV members can not only watch all VIP dramas, but also set the highest definition picture quality to help users watch dramas happily. Below, the editor will bring you some free Mango TV membership accounts for users to use, hurry up and take a look Take a look. Mango TV latest member account free sharing 2023: Note: These are the latest member accounts collected, you can log in directly and use them, do not change the password at will. Account number: 13842025699 Password: qds373 Account number: 15804882888 Password: evr6982 Account number: 13330925667 Password: jgqae Account number: 1703

How to enable administrative access from the cockpit web UI How to enable administrative access from the cockpit web UI Mar 20, 2024 pm 06:56 PM

Cockpit is a web-based graphical interface for Linux servers. It is mainly intended to make managing Linux servers easier for new/expert users. In this article, we will discuss Cockpit access modes and how to switch administrative access to Cockpit from CockpitWebUI. Content Topics: Cockpit Entry Modes Finding the Current Cockpit Access Mode Enable Administrative Access for Cockpit from CockpitWebUI Disabling Administrative Access for Cockpit from CockpitWebUI Conclusion Cockpit Entry Modes The cockpit has two access modes: Restricted Access: This is the default for the cockpit access mode. In this access mode you cannot access the web user from the cockpit

What are web standards? What are web standards? Oct 18, 2023 pm 05:24 PM

Web standards are a set of specifications and guidelines developed by W3C and other related organizations. It includes standardization of HTML, CSS, JavaScript, DOM, Web accessibility and performance optimization. By following these standards, the compatibility of pages can be improved. , accessibility, maintainability and performance. The goal of web standards is to enable web content to be displayed and interacted consistently on different platforms, browsers and devices, providing better user experience and development efficiency.

Solve the problem that Discuz WeChat sharing cannot be displayed Solve the problem that Discuz WeChat sharing cannot be displayed Mar 09, 2024 pm 03:39 PM

Title: To solve the problem that Discuz WeChat shares cannot be displayed, specific code examples are needed. With the development of the mobile Internet, WeChat has become an indispensable part of people's daily lives. In website development, in order to improve user experience and expand website exposure, many websites will integrate WeChat sharing functions, allowing users to easily share website content to Moments or WeChat groups. However, sometimes when using open source forum systems such as Discuz, you will encounter the problem that WeChat shares cannot be displayed, which brings certain difficulties to the user experience.

Share two installation methods for HP printer drivers Share two installation methods for HP printer drivers Mar 13, 2024 pm 05:16 PM

HP printers are essential printing equipment in many offices. Installing the printer driver on the computer can perfectly solve problems such as the printer being unable to connect. So how to install HP printer driver? The editor below will introduce you to two HP printer driver installation methods. The first method: download the driver from the official website 1. Search the HP China official website in the search engine, and in the support column, select [Software and Drivers]. 2. Select the [Printer] category, enter your printer model in the search box, and click [Submit] to find your printer driver. 3. Select the corresponding printer according to your computer system. For win10, select the driver for win10 system. 4. After downloading successfully, find it in the folder

See all articles