 WeChat Applet
 Mini Program Development
 Interpretation and examples of the three view controls of WeChat applet: View, ScrollView and Swiper
Interpretation and examples of the three view controls of WeChat applet: View, ScrollView and Swiper
Regarding the view control of the WeChat applet, today I will give you a systematic interpretation and demonstration. I believe you can use it easily after reading it.
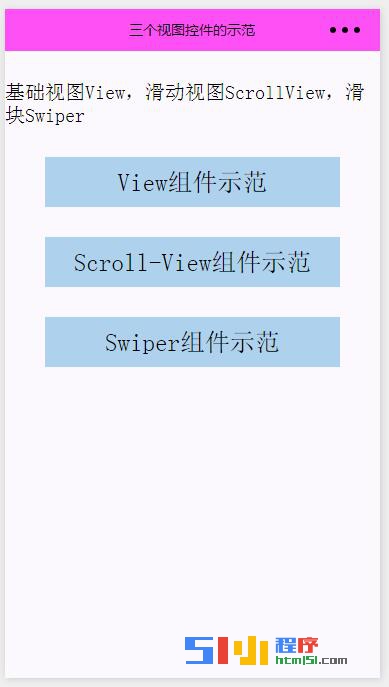
First take a look at the running effect of this sample program.

As you can see, there are three views, each with different configuration and usage.
Next we will introduce it in detail.
Let’s first create a new project, add three navigator navigation buttons on the homepage, and jump to the corresponding component demonstration page respectively.

The WXML code of the index page is as follows:
<!--index.wxml-->
<view class="usermotto">
<text class="user-motto">{{motto}}</text>
</view>

<view class="viewName">
<navigator url="Component/View/View">
<text class="view-Name">View组件示范</text>
</navigator>
</view>
<view class="viewName">
<navigator url="Component/ScrollView/ScrollView">
<text class="view-Name">Scroll-View组件示范</text>
</navigator>
</view>
<view class="viewName">
<navigator url="Component/Swiper/Swiper">
<text class="view-Name">Swiper组件示范</text>
</navigator>
</view>The JS code of the index page is as follows:
var app = getApp()
Page({
data: {
motto: '基础视图View,滑动视图ScrollView,滑块Swiper',
userInfo: {}
},

onLoad: function () {
console.log('onLoad')
var that = this
//调用应用实例的方法获取全局数据
app.getUserInfo(function(userInfo){
//更新数据
that.setData({
userInfo:userInfo
})
})
}
})The WXSS style code of the index page is as follows :
/**index.wxss**/
.usermotto {
margin-top: 30px;
font-size: 20px;
}

.viewName{
margin-top: 30px;
margin-left: 40px;
margin-right: 40px;
height: 50px;
font-size: 25px;
background-color: #AED2EE;
/**下面是设置三个view视图的文本内容上下左右居中**/
justify-content: center;
display: flex;
align-items: center;
} In addition, we would like to remind you that every page will use some of the same styles. In this case, these styles can be extracted and placed in the app.wxss file as public styles.
The common styles in this example Demo are as follows, written in app.wxss.
/**app.wxss**/
page {
background-color: #fbf9fe;
height: 100%;
}
/**在这里可以把整个小程序所有页面用到的公共样式放在这里,便于每个页面直接调用**/
.viewTitle{
margin-top: 20px;
height: 40px;
text-align: center;
}
.bc_green{
background-color: #09BB07;
}
.bc_red{
background-color: #F76260;
}
.bc_blue{
background-color: #10AEFF;
}
.bc_yellow{
background-color: #FFBE00;
}
.bc_gray{
background-color: #C9C9C9;
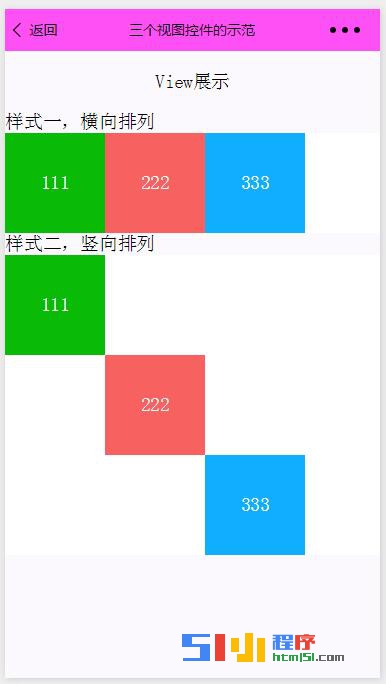
}First, the basic view View component page, the page screenshot is as follows:

The WXML code of the View page is as follows:
<!--View.wxml-->
<!--更多源码请于51小程序源码版块下载:[url]http://bbs.html51.com/f-36-1/-->[/url]
<view class="viewTitle">
    <text>View展示</text>
</view>
<!--样式一,横向排列-->
<view class="section">
    <view class="section__title">样式一,横向排列</view>
    <view class="flex-wrp">
        <view class="flex-item bc_green">111</view>
        <view class="flex-item bc_red">222</view>
        <view class="flex-item bc_blue">333</view>
    </view>
</view>
<!--样式二,竖向排列。下面的style="height:300px"样式,也可以在 .wxml的文件中进行样式设计-->
<view class="section">
    <view class="section__title">样式二,竖向排列</view>
    <view class="flex-wrp" style="height:300px">
<!--下面的view有2个class 一个是来之View.wxss文件定义的样式,一个是总的样式文件app.wxss定义的样式-->
        <view class="flex-item bc_green" style="margin-top: 0px">111</view>
        <view class="flex-item bc_red" style="margin-top: 100px">222</view>
        <view class="flex-item bc_blue" style="margin-top: 200px">333</view>
    </view>
</view>View The WXSS code of the page is as follows:
/**View.wxss**/
.flex-wrp{
    height: 100px;
    display: flex;
    background-color: #ffffff;
}
/**
这里定义了一个样式,另外在总的小程序app.wxss中也可以定义通用的样式,可以应用到每个页面中。
**/
.flex-item{
    width: 100px;
    height: 100px;
    color: #ffffff;
    display: flex;
    justify-content: center;
    align-items: center;
}Because this is a demo View component, there is no JS code. Effect, you can view the animation renderings at the top.
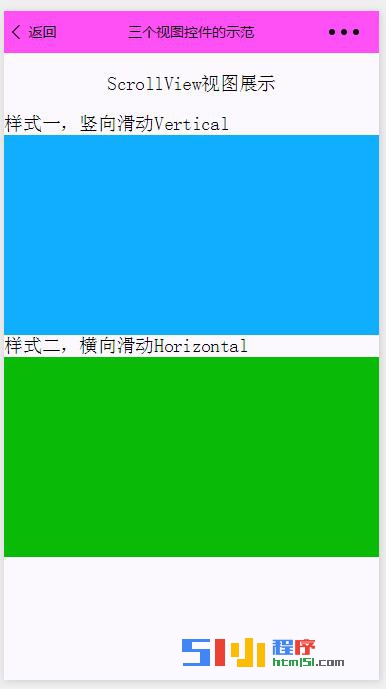
Second, the screenshot of the sliding view component page is as follows:

The WXML code of the ScrollView page is as follows:
<!--ScrollView.wxml-->
<view class="viewTitle">
    <text class="titleName">ScrollView视图展示</text>
  </view>
  <!--样式一,竖向滑动-->
<view class="section">
    <view class="section__title">样式一,竖向滑动Vertical</view>
    <view class="flex-wrp">
    <!--bindscrolltoupper后面的参数可以不写,在.js文件中
    有对应的交互方法-->
      <scroll-view scroll-y="true" style="height: 200px;"
      bindscrolltoupper="upper" bindscrolltolower="lower"
      bindscroll="scroll" scroll-into-view="{{toView}}"
      scroll-top="{{scrollTop}}">
      <!--这里的id用来js中找到对应的显示视图,如果不进行js中data的{{toView}}
      的数据交互,显示的是蓝黄红绿,如果进行js数据交互,那么初始化时显示的是
      最下面的绿-->
        <view id="blue" class="scroll-view-item bc_blue"></view>
        <view id="yellow"  class="scroll-view-item bc_yellow"></view>
        <view id="red" class="scroll-view-item bc_red"></view>
        <view id="green" class="scroll-view-item bc_green"></view>
      </scroll-view>
    </view>
</view>
<!--样式二,横向滑动-->
<view class="section">
    <view class="section__title">样式二,横向滑动Horizontal</view>
    <view class="flex-wrp">
    <scroll-view class="scroll-view_H" scroll-x="true" style="width: 100%">
        <view id="green" class="scroll-view-item_H bc_green"></view>
        <view id="red"  class="scroll-view-item_H bc_red"></view>
        <view id="yellow" class="scroll-view-item_H bc_yellow"></view>
        <view id="blue" class="scroll-view-item_H bc_blue"></view>
      </scroll-view>
    </view>
</view>JS of the ScrollView page The code is as follows:
//ScrollView.js
var order = ['green', 'red', 'yellow', 'blue', 'green']
Page({
})The WXSS code of the ScrollView page is as follows:
/**ScrollView.wxss**/
/**更多源码请于51小程序源码版块下载:[url]http://bbs.html51.com/f-36-1/[/url]**/
.scroll-view_H{
  white-space: nowrap;
}
.scroll-view-item{
  height: 200px;
}
.scroll-view-item_H{
  display: inline-block;
  width: 100%;
  height: 200px;
}
.flex-wrp{
    height: 200px;
    display: flex;
    background-color: #ffffff;
}For the effect of this page, you can view the animation renderings at the top.
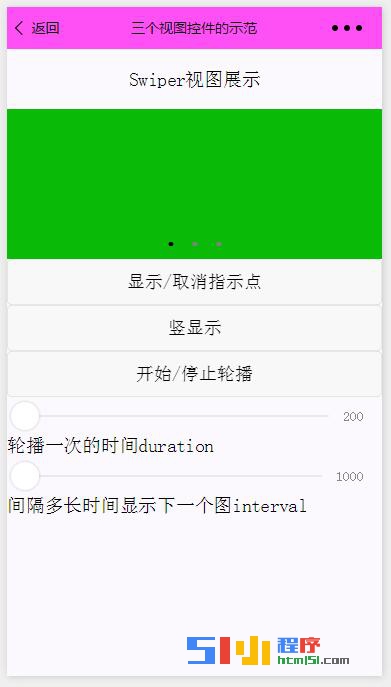
Third, the screenshot of the Swiper view component page is as follows:

This page is relatively complex. You can see a slider view and 3 button controls. Different display states, and two other slide bars, control the speed of the slider view switching.
The specific code and interpretation are as follows:
The WXML code of the Swiper page is as follows:
<!--Swiper.wxml-->
<view class="viewTitle">
<text class="titleName">Swiper视图展示</text>
</view>
<view class="page__bd">
<view class="section section_gap swiper">
<swiper indicator-dots="{{indicatorDots}}" vertical="{{vertical}}"
autoplay="{{autoplay}}" interval="{{interval}}"
duration="{{duration}}">
<block wx:for="{{background}}">
<swiper-item>
<view class="swiper-item bc_{{item}}"></view>
</swiper-item>
</block>
</swiper>
</view>
<view class="btn-area">
<button type="default" bindtap="changeIndicatorDots">
显示/取消指示点</button>
<button type="default" bindtap="changeVertical">
{{vertical?'横显示':'竖显示'}}</button>
<button type="default" bindtap="changeAutoplay">
开始/停止轮播</button>
</view>
<slider bindchange="durationChange" value="{{duration}}"
show-value min="200" max="2000"/>
<view class="section__title">轮播一次的时间duration</view>
<slider bindchange="intervalChange" value="{{interval}}"
show-value min="1000" max="10000"/>
<view class="section__title">间隔多长时间显示下一个图interval</view>
</view>The JS code of the Swiper page is as follows:
//Swiper.js
Page({
  data: {
    background: ['green', 'red', 'yellow'],
    indicatorDots: true,    //布尔值变量,用于控制显示/取消指示点
    vertical: false,        //根据这个布尔值的真假,控制滑块视图,横显示或者竖显示
    autoplay: false,        //通过这个开关控制,是否开始轮播,或者停止轮播
    interval: 3000,         //设置间隔多长时间显示下一个图
    duration: 1200          //设置轮播一次的时间
  },
  changeIndicatorDots: function (e) {
    this.setData({
      indicatorDots: !this.data.indicatorDots
    })
  },
  changeVertical: function (e) {
    this.setData({
      vertical: !this.data.vertical
    })
  },
  changeAutoplay: function (e) {
    this.setData({
      autoplay: !this.data.autoplay
    })
  },
  intervalChange: function (e) {
    this.setData({
      interval: e.detail.value
    })
  },
  durationChange: function (e) {
    this.setData({
      duration: e.detail.value
    })
  }
})The WXSS code of the Swiper page is as follows:
/**Swiper.wxss**/
.swiper-item{
  display: block;
  height: 150px;
}For more articles about the interpretation and examples of the three view controls View, ScrollView, and Swiper of the WeChat applet, please pay attention to the PHP Chinese website!

Hot AI Tools

Undresser.AI Undress
AI-powered app for creating realistic nude photos

AI Clothes Remover
Online AI tool for removing clothes from photos.

Undress AI Tool
Undress images for free

Clothoff.io
AI clothes remover

Video Face Swap
Swap faces in any video effortlessly with our completely free AI face swap tool!

Hot Article

Hot Tools

Notepad++7.3.1
Easy-to-use and free code editor

SublimeText3 Chinese version
Chinese version, very easy to use

Zend Studio 13.0.1
Powerful PHP integrated development environment

Dreamweaver CS6
Visual web development tools

SublimeText3 Mac version
God-level code editing software (SublimeText3)

Hot Topics
 1672
1672
 14
14
 1428
1428
 52
52
 1332
1332
 25
25
 1277
1277
 29
29
 1257
1257
 24
24

