label label component description:
label label, which is basically the same as the label label of html. The label element does not present any special effects to the user. However, it improves usability for mouse users. This control is triggered if you click on the text inside the label element. That is to say, when the user selects the label, the focus will automatically go to the form control bound to the label, which is mainly used to improve the usability of the form component.
Use the for attribute to find the corresponding id, or place the control under the label. When clicked, the corresponding control will be triggered.
for has a higher priority than internal controls. When there are multiple controls inside, the first control is triggered by default.
Currently the controls that can be bound are: ,
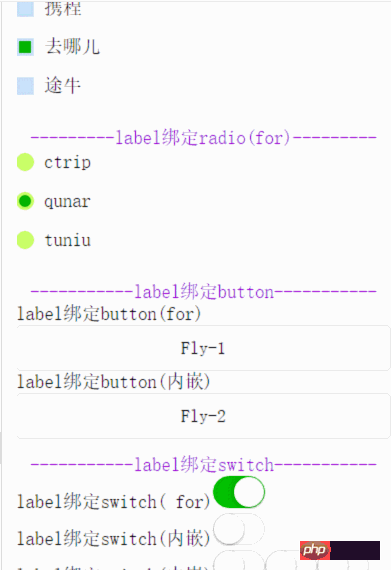
The effect of component usage example code As follows:

The WXML code is as follows:
<view class="content">
  <text class="section__title">-------label绑定checkbox(内嵌)-------</text>
  <checkbox-group bindchange="checkboxChange">
    <view class="label-1" wx:for="{{checkboxItems}}">
      <label>
        <checkbox hidden value="{{item.name}}" checked="{{item.checked}}"></checkbox>
        <view class="label-1__icon">
          <view class="label-1__icon-checked" style="opacity:{{item.checked ? 1: 0}}"></view>
        </view>
        <text class="label-1__text">{{item.value}}</text>
      </label>
    </view>
  </checkbox-group>
</view>
<view class="content">
  <text class="section__title">---------label绑定radio(for)---------</text>
  <radio-group class="group" bindchange="radioChange">
    <view class="label-2" wx:for="{{radioItems}}">
      <radio id="{{item.name}}" hidden value="{{item.name}}" checked="{{item.checked}}"></radio>
      <view class="label-2__icon">
        <view class="label-2__icon-checked" style="opacity:{{item.checked ? 1: 0}}"></view>
      </view>
      <label class="label-2__text" for="{{item.name}}"><text>{{item.name}}</text></label>
    </view>
  </radio-group>
</view>
<view class="content">
  <text class="section__title">-----------label绑定button-----------</text>
  <label for="buttontest">label绑定button(for)</label>
  <button id="buttontest" bindtap="testLabelBindButton_1">Fly-1</button>
  <label>
    <text>label绑定button(内嵌)</text>
    <button bindtap="testLabelBindButton_2">Fly-2</button>
  </label>
</view>
<view class="content">
  <text class="section__title">-----------label绑定switch-----------</text>
  <view>
    <label for="switchtest">label绑定switch( for)</label>
    <switch id="switchtest" checked/>
  </view>
  <view>
    <label>
      <text>label绑定switch(内嵌)</text>
      <switch/>
    </label>
  </view>
    <view>
    <label>
      <text>label绑定switch(内嵌)</text>
      <switch/>
      <switch/>
      <switch/>
    </label>
  </view>
</view>The JS code is as follows:
Page({
  data: {
    checkboxItems: [
      {name: 'ctrip', value: '携程', checked: 'true'},
      {name: 'qunar', value: '去哪儿'},
      {name: 'tuniu', value: '途牛'}
    ],
    radioItems: [
      {name: 'ctrip', value: '携程'},
      {name: 'qunar', value: '去哪儿', checked: 'true'},
      {name: 'tuniu', value: '途牛'}
    ],
    hidden: false
  },
  checkboxChange: function(e) {
    var checked = e.detail.value
    var changed = {}
    for (var i = 0; i < this.data.checkboxItems.length; i ++) {
      if (checked.indexOf(this.data.checkboxItems[i][i].name) !== -1) {
        changed['checkboxItems['+i+'].checked'] = true
      } else {
        changed['checkboxItems['+i+'].checked'] = false
      }
    }
    this.setData(changed)
  },
  radioChange: function(e) {
    var checked = e.detail.value
    var changed = {}
    for (var i = 0; i < this.data.radioItems.length; i ++) {
      if (checked.indexOf(this.data.radioItems.name) !== -1) {
        changed['radioItems['+i+'].checked'] = true
      } else {
        changed['radioItems['+i+'].checked'] = false
      }
    }
    this.setData(changed)
  },
  testLabelBindButton_1:function(){
    console.log("奔走相告,button通过for可以绑定成功啦!!!");
  },
  testLabelBindButton_2:function(){
    console.log("奔走相告,button通过内嵌可以绑定成功啦!!!");
  }
})The WXSS code is as follows
.label-1, .label-2{
    margin-bottom: 15px;
}
.label-1__text, .label-2__text {
    display: inline-block;
    vertical-align: middle;
}
.label-1__icon {
    position: relative;
    margin-right: 10px;
    display: inline-block;
    vertical-align: middle;
    width: 18px;
    height: 18px;
    background: #CAE1FF;
}
.label-1__icon-checked {
    position: absolute;
    top: 3px;
    left: 3px;
    width: 12px;
    height: 12px;
    background: #1aad19;
}
.label-2__icon {
    position: relative;
    display: inline-block;
    vertical-align: middle;
    margin-right: 10px;
    width: 18px;
    height: 18px;
    background: #CAFF70;
    border-radius: 50px;
}
.label-2__icon-checked {
    position: absolute;
    left: 3px;
    top: 3px;
    width: 12px;
    height: 12px;
    background: #1aad19;
    border-radius: 50%;
}
.section__title{
  display: block;
  text-align: center;
  color: #9400D3;
}
.content{
  padding-bottom: 15px;
}Attributes |
Type |
Type |
| for | String | The id of the bound control (the id and the form control that needs to be bound It will only take effect if the id is exactly the same) |
The above is the detailed content of WeChat applet component label interpretation and analysis examples. For more information, please follow other related articles on the PHP Chinese website!


