 WeChat Applet
 Mini Program Development
 Detailed explanation of wxml and wxss files in WeChat applet
Detailed explanation of wxml and wxss files in WeChat applet
WXML
WXML (WeiXin Markup Language) is a set of tag languages of WeChat. Combined with basic components and event systems, it can build the structure of the page.
(Little Anna: It seems very powerful. What are the basic components and event system? It feels even more powerful because they must be combined.) , the basic components are similar to tags in HTML, The event system is an event in JavaScript, which can process logic and reflect it on the interface; wxml is just a file format. If there are no components and events, it is of no use. And if the components and events are written in a txt document, it is of no use, so there is no Who is more powerful, a mutually reinforcing relationship. (Little Anna: Suga, it’s like the relationship between ap, ad, and adc, they are the strongest together)
Use the following simple examples to see what capabilities WXML has:
Data binding
The dynamic data in WXML comes from the data object corresponding to the Page.
Simple binding
Data binding uses Mustache syntax (double braces) to wrap variables, which can be used in the following:
(Xiao Anna: etc. Wait, are you sincere, Mustache doesn’t know anything! ), Mustache is a template parsing engine based on JavaScript, etc... In short, it is very convenient and easy to use. (Little Anna: Let me go, you don’t know what it is)
Content
<view> {{ message }} </view>Page({
data: {
message: 'Hello MINA!'
}
})Display results:

Display results
(Little Anna: What does <view> mean? Remember there is no such tag in HTML?), This is the basic component. The view component represents the view container and can be understood as the p tag in HTML.
Component properties (need to be within double quotes)
<view id="item-{{id}}">id="item-{{id}}"</view>Page({
data: {
id: 0
}
})Display results:

Display results
Control attributes (need to be within double quotes)
<view wx:if="{{condition}}">你看得见我吗?</view>Page({
data: {
condition: true
}
})Display results:

Display results
(Little Anna: I just tried it. If you change the condition to false, you can no longer see me!) , yes, changing it to false means that the condition is false and the content in the view component will not be visible. will be displayed. (Little Anna: Oh, I understand. Although I don’t want to see you, in order to learn the mini program well, I’d better change it to true)
Keywords (need to be within double quotes)
true: boolean type true, representing true value.
false: boolean type false, representing a false value.
<checkbox checked="{{false}}" />默认没选中Special attention: Do not write checked="false" directly, at this time "false" is a string, (in JavaScript Non-zero is true, non-empty bit is true) is converted into boolean type to represent the true value.
(Little Anna: Is this checkbox the same as the HTML checkbox?) , yes, but the checkbox component It is more united and exists based on the concept of group. For example, we will use checkbox-group to include all checkbox components of the same type. You will naturally understand it when you use it later. (Little Anna: Oh, I’m going crazy, there’s another checkbox-group, I feel like I don’t have the patience to learn) , don’t think like that, the basics are boring, but with the I need to take you with me before you fly. It will be very interesting when we do a case study in the next article. (Little Anna: Got it, then I can just read the next one ^_^) , continue...
So the result is displayed:

Display results
Operation
You can perform simple operations within {{}}. The following methods are supported:
Ternary operation
Ternary operation is: condition? Result 1: Result 2; when the condition is true, the result is 1, otherwise the result is 2.
<view hidden="{{flag ? true : false}}"> 看得见吗? </view> (Little Anna: flag I haven’t seen your definition after looking for it for a long time. Are you sure you won’t report an error?) , no, this kind of variable is is an empty variable, (remember that non-empty means true) flag is converted to boolean type and represents false, that is, the final expression is like this of: hidden="{{false}}", do you understand? (Little Anna: Alasou, continue)
Display results:

Display results
算数运算
<view> {{a + b}} + {{c}} + d </view>Page({
data: {
a: 1,
b: 2,
c: 3
}
})这次就先不说结果了,小安娜,你来猜猜看结果是什么?(小安娜:恩~,a=1,b=2,a+b就等于3,c=3,咦~,d没定义啊?),结果其实是:3 + 3 + d,d不是没定义,而它本来就是一个文字d,不参与任何计算。(小安娜:我这么认真回答,你居然这样坑我!!!)
显示结果:

显示结果
字符串运算
<view>{{"hello " + name}}</view>Page({
data:{
name: 'MINA2'
}
})显示结果:

显示结果
数据路径运算
如果data对象中包含了子对象,例如:
Page({
data: {
object: {
key: 'Hello '
},
array: ['MINA3']
}
})可以这样访问:
<view>{{object.key}} {{array[0]}}</view>显示结果:

显示结果
这个应该没问题吧?(小安娜:没问题,就是点操作嘛,一个是JSON对象操作,一个是数组操作),OK继续。
组合
也可以在 Mustache 内直接进行组合,构成新的对象或者数组。
数组
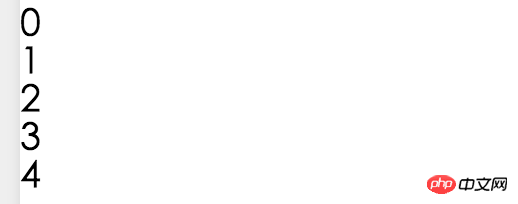
<view wx:for="{{[zero, 1, 2, 3, 4]}}"> {{item}} </view>Page({
data: {
zero: 0
}
})(小安娜:等等,这里我看了很久还是理解不了,再细讲解下),好,首先我们在data对象中定义zero变量并赋值为0,然后使用view组件的wx:for属性表示重复显示这个组件,wx:for属性的值是一个重新构造的数组,数组中第一个元素(也就是下标为0)的值来自于data中的zero对象,所以最终是用数组为[0, 1, 2, 3, 4]重复渲染组件。(小安娜:哦哦,完~全明白了)
显示结果:
显示结果
条件渲染
wx:if
wx:if我们之前已经用过了,用来判断是否渲染该组件:
<view wx:if="{{condition}}">你看得见我吗?</view>也可以用 wx:elif 和 wx:else 来添加其他判断:
<view wx:if="{{length > 5}}"> 1 </view>
<view wx:elif="{{length > 2}}"> 2 </view>
<view wx:else> 3 </view>Page({
data: {
length: 10
}
})界面显示结果:1
block wx:if
因为 wx:if 是一个控制属性,需要将它添加到一个标签上。但是如果我们想一次性判断多个组件,我们可以使用 <block/> 标签将多个组件包装起来,并在block标签上用wx:if控制属性。
<block wx:if="{{true}}">
<view> view1 </view>
<view> view2 </view>
</block>这里的{{true}}是一个boolean类型的值,所以最后view1、view2都会显示。
(小安娜:我记得你说view可以看成p,那block呢,HTML中没这种控制标签?),没错啦,<block/> 并不是一个组件,它仅是一个包装元素,不会在页面中做任何渲染显示,只接受控制属性。(小安娜:明白了,block就好像文件夹,不占用空间,可设置文件夹显示和隐藏)
列表渲染
wx:for
在组件上使用 wx:for 控制属性绑定一个数组数据重复渲染该组件。
默认的当前项下标变量名为: index,数组当前项的变量名为:item:(小安娜:不默认是什么样啊?)
<view wx:for="{{array}}">
{{index}}:{{item.message}}
</view>Page({
data: {
array: [{
message: 'foo',
}, {
message: 'bar'
}]
}
})显示结果:

显示结果
不使用默认可以使用 wx:for-item 可以指定当前元素的变量名,使用 wx:for-index 可以指定当前下标的变量名:
<view wx:for="{{array}}" wx:for-index="idx" wx:for-item="itemName">
{{idx}}: {{itemName.message}}
</view>输出结果一样。
block wx:for
类似block wx:if,也可以将wx:for用在 <block/>标签上,重复渲染多组件块。例如:
<block wx:for="{{['a', 'b', 'c']}}">
<view> {{index}}:{{item}}</view>
</block>显示结果:

显示结果
wx:key(可以选择跳过,但,是很重要的重点)
(小安娜:突然有种想打你的冲动,又是重点又可以跳过,下课操场见!!!),冷静、冷静,官方文档我看到这时,也是没理解这是什么意思,后来就跳过这段了,但是也完成了B站的首页,(小安娜:哈~,原来是自己傻看不懂,别把我们的智商和你比好吧!),当写到这时再去多看了一遍(小安娜:绝对不止一遍),把官方例子运行调试之后,才发现微信官方设计wx:key的用意,而且是很重要的重点。
如果列表中的项目位置会改变或者有新的项目添加到列表中,为了项目保持自己的属性和状态(如 <input/> 的输入内容,<switch/> 的选中状态),需要使用wx:key来指定列表中项目的唯一的标识符。
wx:key的值以两种形式提供:
字符串;代表在
for循环的array中item的某个属性,该属性的值是列表中唯一的字符串或数字,并且不能动态改变。保留关键字;
*this代表在for循环中的item本身,这种需要item本身是唯一的字符串或者数字。
是不是完全理解不了什么意思?(小安娜:我觉得这不是重点,重点是案例你还没讲)
案例1:wx:key的值是字符串
<switch wx:for="{{objectArray}}" wx:key="unique" style="display: block;"> {{item.id}} </switch>
<button bindtap="switch"> 改变顺序 </button>
<button bindtap="addToFront"> 添加到前面 </button>(小安娜:bindtap是什么意思呢?),这个是用来绑定事件的,bindtap是当用户点击的时候会执行相对于的函数,这个马上会在事件中详细讲解。
Page({
data: {
objectArray: [
{id: 5, unique: 'unique_5'},
{id: 4, unique: 'unique_4'},
{id: 3, unique: 'unique_3'},
{id: 2, unique: 'unique_2'},
{id: 1, unique: 'unique_1'},
{id: 0, unique: 'unique_0'},
]
},
// 随机改变列表项目顺序
switch: function(e) {
const length = this.data.objectArray.length
for (let i = 0; i < length; ++i) {
const x = Math.floor(Math.random() * length)
const y = Math.floor(Math.random() * length)
const temp = this.data.objectArray[x]
this.data.objectArray[x] = this.data.objectArray[y]
this.data.objectArray[y] = temp
}
this.setData({
objectArray: this.data.objectArray
})
},
// 添加项目到最前面
addToFront: function(e) {
const length = this.data.objectArray.length
this.data.objectArray = [{id: length, unique: 'unique_' + length}].concat(this.data.objectArray)
this.setData({
objectArray: this.data.objectArray
})
}
})(小安娜:天了噜,一大波代码来袭,看不懂了啦),所有函数真可以不用看懂内部实现,只需知道干什么用就行(内心的杰尔夫君:其实我知道只有她看不懂,大家照顾照顾她,假装看不懂)(小安娜:阿丘~谁在说我坏话!)。
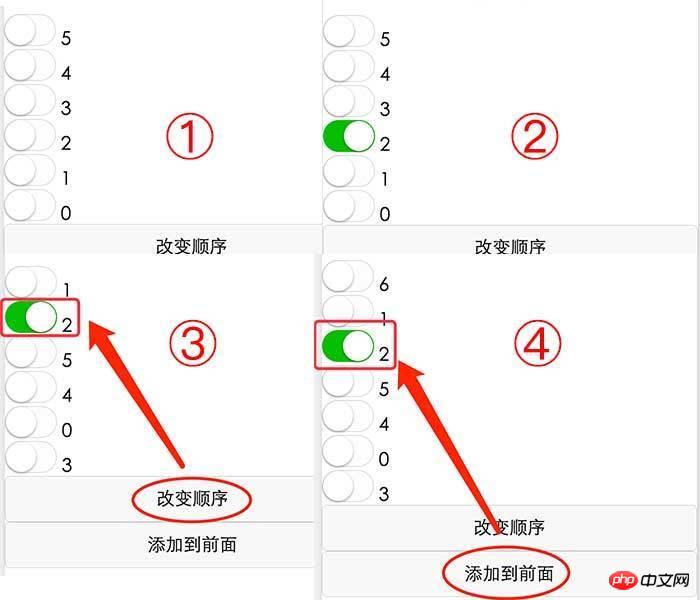
显示结果(①:初始化状态;②:打开项目2的开关;③:改变顺序后项目2依然是打开状态;④:在最前面添加项目6,项目2依然是打开状态),这就是wx:key的作用,它会利用一个唯一值保留该项状态:
显示结果
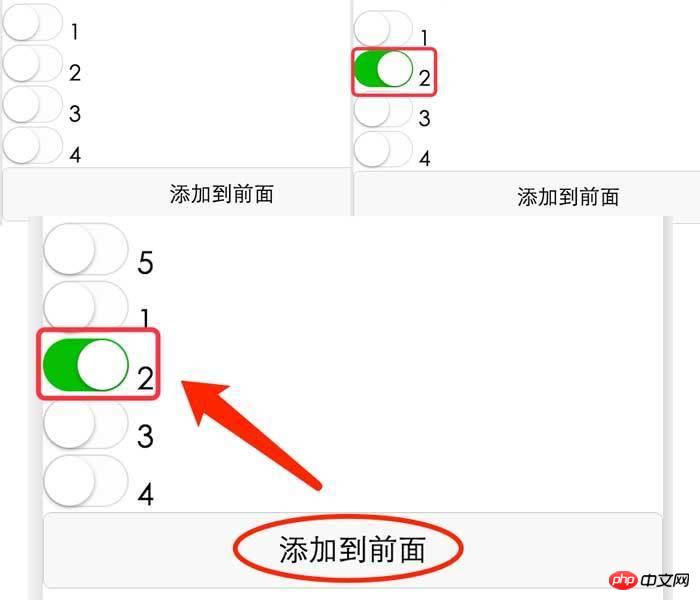
案例2:wx:key的值是*this
<switch wx:for="{{numberArray}}" wx:key="*this" style="display: block;"> {{item}} </switch>
<button bindtap="addNumberToFront">添加到前面</button>Page({
data: {
numberArray: [1, 2, 3, 4]
},
// 添加项目到前面
addNumberToFront: function(e){
this.data.numberArray = [ this.data.numberArray.length + 1 ].concat(this.data.numberArray)
this.setData({
numberArray: this.data.numberArray
})
}
})显示结果:
显示结果
模板
WXML提供模板(template),可以在模板中定义代码片段,然后在不同的地方调用。
使用模板
使用name属性作为模板的名字。然后在
<template/>内定义代码片段。使用 is 属性,声明需要的使用的模板,然后将模板所需要的 data 传入。
<template name="msgItem">
<view>
<text> {{index}}: {{msg}} </text>
<text> Time: {{time}} </text>
</view>
</template>
<!-- 这里代表把item对象传入模板 -->
<template is="msgItem" data="{{...item}}"/>Page({
data: {
item: {
index: 0,
msg: 'this is a template',
time: '2016-09-15'
}
}
})显示结果:

显示结果
is 属性可以使用 Mustache 语法来做逻辑判断,例如以下根据条件来选择使用模板:
<template name="odd">
<view> odd </view>
</template>
<template name="even">
<view> even </view>
</template>
<block wx:for="{{[1, 2, 3, 4, 5]}}">
<template is="{{item % 2 == 0 ? 'even' : 'odd'}}"/>
</block>显示结果:

显示结果
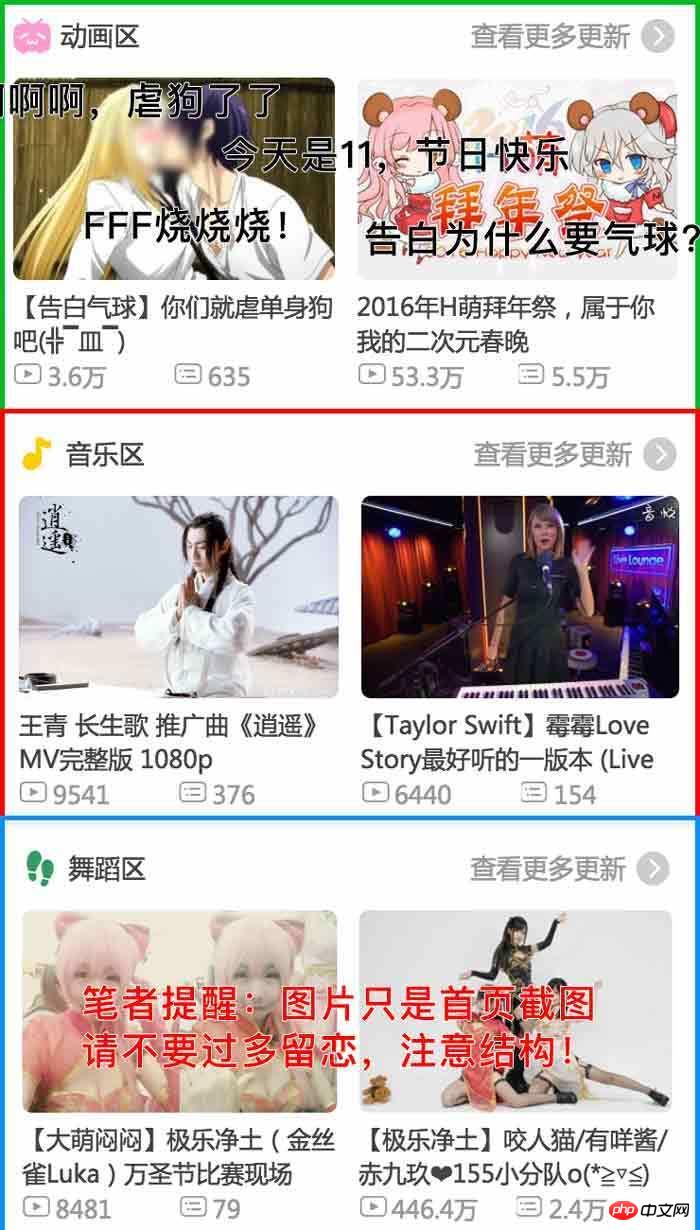
恩~~,这里有什么问题吗?(小安娜:恩~~就是呢,不知道模板可以用在什么地方?),当你网站很多地方都用到同一种结构的时候就可以用了,例如我们要做的B站首页:
(小安娜:↓↓↓蓝色区域第二张图,不谢)
B站首页
可以看出绿、红、蓝色区域的结构都一样,改变的只是内容,这样的结构就很适合用模板实现。(小安娜:那其他页面也有这种结构呢?例如B站的直播页也有这种结构,顺便问一下为什么绿色在最前面XD),像这种需求我们就需要创建单独的模板文件,在需要的地方导入模板文件就行,接下来就细讲这个。
导入模板
WXML 提供两种文件引用方式import和include。
带作用域的import
import可以导入指定文件的template,例如在item.wxml中定义了一个叫item的template:
<!-- item.wxml -->
<template name="item">
<text>{{text}}</text>
</template>在 index.wxml 中引用了 item.wxml,就可以使用item模板:
<import src="item.wxml"/>
<template is="item" data="{{text: 'forbar'}}"/>data="{{text: 'forbar'}}"表示构造一个对象传入item.wxml中item模板。
(小安娜:显示结果是:forbar,对吧?),没错啦,厉害了我的小姐姐;还有就是import有一级作用域的概念,例如:C import B,B import A,在C中可以使用B定义的template,在B中可以使用A定义的template,但是C不能使用A定义的template。
<!-- a.wxml --> <template name="A"> <text> A template </text> </template>
<!-- b.wxml --> <import src="a.wxml"/> <template name="B"> <text> B template </text> </template>
<!-- index.wxml --> <import src="b.wxml"/> <template is="A"/> <!-- Error! Can not use template when not import A. --> <template is="B"/>
显示结果:B template;程序这样写编译会通过,但会在控制台(Console)报运行时警告(Runtime warn),还请注意。(小安娜:这么大个坑,那不是debug时很难找出问题?),是啊,的确很难避免,很容易出错而且找不到问题所在,但显示结果又不对,所以我们开发的时候要多注意调试控制台(Console)输出的错误和异常信息。(小安娜:开发果然是个细心活,同志们一起加油啦)。
头部和底部的include
include可以将目标文件除了<template/>的整个代码引入,相当于是拷贝到<include />的位置,比较常用于程序的头部(header)和底部(footer),例如:
<!-- header.wxml -->
<view>{{header}}</view><!-- footer.wxml -->
<view>{{footer}}</view><!-- index.wxml --> <include src="header.wxml"/> <view> body </view> <include src="footer.wxml"/>
等同于 === :
<!-- index.wxml -->
<view>{{header}}</view>
<view> body </view>
<view>{{footer}}</view>// index.js
Page({
data: {
header: "header",
footer: "footer"
}
})显示结果:

显示结果
(小安娜:发现了,它可以直接使用index.js的数据),没错,所以这种更适合头部和底部数据不会随着页面不同而改变,而import更适合定义内容中模板,因为每个页面的数据结构体是会不一样的,例如首页的数据结构可能是:{channels:[music:[],dance:[],live:[]]},而在直播页面中的数据结构可能是:{lives:[]},2个页面数据结构不同,这时候可以用import把数据重新构造传入给模板。(小安娜:懵懵懂懂好像明白了),没关系,后面我们实战时就会彻底明白了。(小安娜:期待期待~)
事件
事件是视图层(wxml)到逻辑层(js)的通讯方式,可以绑定在组件上,当触发事件,就会执行逻辑层中对应的事件处理函数。
事件分类
| 类型 | 触发条件 |
|---|---|
| touchstart | 手指触摸动作开始 |
| touchmove | 手指触摸后移动 |
| touchcancel | 手指触摸动作被打断,如来电提醒,弹窗 |
| touchend | 手指触摸动作结束 |
| tap | 手指触摸后马上离开 |
| longtap | 手指触摸后,超过350ms再离开 |
绑定事件格式为:bind + 事件类型(例如:bindtap),我们先来看事件类型的执行顺序:
<!-- index.wxml --> <button bindtouchstart="ontouchstart" bindtouchmove="ontouchmove" bindtouchend="ontouchend" bindtap="ontap" bindlongtap="onlongtap">点击我<button/>
Page({
ontouchstart: function() {
console.log( "touchstart" );
},
ontouchmove: function() {
console.log( "touchmove" );
},
ontouchend: function() {
console.log( "touchend" );
},
ontap: function() {
console.log( "tap" );
},
onlongtap: function() {
console.log( "longtap" );
}
})当点击(\<=350ms)的时候,执行顺序:
touchstart
touchend
tap
当长按(>350ms)的时候,执行顺序:
touchstart
longtap
touchend
tap
我们发现点击是我们想象中的那样,但是长按执行一次longtap还会在执行一次tap事件,(小安娜:那这就比较坑了,我很喜欢长按一些头像按钮,因为会有快捷操作菜单),是啊,我知道长按这个操作在Android是很常用的设计,所以我们在小程序里面尽量避免设计某个组件有长按又有点击事件。(小安娜:因为这个操作太好用了,没有解决办法吗?),可以在data里面设置一个判断长按的变量,当touchstart的时候设置此变量为false,当执行longtap事件的时候设置变量为true,然后在tap事件里面做判断就行了。
Page({
data: {
islongtap: false
},
ontouchstart: function() {
this.islongtap = false;
console.log( "touchstart" );
},
ontap: function() {
if( this.islongtap ) return ;
console.log( "tap" );
},
onlongtap: function() {
this.islongtap = true;
console.log( "longtap" );
}
})(小安娜:perfect,运行了下完美解决)
像js的事件一样,小程序事件也分为冒泡事件和非冒泡事件:
<view id="outter" bindtap="handleTap1">
<view id="middle" bindtap="handleTap2">
<button id="inner" bindtap="handleTap3">
操作按钮
</button>
</view>
</view>Page({
handleTap1: function() {
console.log( "handleTap1" );
},
handleTap2: function() {
console.log( "handleTap2" );
},
handleTap3: function() {
console.log( "handleTap3" );
}
})这是一个常用的结构,一个大的层包含内部很多小层,小层内部有个操作按钮,当我们点击操作按钮:
handleTap3
handleTap2
handleTap1
发现所有父组件的点击事件都执行了,这就是冒泡事件:当一个组件上的事件被触发后,该事件会向父节点传递。非冒泡事件就是不会向父节点传递。当然这很多时候不是件好事情,怎么避免呢?
小程序除了提供bind还提供catch绑定事件,格式为:catch + 事件类型,catch事件绑定可以阻止向上冒泡。现在在button上改用catch试一下:
<view id="outter" bindtap="handleTap1">
<view id="middle" bindtap="handleTap2">
<button id="inner" catchtap="handleTap3">
操作按钮
</button>
</view>
</view>输出结果:handleTap3,达到我们的效果了。(小安娜:我觉得把父组件的绑定事件去掉更好)
事件参数event
当组件触发事件时,处理函数会收到一个事件对象参数。
Page({
handleTap3: function(event) {
console.log( event );
}
})控制台输出的结果:
{
// 代表事件的类型
"type": "tap",
// 页面打开到触发事件所经过的毫秒数
"timeStamp": 2239,
// 触发事件的源组件
"target": {
// 事件源组件的id
"id": "inner",
// 距离左方或上层控件的位置(官方文档未说明)
"offsetLeft": 0,
// 距离上方或上层控件的位置(官方文档未说明)
"offsetTop": 0,
// 事件源组件上由data-开头的自定义属性组成的集合
"dataset": {}
},
// 事件绑定的当前组件,数据格式同 target
"currentTarget": {
"id": "inner",
"offsetLeft": 0,
"offsetTop": 0,
"dataset": {}
},
// 额外的数据信息
"detail": {
"x": 280,
"y": 18
},
// touches 是一个数组,每个元素为一个 Touch 对象(canvas 触摸事件中携带的 touches 是 CanvasTouch 数组)。 表示当前停留在屏幕上的触摸点。
"touches": [
{
// 触摸点的标识符
"identifier": 0,
// 距离文档左上角的距离,文档的左上角为原点 ,横向为X轴
"pageX": 280,
// 距离文档左上角的距离,文档的左上角为原点 ,纵向为Y轴
"pageY": 18,
// 距离页面可显示区域(屏幕除去导航条)左上角距离,横向为X轴
"clientX": 280,
// 距离页面可显示区域(屏幕除去导航条)左上角距离,纵向为Y轴
"clientY": 18
}
],
// changedTouches 数据格式同 touches。 表示有变化的触摸点,如从无变有(touchstart),位置变化(touchmove),从有变无(touchend、touchcancel)。
"changedTouches": [
{
"identifier": 0,
"pageX": 280,
"pageY": 18,
"clientX": 280,
"clientY": 18
}
]
}每个参数具体什么意思,我们放在以后B站项目中去讲解,(小安娜:噗~,我好多问题准备问了,现在又憋回去了,听你讲东西真心累),毕竟太多了,每个都讲到估计可以写几篇文章了,用到什么再回头来看看,然后再配合案例这样最容易理解了。(小安娜:好像也是,总感觉哪里不对,等等...要是你不用到呢),这个保证不会,因为有我们常用的dataset,经常会为组件自定义一些参数。(小安娜:姑且相信你)
WXSS
WXSS(WeiXin Style Sheets)是一套样式语言,用于描述 WXML 的组件样式。
用来决定 WXML 的组件应该怎么显示。
具有 CSS 大部分特性。
定义在 app.wxss 中的样式为全局样式,可用于任何Page。在 Page 里的 wxss 文件中定义的样式为局部样式,只作用在当前页面,并会覆盖 app.wxss 中相同的选择器。
与 CSS 相比增加的特性有:
尺寸单位
样式导入
尺寸单位rpx
rpx(responsive pixel): 可以根据屏幕宽度进行自适应。规定屏幕宽为750rpx。如在 iPhone6 上,屏幕宽度为375px,共有750个物理像素,则750rpx = 375px = 750物理像素,1rpx = 0.5px = 1物理像素。(小安娜:真啰嗦,也就是1px = 2rpx嘛)
| 设备 | rpx换算px (屏幕宽度/750) | px换算rpx (750/屏幕宽度) |
|---|---|---|
| iPhone5 | 1rpx = 0.42px | 1px = 2.34rpx |
| iPhone6/6s | 1rpx = 0.5px | 1px = 2rpx |
| iPhone6/6s Plus | 1rpx = 0.552px | 1px = 1.81rpx |
所以:我们设计/开发微信小程序时都应该用 iPhone6s 作为视觉稿的标准。(小安娜:所以,看你教程是不是有福利,会给我们发iPhone 6s吗?)
样式导入
使用@import语句导入外联样式表,@import后跟样式表的相对路径。
/* common.wxss */
.header,
.footer {
padding: 20rpx 0;
text-align: center;
font-size: 50rpx;
}/* index.wxss */
@import "common.wxss";
.content {
line-height: 50rpx;
}<view class="header">header</view> <view class="content" style="color:#e64340;">和小安娜一块去超市买东西,小安娜:“好想吃泡面,可是怕上火啊”;我:“那就不要买了”;小安娜:“不行,再去买一罐加多宝吧”;我:...</view> <view class="footer">footer</view>
这样就在index.wxss中导入了common.wxss样式文件,显示结果:
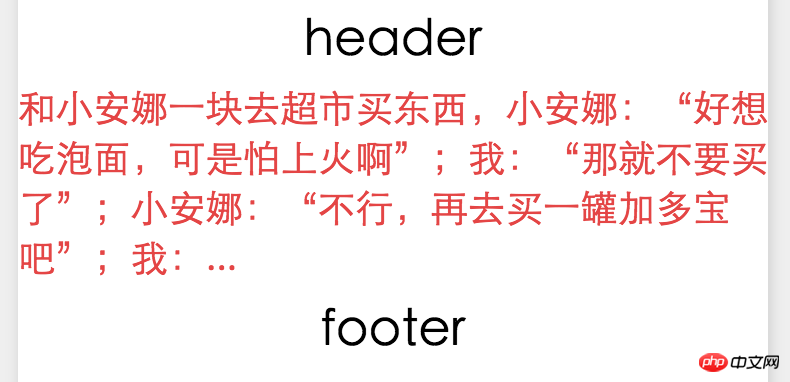
显示结果
(小安娜:你怎么?不过用加多宝泡泡面还真挺好吃。喂,快说正事啦,我发现你使用了行内样式style="color:#e64340;"),wxss也支持行内样式,不过尽量避免将静态的样式写入style中,以免影响渲染速度,静态样式都应该写在wxss文件中。
目前支持的选择器
| 选择器 | 样例 | 样例描述 |
|---|---|---|
| .class | .intro | 选择所有拥有 class="intro" 的组件 |
| #id | #firstname | 选择拥有 id="firstname" 的组件 |
| element | view | 选择所有 view 组件 |
| element, element | view,.header | checkbox 选择所有文档的 view 组件和所有的 checkbox 组件 |
| ::after | view::after | 在 view 组件后边插入内容 |
| ::before | view::before | 在 view 组件前边插入内容 |
注意:结果笔者开发试验,暂时还不支持*选择器(所有元素),例如我们经常会设置所有组件的box-sizing属性来改变测量宽度的起点边界,从而使规定宽度包括边框和填充:
* {
box-sizing: border-box;
}使用之后会发现所有wxss文件中的样式都无效了。(小安娜:那可以怎么解决呢,难道给每个组件都设置一次?),小哥哥不才,目前还真是每个组件都设置一次,或者这问题官方会很快解决。(小安娜:也是,还是官方靠谱点。)
记得官方文档
了解到这,基础知识终于告一段落了,下一篇开始实战,开发时更多组件知识请参考官方文档。
开发工具介绍和下载:mp.weixin.qq.com/debug/wxadoc/dev/devtools/devtools.html
注册流程:mp.weixin.qq.com/debug/wxadoc/introduction/index.html
开发组件:mp.weixin.qq.com/debug/wxadoc/dev/component/
开发API:mp.weixin.qq.com/debug/wxadoc/dev/api/
写了这么多口好干,我需要倒杯水喝,等等我。(小安娜:去吧去吧),「滴答、滴答,过去5分钟...10分钟...」(小安娜:喂喂,10分钟了,你是喝一桶水吗?),(远处的声音:quatary kill!WO CAO,要超神了),(小安娜:我去,喝个水时间去开黑了,快滚回来,马上到我的提问环节了!),都怪你了,一开始就说什么ap、ad、adc,搞的我热血沸腾的,马上来了。
小安娜有问题
WXML是什么?
杰尔夫君:WXML(WeiXin Markup Language)是一套标签语言,结合基础组件、事件系统,可以构建出页面的结构。和HTML相似。
WXML组件怎么绑定数据?
杰尔夫君:WXML中的动态数据均来自对应 Page 的 data。数据绑定使用 Mustache 语法(双大括号)将变量包起来。例如:
Page({
  data: {
    message: 'Hello MINA!'
  }
})<!-- 绑定Page中的data.message -->
<view> {{ message }} </view>什么是Mustache?
杰尔夫君:Mustache 是一个 logic-less (轻逻辑)模板解析引擎。在小程序里主要关注小程序的语法。详细了解前往:www.open-open.com/lib/view/open1416792564461.html
WXML中怎么使用条件判断?
杰尔夫君:在框架中,我们用 wx:if="{{condition}}" 来判断是否需要渲染该代码块:
<view wx:if="{{condition}}"> True </view>也可以用 wx:elif 和 wx:else :
<view wx:if="{{length > 5}}"> 1 </view>
<view wx:elif="{{length > 2}}"> 2 </view>
<view wx:else> 3 </view>如果想一次性判断多个组件标签,我们可以使用一个 <block/> 标签将多个组件包装起来:
<block wx:if="{{true}}">
  <view> view1 </view>
  <view> view2 </view>
</block>WXML怎么循环列表?
杰尔夫君:在组件上使用wx:for属性绑定一个数组,即可使用数组中的数据重复渲染该组件,默认当前的下标变量名为index,当前项的变量名为item。用wx:for-index指定当前下标的变量名,用wx:for-item指定当前元素的变量名;
<view wx:for="{{array}}" wx:for-index="idx" wx:for-item="itemName">
  {{idx}}: {{itemName.message}}
</view>等等,怎么感觉你从头到尾都有问题啊,感觉没学过一样?(小安娜:没办法啦,这次讲太多了,本小姐记忆不太好,都不记得学了什么),好吧好吧,也正好总结一下,继续你的问题。(小安娜:你别打断啊!)
WXML怎么使用模板?
杰尔夫君:用<template/>定义模板,指定name属性为模板的名字,用is属性指定使用模板的名称,然后将模板所需要的data传入,如:
<template name="msgItem">
<view>
<text> {{index}}: {{msg}} </text>
<text> Time: {{time}} </text>
</view>
</template><!-- 参数传入Page中的data.item -->
<template is="msgItem" data="{{...item}}"/>Page({
data: {
item: {
index: 0,
msg: 'this is a template',
time: '2016-09-15'
}
}
})也可以把模板定义在单独文件中,通过import或include引入。
<!-- item.wxml -->
<template name="item">
  <text>{{text}}</text>
</template>
<import src="item.wxml"/>
<template is="item" data="{{text: 'forbar'}}"/><view> header <view> footer <!-- index.wxml --> <include src="header.wxml"/> <view> body </view> <include src="footer.wxml"/>
import和include区别是:import有一层作用域概念,即C import B,B import A,在C中可以使用B的template,在B中可以使用A的template,但是C不能使用A定义的template。而include相当于是拷贝,使用原页面数据。
WXML中怎么使用事件?
杰尔夫君:使用bind或catch开头,然后跟上事件的类型(如:bindtap, catchtouchstart),bind事件绑定会发生事件冒泡,catch事件绑定可以阻止冒泡事件向上冒泡。
什么是WXSS?
杰尔夫君:WXSS(WeiXin Style Sheets)是一套样式语言,用于描述 WXML 的组件样式。WXSS 具有 CSS 大部分特性。 同时为了更适合开发微信小程序,对 CSS 进行了扩充以及修改了:尺寸单位、样式导入。
尺寸单位
rpx(responsive pixel): 可以根据屏幕宽度进行自适应。规定屏幕宽为750rpx。以iPhone6为例:1rpx = 0.5px,1px = 2rpx。
样式导入
使用@import语句导入外部样式,@import后跟外部样式文件的相对路径。
@import "common.wxss";
.middle-p {
  padding:15px;
}The above is the detailed content of Detailed explanation of wxml and wxss files in WeChat applet. For more information, please follow other related articles on the PHP Chinese website!

Hot AI Tools

Undresser.AI Undress
AI-powered app for creating realistic nude photos

AI Clothes Remover
Online AI tool for removing clothes from photos.

Undress AI Tool
Undress images for free

Clothoff.io
AI clothes remover

Video Face Swap
Swap faces in any video effortlessly with our completely free AI face swap tool!

Hot Article

Hot Tools

Notepad++7.3.1
Easy-to-use and free code editor

SublimeText3 Chinese version
Chinese version, very easy to use

Zend Studio 13.0.1
Powerful PHP integrated development environment

Dreamweaver CS6
Visual web development tools

SublimeText3 Mac version
God-level code editing software (SublimeText3)

Hot Topics
 1654
1654
 14
14
 1413
1413
 52
52
 1306
1306
 25
25
 1252
1252
 29
29
 1225
1225
 24
24
 Develop WeChat applet using Python
Jun 17, 2023 pm 06:34 PM
With the popularity of mobile Internet technology and smartphones, WeChat has become an indispensable application in people's lives. WeChat mini programs allow people to directly use mini programs to solve some simple needs without downloading and installing applications. This article will introduce how to use Python to develop WeChat applet. 1. Preparation Before using Python to develop WeChat applet, you need to install the relevant Python library. It is recommended to use the two libraries wxpy and itchat here. wxpy is a WeChat machine
 Implement card flipping effects in WeChat mini programs
Nov 21, 2023 am 10:55 AM
Implementing card flipping effects in WeChat mini programs In WeChat mini programs, implementing card flipping effects is a common animation effect that can improve user experience and the attractiveness of interface interactions. The following will introduce in detail how to implement the special effect of card flipping in the WeChat applet and provide relevant code examples. First, you need to define two card elements in the page layout file of the mini program, one for displaying the front content and one for displaying the back content. The specific sample code is as follows: <!--index.wxml-->&l
 Can small programs use react?
Dec 29, 2022 am 11:06 AM
Mini programs can use react. How to use it: 1. Implement a renderer based on "react-reconciler" and generate a DSL; 2. Create a mini program component to parse and render DSL; 3. Install npm and execute the developer Build npm in the tool; 4. Introduce the package into your own page, and then use the API to complete the development.
 Alipay launched the 'Chinese Character Picking-Rare Characters' mini program to collect and supplement the rare character library
Oct 31, 2023 pm 09:25 PM
According to news from this site on October 31, on May 27 this year, Ant Group announced the launch of the "Chinese Character Picking Project", and recently ushered in new progress: Alipay launched the "Chinese Character Picking-Uncommon Characters" mini program to collect collections from the society Rare characters supplement the rare character library and provide different input experiences for rare characters to help improve the rare character input method in Alipay. Currently, users can enter the "Uncommon Characters" applet by searching for keywords such as "Chinese character pick-up" and "rare characters". In the mini program, users can submit pictures of rare characters that have not been recognized and entered by the system. After confirmation, Alipay engineers will make additional entries into the font library. This website noticed that users can also experience the latest word-splitting input method in the mini program. This input method is designed for rare words with unclear pronunciation. User dismantling
 How uniapp achieves rapid conversion between mini programs and H5
Oct 20, 2023 pm 02:12 PM
How uniapp can achieve rapid conversion between mini programs and H5 requires specific code examples. In recent years, with the development of the mobile Internet and the popularity of smartphones, mini programs and H5 have become indispensable application forms. As a cross-platform development framework, uniapp can quickly realize the conversion between small programs and H5 based on a set of codes, greatly improving development efficiency. This article will introduce how uniapp can achieve rapid conversion between mini programs and H5, and give specific code examples. 1. Introduction to uniapp unia
 Teach you how to use public account template messages in mini programs (with detailed ideas)
Nov 04, 2022 pm 04:53 PM
This article brings you some related issues about WeChat mini programs. It mainly introduces how to use official account template messages in mini programs. Let’s take a look at them together. I hope it will be helpful to everyone.
 Tutorial on writing a simple chat program in Python
May 08, 2023 pm 06:37 PM
Implementation idea: Establishing the server side of thread, so as to process the various functions of the chat room. The establishment of the x02 client is much simpler than the server. The function of the client is only to send and receive messages, and to enter specific characters according to specific rules. To achieve the use of different functions, therefore, on the client side, you only need to use two threads, one is dedicated to receiving messages, and the other is dedicated to sending messages. As for why not use one, that is because, only
 Geographical positioning and map display using PHP and mini-programs
Jul 04, 2023 pm 04:01 PM
Geolocation positioning and map display of PHP and mini programs Geolocation positioning and map display have become one of the necessary functions in modern technology. With the popularity of mobile devices, people's demand for positioning and map display is also increasing. During the development process, PHP and applets are two common technology choices. This article will introduce you to the implementation method of geographical location positioning and map display in PHP and mini programs, and attach corresponding code examples. 1. Geolocation in PHP In PHP, we can use third-party geolocation


