
 WeChat Applet
Mini Program Development
Detailed explanation of Nginx environment configuration for WeChat applet development
WeChat Applet
Mini Program Development
Detailed explanation of Nginx environment configuration for WeChat applet development
Detailed explanation of Nginx environment configuration for WeChat applet development
Detailed explanation of WeChat Mini Program Server environment configuration
Main content:
1. SSL free certificate application steps
2. Nginx HTTPS configuration
3. TLS 1.2 upgrade process
WeChat applet requires using https to send requests, then the web server must be configured to support https , you need to apply for an SSL certificate first
The applet also requires that the version of TLS (Transport Layer Security Protocol) is at least 1.2, after configuring After https, if the version of TLS is lower, it will involve upgrade issues
So the main steps for server-side environment configuration:
Apply for SSL certificate
Configure the web server to support https (I am using nginx)
Upgrade to TLS 1.2
SSL Certificate Application
#https You need to use an SSL certificate. The price of this certificate is between three and five thousand to more than ten thousand per year. For a small team Or for users who want to get familiar with small programs, the price is still relatively high. In this case, you can choose a free certificate. In addition, you can also consider cloud services, such as Wild Dog, LeanCloud These mature service platforms all support https. If these platforms can meet your business needs, you will save a lot of trouble
Free certificate: Simon on Alibaba Cloud Tieke Free DV SSL
Application Process
wanwang.aliyun.com
Log in to the console, click Security-> Certificate Service in the left menu, there is Purchase Certificate button, click to enter the purchase page, select Free DV SSL, purchase
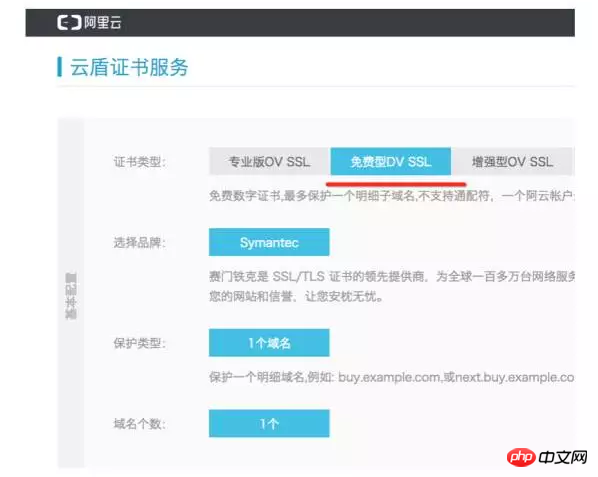
and the order amount is 0 yuan, just go through the purchase process. After completion, return to the Certificate Service page, you can see a certificate in the list
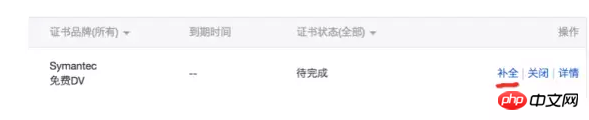
First proceed "Complete" operation, fill in your domain name and basic information
and then "Complete" the connection will change to "Progress", After clicking, follow the prompts. The main purpose is to verify your own server. I chose file verification. Download a file and upload it to your own server. Wait for verification
After the verification is OK, you can download the SSL certificate in about 10 minutes.
Nginx HTTPS configuration
Upload the certificate to the nginx directory, for example
/usr/local/nginx/cert
Modifyconf/nginx.conf
Configure the HTTPS server block and add SSL configuration
# HTTPS server
#
server {
 listen  443 ssl;
 server_name localhost;
 ......

 ssl on;
 ssl_certificate /usr/local/nginx/cert/213994146300992.pem;
 ssl_certificate_key /usr/local/nginx/cert/213994146300992.key;
 ssl_session_timeout 5m;
 ssl_ciphers ECDHE-RSA-AES128-GCM-SHA256:ECDHE:ECDH:AES:HIGH:!NULL:!aNULL:!MD5:!ADH:!RC4;
 ssl_protocols TLSv1 TLSv1.1 TLSv1.2;
 ssl_prefer_server_ciphers on;


 location / {
  root html;
  index index.html index.htm;
 }


 ......

}Reload the configuration file and use the https method to access your own domain name in the browser to see if it can be accessed normally
Upgrade to TLS 1.2
Check TLS version
After accessing https url, there will be a small green lock icon in front of the address bar. Click it to view TLS version information
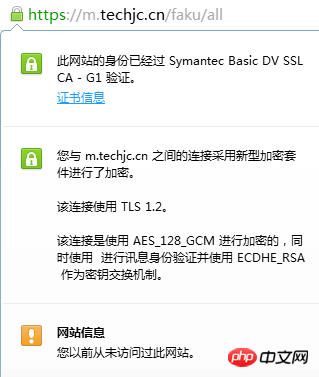
#If it does not reach 1.2, you need to upgrade
The operating environment below is centos linux
1) Check openssl version
https://www.openssl.org/source/
1.0.2. Versions below must be upgraded. Previous versions have officially stopped maintenance
2) Upgrade openssl
Download the new version from the official website
https://www.openssl.org/source/
For example, download to /usr/local
Upgrade
cd /usr/local
tar zxvf openssl-1.0.2j.tar.gz
cd openssl-1.0.2j
./config --prefix=/usr/local/openssl
make && make install
mv /usr/bin/openssl \
 /usr/bin/openssl.OFF
mv /usr/include/openssl \
 /usr/include/openssl.OFF
ln -s \
 /usr/local/openssl/bin/openssl \
 /usr/bin/openssl
ln -s \
 /usr/local/openssl/include/openssl \
 /usr/include/openssl
echo "/usr/local/openssl/lib"\
 >>/etc/ld.so.conf
ldconfig -v
Verification
openssl version -a
3) Recompile nginx
After upgradingOpenSSL, nginx needs to be recompiled, otherwise TLS will still be the old version
The following is the basic installation, if you need more, please adjust it yourself
Software used
openssl
Has been installed previously
pcre
pcre installation:
下载地址
http://www.pcre.org/
例如下载到 /usr/local
cd /usr/local
tar -zxv -f pcre-8.39.tar.gz
cd pcre-8.39
./configure --prefix=/usr/local/pcre/
make && make install
zlib installation
下载地址
http://www.zlib.net/
例如下载到 /usr/local
cd /usr/local
tar -zxv -f zlib-1.2.10.tar.gz
cd zlib-1.2.10
./configure --prefix=/usr/local/zlib/
make && make install
Compile nginx:
tar zxvf nginx-1.10.3.tar.gz
cd nginx-1.10.3
./configure --prefix=/data/nginx --with-http_ssl_module --with-openssl=/usr/local/openssl
tar -zxvf nginx-1.10.2.tar.gz
cd nginx-1.10.2
./configure \
--user=用户 \
--group=组 \
--prefix=/usr/local/nginx \
--with-http_ssl_module \
--with-openssl=/usr/local/openssl-1.0.2j \
--with-pcre=/usr/local/pcre-8.39 \
--with-zlib=/usr/local/zlib-1.2.10 \
--with-http_stub_status_module \
--with-threads
make && make install
After the compilation is completed, remember to modify the configuration file and add SSL Related information
Then start nginx, visit https url and verify the TSL version again
Problems encountered when compiling and installing Nginx:
The error message is as follows :
/bin/sh: line 2: ./config: No such file or directory
make[1]: *** [/usr/local/ssl/.openssl/include/openssl/ssl.h] Error 127
make[1]: Leaving directory `/usr/local/src/nginx-1.10.2‘
make: *** [build] Error 2
It should be noted that the Nginx source code I used for compilation here is 1.10.2. According to the error message, we know that the error is because Nginx cannot find the corresponding file in the /usr/local/ssl/.openssl/ directory when compiling. In fact, we can find this directory when we open the /usr/local/ssl/ directory. There is no .openssl directory, so we can solve this problem by modifying the path selection for openssl when compiling Nginx.
Solution:
Open the nginx source file /root/nginx-1.10.2/auto/lib/openssl/conf file
Find such a piece of code:
CORE_INCS="$CORE_INCS $OPENSSL/.openssl/include"
CORE_DEPS="$CORE_DEPS $OPENSSL/.openssl/include/openssl/ssl.h"
CORE_LIBS="$CORE_LIBS $OPENSSL/.openssl/lib/libssl.a"
CORE_LIBS="$CORE_LIBS $OPENSSL/.openssl/lib/libcrypto.a"
CORE_LIBS="$CORE_LIBS $NGX_LIBDL"
Modify it to the following code:
CORE_INCS="$CORE_INCS $OPENSSL/.openssl/include"
CORE_DEPS="$CORE_DEPS $OPENSSL/include/openssl/ssl.h"
CORE_LIBS="$CORE_LIBS $OPENSSL/lib/libssl.a"
CORE_LIBS="$CORE_LIBS $OPENSSL/lib/libcrypto.a"
CORE_LIBS="$CORE_LIBS $NGX_LIBDL"
And then Just compile and install Nginx
The above is the detailed content of Detailed explanation of Nginx environment configuration for WeChat applet development. For more information, please follow other related articles on the PHP Chinese website!

Hot AI Tools

Undresser.AI Undress
AI-powered app for creating realistic nude photos

AI Clothes Remover
Online AI tool for removing clothes from photos.

Undress AI Tool
Undress images for free

Clothoff.io
AI clothes remover

Video Face Swap
Swap faces in any video effortlessly with our completely free AI face swap tool!

Hot Article
Hot Tools

Notepad++7.3.1
Easy-to-use and free code editor

SublimeText3 Chinese version
Chinese version, very easy to use

Zend Studio 13.0.1
Powerful PHP integrated development environment

Dreamweaver CS6
Visual web development tools

SublimeText3 Mac version
God-level code editing software (SublimeText3)
Hot Topics
 1664
1664
 14
1421
52
1315
25
1266
29
1239
24
14
1421
52
1315
25
1266
29
1239
24

 How to configure nginx in Windows
Apr 14, 2025 pm 12:57 PM
How to configure nginx in Windows
Apr 14, 2025 pm 12:57 PM
How to configure Nginx in Windows? Install Nginx and create a virtual host configuration. Modify the main configuration file and include the virtual host configuration. Start or reload Nginx. Test the configuration and view the website. Selectively enable SSL and configure SSL certificates. Selectively set the firewall to allow port 80 and 443 traffic.
 How to start containers by docker
Apr 15, 2025 pm 12:27 PM
How to start containers by docker
Apr 15, 2025 pm 12:27 PM
Docker container startup steps: Pull the container image: Run "docker pull [mirror name]". Create a container: Use "docker create [options] [mirror name] [commands and parameters]". Start the container: Execute "docker start [Container name or ID]". Check container status: Verify that the container is running with "docker ps".
 How to check the name of the docker container
Apr 15, 2025 pm 12:21 PM
How to check the name of the docker container
Apr 15, 2025 pm 12:21 PM
You can query the Docker container name by following the steps: List all containers (docker ps). Filter the container list (using the grep command). Gets the container name (located in the "NAMES" column).
 How to check whether nginx is started
Apr 14, 2025 pm 01:03 PM
How to check whether nginx is started
Apr 14, 2025 pm 01:03 PM
How to confirm whether Nginx is started: 1. Use the command line: systemctl status nginx (Linux/Unix), netstat -ano | findstr 80 (Windows); 2. Check whether port 80 is open; 3. Check the Nginx startup message in the system log; 4. Use third-party tools, such as Nagios, Zabbix, and Icinga.
 How to create containers for docker
Apr 15, 2025 pm 12:18 PM
How to create containers for docker
Apr 15, 2025 pm 12:18 PM
Create a container in Docker: 1. Pull the image: docker pull [mirror name] 2. Create a container: docker run [Options] [mirror name] [Command] 3. Start the container: docker start [Container name]
 How to check nginx version
Apr 14, 2025 am 11:57 AM
How to check nginx version
Apr 14, 2025 am 11:57 AM
The methods that can query the Nginx version are: use the nginx -v command; view the version directive in the nginx.conf file; open the Nginx error page and view the page title.
 How to configure cloud server domain name in nginx
Apr 14, 2025 pm 12:18 PM
How to configure cloud server domain name in nginx
Apr 14, 2025 pm 12:18 PM
How to configure an Nginx domain name on a cloud server: Create an A record pointing to the public IP address of the cloud server. Add virtual host blocks in the Nginx configuration file, specifying the listening port, domain name, and website root directory. Restart Nginx to apply the changes. Access the domain name test configuration. Other notes: Install the SSL certificate to enable HTTPS, ensure that the firewall allows port 80 traffic, and wait for DNS resolution to take effect.
 What to do if nginx server is hung
Apr 14, 2025 am 11:42 AM
What to do if nginx server is hung
Apr 14, 2025 am 11:42 AM
When the Nginx server goes down, you can perform the following troubleshooting steps: Check that the nginx process is running. View the error log for error messages. Check the syntax of nginx configuration. Make sure nginx has the permissions you need to access the file. Check file descriptor to open limits. Confirm that nginx is listening on the correct port. Add firewall rules to allow nginx traffic. Check reverse proxy settings, including backend server availability. For further assistance, please contact technical support.
