 WeChat Applet
 Mini Program Development
 Solutions and methods for componentizing WeChat mini programs
Solutions and methods for componentizing WeChat mini programs
This article mainly shares with you the solution ideas and methods of componentization of WeChat mini programs. Starting from mini program basic library version 1.6.3, mini programs support simple component programming. To check the version of the mini program basic library you are using, you can click Details on the right side of the developer tools to view: the most basic components.
The component of the mini program is actually a directory. The directory needs to contain 4 files:
xxx.json
xxx.wxml
xxx.wxss
xxx.js
Declare a component
First you need to make a custom component declaration in the json file (set the component field to true to enable this group The file is set as a custom component)
{
"component": true
}Secondly, in the json file of the page where the component is to be introduced, make a reference statement
{
"usingComponents": {
//自定义的组件名称     : 组件路径,注意是相对路径,不能是绝对路径
"component-tag-name": "path/to/the/custom/component"
}
}In this way, it can be used on the main page.
Compared with the introduction of vue components, the mini program solution is more concise. The introduction of vue components requires import and registration in components at the same time. The components of the mini program only need to be registered in .json before they can be used in wxml.
Using slot
Same as vue, small programs also have the concept of slot.
Single slot
You can provide a
// 主页面内,<addlike>是组件
<addlike item="item" my_properties="sssss">
<text>我是被slot插入的文本</text>
</addlike>
// addlike 组件
<view class="container">
<view>hello, 这里是组件</view>
<view>hello, {{my_properties}}</view>
<slot></slot>
</view>
// 渲染后
<view class="container">
<view>hello, 这里是组件</view>
<view>hello, {{my_properties}}</view>
<text>我是被slot插入的文本</text>
</view>Multiple slots
If you need to use multiple slots in the component, you need to declare and enable it in the component js:
Component({
 options: {
   multipleSlots: true // 在组件定义时的选项中启用多slot支持
},
 properties: { /* ... */ },
 methods: { /* ... */ }
})Use:
// 主页面
<addlike item="item" my_properties="sssss">
// 在普通的元素上加入 slot 属性,指定slotname, 就可以变成子元素的slot了
<text slot="slot1">我是被slot1插入的文本</text>
<text slot="slot2">我是被slot2插入的文本</text>
</addlike>

// 子页面
<view class="container">
<view>hello, 这里是组件</view>
<view>hello, {{my_properties}}</view>
<slot name="slot1"></slot>
<slot name="slot2"></slot>
</view>Component constructor
As we just said, a component should include four files: js, wxml, wxss, and json. wxml is equivalent to HTML, wxss is equivalent to css, so what should be written in js?
In the case provided by WeChat official:
Component({
 behaviors: [],
 properties: {
},
 data: {}, // 私有数据,可用于模版渲染
// 生命周期函数,可以为函数,或一个在methods段中定义的方法名
 attached: function(){},
 moved: function(){},
 detached: function(){},
 methods: {
   onMyButtonTap: function(){
},
   _myPrivateMethod: function(){
},
   _propertyChange: function(newVal, oldVal) {
}
}
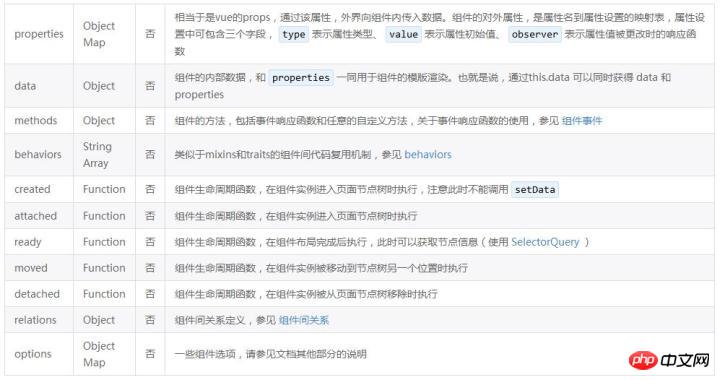
})A Component constructor is called in it. The Component constructor can be used to define components. When calling the Component constructor, you can specify the properties, data, methods, etc. of the component. What can be placed in the specific Component is as follows:
Component and data communication
Componentization must involve data communication. In order to solve the problem of data For maintenance issues between components, vue, react, and angular have different solutions. The solution of mini program is much simpler.
The main page passes in data to the component
Properties are equivalent to vue's props and are the entrance to pass in external data.
// 主页面使用组件
<a add_like="{{add_like}}">
</a>
// 组件a.js 内
Component({
   properties:{
       add_like:{
           type:Array,
           value:[],
           observer:function(){
}
}
}
})Note: The incoming data, whether it is a simple data type or a reference type, is the same as value copying (it is different from the description in the Red Book that js function parameters are passed in as value copying, Hongbao The meaning in the book is: simple data types directly copy values, and reference types copy references. That is to say, modifying the properties of the parameter object within the function will affect the properties of the object outside the function).
If it is Vue's props, it can be synchronized through .sync. In the mini program sub-component, calling this.setData() to modify the data in the parent component will not affect the data in the parent component. , that is to say, the modification of the child component's property seems to have nothing to do with the parent component. So, if you want to modify the data of the parent component in the child component, or even modify the data in the sibling component, is there a simple way? The following will talk about
components sending data to the main page
Similar to vue, the main form of interaction between components is custom events.
The component triggers custom events through this.triggerEvent(), and the main page receives custom events through bind:component_method="main_page_mehod" on the component.
Among them, the this.triggerEvent() method receives the custom event name and also receives two objects, eventDetail and eventOptions.
// 子组件触发自定义事件
ontap () {
// 所有要带到主页面的数据,都装在eventDetail里面
var eventDetail = {
name:'sssssssss',
test:[1,2,3]
}
// 触发事件的选项 bubbles是否冒泡,composed是否可穿越组件边界,capturePhase 是否有捕获阶段
var eventOption = {
composed: true
}
this.triggerEvent('click_btn', eventDetail, eventOption)
}
// 主页面里面
main_page_ontap (eventDetail) {
   console.log(eventDetail)
// eventDetail
// changedTouches
// currentTarget
// target
// type
// ……
// detail   哈哈,所有的子组件的数据,都通过该参数的detail属性暴露出来
}Data communication between components
Different from the vuex solution proposed by vue, the communication between components of the mini program is simple and compact. You can use custom events to communicate just like the main page communicates with components. Of course, a simpler and more convenient way is to use the relations provided by the mini program.
relations is a property in the Component constructor, as long as The relations properties of the two components are related, and they can capture each other, and can access each other and modify each other's properties just like modifying their own properties.
Component({
  relations:{
'./path_to_b': { // './path_to_b'是对方组件的相对路径
       type: 'child', //  type可选择两组:parent和child、ancestor和descendant
       linked:function(target){ } // 钩子函数,在组件linked时候被调用 target是组件的实例,
       linkChanged: function(target){}
       unlinked: function(target){}
}
},
})For example, there are two components as shown in the code:
// 组件a slot 包含了组件b<a><b></b></a>
The relationship between them is as shown below:
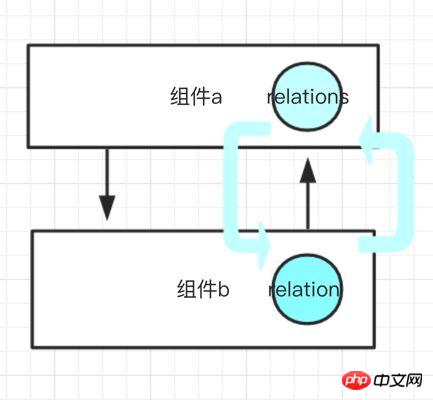
Two components capture instances of each other's components through this.getRelationNodes('./path_to_a') method. Now that you have obtained the instance of the other party's component, you can access the data on the other party's component, and you can also set the data on the other party's component, but you cannot call methods on the other party's component.
// 在a 组件中
Component({
  relations:{
'./path_to_b': {
          type: 'child',
          linked:function(target){ } // target是组件b的实例,
          linkChanged: function(target){}
          unlinked: function(target){}
}
},
  methods:{
      test () {
var nodes = this.getRelationNodes('./path_to_b')
var component_b = nodes[0];

// 获取到b组件的数据
          console.log(component_b.data.name)

// 设置父组件的数据
// 这样的设置是无效的
this.setData({
              component_b.data.name:'ss'
})
// 需要调用对方组件的setData()方法来设置
          component_b.setData({
              name:'ss'
})
}
}
})

// 在b 组件里面
Component({
  relations:{
'./path_to_a': { //注意!必须双方组件都声明relations属性
          type:'parent'
}
},
  data: {
      name: 'dudu'
}
})
注意:1. 主页面使用组件的时候,不能有数字,比如说 <component_sub1> 或 <component_sub_1>,可以在主页面的json 里面设置一个新名字
{
"usingComponents":{
"test_component_subb": "../../../components/test_component_sub2/test_component_sub2"
}
}2. The path in relations, for example here:
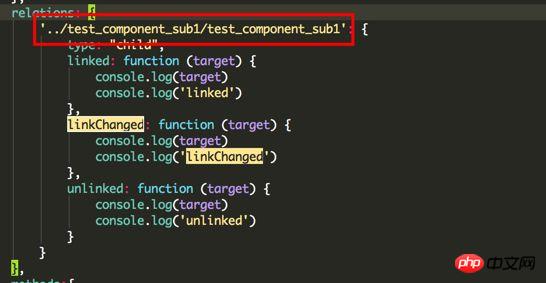
is the real relative path of the other component, not the logical path between components.
3. If relations are not related, then this.getRelationNodes cannot obtain the other component
4. 本组件无法获取本组件的实例,使用this.getRelatonsNodes('./ path_to_self ') 会返回一个null
4. type 可以选择的 parent 、 child 、 ancestor 、 descendant
现在我们已经可以做到了两个组件之间的数据传递,那么如何在多个组件间传递数据呢?
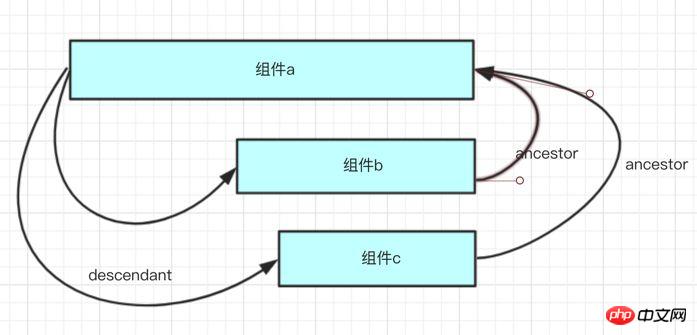
如上图所示,同级的组件b 和同级的组件c , b 和 c 之间不可以直接获取,b可以获取到a, c 也可以获取到a,而a可以直接获取到 b 和 c。所以,如果想获取到兄弟元素,需要先获取到祖先节点,然后再通过祖先节点获取兄弟节点
我在组件b 里面,我需要先找到祖先组件a的实例,然后用祖先组件a的实例的getRelationNodes方法获取到组件c的实例。
看见没?恐怕我们又要写一大堆重复性的代码了。
幸好,微信小程序还提供了behavior 属性, 这个属性相当于 mixin,很容易理解的,是提高代码复用性的一种方法。
思路:
假设目前有三个组件,组件a, 组件b, 组件c, 其中组件b和组件c是兄弟组件,组建a是b和c的兄弟组件。为了减少代码的重复性,我们把获取父组件的方法,和获取兄弟组件的方法封装一下,封装在 behavior 的 methods 中。只要是引入该behavior的组件,都可以便捷的调用方法。
实现:
新建一个behavior文件,命名无所谓,比如说relation_behavior.js
// 在 get_relation.js 文件里面
module.exports = Behavior({
methods:{
// 获取父组件实例的快捷方法
_parent () {
// 如果根据该路径获取到acestor组件为null,则说明this为ancesor
var parentNode = this.getRelationNodes('../record_item/record_item')
if (parentNode&&parentNode.length !== 0) {
return parentNode[0]
} else {
return this
}
},
// 获取兄弟组件实例的快捷方法
_sibling(name) {
var node = this._parent().getRelationNodes(`../${name}/${name}`)
if (node &&node.length > 0) {
return node[0]
}
}
}
})然后在组件b, 和 组件c 上引入该behavior,并且调用方法,获取父组件和兄弟组件的实例
// 组件b中
var relation_behavior = require('./path_to_relation_behavior')
Component({
   behaviors:[relation_behavior],
   methods:{
       test () {
// 获得父组件的实例
let parent = this._parent()
// 访问父组件的数据d
           console.log(parent.data.name)
// 修改父组件的数据
           parent.setData({
               name: 'test1'
})
// 获得兄弟组件的实例
let sibling = this._sibling('c')
// 访问兄弟组件的数据
           console.log(sibling.data.name)
// 修改兄弟组件的数据
           sibling.setData({
               name:"test"
})
}
}
})
// 组件c中
var relation_behavior = require('./path_to_relation_behavior')
Component({
   behaviors:[relation_behavior],
   methods:{
       test () {
// 获得父组件的实例
let parent = this._parent()
// 访问父组件的数据d
           console.log(parent.data.name)
// 修改父组件的数据
           parent.setData({
               name: 'test1'
})
// 获得兄弟组件的实例
let sibling = this._sibling('b')
// 访问兄弟组件的数据
           console.log(sibling.data.name)
// 修改兄弟组件的数据
           sibling.setData({
               name:"test"
})
}
}
})同时需要注意,c和b两个组件,从relations属性的角度来说,是a的后代组件。
但是组件b和组件c 所处的作用域, 都是主页面的作用域,传入的property都是主页面的property,这样就保证了组件数据的灵活性。relations 像一个隐形的链子一样把一堆组件关联起来,关联起来的组件可以相互访问,修改对方的数据,但是每一个组件都可以从外界独立的获取数据。
看了这么多理论的东西,还是需要一个具体的场景来应用。
比如说,我们有个一个分享记录图片心情的页面,当用户点击【点赞】的按钮时候,该心情的记录 点赞按钮会变红,下面的一栏位置会多出点赞人的名字。
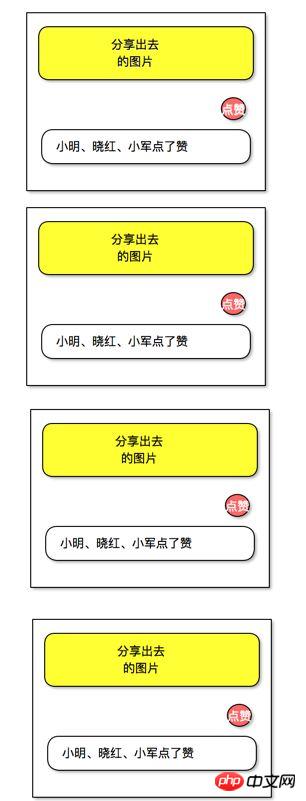
如果不通过组件化,很可能的做法是 修改一个点赞按钮,然后遍历数据更新数据,最后所有记录列表的状态都会被重新渲染一遍。
如果是通过组件化拆分:把点赞的按钮封装为 组件b, 下面点赞人的框封装为组件c, 每一个心情记录都是一个组件a
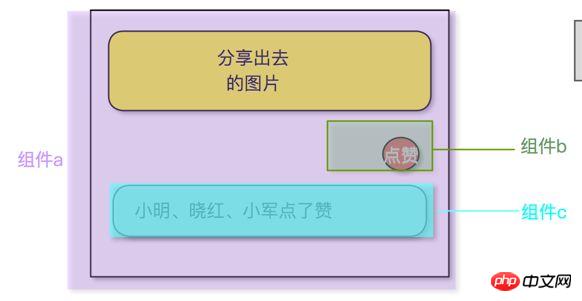
下面是代码实现
// 在主页面内
<view wx:for='{{feed_item}}'>
<a item='{{item}}'>
<b></b>
<c></c>
</a>
<view>
// 在组件a内
var behavior_relation = require('../../relation_behavior.js) //这里引入上文说的Behavior
Component({
behaviors:[behavior_relation],
relations:{
'../b/b':{
type: 'descendant'
}
}
})
// 在组件b内
var behavior_relation = require('../../relation_behavior.js) //这里引入上文说的Behavior
Component({
behaviors:[behavior_relation]
relations:{
'../a/a':{
type: 'ancestor'
}
},
data: {
is_like: false //控制点赞图标的状态
},
methods:{
// 当用户点赞的时候
onClick () {
// 修改本组件的状态
this.setData({
is_like: true
})
// 修改 c 组件的数据
this._sibling('c').setData({
likeStr: this._sibling('c').data.likeStr + '我'
})
}
}
})
// 在组件c内
var behavior_relation = require('../../relation_behavior.js) //这里引入上文说的Behavior
Component({
behaviors:[behavior_relation],
relations:{
'../a/a':{
type: 'ancestor'
}
},
data:{
likeStr:'晓红,小明'
}
})这样,组件b 可以修改组件c中的数据。同时,组件b 和 组件c 又可以通过 properties 和 事件系统,和主页面保持独立的数据通信。
相关推荐:
The above is the detailed content of Solutions and methods for componentizing WeChat mini programs. For more information, please follow other related articles on the PHP Chinese website!

Hot AI Tools

Undresser.AI Undress
AI-powered app for creating realistic nude photos

AI Clothes Remover
Online AI tool for removing clothes from photos.

Undress AI Tool
Undress images for free

Clothoff.io
AI clothes remover

Video Face Swap
Swap faces in any video effortlessly with our completely free AI face swap tool!

Hot Article

Hot Tools

Notepad++7.3.1
Easy-to-use and free code editor

SublimeText3 Chinese version
Chinese version, very easy to use

Zend Studio 13.0.1
Powerful PHP integrated development environment

Dreamweaver CS6
Visual web development tools

SublimeText3 Mac version
God-level code editing software (SublimeText3)

Hot Topics
 1653
1653
 14
14
 1413
1413
 52
52
 1304
1304
 25
25
 1251
1251
 29
29
 1224
1224
 24
24
 How to delete WeChat friends? How to delete WeChat friends
Mar 04, 2024 am 11:10 AM
WeChat is one of the mainstream chat tools. We can meet new friends, contact old friends and maintain the friendship between friends through WeChat. Just as there is no such thing as a banquet that never ends, disagreements will inevitably occur when people get along with each other. When a person extremely affects your mood, or you find that your views are inconsistent when you get along, and you can no longer communicate, then we may need to delete WeChat friends. How to delete WeChat friends? The first step to delete WeChat friends: tap [Address Book] on the main WeChat interface; the second step: click on the friend you want to delete and enter [Details]; the third step: click [...] in the upper right corner; Step 4: Click [Delete] below; Step 5: After understanding the page prompts, click [Delete Contact]; Warm
 How to recover deleted contacts on WeChat (simple tutorial tells you how to recover deleted contacts)
May 01, 2024 pm 12:01 PM
Unfortunately, people often delete certain contacts accidentally for some reasons. WeChat is a widely used social software. To help users solve this problem, this article will introduce how to retrieve deleted contacts in a simple way. 1. Understand the WeChat contact deletion mechanism. This provides us with the possibility to retrieve deleted contacts. The contact deletion mechanism in WeChat removes them from the address book, but does not delete them completely. 2. Use WeChat’s built-in “Contact Book Recovery” function. WeChat provides “Contact Book Recovery” to save time and energy. Users can quickly retrieve previously deleted contacts through this function. 3. Enter the WeChat settings page and click the lower right corner, open the WeChat application "Me" and click the settings icon in the upper right corner to enter the settings page.
 How to write a novel in the Tomato Free Novel app. Share the tutorial on how to write a novel in Tomato Novel.
Mar 28, 2024 pm 12:50 PM
Tomato Novel is a very popular novel reading software. We often have new novels and comics to read in Tomato Novel. Every novel and comic is very interesting. Many friends also want to write novels. Earn pocket money and edit the content of the novel you want to write into text. So how do we write the novel in it? My friends don’t know, so let’s go to this site together. Let’s take some time to look at an introduction to how to write a novel. Share the Tomato novel tutorial on how to write a novel. 1. First open the Tomato free novel app on your mobile phone and click on Personal Center - Writer Center. 2. Jump to the Tomato Writer Assistant page - click on Create a new book at the end of the novel.
 How to enter bios on Colorful motherboard? Teach you two methods
Mar 13, 2024 pm 06:01 PM
Colorful motherboards enjoy high popularity and market share in the Chinese domestic market, but some users of Colorful motherboards still don’t know how to enter the bios for settings? In response to this situation, the editor has specially brought you two methods to enter the colorful motherboard bios. Come and try it! Method 1: Use the U disk startup shortcut key to directly enter the U disk installation system. The shortcut key for the Colorful motherboard to start the U disk with one click is ESC or F11. First, use Black Shark Installation Master to create a Black Shark U disk boot disk, and then turn on the computer. When you see the startup screen, continuously press the ESC or F11 key on the keyboard to enter a window for sequential selection of startup items. Move the cursor to the place where "USB" is displayed, and then
 The secret of hatching mobile dragon eggs is revealed (step by step to teach you how to successfully hatch mobile dragon eggs)
May 04, 2024 pm 06:01 PM
Mobile games have become an integral part of people's lives with the development of technology. It has attracted the attention of many players with its cute dragon egg image and interesting hatching process, and one of the games that has attracted much attention is the mobile version of Dragon Egg. To help players better cultivate and grow their own dragons in the game, this article will introduce to you how to hatch dragon eggs in the mobile version. 1. Choose the appropriate type of dragon egg. Players need to carefully choose the type of dragon egg that they like and suit themselves, based on the different types of dragon egg attributes and abilities provided in the game. 2. Upgrade the level of the incubation machine. Players need to improve the level of the incubation machine by completing tasks and collecting props. The level of the incubation machine determines the hatching speed and hatching success rate. 3. Collect the resources required for hatching. Players need to be in the game
 Summary of methods to obtain administrator rights in Win11
Mar 09, 2024 am 08:45 AM
A summary of how to obtain Win11 administrator rights. In the Windows 11 operating system, administrator rights are one of the very important permissions that allow users to perform various operations on the system. Sometimes, we may need to obtain administrator rights to complete some operations, such as installing software, modifying system settings, etc. The following summarizes some methods for obtaining Win11 administrator rights, I hope it can help you. 1. Use shortcut keys. In Windows 11 system, you can quickly open the command prompt through shortcut keys.
 How to set font size on mobile phone (easily adjust font size on mobile phone)
May 07, 2024 pm 03:34 PM
Setting font size has become an important personalization requirement as mobile phones become an important tool in people's daily lives. In order to meet the needs of different users, this article will introduce how to improve the mobile phone use experience and adjust the font size of the mobile phone through simple operations. Why do you need to adjust the font size of your mobile phone - Adjusting the font size can make the text clearer and easier to read - Suitable for the reading needs of users of different ages - Convenient for users with poor vision to use the font size setting function of the mobile phone system - How to enter the system settings interface - In Find and enter the "Display" option in the settings interface - find the "Font Size" option and adjust it. Adjust the font size with a third-party application - download and install an application that supports font size adjustment - open the application and enter the relevant settings interface - according to the individual
 Detailed explanation of Oracle version query method
Mar 07, 2024 pm 09:21 PM
Detailed explanation of Oracle version query method Oracle is one of the most popular relational database management systems in the world. It provides rich functions and powerful performance and is widely used in enterprises. In the process of database management and development, it is very important to understand the version of the Oracle database. This article will introduce in detail how to query the version information of the Oracle database and give specific code examples. Query the database version of the SQL statement in the Oracle database by executing a simple SQL statement


