

Analysis of WeChat Mini Program Amap SDK

This article mainly introduces the detailed explanation and simple examples (source code download) of the WeChat Mini Program Amap Map. Friends in need can refer to
WeChat Mini Program Amap SDK:
Introduction
WeChat Mini Program SDK helps you obtain Amap’s rich address descriptions, POIs and real-time weather data in WeChat Mini Programs.
Features
|
|


Account and Key application
Registration as an AutoNavi developer requires three steps:
The first step is to register as an AutoNavi developer; the second step is to control Create an application on the platform; the third step is to obtain the Key.
1 Register as an AutoNavi developer
2 Create an application
3 Get API key
Get API Key
Getting Started Guide
Last updated: January 9, 2017
This guide is a quick start guide for using the WeChat Mini Program SDK.
Step 1: Download and install the WeChat Mini Program Development Tool
Follow the WeChat Mini Program Development Document to download and install the WeChat Mini Program Developer Tool.
Step 2: Get the Amap Key
Click here to get the Key>>
Click here to see how to apply for the Amap Key>>
Step 3: Create a project
Follow the following steps to create a new local applet project.
1. Start the "WeChat web developer tool", use WeChat to scan the QR code, and click the "Confirm Login" button on WeChat to log in to the development tool.
2. Click the "Local Mini Program Project" button to select the debugging type.
3. Click the " " button to add items.
4. Enter the AppID (for how to obtain it, please refer to:), project name, select the project directory, and check "Create a quick start project in the current directory", then click the "Add Project" button and log in again WeChat public platform to complete project creation. Download the development package from the relevant download page and unzip it.
Step 4: Download and install WeChat Mini Program SDK
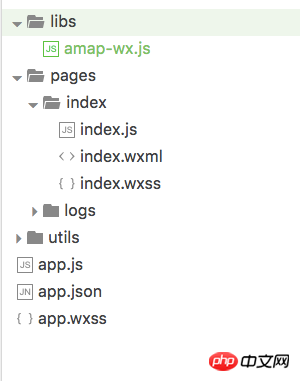
Download the development package from the relevant download page and unzip it.
After decompression, you will get the amap-wx.js file. In the created project, create a new directory named libs, copy the amap-wx.js file to the local directory of libs, and complete the installation.
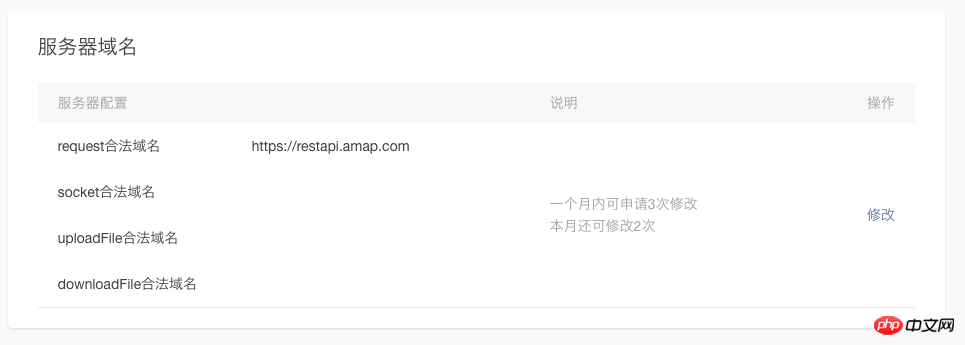
Step 5: Set a secure communication domain name
In order to ensure the normal use of the functions provided in the AutoNavi Mini Program SDK, you need to set a secure domain name.
Log in to the WeChat public platform, set the request legal domain name in "Settings"->"Development Settings", and add https://restapi.amap.com , as shown below Shown:
Step 6: Hello AMapWX
1. Create a mini program instance.
If you checked "Create a quick start project in the current directory" when creating the project, you can skip this step directly. Otherwise, please refer to the WeChat Mini Program Development Document to create a mini program example.
2. Set up the index.js file.
index.js is the script file of the page in the page/index directory of the project space. In this file, it monitors and processes the life cycle functions of the page, declares and processes data, responds to page interaction events, etc.
First, introduce the amap-wx.js file in index.js.
var amapFile = require('path/to/amap-wx.js');//如:../../libs/amap-wx.js
Then, instantiate the AMapWX object in index.js and call the getPoiAround method to obtain POI data.
To ensure that the marker is displayed with a custom icon, you need to create a new img directory in the project, copy the icon corresponding to the marker to the local img directory of the project, and add the following code to index.js:
var markersData = [];
Page({
data: {
markers: [],
latitude: '',
longitude: '',
textData: {}
},
makertap: function(e) {
var id = e.markerId;
var that = this;
that.showMarkerInfo(markersData,id);
that.changeMarkerColor(markersData,id);
},
onLoad: function() {
var that = this;
var myAmapFun = new amapFile.AMapWX({key:'您的key'});
myAmapFun.getPoiAround({
iconPathSelected: '选中 marker 图标的相对路径', //如:../../img/marker_checked.png
iconPath: '未选中 marker 图标的相对路径', //如:../../img/marker.png
success: function(data){
markersData = data.markers;
that.setData({
markers: markersData
});
that.setData({
latitude: markersData[0].latitude
});
that.setData({
longitude: markersData[0].longitude
});
that.showMarkerInfo(markersData,0);
},
fail: function(info){
wx.showModal({title:info.errMsg})
}
})
},
showMarkerInfo: function(data,i){
var that = this;
that.setData({
textData: {
name: data[i].name,
desc: data[i].address
}
});
},
changeMarkerColor: function(data,i){
var that = this;
var markers = [];
for(var j = 0; j < data.length; j++){
if(j==i){
data[j].iconPath = "选中 marker 图标的相对路径"; //如:../../img/marker_checked.png
}else{
data[j].iconPath = "未选中 marker 图标的相对路径"; //如:../../img/marker.png
}
markers.push(data[j]);
}
that.setData({
markers: markers
});
}
})2. Set the index.wxml file.
index.wxml is in the page/index directory of the project space. This file is a page structure file, used to build the page structure, bind data and interactive processing functions, etc.
The sample code is as follows:
<view class="map_container">
 <map class="map" id="map" longitude="{{longitude}}" latitude="{{latitude}}" scale="14" show-location="true" markers="{{markers}}" bindmarkertap="makertap"></map>
</view>
<view class="map_text">
 <text class="h1">{{textData.name}}</text>
 <text>{{textData.desc}}</text>
</view>3. Set the index.wxss file.
index.wxss is a page style file in the page/index directory of the project space.
The sample code is as follows:
.map_container{
 position: absolute;
 top: 0;
 bottom: 80px;
 left: 0;
 right: 0;
}
.map{
 width: 100%;
 height: 100%;
}
.map_text{
 position: absolute;
 left: 0;
 right: 0;
 bottom: 0px;
 height: 80px;
 background: #fff;
 padding: 0 15px;
}
text{
 margin: 5px 0;
 display: block;
 font-size:12px;
}
.h1{
 margin: 15px 0;
 font-size:15px;
}Step 7: Build and mobile preview your applet
Click the Console button in the left menu bar to build your mini program and check the running effect.
You can also choose to see the final effect on WeChat, select "Project" on the left menu bar of the development tool, click "Preview", and use WeChat to scan the QR code to experience it in the WeChat client.
Get Key
Last updated: January 6, 2017
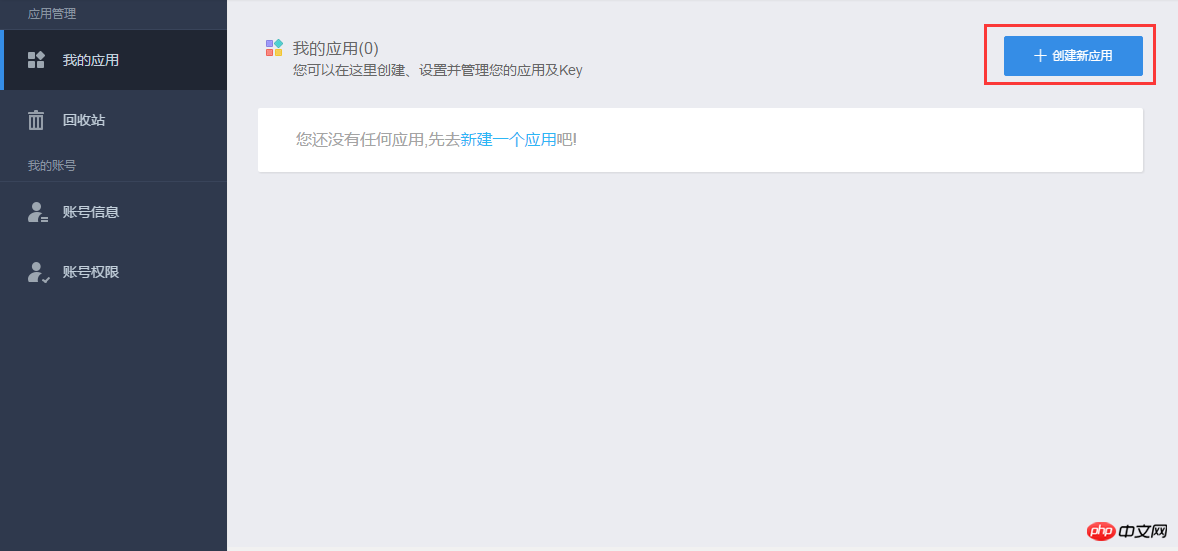
1. Enter the console and create a new application. If you have created an application before, you can skip this step directly.
#2. Click the "Add New Key" button on the created application. In the pop-up dialog box, enter the application name and select the bound service platform. It is a "WeChat Mini Program", as shown in the figure below:
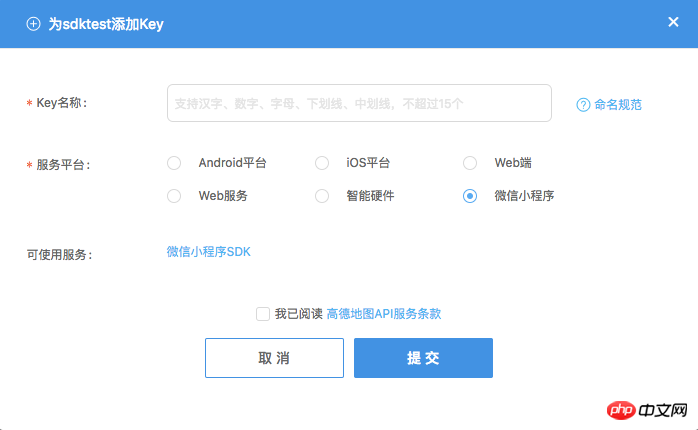
After reading the Amap API Terms of Service, check this option, click "Submit", and complete the Key At this time, you can see the Key you just applied for under the created application.
Configuration Project
Last updated: January 6, 2017
Step 1: Create a new mini program project
Create a new local applet project, you can refer to the "Creating a Project" chapter in the Getting Started Guide.
第 2 步:添加 js 文件
在创建的项目中,新建一个名为 libs 目录,将 amap-wx.js 文件拷贝到 libs 的本地目录下,如下图所示。
获取POI数据
最后更新时间: 2017年1月9日
查找您当前位置周边 “餐饮服务”、“商务住宅”、“生活服务”类型的POI,解决您的吃穿住行问题。
SDK 返回 marker 数组,可以直接用来在微信的地图组件上标记,同时,也返回了POI数组用于您的自定义的界面页面展示。
实现POI周边查询功能的步骤如下:
1、在页面的 js 文件中,实例化 AMapWX 对象,处理搜索数据。
首先,引入 amap-wx.js 文件。
var amapFile = require('path/to/amap-wx.js');//如:../../libs/amap-wx.js
然后,构造 AMapWX 对象,并调用 getPoiAround 方法,代码如下:
Page({
 onLoad: function() {
 var that = this;
 var myAmapFun = new amapFile.AMapWX({key:'高德Key'});
 myAmapFun.getPoiAround({
  success: function(data){
  //成功回调
  },
  fail: function(info){
  //失败回调
  console.log(info)
  }
 })
 },
})2、编写页面的 wxml 文件,搭建页面结构。
<view class="map_container">
 <!--定义页面结构,可以使用地图组件也能使用其他组件 -->
</view>
3、编写页面的 wxss 文件,设置页面样式。
.map_container{
 position: absolute;
 top: 0;
 bottom: 0;
 left: 0;
 right: 0;
}
……示例将查询结果以 marker 显示在地图上,同时点击 marker 时,以文本显示 marker 的详细信息。运行程序,效果如下: 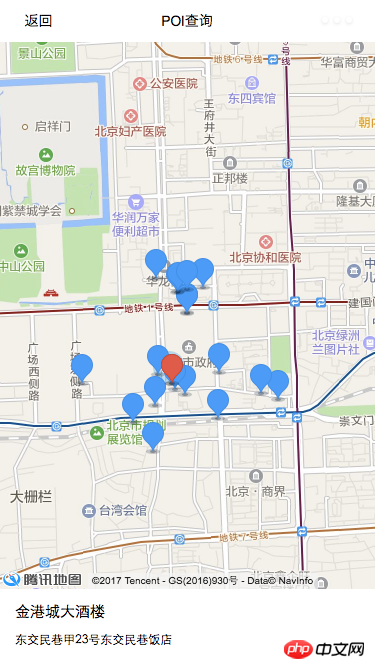
获取地址描述数据
可以将定位地点的详细地址信息,便于您快速的找到准确的地点。
实现逆地理编码功能的步骤如下:
1、在页面的 js 文件中,实例化 AMapWX 对象,处理搜索数据。
首先,引入 amap-wx.js 文件。
var amapFile = require('path/to/amap-wx.js');//如:../../libs/amap-wx.js
然后,构造 AMapWX 对象,并调用 getPoiAround 方法,代码如下:
Page({
 onLoad: function() {
 var that = this;
 var myAmapFun = new amapFile.AMapWX({key:'高德Key'});
 myAmapFun.getRegeo({
  success: function(data){
  //成功回调
  },
  fail: function(info){
  //失败回调
  console.log(info)
  }
 })
 },
})2、编写页面的 wxml 文件,搭建页面结构。
<view class="map_container">
 <!--定义页面结构,可以使用地图组件也能使用其他组件 -->
</view>
3、编写页面的 wxss 文件,设置页面样式。
.map_container{
 position: absolute;
 top: 0;
 bottom: 0;
 left: 0;
 right: 0;
}
……示例将当前位置以 marker 的形式显示在地图上,并通过逆地理编码请求,获取该位置的详细的地址信息,以文本形式显示。运行程序,效果如下: 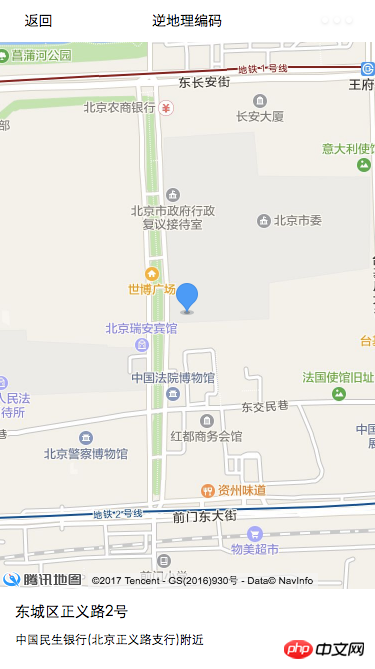
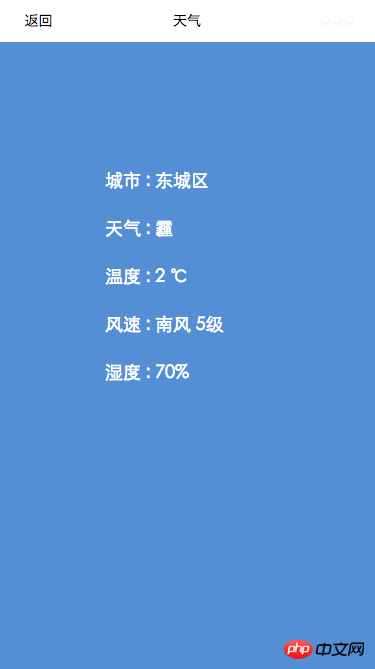
获取实时天气数据
查询您当前定位城市的实时天气情况,帮助您合理安排出行。
实现天气查询功能的步骤如下:
1、在页面的 js 文件中,引入amap-wx.js 文件,实例化 AMapWX 对象,并调用 getWeather 方法获取搜索数据,代码如下:
var amapFile = require('path/to/amap-wx.js');//如:../../libs/amap-wx.js
Page({
onLoad: function() {
var that = this;
var myAmapFun = new amapFile.AMapWX({key:'高德Key'});
myAmapFun.getWeather({
success: function(data){
//成功回调
},
fail: function(info){
//失败回调
console.log(info)
}
})
}
})2、编写页面的 wxml 文件,搭建页面结构。
<view class="container">
 <!--定义页面结构,使用文本组件或其他组件 -->
</view>
3、编写页面的 wxss 文件,设置页面样式。
.container{
 position: absolute;
 top: 0;
 bottom: 0;
 left: 0;
 right: 0;
 background: #4D8AD7;
 color: #fff;
 font-size: 18px;
 padding-top: 200rpx;
 padding-left: 150rpx;
}
……示例将天气情况以文本形式显示。运行程序,效果如下:
官方地址:http://lbs.amap.com/api/wx/summary/
以上就是本文的全部内容,希望对大家的学习有所帮助,更多相关内容请关注PHP中文网!
相关推荐:
The above is the detailed content of Analysis of WeChat Mini Program Amap SDK. For more information, please follow other related articles on the PHP Chinese website!

Hot AI Tools

Undresser.AI Undress
AI-powered app for creating realistic nude photos

AI Clothes Remover
Online AI tool for removing clothes from photos.

Undress AI Tool
Undress images for free

Clothoff.io
AI clothes remover

Video Face Swap
Swap faces in any video effortlessly with our completely free AI face swap tool!

Hot Article
Hot Tools

Notepad++7.3.1
Easy-to-use and free code editor

SublimeText3 Chinese version
Chinese version, very easy to use

Zend Studio 13.0.1
Powerful PHP integrated development environment

Dreamweaver CS6
Visual web development tools

SublimeText3 Mac version
God-level code editing software (SublimeText3)
Hot Topics
 1654
1654
 14
1413
52
1306
25
1252
29
1225
24
14
1413
52
1306
25
1252
29
1225
24

 Xianyu WeChat mini program officially launched
Feb 10, 2024 pm 10:39 PM
Xianyu WeChat mini program officially launched
Feb 10, 2024 pm 10:39 PM
Xianyu's official WeChat mini program has quietly been launched. In the mini program, you can post private messages to communicate with buyers/sellers, view personal information and orders, search for items, etc. If you are curious about what the Xianyu WeChat mini program is called, take a look now. What is the name of the Xianyu WeChat applet? Answer: Xianyu, idle transactions, second-hand sales, valuations and recycling. 1. In the mini program, you can post idle messages, communicate with buyers/sellers via private messages, view personal information and orders, search for specified items, etc.; 2. On the mini program page, there are homepage, nearby, post idle, messages, and mine. 5 functions; 3. If you want to use it, you must activate WeChat payment before you can purchase it;
 WeChat applet implements image upload function
Nov 21, 2023 am 09:08 AM
WeChat applet implements image upload function
Nov 21, 2023 am 09:08 AM
WeChat applet implements picture upload function With the development of mobile Internet, WeChat applet has become an indispensable part of people's lives. WeChat mini programs not only provide a wealth of application scenarios, but also support developer-defined functions, including image upload functions. This article will introduce how to implement the image upload function in the WeChat applet and provide specific code examples. 1. Preparatory work Before starting to write code, we need to download and install the WeChat developer tools and register as a WeChat developer. At the same time, you also need to understand WeChat
 Implement image filter effects in WeChat mini programs
Nov 21, 2023 pm 06:22 PM
Implement image filter effects in WeChat mini programs
Nov 21, 2023 pm 06:22 PM
Implementing picture filter effects in WeChat mini programs With the popularity of social media applications, people are increasingly fond of applying filter effects to photos to enhance the artistic effect and attractiveness of the photos. Picture filter effects can also be implemented in WeChat mini programs, providing users with more interesting and creative photo editing functions. This article will introduce how to implement image filter effects in WeChat mini programs and provide specific code examples. First, we need to use the canvas component in the WeChat applet to load and edit images. The canvas component can be used on the page
 Implement the drop-down menu effect in WeChat applet
Nov 21, 2023 pm 03:03 PM
Implement the drop-down menu effect in WeChat applet
Nov 21, 2023 pm 03:03 PM
To implement the drop-down menu effect in WeChat Mini Programs, specific code examples are required. With the popularity of mobile Internet, WeChat Mini Programs have become an important part of Internet development, and more and more people have begun to pay attention to and use WeChat Mini Programs. The development of WeChat mini programs is simpler and faster than traditional APP development, but it also requires mastering certain development skills. In the development of WeChat mini programs, drop-down menus are a common UI component, achieving a better user experience. This article will introduce in detail how to implement the drop-down menu effect in the WeChat applet and provide practical
 What is the name of Xianyu WeChat applet?
Feb 27, 2024 pm 01:11 PM
What is the name of Xianyu WeChat applet?
Feb 27, 2024 pm 01:11 PM
The official WeChat mini program of Xianyu has been quietly launched. It provides users with a convenient platform that allows you to easily publish and trade idle items. In the mini program, you can communicate with buyers or sellers via private messages, view personal information and orders, and search for the items you want. So what exactly is Xianyu called in the WeChat mini program? This tutorial guide will introduce it to you in detail. Users who want to know, please follow this article and continue reading! What is the name of the Xianyu WeChat applet? Answer: Xianyu, idle transactions, second-hand sales, valuations and recycling. 1. In the mini program, you can post idle messages, communicate with buyers/sellers via private messages, view personal information and orders, search for specified items, etc.; 2. On the mini program page, there are homepage, nearby, post idle, messages, and mine. 5 functions; 3.
 Use WeChat applet to achieve carousel switching effect
Nov 21, 2023 pm 05:59 PM
Use WeChat applet to achieve carousel switching effect
Nov 21, 2023 pm 05:59 PM
Use the WeChat applet to achieve the carousel switching effect. The WeChat applet is a lightweight application that is simple and efficient to develop and use. In WeChat mini programs, it is a common requirement to achieve carousel switching effects. This article will introduce how to use the WeChat applet to achieve the carousel switching effect, and give specific code examples. First, add a carousel component to the page file of the WeChat applet. For example, you can use the <swiper> tag to achieve the switching effect of the carousel. In this component, you can pass b
 Implement the sliding delete function in WeChat mini program
Nov 21, 2023 pm 06:22 PM
Implement the sliding delete function in WeChat mini program
Nov 21, 2023 pm 06:22 PM
Implementing the sliding delete function in WeChat mini programs requires specific code examples. With the popularity of WeChat mini programs, developers often encounter problems in implementing some common functions during the development process. Among them, the sliding delete function is a common and commonly used functional requirement. This article will introduce in detail how to implement the sliding delete function in the WeChat applet and give specific code examples. 1. Requirements analysis In the WeChat mini program, the implementation of the sliding deletion function involves the following points: List display: To display a list that can be slid and deleted, each list item needs to include
 Implement image rotation effect in WeChat applet
Nov 21, 2023 am 08:26 AM
Implement image rotation effect in WeChat applet
Nov 21, 2023 am 08:26 AM
To implement the picture rotation effect in WeChat Mini Program, specific code examples are required. WeChat Mini Program is a lightweight application that provides users with rich functions and a good user experience. In mini programs, developers can use various components and APIs to achieve various effects. Among them, the picture rotation effect is a common animation effect that can add interest and visual effects to the mini program. To achieve image rotation effects in WeChat mini programs, you need to use the animation API provided by the mini program. The following is a specific code example that shows how to
