Correction status:qualified
Teacher's comments:总结的很详细,继续加油


CSS 伪类是添加到选择器的关键字,根据元素的位置和状态来选择匹配的子元素。
1,结构伪类,与关系选择器类似但不一样。用来选择一组兄弟元素中的特定元素,查询入口可以是父级元素,也可以是其中一个兄弟元素。
HTML 示例代码结构:
<ul class="list"><li class="item">item1</li><li class="item">item2</li><li class="item">item3</li><li class="item">item4</li><li class="item">item5</li><li class="item">item6</li><li class="item">item7</li><li class="item">item8</li><li class="item">item9</li></ul>
:first-child,第一个元素
/* 查询入口为父元素 */.list>.item:first-child{ background: pink; }/* item1 被选中 */
:last-child,最后一个元素
/* 查询入口为兄弟元素 */.item:last-child{ background: pink; }/* item9 被选中 */
:nth-child(an+b)
首先找到所有当前元素的兄弟元素,然后按照位置先后顺序从 1 开始排序,选择的结果(an+b)匹配到的对应序号的元素集合。
注意:n=0,1,2,3…,a 和 b 都必须为整数,an 必须写在 b 前面。
.list>.item:nth-child(0n+3){ background: pink; }/* item3 被选中 *//* 可以简写为:nth-child(3) */.list>.item:nth-child(n) /* (1n+0),全选中 */.list>.item:nth-child(n+3) /* (1n+0),item3(含)以后全选中 */.list>.item:nth-child(-n+3) /* (-1n+3),前三个被选中 */.list>.item:nth-child(2n) /* (2n+0),偶数项 */.list>.item:nth-child(even) /* (even)=(2n+0),偶数项*/.list>.item:nth-child(2n+1) /* (2n+1),奇数项 */.list>.item:nth-child(odd) /* (odd)=(2n+1),奇数项*/.list>.item:nth-child(3n) /* (3n+0),第3、6、9...项*/.list>.item:nth-child(3n+1) /* (3n+1),第1、4、7...项*/
:nth-last-child(an+b)
用法和 :nth-child(an+b) 相似,只是元素排序是从后向前排(最后一个序号为1)
.list>.item:nth-last-child(-n+3){ background: pink; }/* 最后三个被选中 */
2,状态伪类(用户行为伪类),这些伪类需要用户进行一些交互才能够应用,例如将鼠标指针悬停在元素上。
HTML 示例代码结构:
<form action="#"><fieldset class="login"><legend>用户登录</legend><label for="userName">用户名:<input type="text" name="userName" id="userName" required></label><br /><label for="password">密码:<input type="password" name="password" id="password" required></label><br /><label for="email">邮箱:<input type="email" name="email" id="email"></label><br /><label for="rem"><input type="checkbox" name="rem" id="rem">记住我</label><br /><button type="submit">点击登录</button></fieldset></form>
初始页面显示: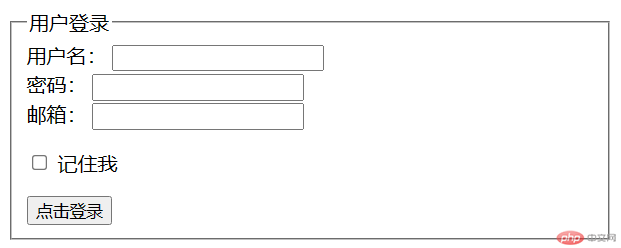
:focus 表示获得焦点的元素(如表单输入)。当用户点击或触摸元素或通过键盘的“tab”键选择它时会被触发。
.login :focus{outline: 2px solid red;}/* 获取焦点的元素加上红色边框 */
页面显示效果: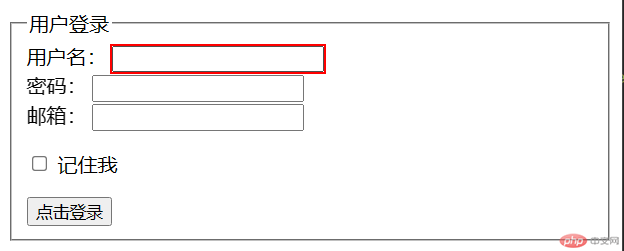
:required 表示任意设置了required属性的<input>,<select>, 或 <textarea>元素。这个伪类对于高亮显示在提交表单之前必须具有有效数据的字段非常有用。
.login :required{background-color: lightyellow;}/* 设置了必填(required)的元素高亮显示 */
页面显示效果: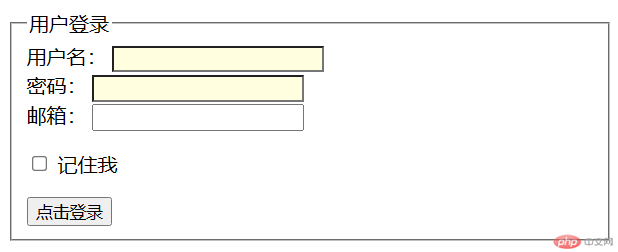
checked 表示任意被勾选/选中的 radio(单选按钮),checkbox(复选框),或者 option(select 中的一项)。
.login input[type="checkbox"]:checked + label{color: red;}/* 复选框选中时,其后的<label>元素的文字为红色 */
页面显示效果: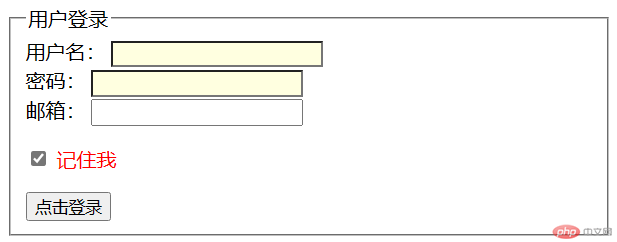
:hover 在光标(鼠标指针)悬停在元素上时提供关联的样式。
.login>button:hover{background-color: blue;color: white;}/* 鼠标悬停在提交按钮上时,按钮变成蓝底白字 */
页面显示效果: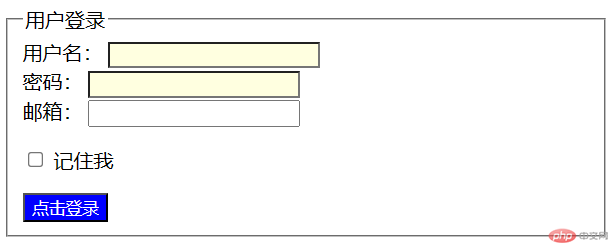
更多状态伪类查询:https://developer.mozilla.org/zh-CN/docs/Web/CSS/Pseudo-classes。
如果有两条或两条以上指向同一元素的冲突 CSS 样式声明,则浏览器将根据权重(优先级)来确定使用哪一条声明。
以下定义了四种选择器的特异性级别:
行内样式 - 行内(内联)样式直接附加到要设置样式的元素。实例:<h1 style="color: #fff;">。
ID - ID 是页面元素的唯一标识符,例如 #navbar。
类、属性和伪类 - 此类别包括 .classes、[attributes] 和伪类,例如::hover、:focus 等。
元素和伪元素 - 此类别包括元素名称和伪元素,比如 h1、div、:before 和 :after。
特异性计算方法:
示例:
A: h1{ color="red"; }B: #content h1{ color="blue"; }C: <div id="content"><h1 style="color: green">Heading</h1></div>
其中:
由于 1 < 101 < 1000,因此第三条规则(C)具有更高的特异性,所以将被应用。
注意:
可以通过重复 ID 或 类选择器来增加特异性,例如:#login#login{} 大于 #login{},.user.user{} 大于 .user{}。
数量再多的元素名称或伪元素(例如:11个),其特异性也不会超过一个属性、类或伪类。同样,数量再多的属性、类或伪类不会超过一个 ID,数量再多的 ID 不会超过行内样式。
通配选择符*,关系选择符+ > ` ~`,对特异性没有影响。
在特异性相同的情况下,前面写的样式会被后面写的样式覆盖。
!important例外:当在一个样式声明中使用一个 !important 规则时,此声明将覆盖任何其他声明。应尽量避免使用!important规则,优先考虑样式权重来解决问题。
:is() 和 :not() 本身不会参与特异性计算,但它们括号内部的选择器会参与特异性计算。
当对一个文档进行布局(lay out)的时候,浏览器的渲染引擎会根据标准之一的 CSS 基础框盒模型(CSS basic box model),将所有元素表示为一个个矩形的盒子(box)。CSS 决定这些盒子的大小、位置以及属性(例如颜色、背景、边框尺寸…)。
每个盒子由四个部分(或称区域)组成。如下面示例:
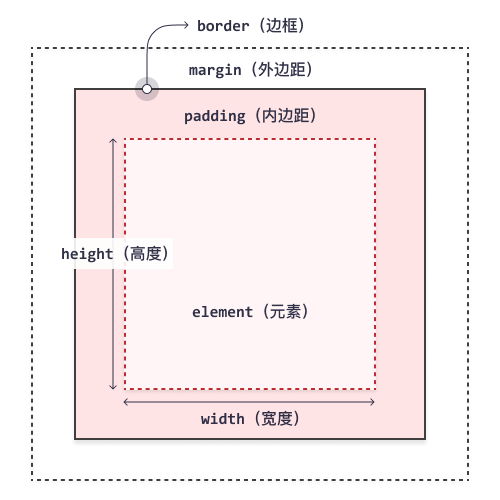
其中:
box-sizing 属性决定盒子大小的计算方式: