Correction status:qualified
Teacher's comments:


对数据库操作一无所知,直播课中讲到的PDO,一直没有听懂,就在PHP中文网上找了一套PDO小型项目的视频学习,这次用双休的时间照视频制作了一套非常简陋的学生管理系统。
1、下载adminer.php,用于操作数据库,phpmyadmin太复杂了。
2、用adminer.php连接数据库,创建一个新的数据库【myphp】,编码为:utf8_general_ci
3、在myphp数据库创建一个数据表class,引擎为myaISAM
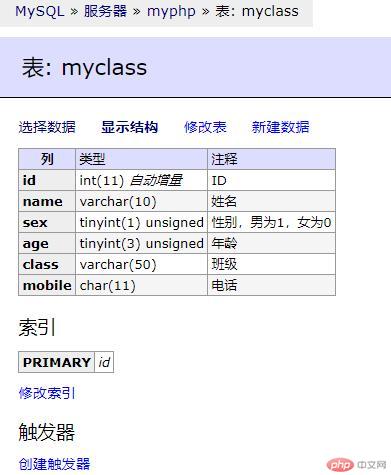
4、创建以下字段
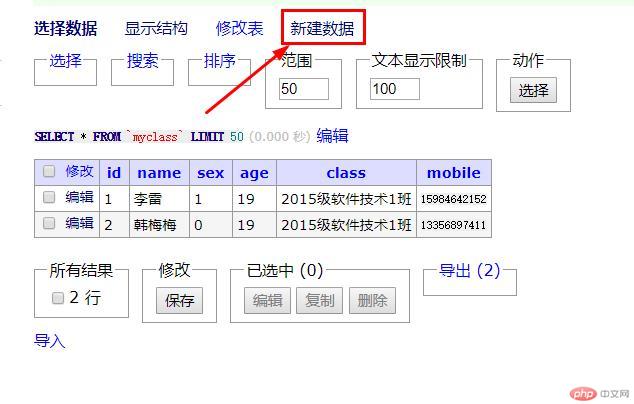
5、点击【新建数据】,然后新增2条同学的信息,如下图
6、数据库的创建就基本完成。
1、在phpstudy中创建一个站点
2、在站1点中创建index.php文件,作为主页
3、创建conn.php文档,用于连接数据库
<?php
try {
    $dns = 'mysql:host=127.0.0.1;dbname=myphp';
    $pdo = new PDO($dns, 'root', 'root');
} catch (PDOException $a) {
    die('数据库连接失败' . $a->getMessage());
}
print_r($pdo);
echo '数据库连接成功';
//如果连接成功,最后两段代码可以删除或是注释掉。
4、在index.php中引入conn.php文件
<!doctype html>
<html lang="en">
<head>
    <meta charset="UTF-8">
    <title>学生管理系统</title>
    <?php
 include('conn.php');
 ?>
</head>
<body>
</body>
</html>
5、在浏览器中动态测试index.php页面,能否连接成功,在页面中都会显示相应的信息。
1、创建menu.php文档,制作菜单页
<a href="index.php">浏览学生</a> <a href="add.php">增加学生</a> <hr>
2、在index.php中引入menu.php,并制作一个表格
<!doctype html>
<html lang="en">
<head>
    <meta charset="UTF-8">
    <title>学生管理系统</title>
    <?php
 include('conn.php');
 ?>
</head>
<body>
<center>
    <h1>学生管理系统</h1>
    <?php
 include('menu.php');
 ?>
 <table width="650" border="1">
        <tr align="center">
            <td>ID</td>
            <td>姓名</td>
            <td>性别</td>
            <td>年龄</td>
            <td>班级</td>
            <td>***</td>
            <td>操作</td>
        </tr>
    </table>
</center>
</body>
</html>
3、再开始使用PHP进行数据库的内容读取了。
1、在index.php页面,插入以下代码
<!doctype html>
<html lang="en">
<head>
    <meta charset="UTF-8">
    <title>学生管理系统</title>
 <?php
    include('conn.php');
 ?>
</head>
<body>
<center>
    <h1>学生管理系统</h1>
 <?php
    include('menu.php');
 ?>
 <table width="650" border="1">
        <tr align="center">
            <td>ID</td>
            <td>姓名</td>
            <td>性别</td>
            <td>年龄</td>
            <td>班级</td>
            <td>***</td>
            <td>操作</td>
        </tr>

<?php
 $sql = 'SELECT * FROM `myclass`';
 foreach ($pdo->query($sql) as $e):
 ?>
 <tr align="center">
                <td><?php echo $e['id']; ?></td>
                <td><?php echo $e['name']; ?></td>
                <td><?php echo $e['sex'] ? '男' : '女'; ?></td>
                <td><?php echo $e['age']; ?></td>
                <td><?php echo $e['class']; ?></td>
                <td><?php echo $e['mobile']; ?></td>
                <td>
                    <button>修改</button>
                    <button>删除</button>
                </td>
            </tr>
 <?php
        endforeach;
 $pdo = null;
 ?>
 </table>
</center>
</body>
</html> 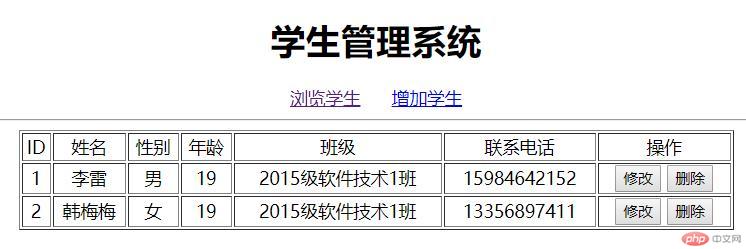
2、此时浏览页面,可以看到数据库中的数据已调用出来了。
1、创建add.php文档,插入以下代码:
<!doctype html>
<html lang="en">
<head>
    <meta charset="UTF-8">
    <title>学生管理系统</title>
 <?php
    include('conn.php');
 ?>
</head>
<body>
<center>
    <h1>学生管理系统</h1>
 <?php
    include('menu.php');
 ?>

</center>
</body>
</html>
2、再插入表单标签
<!doctype html>
<html lang="en">
<head>
    <meta charset="UTF-8">
    <title>学生管理系统</title>
 <?php
    include('conn.php');
 ?>
</head>
<body>
<center>
    <h1>学生管理系统</h1>
 <?php
    include('menu.php');
 ?>
 <h2>增加学生信息</h2>
    <form action="action.php?action=add" method="post">
        <table>
            <tr>
                <td>姓名:</td>
                <td><input type="text" name="name"></td>
            </tr>
            <tr>
                <td>性别:</td>
                <td>
                    <input type="radio" name="sex" value="1"> 男
 <input type="radio" name="sex" value="0"> 女
 </td>
            </tr>
            <tr>
                <td>年龄:</td>
                <td><input type="text" name="age"></td>
            </tr>
            <tr>
                <td>班级:</td>
                <td><input type="text" name="class"></td>
            </tr>
            <tr>
                <td>电话:</td>
                <td><input type="text" name="mobile"></td>
            </tr>
            <tr align="center">
                <td colspan="2">
                    <input type="submit" value="提交">
                    <input type="reset" value="重置">
                </td>
            </tr>
        </table>
    </form>
</center>
</body>
</html> 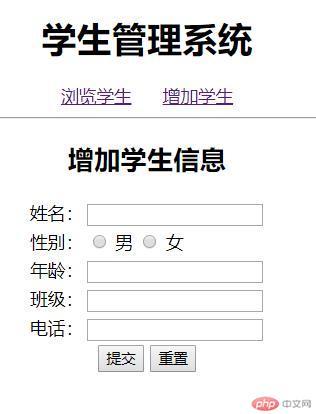
3、表单是提交到action.php文档中进行处理的,我们再创建一个action.php文件。
4、在add.php文档的表单中,提交到action.php文档时,还传递了一个参数action=add,我们就可以利用传递的参数来对数据进行处理。
1、在action.php中输入以下代码
<?php
include('conn.php');
//连接数据库
switch ($_GET['action']) {
    //判断传递的参数
    case 'add':
        //如果传递的参数是add,则执行下列语句
        $name = $_POST['name'];
        $sex = $_POST['sex'];
        $age = $_POST['age'];
        $class = $_POST['class'];
        $mobile = $_POST['$mobile'];
        //表单是post提交,将提交上来的数据存放到变量中
        $sql = "INSERT INTO `myclass` (`name`, `sex`, `age`, `class`, `mobile`)
VALUES ('{$name}', '{$sex}', '{$age}', '{$class}', '{$mobile}')";
        //SQL的写入数据语句
        $smt = $pdo->exec($sql);
        //PDO对象执行一次sql语句
        if ($smt > 0) {
            //如果PDO对象中的数据有变化,则弹出窗口,并跳转到index.php页面,否则就返回到提交页。
            echo "<script>alert('数据添加成功');window.location='index.php';</script>";
        } else {
            echo "<script>alert('数据添加失败');window.history.back();</script>";
        }
        break;
2、在主页进行【增加学生】的操作,如果成功,则会跳到主页,显示最新的学生名单。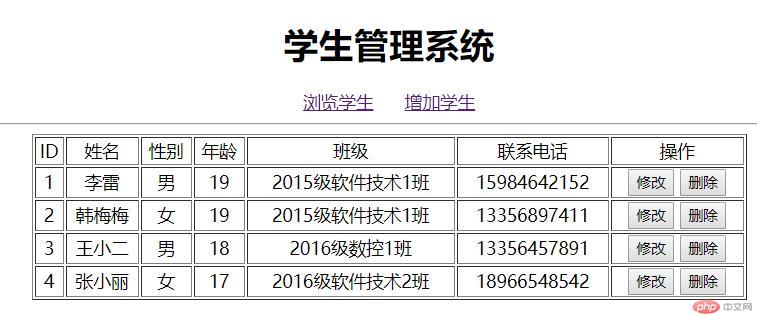
}