

第二节课内容总结如下:
背景色和背景图主要通过background属性来设置,直接设置颜色值的方法有四种(英文单词 16进制颜色 rgb颜色 rgba颜色)。设置背景图使用url带连接的方式,可使用本地链接也可使用外网链接,复合写法可带上是否平铺图片,使用如下图所示:

背景色可使用linear-gradient(方向,起始颜色,终止颜色)方法设置渐变色,使用(background-position:背景图片定位 x y坐标)方法设置精灵图,使用精灵图可节省网站压力
边框属性:border:宽度 样式 颜色; (样式:dotted:点线边框、dashed:虚线边框、solid:实线边框、double:两个边框),也可以使用border-top-left-radius,border-top-right-radius,border-bottom-right-radius,border-bottom-left-radius
设置单边框,使用border-radius设置边框圆角顺序(上右下左),边框阴影:box-shadow:x y 阴影宽度 阴影颜色;
表格由 <table> 标签来定义每个表格均有若干行(由 <tr> 标签定义),每行被分割为若干单元格(由 <td> 标签定义),table特有的属性折叠边框border-collapse: collapse;需要注意每行每列一一对应,可使用rowspan合并行,使用colspan合并列
无序列表由 <ul> 标签来定义 ,每个列表均有若干列表项(由 <li> 标签定义),使用时先清除列表样式
表单用于收集不同类型的用户输入 <form>表单是一个包含表单元素的区域,两个重要属性 action=“url”和method="get/post”,<input> 元素: 最重要的表单元素 该元素根据不同的 type 属性,可以变化为多种形态,比如text,password,radio,checkbox,submit,button等控件
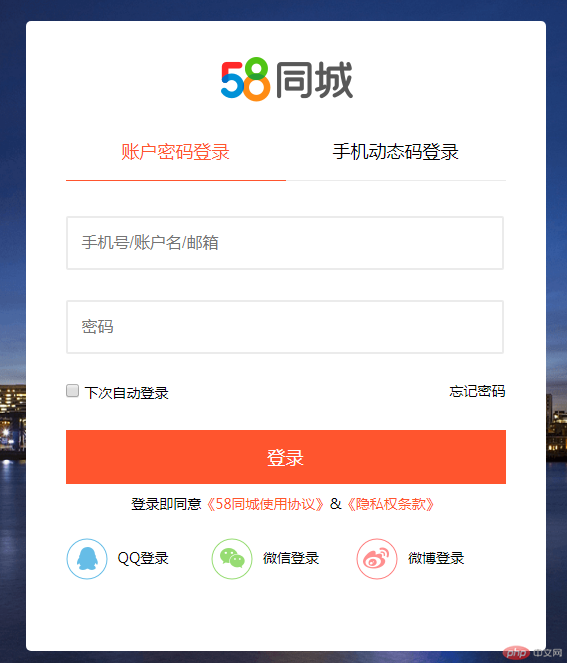
以下部分为作业部分,仿58同城的登录页面:
<!DOCTYPE html>
<html lang="en">
<head>
    <meta charset="UTF-8">
    <title>仿58同城登录页面练习</title>
    <style type="text/css">
        * {
            margin: 0px;
            padding: 0px
        }

        body {
            background: url("static/images/bg.png") no-repeat;
            background-size: 100% 100%; /*宽度100%高度都设置100%*/
        }

        .main {
            width: 520px;
            height: 595px;
            margin: 45px auto;
            background: white;
            border-radius: 5px;
            padding-top: 35px;
        }

        .titleIcon {
            width: 134px;
            height: 46px;
            margin: 0px auto 20px;
            background: url("static/images/pc_login_sprite.png") 0px -202px;
        }

        ul {
            width: 440px;
            margin: 0px auto;
        }

        .titleli {
            list-style: none;
            float: left;
            width: 50%;
            height: 58px;
            font-size: 18px;
            text-align: center;
            line-height: 58px;
        }

        .content {
            width: 440px;
            margin: 20px auto;

        }

        input {
            width: 420px;
            height: 50px;
            border: 2px solid #EBEBEB;
            border-radius: 2px;
            padding-left: 14px;
            margin-top: 15px;
            margin-bottom: 15px;
            font-size: 16px;
            color: #000;
        }

        .clearfloat {
            clear: both; /**清除浮动*/
        }

        .content_li_left {
            list-style: none;
            float: left;
        }

        .content_li_right {
            list-style: none;
            float: right;
            font-size: 14px;
        }

        .box {
            width: 14px;
            height: 14px;
            font-size: 14px;
        }

        button {
            width: 440px;
            height: 54px;
            margin: 15px auto 0;
            color: white;
            background: #FF552E;
            font-size: 18px;
            border: none;
        }

        p {
            width: 440px;
            margin: 10px auto;
            font-size: 14px;
            text-align: center;
        }

        .li_otherlogin {
            list-style: none;
            height: 45px;
            line-height: 45px;
            float: left;
            width: 33%;
            font-size: 14px;
            margin:2px 0;
        }

        .qqlogin {
            display: inline-block;
            width: 42px;
            height: 42px;
            vertical-align: middle;
            margin-right: 10px;
            background: url('static/images/pc_login_sprite.png') -138px -248px;
        }

        .wxlogin{
            display: inline-block;
            width: 42px;
            height: 42px;
            vertical-align: middle;
            margin-right: 10px;
            background: url('static/images/pc_login_sprite.png') -306px -248px;
        }

        .wblogin{
            display: inline-block;
            width: 42px;
            height: 42px;
            vertical-align: middle;
            margin-right: 10px;
            background: url('static/images/pc_login_sprite.png') -264px -248px;
        }


    </style>
</head>
<body>
<div class="main">
    <div class="titleIcon"></div>
    <ul>
        <li class="titleli" style="border-bottom: 1px solid #FF552E;color:#FF552E ">账户密码登录</li>
        <li class="titleli" style="border-bottom: 1px solid #ebebeb;">手机动态码登录</li>
    </ul>
    <div class="clearfloat"></div>
    <form class="content" method="" action="">

        <input type="text" placeholder="手机号/账户名/邮箱">
        <input type="text" placeholder="密码">
        <ul style="line-height: 44px;">
            <li class="content_li_left">
                <input class="box" type="checkbox"> <span style="font-size: 14px">下次自动登录</span>
            </li>
            <li class="content_li_right">忘记密码</li>
        </ul>
        <div class="clearfloat"></div>
        <button>登录</button>
        <p>登录即同意<span style="color:#FF552E ">《58同城使用协议》</span>&<span style="color:#FF552E ">《隐私权条款》</span></p>
    </form>
    <ul>
        <li class="li_otherlogin">
            <i class="qqlogin"></i>QQ登录
        </li>
        <li class="li_otherlogin">
            <i class="wxlogin"></i>微信登录
        </li>
        <li class="li_otherlogin">
            <i class="wblogin"></i>微博登录
        </li>
    </ul>
    <div class="clearfloat"></div>
</div>
</body>
</html>点击 "运行实例" 按钮查看在线实例
结果页面截图如下:

总结:本节课主要是讲了一些元素标签的使用和设置,需要多敲代码才能更熟悉。如果写了浮动,记得要清除浮动,不然元素会层级叠加在一起。
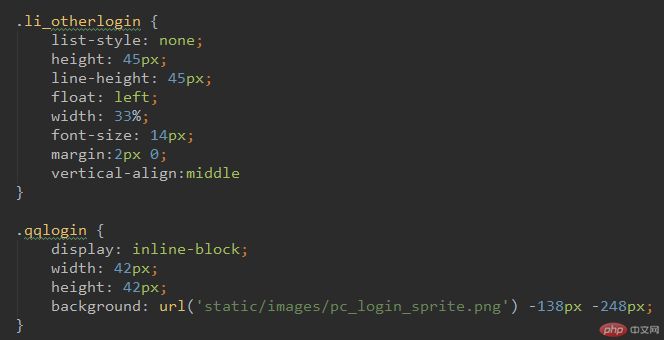
在做作业时遇到了一个bug如下:


虽然设置了li的height和line-height,但是像上面这样写的话并没有什么效果,图片和文字还是不能居中,百度了下,是因为父控件使用了浮动float,那么子元素需要改为display: inline-block;行内块元素,并且设置vertical-align: middle;才能生效