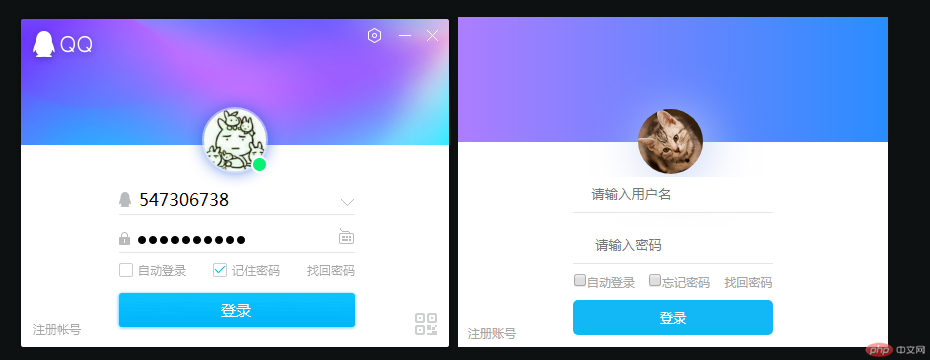


这段代码使用现有技术制作了一个仿qq的登录框,使用到的技术有:
background背景控制,background:linear-gradient背景色线性渐变 ,border边框属性,单边边框,边框阴影,边框圆角,圆形border-radius,以及表单元素text password checkbox button 只是初步仿制出样式,功能待日后补齐
<!DOCTYPE html>
<html lang="en">
<head>
  <meta charset="UTF-8">
  <meta name="viewport" content="width=device-width, initial-scale=1.0">
  <meta http-equiv="X-UA-Compatible" content="ie=edge">
  <style type="text/css">
    *{
      margin: 0;
      padding: 0;
    }
    body{
      background: #0E1112;
    }
    #div1{
      width: 430px;
      height: 330px;
      background: #fff;
      margin: 80px auto;
    }
    #div2{
      width: 430px;
      height: 125px;
      background: linear-gradient(to right,#AC7DFF,#298DFF)

    }
    img{
      width: 65px;
      height: 65px;
      border-radius: 50%;
      margin-top: 92px;
      margin-left: 180px;
      box-shadow: 5px 5px 50px #C0CFF5;
    }
    form{
      width: 430px;
      text-align: center;
      margin-top: 20px;
      font-size: 10px;
      color: #A6A6A6;
    }
    .text1{
      width: 200px;
      height: 35px;
      margin-top: 15px;
      border: none;
      border-bottom: 1px solid #E5E5E5;
    }
    button{
      border: none;
      background: #12B7F5;
      color: #fff;
      width: 200px;
      height: 35px;
      margin-top: 10px;
      border-radius: 5px;
    }
    .text2{
      height: 13px;
      margin-top: 10px;
    }
    p{
      text-align: left;
      margin-top: -10px;
      margin-left: 10px;
    }
  </style>
  <title>03-12练习</title>
</head>
<body>
  <div class=""id="div1">
    <div class=""id="div2">
      <img src="http://img1.touxiang.cn/uploads/20130904/04-074432_105.jpg" alt="头像图片">
    </div>
    <form class="" action="index.html" method="post">
      <input type="text" name="" value=""class="text1"placeholder="     请输入用户名"><br>
      <input type="password" name="" value=""class="text1"placeholder="      请输入密码"><br>
      <input type="checkbox" name="" value=""class="text2">自动登录
      <input type="checkbox" name="" value=""class="text2">忘记密码      找回密码<br>
      <button type="button" name="">登录</button>
      <p>注册账号</p>
    </form>
  </div>
</body>
</html>点击 "运行实例" 按钮查看在线实例
左边是QQ原界面 右边是仿制的界面

总结当日所学知识点,没有用到表单,精灵图等知识点,但是也自己联系掌握了,这是今天的笔记
03-12
02:背景,边框,表格与列表,表单元素,登录页面
2-1:背景控制,使用background来控制背景图,背景
色,背景色的设置分为三种(英文单词,16进制颜
色,rgb颜色)
例:background:red;
background:#c97474;
background:rgb(129,44,44)
2-2:背景色透明度
例:background:rgba(129,44,44,0.2)
2-3:背景色线性渐变:
backgound:linear-gradient(方向,起始颜色,终
止颜色)
例:background:linear-gradient(to
right,red,blue)
2-4:背景图片 不平铺,放大
例:background:url(图片地址) no-repeat;
background-size:100%;
2-5:精灵图
background-position:背景图片定位x y坐标
例:background:url(图片地址) -10px -30px;
2-6:边框属性
border:宽度 样式 颜色; 这属于复合写法
例:border:1px solid #ccc
2-7:边框样式:
dotted:点线边框 dashed:虚线边框 solid:实线
边框 double:双线边框
2-8:单边边框
上:border-top:1px dashed #ccc;
左:border-left:1px dotted #ccc;
右:border-right:1px solid #ccc;
下:border-bottom:3px double #ccc;
2-9:边框阴影
box-shadow:x y阴影宽度 阴影颜色;
例:box-shadow:2px 2px 20px #ccc;
2-10:边框圆角
border-radius;
例:border-radius:10px;
2-11:圆形
border-radius:50%;给半径px或者百分比50%
2-12:控制单边圆角:
左上:border-top-left-radius:20px;
右上:border-top-right-radius:20px;
左下:border-bottom-left-radius:20px;
右下:border-bottom-right-radius:20px;
2-13:表格
表格由<table></table>标签来定义,每个表格均有
若干行(由<tr></tr>标签定义),每行被分隔为若干
单元格(由<td></td>标签来定义)
2-14:表格特有属性:折叠边框
border-collapse:collapse;
2-15:合并行
在td标签中添加属性:<td rowspan="数量">
2-16:合并列
在td标签中添加属性:<td colspan="数量">
2-17:无序列表
由<ul></ul>标签与<li></li>标签组成
去除标签格式 list-style:none
2-18:表单元素
表单用于收集不同类型的用户输入<form>表单是一
个包含表单元素的区域
<form action="跳转的页面" method="get/post传
值方式">
2-19:input
<input>元素,是最重要的表单元素,该元素根据不同
的type属性,可以变化为多种形态
1:供文本输入的单行输入
<input type="text">
2:定义密码字段
<input type="password">
3:单选框
<input type="radio">
4:多选框
<input type="checkbox">
2-20:文本域
<textarea></textarea>
2-21:按钮
1:定义提交表单数据至表单处理程序的按钮 通
常使用较少
<input type="submit" value="提交">
2:定义按钮
<input type="button" value="搜索">
3:最常用的按钮
<button>提交</button>