

1.背景控制:
背景色透明度:background: rgba(129,44,44,0.2);
no-repeat 不平铺:background: url(http://imgsrc.baidu.com/imgad/pic/item/0eb30f2442a7d93388b54e55a74bd11373f001f2.jpg) no-repeat;
背景色的线性渐变:background: linear-gradient(方向,起始颜色,终止颜色)
*/
hr{height: 10px;background: linear-gradient(to right,red,blue)}
背景图:background-image:url(图片地址),background: url(static/images/p2.jpg) -100px 0 ;
精灵图:background-position:背景图片定位 x y坐标
2.边框属性
边框属性:border:宽度 样式 颜色; (样式:dotted:点线边框、dashed:虚线边框、solid:实线边框、double:两个边框)
/*设置单边边框:*/
/*border-top:1px dashed #ccc;
border-left:1px dotted #ccc;
border-right:1px solid #ccc;
border-bottom:3px double #ccc;*/
边框阴影:box-shadow:x y 阴影宽度 阴影颜色; p{
width: 200px;
height: 200px;
margin: 50px auto;
box-shadow: 2px 2px 20px #ccc;
/*边框圆角: border-radius;*/
/*border-radius: 10px;*/
/*圆形*/
/* border-radius:50% ;*/
/*控制单边框圆角:*/
border-top-left-radius: 20px;
border-top-right-radius: 20px;
border-bottom-right-radius: 20px;
border-bottom-left-radius: 20px;
}
3.表格:表格由 <table> 标签来定义每个表格均有若干行(由 <tr> 标签定义),每行被分割为若干单元格(由 <td> 标签定义)
<table>
<tr>
<td>这是一个一行一列的表格</td>
</tr>
</table>
<table>
<tr>
<!-- 合并行 -->
<td rowspan="4">商品</td>
</tr>
<tr>
<!-- 合并列 -->
<td colspan="4">商品</td>
</tr>
<tr>
<td>苹果</td>
<td>苹果</td>
<td>苹果</td>
<td>苹果</td>
</tr>
<tr>
<td>苹果</td>
<td>苹果</td>
<td>苹果</td>
<td>苹果</td>
</tr>
</table>
<!-- 无序列表: -->
<!-- 无序列表由 <ul> 标签来定义 ,每个列表均有若干列表项(由 <li> 标签定义) -->
<ul>
<li>苹果</li>
<li>苹果</li>
<li>苹果</li>
</ul>
4.表单:表单用于收集不同类型的用户输入 <form>表单是一个包含表单元素的区域。
<input> 元素: 最重要的表单元素 该元素根据不同的 type 属性,可以变化为多种形态。
用户名:<input type="text"><!-- 定义供文本输入的单行输入 -->
密码: <input type="password" name=""><!-- 定义密码字段 -->
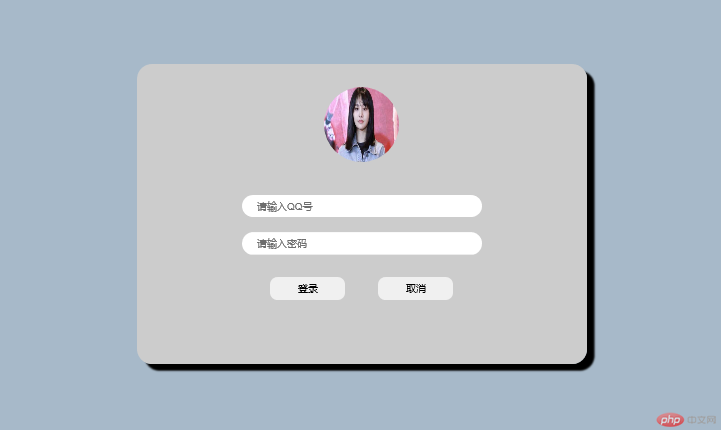
5.完成qq登录代码
<!DOCTYPE html>

<html>

<head>

 <meta charset="utf-8">

 <title>QQ登录页面</title>

 <link rel="stylesheet" type="text/css" href="">

 <style type="text/css">

  *{margin: 0px;padding: 0px;}

  body{background-color: #A7B9C9;width: 100%;height:100%;}

  .centens{

   width: 600px;

   height: 400px;

   background: #ccc;

   margin: 100px auto;

  }

  div{text-align: center;

   border-radius: 20px;

   background: rgb(124,124,121,0.6);

   box-shadow: 10px 9px 3px;

  }

  img{

   width: 100px;

   height: 100px;

   border-radius: 50%;

   margin:30px


  }

  input{

   width: 300px;

   height: 30px;

   border: none;

   margin: 10px;

   border-radius: 20px;

   padding-left: 20px;

  }

  button{

   width: 100px;

   height: 30px;

   border: none;

   margin: 20px;

   border-radius: 10px;

  }

 </style>

</head>

<body>


  <div class="centens">

   <img src="
http://s.img.mix.sina.com.cn/auto/crop?img=http%3A%2F%2Fn.sinaimg.cn%2Fent%2Ftransform%2F200%2Fw600h400%2F20190318%2Fu3hJ-hukwxnv1973559.jpg&size=328_218
">

   <form>

   <input type="text" name="" placeholder="请输入QQ号"><br>

   <input type="password" name="" placeholder="请输入密码"><br>

   <button>登录</button>

   <button>取消</button>

   </form>

  </div>


</body>

</html>
运行后如图