

写一案例,要求用到<a href="" target="">与<iframe>理解target与name属性之间的关联是如何实现的
学习总结:
<iframe src="URL"></iframe>
通过使用框架,你可以在同一个浏览器窗口中显示不止一个页面。
iframe语法:
该URL指向不同的网页。
Iframe - 设置高度与宽度
height 和 width 属性用来定义iframe标签的高度与宽度。属性默认以像素为单位, 但是你可以指定其按比例显示 (如:"80%").
frameborder 属性用于定义iframe表示是否显示边框。设置属性值为 "0" 移除iframe的边框:
显示一个目标链接的页面,目标链接的属性必须使用iframe的属性,如:
<iframe src="demo_iframe.htm" name="iframe_a"></iframe>
<p><a href="http://www.php.cn" target="iframe_a">php.cn</a></p>
注意: 因为 a 标签的 target 属性是名为 iframe_a 的 iframe 框架,所以在点击链接时页面会显示在 iframe框架中。
<!DOCTYPE html>
<html lang="en">
<head>
    <meta charset="UTF-8">
    <title>内联标签</title>
</head>
<body>
<!--使用iframe在一个网页中打开网站,窗口内嵌当前页面-->
<!--内联框架: 在当前页窗口中, 再次加载一个窗口, 显示另一个页面,类似画中画功能-->
<h2>视频目录导航</h2>
<div class="nav">
<ul>
    <li><a href="https://www.iqiyi.com/v_19rsexikiw.html?vfrm=pcw_home&vfrmblk=G&vfrmrst=711219_home_zongyi_float_pic_play5"  target="flash1">极限挑战</a></li>
    <li><a href="https://www.iqiyi.com/v_19rsexikiw.html?vfrm=pcw_home&vfrmblk=G&vfrmrst=711219_home_zongyi_float_pic_play4" target="flash2">奔跑吧</a></li>
</ul>
</div>
<div class="flash">
<h3>极限挑战</h3>
<!--利用a标签的target属性可以指向一个框架的name属性的特性-->
<p><iframe src=""
           name="flash1" width="800" height="500" frameborder="0">极限挑战</iframe></p>
<h3>奔跑吧</h3>
<p><iframe src=""
           name="flash2" width="800"  height="500" frameborder="0">奔跑吧</iframe></p>
</div>
</body>
</html>
点击 "运行实例" 按钮查看在线实例
2.写一个案例, 演示css中的内联样式,内部样式,外部样式的应用场景,理解style属性, style标签, 以及外部样式表的使用方式
CSS 可以通过以下方式添加到HTML中:
内联样式- 在HTML元素中使用"style" 属性
内部样式表 -在HTML文档头部 <head> 区域使用<style> 元素 来包含CSS
外部引用 - 使用外部 CSS 文件
最好的方式是通过外部引用CSS文件.
内联样式:<div style="display: none"></div>
内部样式(标签样式):<style></style>
外部样式:<link rel="stylesheet" href="./style.css">
css优先级
内联样式>id>class>内部样式(标签样式)>外部样式
css选择器:
1. id选择器>class选择器>tag标签选择器
内联样式
当特殊的样式需要应用到个别元素时,就可以使用内联样式。 使用内联样式的方法是在相关的标签中使用样式属性。样式属性可以包含任何 CSS 属性。以下实例显示出如何改变段落的颜色和左外边距。
<p style="color:blue;margin-left:20px;">This is a paragraph.</p>
背景色属性(background-color)定义一个元素的背景颜色:<p style="background-color:green;"></p>;
font-family(字体),color(颜色),和font-size(字体大小)属性来定义字体的样式:<p style="font-family:arial;color:red;font-size:20px;">一个段落。</p>
现在通常使用font-family(字体),color(颜色),和font-size(字体大小)属性来定义文本样式,而不是使用<font>标签。
text-align(文字对齐)属性指定文本的水平与垂直对齐方式:center,left,right.
内部样式表
当单个文件需要特别样式时,就可以使用内部样式表。你可以在<head> 部分通过 <style>标签定义内部样式表:
<head>
<style type="text/css">
body {background-color:yellow;}
p {color:blue;}
</style>
</head>
外部样式表
当样式需要被应用到很多页面的时候,外部样式表将是理想的选择。使用外部样式表,你就可以通过更改一个文件来改变整个站点的外观。
<head>
<link rel="stylesheet" type="text/css" href="mystyle.css">
</head>
<!DOCTYPE html>
<html lang="en">
<head>
    <meta charset="UTF-8">
    <title>如何使用添加部分样式信息</title>
    <link rel="stylesheet"  type="text/css" href="static/css-self.css">
    <!--链接到一个外部样式表css-self.css,在头部创建<link></link>标签,rel属性指明当前加载文件类型,href指明文件来源。-->
</head>

<!--使用添加到<head>部分的样式信息对HTML进行格式化-->
<style>
    h1{
        color:red;
       /*!*写样式规则时带分号*!css解释格式*/
    }
    p{
        /*内部样式仅对当前文档有效*/
        color:mediumpurple;
    }
</style>

<body>
<h1>小姐姐在猫扑直播</h1>
<p>小哥哥在bili当up主</p>
<a href="http:iqiyi.com" style="text-decoration: none;">爱奇艺</a>
<!--使用样式属性(style)制作一个没有下划线的链接;-->
<h3>使用外部样式文件格式化文本</h3>
</body>
</html>点击 "运行实例" 按钮查看在线实例
3.对于盒 模型中的内外边距, 边框的样式设置有什么不同, 写出你的理解、
盒模型是布局的基础,页面上的一切可见元素皆可看做盒子
盒子默认都是块级元素: 独占一行,支持宽度设置
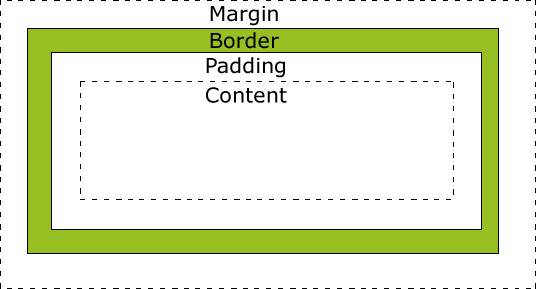
(根据盒子模型示意图分析)
盒子模型可以设置5个样式: 宽高背景内外边距与边框
(1): width: 宽度(水平方向)
(2): height: 高度(垂直方向)
(3): background-color: 背景 (默认透明)
(4): padding: 内边距, 内容与边框之间的填充区域
(5): margin: 外边距,决定当前盒子与其它盒子之间的位置与关系
(3): border: 边框, 位于内外边距之间, 是可见元素,允许设置宽度, 样式和颜色
根据是可见性可以分为二类:
(1). 可见的: width, height, border
(2). 透明的: background, padding, margin
注: padding,margin 只允许设置宽度, 不允许设置样式与颜色

不同部分的说明:
Margin(外边距) - 清除边框外的区域,外边距是透明的。
Border(边框) - 围绕在内边距和内容外的边框。
Padding(内边距) - 清除内容周围的区域,内边距是透明的。
Content(内容) - 盒子的内容,显示文本和图像。
元素的宽度和高度
重要: 当您指定一个CSS元素的宽度和高度属性时,你只是设置内容区域content的宽度和高度。要知道,完全大小的元素,你还必须添加填充,边框和边距。
下面的例子中的元素的总宽度为300px:
width:250px;
padding:10px;
border:5px solid gray;
margin:10px;
最终元素的总宽度计算公式是这样的:
总元素的宽度=宽度+左填充+右填充+左边框+右边框+左边距+右边距
300px =250px+10px + 10px + 5px+ 5px +10px+10px
元素的总高度最终计算公式是这样的:
总元素的高度=高度+顶部填充+底部填充+上边框+下边框+上边距+下边距
CSS 边框 (border) 可以是围绕元素内容和内边距的一条或多条线,对于这些线条,可以自定义它们的样式、宽度以及颜色。
css边框属性:
1、 border-style属性用来定义边框的样式
none: 默认无边框
dotted: dotted:定义一个点线框
dashed: 定义一个虚线框
solid: 定义实线边界
double: 定义两个边界。 两个边界的宽度和border-width的值相同
groove: 定义3D沟槽边界。效果取决于边界的颜色值
ridge: 定义3D脊边界。效果取决于边界的颜色值
inset:定义一个3D的嵌入边框。效果取决于边界的颜色值
outset: 定义一个3D突出边框。 效果取决于边界的颜色值
2、border-width 属性为边框指定宽度
为边框指定宽度有两种方法:可以指定长度值,比如 2px 或 0.1em;或者使用 3 个关键字之一,它们分别是 thin 、medium(默认值) 和 thick。
注意: "border-width" 属性 如果单独使用则不起作用。要先使用 "border-style" 属性来设置边框。
p.one
{
border-style:solid;
border-width:5px;
}
注意:CSS 没有定义 3 个关键字的具体宽度,所以一个用户代理可能把 thin 、medium 和 thick 分别设置为等于 5px、3px 和 2px,而另一个用户代理则分别设置为 3px、2px 和 1px。
3、
border-color属性用于设置边框的颜色。可以设置的颜色:
name - 指定颜色的名称,如 "red"
RGB - 指定 RGB 值, 如 "rgb(255,0,0)"
Hex - 指定16进制值, 如 "#ff0000"
您还可以设置边框的颜色为"transparent"。
注意: border-color单独使用是不起作用的,必须得先使用border-style来设置边框样式。
p.two
{
border-style:solid;
border-color:red;
}
单独设置各边边框
在CSS中,可以指定不同的侧面不同的边框:
<style>
p
{
border-top-style:dotted;
border-right-style:solid;
border-bottom-style:dotted;
border-left-style:solid;
}
</style>
border-style属性可以有1-4个值:
border-style:dotted solid double dashed;
上边框是 dotted
右边框是 solid
底边框是 double
左边框是 dashed
border-style:dotted solid double;
上边框是 dotted
左、右边框是 solid
底边框是 double
border-style:dotted solid;
上、底边框是 dotted
右、左边框是 solid
border-style:dotted;
四面边框是 dotted
上面的例子用了border-style。然而,它也可以和border-width 、 border-color一起使用。
简写属性
可以在"border"属性中设置:
border-width
border-style (required)
border-color
例:<style>
p
{
border:5px solid red;
}
</style>
CSS 边框属性(border)
border 简写属性,用于把针对四个边的属性设置在一个声明。
border-style 用于设置元素所有边框的样式,或者单独地为各边设置边框样式。
border-width 简写属性,用于为元素的所有边框设置宽度,或者单独地为各边边框设置宽度。
border-color 简写属性,设置元素的所有边框中可见部分的颜色,或为 4 个边分别设置颜色。
border-bottom 简写属性,用于把下边框的所有属性设置到一个声明中。
border-bottom-color 设置元素的下边框的颜色。
border-bottom-style 设置元素的下边框的样式。
border-bottom-width 设置元素的下边框的宽度。
border-left 简写属性,用于把左边框的所有属性设置到一个声明中。
border-left-color 设置元素的左边框的颜色。
border-left-style 设置元素的左边框的样式。
border-left-width 设置元素的左边框的宽度。
border-right 简写属性,用于把右边框的所有属性设置到一个声明中。
border-right-color 设置元素的右边框的颜色。
border-right-style 设置元素的右边框的样式。
border-right-width 设置元素的右边框的宽度。
border-top 简写属性,用于把上边框的所有属性设置到一个声明中。
border-top-color 设置元素的上边框的颜色。
border-top-style 设置元素的上边框的样式。
border-top-width 设置元素的上边框的宽度。
所有的CSS边距属性(margin)
margin 简写属性。在一个声明中设置所有外边距属性。
margin-bottom 设置元素的下外边距。
margin-left 设置元素的左外边距。
margin-right 设置元素的右外边距。
margin-top 设置元素的上外边距。
所有的CSS填充属性(padding)
padding 使用缩写属性设置在一个声明中的所有填充属性
padding-bottom 设置元素的底部填充
padding-left 设置元素的左部填充
padding-right 设置元素的右部填充
padding-top 设置元素的顶部填充