


iframe标签的使用
内联框架:在当前页面中,加载另一个页面
<iframe src="demo.html" frameborder="1" name="name" width="400" height="300"></iframe>
src是这个内联标签默认显示的内容,也可以是srcdoc="<h2>CMS</h2>",frameborder是边框,为了美观,一般为0,width和height设置宽高。name的作用通过以下代码讲解:
iframe的用法通常是在其他地方点击按钮显示了内容,通过target显示到这个标签的位置,比如:
<h3><a href="https://www.baidu.com" target="baidu">百度</a></h3>
<iframe frameborder="1" name="baidu" width="400" height="300"></iframe>
target的值与iframe中的name的值相同,点击了百度,百度的页面就是在这个内联框架处显示。
<h2>网站管理后台:</h2>
    <ul style="float: left;">
	<li><a href="demo1.html" target="main">用户管理</a></li>
	<li><a href="demo2.html" target="main">分类管理</a></li>
	<li><a href="demo3.html" target="main">商品管理</a></li>
	<li><a href="demo4.html" target="main">系统管理</a></li>
    </ul>
<!--为iframe新增src="demo5.html为默认页面,或者srcdoc="<h2>CMS</h2>"-->
<iframe frameborder="0" name="main" width="400" height="400" style="float: left;"></iframe>
点击 "运行实例" 按钮查看在线实例
因为href内的文档不存在,所以点击时会在内联框架内显示页面找不到
css样式设置的优先级
通用属性:
id 网页元素的*** 相当于***号,用来唯一表示网页元素
class 元素类别 相当于标签类属性,用于元素分类
title 元素说明 相当于元素简介,如用途
style 描述元素的宽度,高度,颜色,轮廓等
最简单:通过标签名称来确定样式
添加css样式的三种方法:
1. 内联样式: 将元素的样式使用styel属性应用到当前元素上,只适用于当前标签
<body><p style="color: blue;">内联样式</p></body>
2. 内部样式:将元素的样式规则用style标签插入到当前的html文档中(这个样式规则, 仅适用于当前的这个html文档)
<head> <style> p { color: green; }</style></head>
<body><p >内部样式</p></body>
3. 外部样式表,通过link引用
<head> <link rel="stylesheet" href="static/css/style1.css"></head>
<body><p >外部样式表</p></body>
static/css/style1.css中的内容为:
p {color: red;}
优先级测试:
<!DOCTYPE html>
<html lang="en">
<head>
    <meta charset="UTF-8">
    <!--外部样式表-->
    <link rel="stylesheet" href="static/css/style1.css">
    <title>css简介与引入</title>
    <style>
        /*内部样式*/
        p {
            color: green;
        }
    </style>
</head>
<body>
<!--内联样式-->
<p style="color: blue;">优先级测试1</p>
<p>优先级测试2</p>
</body>
</html>点击 "运行实例" 按钮查看在线实例
无法引入外部样式表,所以暂不讨论,第一个p标签有内联样式,内部样式和外部样式同时作用,但是只显示了内部样式的蓝色,在本地测试时,第二个p标签有内部样式和外部样式同时作用,但是只显示了内部样式的绿色,所有优先级的高低为:内联样式最高,其次是内部样式,然后才是外部样式。
css的id,class与标签选择器的使用规则
因为无法使用外部引用,所以在内部样式表中使用选择器
标签选择器:
<head> <style> p { color: aqua; }</style></head>
<p >测试</p>
类选择器:'. 类名{属性:值;}'
<head> <style>.green {color: green;}</style></head>
<p class="green">测试1</p>
<p class="green">测试2</p>
id选择器:'# id名{属性:值;}'
<head> <style>#red {color: red; }</style></head>
<p id="red">测试3</p>
除了这三种常用的以外,还用使用js脚本来动态设置样式:
<script>
document.getElementsByTagName('p').item(0).style.color = 'blue';
</script>
<p>js动态设置样式</p>
优先级比较
<!DOCTYPE html>
<html lang="en">
<head>
    <meta charset="UTF-8">
    <title>css基本选择器</title>
    <style>
        /*id选择器: 一个*/
        #red {
            /*color: red;*/
        }

        /*类选择器: 一批*/
        .green {
            /*color: green;*/
        }

        /*标签选择器*/
        p {
            color: aqua;
        }
    </style>
</head>
<body>
<p id="red">测试</p>
<p class="green">测试1</p>
<p class="green">测试2</p>
<p id="red">测试3</p>
<p class="green" id="red">同时具有id和class的标签测试</p>

<script>
//  document.getElementsByTagName('p').item(0).style.color = 'blue';
</script>
</body>
</html>点击 "运行实例" 按钮查看在线实例
代码中只有标签选择器没有注释,其他三种都注释,点击运行显示的都是青色的p标签的内容,打开class选择器,具有class="green"的p标签都变成了绿色,class选择器的优先级大于标签选择器,打开id选择器,具有id="red"的p标签都变成了红色,id选择器的优先级大于类选择器的优先级,打开js脚本,将第一个p标签变成蓝色,哪怕他有id为红色,所以,js脚本的优先级大于id选择器的优先级。总结下来优先级的排序是:标签选择器<类选择器<id选择器<js脚本。
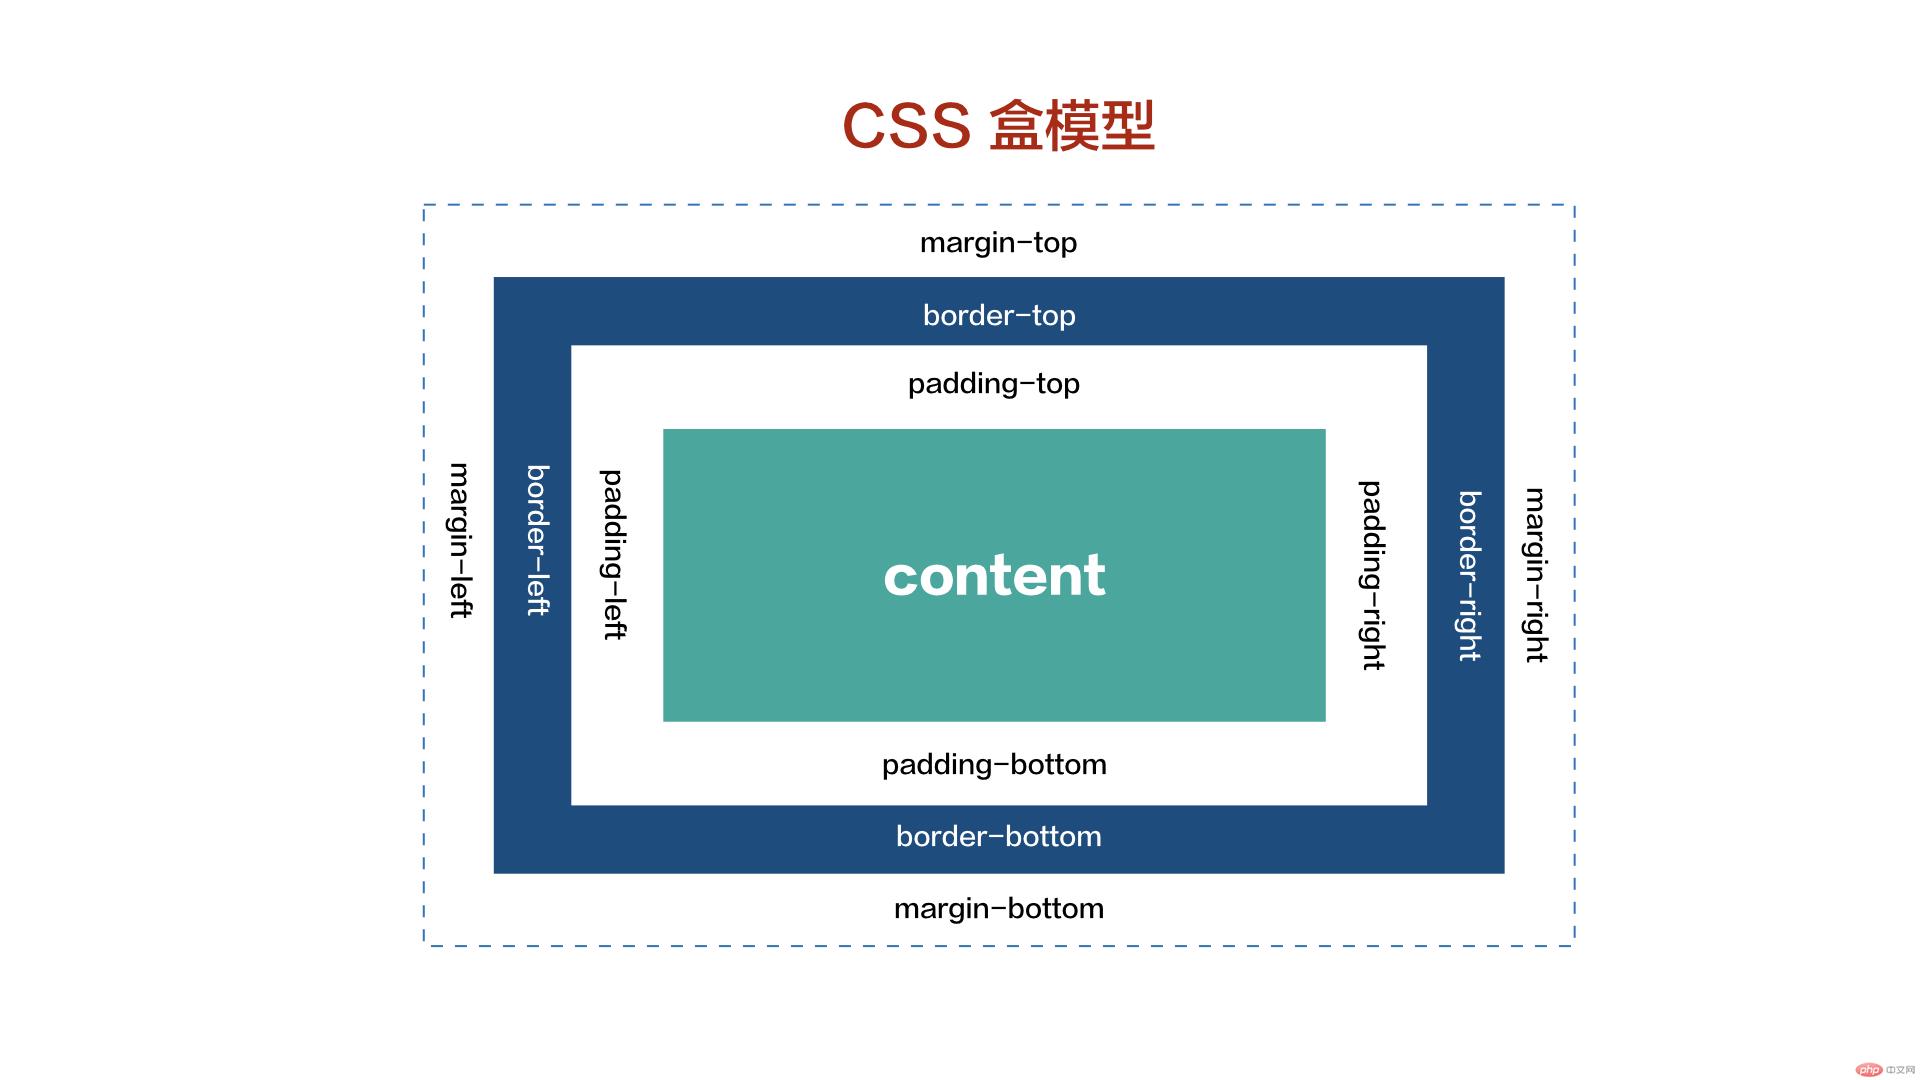
盒模型的五大要素
width,height,padding,border,margin
css盒模型
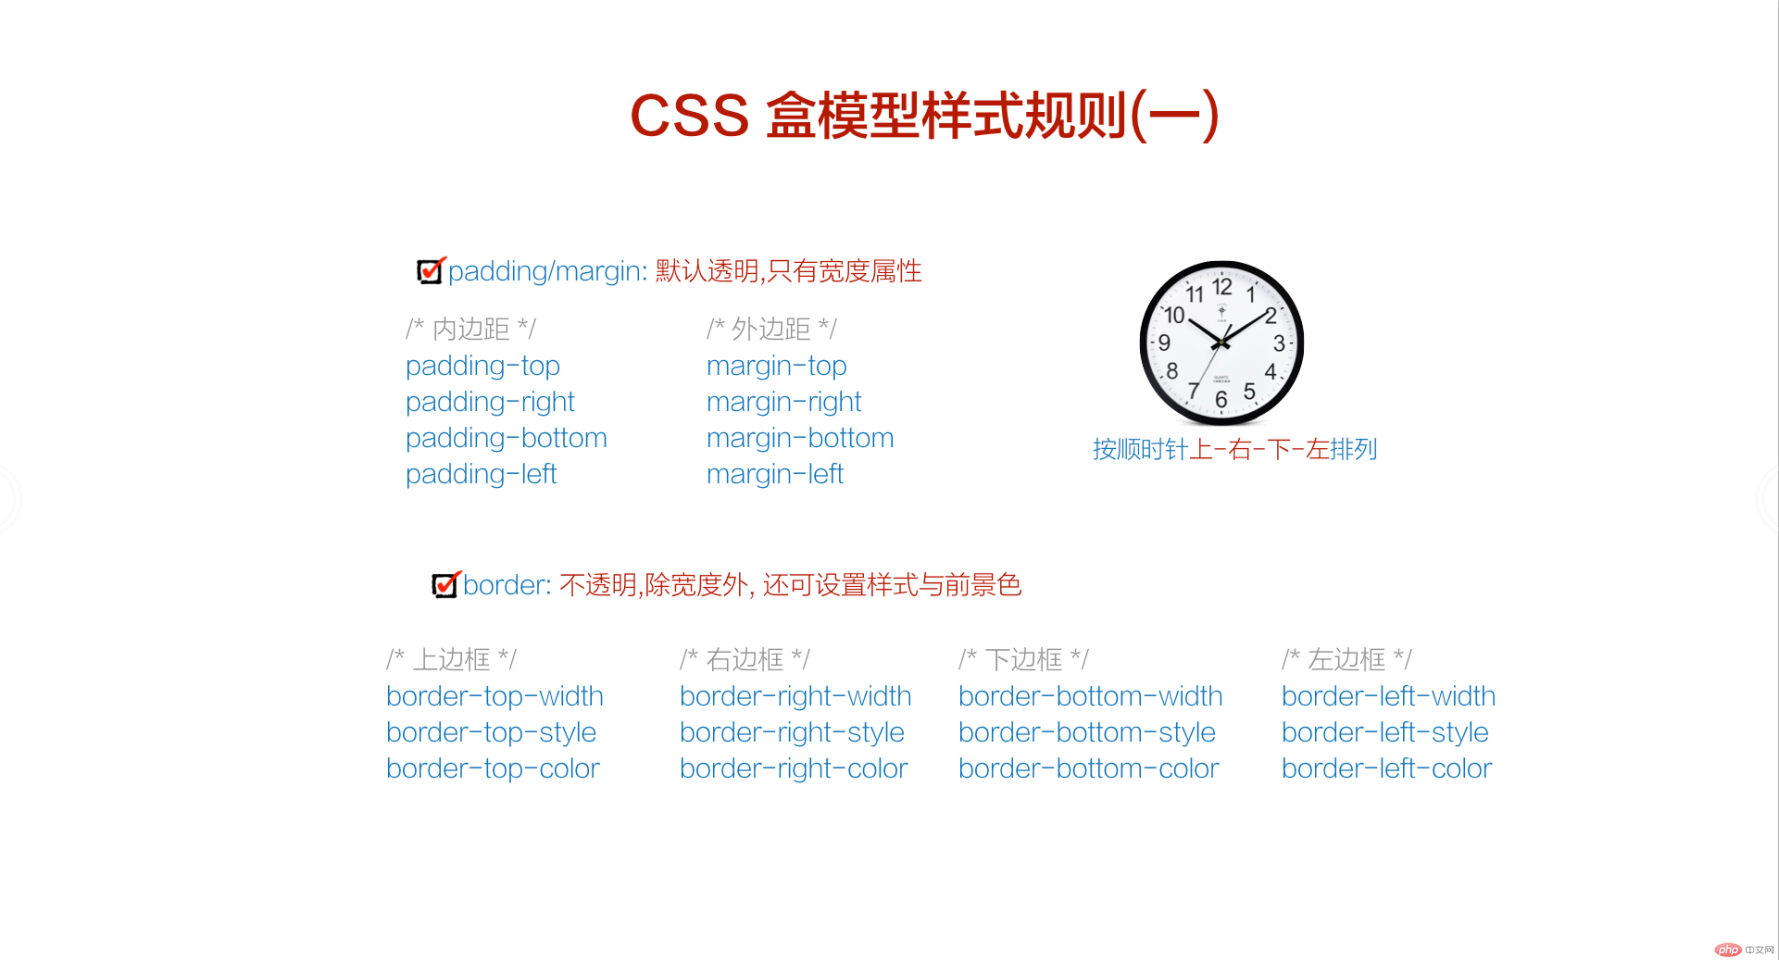
css盒模型样式规则(一)
![]()
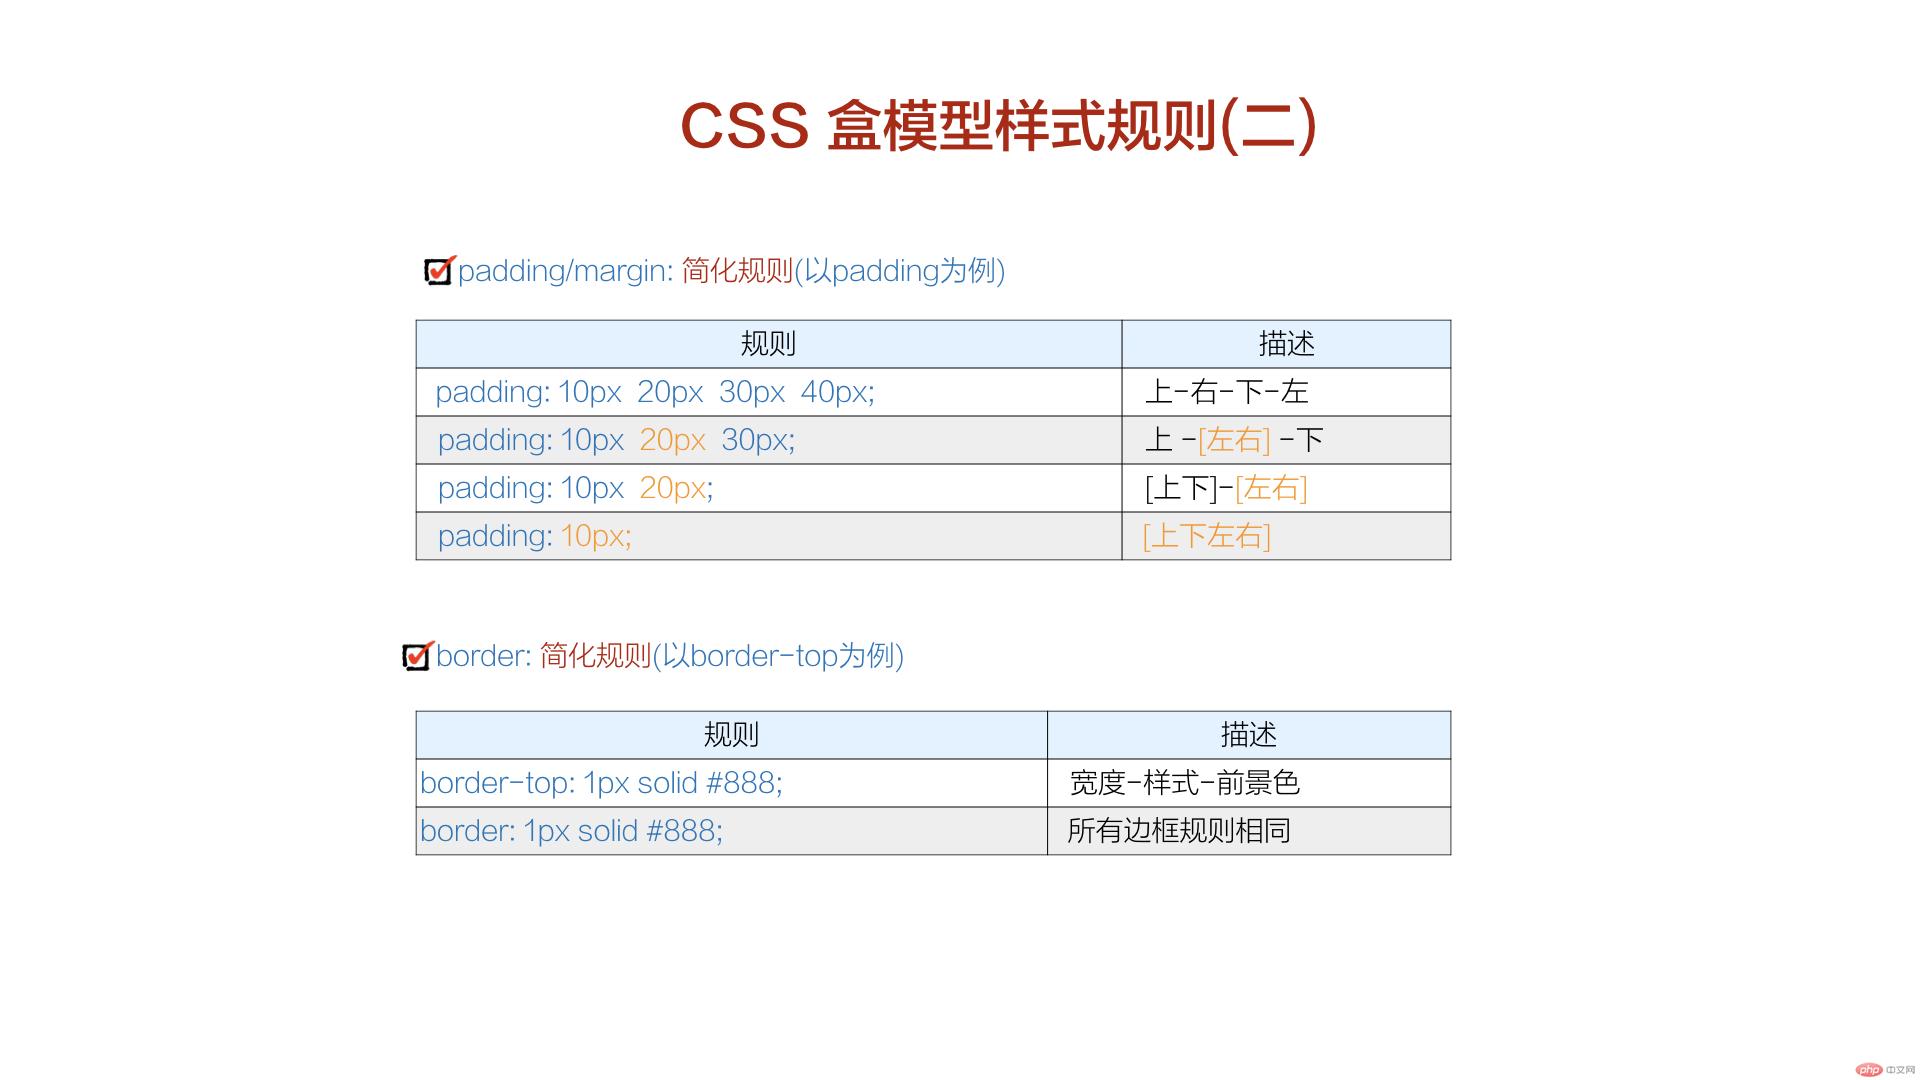
![]()
css盒模型样式规则(二)
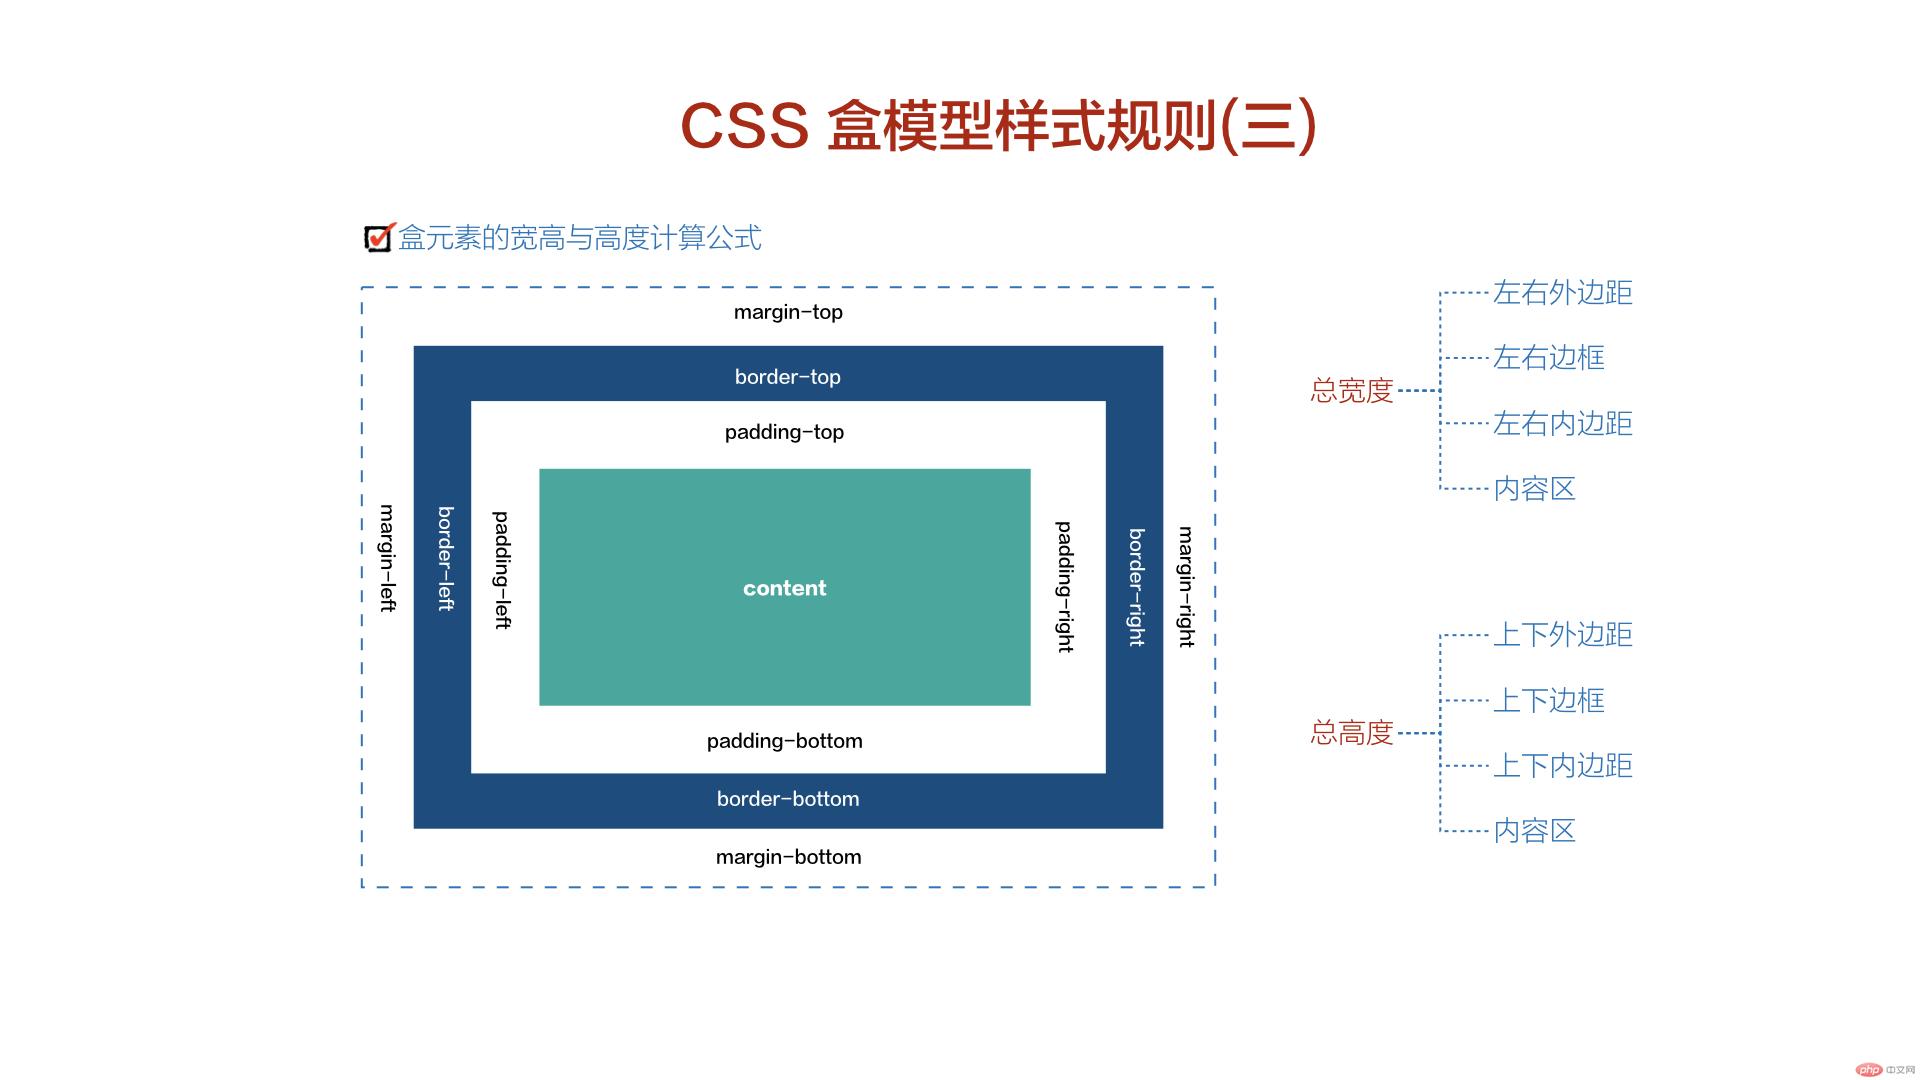
css盒模型样式规则(三)
一切皆盒子
<!DOCTYPE html>
<html lang="en">
<head>
    <meta charset="UTF-8">
    <title>一切皆盒子</title>
    <style>
        ul {
            border: 1px solid red;
        }

        ul > li {
            border:  1px solid green;
        }
    </style>
</head>
<body>
<video src="static/images/demo.mp4" controls width="500" height="280" poster="static/images/bg.jpg"></video>

<ul>
    <li class="item">1<a href="">最新产品1</a></li>
    <li class="item">2<a href="">最新产品2</a></li>
    <li class="item">3<a href="">最新产品3</a></li>
    <li class="item">4<a href="">最新产品4</a></li>
</ul>

<h1>h1也是盒子</h1>
</body>
</html>点击 "运行实例" 按钮查看在线实例
盒模型
1. 盒模型是布局的基础,页面上的一切可见元素皆可看做盒子
2. 盒子默认都是块级元素: 独占一行,支持宽度设置
(根据盒子模型示意图分析)
3. 盒子模型可以设置5个样式: 宽高背景内外边距与边框
(1): width: 宽度(水平方向)
(2): height: 高度(垂直方向)
(3): background-color: 背景 (默认透明)
(4): padding: 内边距, 内容与边框之间的填充区域
(5): margin: 外边距,决定当前盒子与其它盒子之间的位置与关系
(3): border: 边框, 位于内外边距之间, 是可见元素,允许设置宽度, 样式和颜色
4. 根据是可见性可以分为二类:
(1). 可见的: width, height, border
(2). 透明的: background, padding, margin
注: padding,margin 只允许设置宽度, 不允许设置样式与颜色
实例演示盒模型的五大要素:
<!DOCTYPE html>
<html lang="en">
<head>
    <meta charset="UTF-8">
    <title>盒模型</title>
    <style>
    .box1 {
	    width: 200px;
	    height: 200px;
	    background-color: lightblue;
	    /*padding: 20px 30px 40px 50px;*/
	    padding: 20px 50px;
	    /* 上边框 */
	    border-top: 10px solid red;
	    /* 右边框 */
	    border-right: 10px dashed green;
	    /* 下边框 */
	    border-bottom-width: 10px;
	    border-bottom-style: dotted;
	    border-bottom-color: blue;
	    /* 左边框 */
	    border-left-width: 10px;
	    border-left-style: double;
	    border-left-color: black;
	    margin: 30px;
	}
	.box2 {
	    height: 200px;
	    /*padding: inherit;*/
	    /*margin: inherit;*/
	    background-color: wheat;
	}
    </style>
</head>
<body>
<div class="box1">
    <div class="box2"></div>
</div>
</body>
</html>点击 "运行实例" 按钮查看在线实例
总结:
这是我自己做的图片,显示盒模型内部的关系
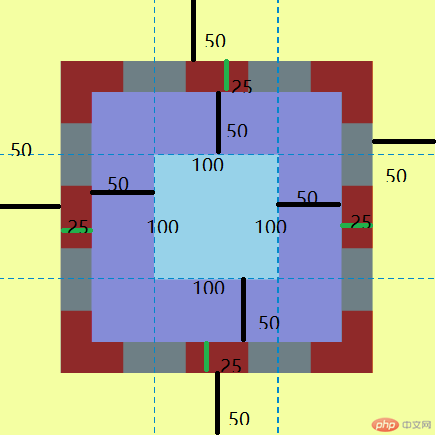
.box {
width: 100px;
height: 100px; /*content区域,如图蓝色,长宽各100px*/
background-color: lightblue; /*设置背景颜色为亮蓝色,这个颜色会显示在content区域和内边距及边框线上*/
padding: 50px 50px; /*内边距50,如图紫色区域,本身没有颜色,显示背景颜色*/
border: 25px dashed red; /*红色虚线边框,25px*/
margin: 50px; /*外边距50px,本身没有颜色,如图黄色区域*/
}
通过大的对比,可以更直观了解各数值的关系。