


昨天我们说到了css3的选择器,选择器分为基本选择器和扩展选择器。基本选择器包括标签选择器,ID选择器以及类选择器。
还有一个通配选择器。通配选择器用一个星号(*)表示。单独使用时,这个选择器可以与文档中的任何元素匹配,就像一个通配符。虽然通配选择器的功能强大,但是出于效率考虑,很少有人使用它。
今天主要来谈一谈扩展选择器,也有说是高级选择器。其实说法都是无所谓的,重要的是大家要记住他们,并且学会如何使用。
扩展选择器一般包括伪类选择器、属性选择器、相邻选择器、兄弟选择器等
一:属性选择器 匹配具有相同元素属性的元素
如:div[id]:匹配所有具备id属性的div
<!DOCTYPE html>
<html lang="en">

<head>
    <meta charset="UTF-8">
    <meta name="viewport" content="width=device-width, initial-scale=1.0">
    <meta http-equiv="X-UA-Compatible" content="ie=edge">
    <title>选择器</title>
    <style type="text/css">
    ul {
    background-color: lightcyan;
    border: 1px dashed pink;
    margin: 0;
    padding: 0;
    width: 400px;
}

ul li {
    /* 去除数字前方小黑点,也可以使用list-style-type */
    list-style: none;
    width: 30px;
    height: 30px;
    background-color: lightpink;
    border: 1px solid lightgreen;
    /* 设置水平居中和垂直居中 */
    text-align: center;
    line-height: 30px;
    /* 设置圆角 ,单位使用百分比,自适应*/
    border-radius: 50%;
    /* 块级元素变成行内元素 */
    display: inline-block;
}


/* 属性选择性 */

li[id] {
    background-color: goldenrod;
}
    </style>
    <!-- <link rel="stylesheet" href="static/css/demo1.css"> -->
</head>

<body>
    <ul>
        <li id="bg-1">1</li>
        <li class="bg-2">2</li>
        <li id="bg-1">3</li>
        <li class="bg-4">4</li>
        <li class="bg-5">5</li>
        <li class="bg-6">6</li>
        <li id="bg-1">7</li>
        <li id="bg-1">8</li>
    </ul>
</body>

</html>点击 "运行实例" 按钮查看在线实例
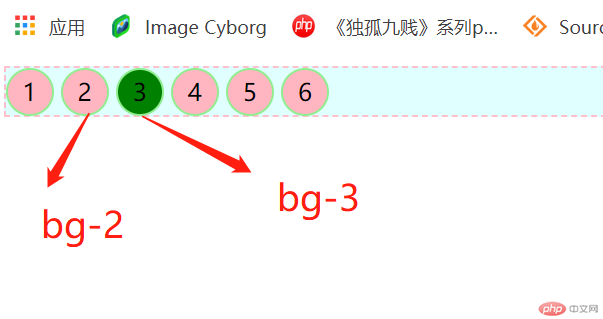
二:相邻(相邻兄弟)选择器
作用:匹配指定元素的相邻【下一个】兄弟元素,前提是他们有相同的父级元素
语法:由 + 号来充当连接符,如 选择器1+选择器2
<!DOCTYPE html>
<html lang="en">

<head>
    <meta charset="UTF-8">
    <meta name="viewport" content="width=device-width, initial-scale=1.0">
    <meta http-equiv="X-UA-Compatible" content="ie=edge">
    <title>选择器</title>
    <style type="text/css">
        ul {
            background-color: lightcyan;
            border: 1px dashed pink;
            margin: 0;
            padding: 0;
            width: 400px;
        }

        ul li {
            /* 去除数字前方小黑点,也可以使用list-style-type */
            list-style: none;
            width: 30px;
            height: 30px;
            background-color: lightpink;
            border: 1px solid lightgreen;
            /* 设置水平居中和垂直居中 */
            text-align: center;
            line-height: 30px;
            /* 设置圆角 ,单位使用百分比,自适应*/
            border-radius: 50%;
            /* 块级元素变成行内元素 */
            display: inline-block;
        }
        /* 相邻兄弟选择器(相邻选择器) */
        /* *指所有元素,“+”后面可以加上*也可以加具体的属性名称 */

        .bg-2+#bg-3 {
            background-color: green;
        }
    </style>
    <!-- <link rel="stylesheet" href="static/css/demo1.css"> -->
</head>

<body>
    <ul>
        <li id="bg-1">1</li>
        <li class="bg-2">2</li>
        <li id="bg-3">3</li>
        <li class="bg-4">4</li>
        <li class="bg-5">5</li>
        <li class="bg-6">6</li>
        <!-- <li id="bg-1">7</li>
        <li id="bg-1">8</li> -->
    </ul>
</body>

</html>点击 "运行实例" 按钮查看在线实例
三:兄弟(通用兄弟)选择器
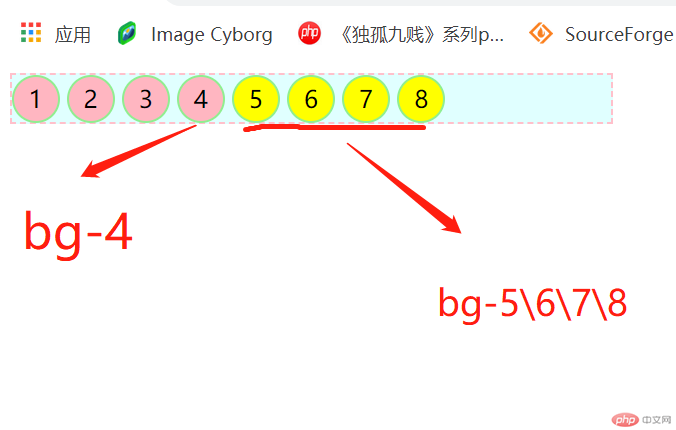
作用:匹配到某元素【后面的】 【所有指定】兄弟元素,具有相同的父级元素
语法:由~充当结合符,如 选择器1~选择器2
<!DOCTYPE html>
<html lang="en">

<head>
    <meta charset="UTF-8">
    <meta name="viewport" content="width=device-width, initial-scale=1.0">
    <meta http-equiv="X-UA-Compatible" content="ie=edge">
    <title>选择器</title>
    <style type="text/css">
        ul {
            background-color: lightcyan;
            border: 1px dashed pink;
            margin: 0;
            padding: 0;
            width: 400px;
        }

        ul li {
            /* 去除数字前方小黑点,也可以使用list-style-type */
            list-style: none;
            width: 30px;
            height: 30px;
            background-color: lightpink;
            border: 1px solid lightgreen;
            /* 设置水平居中和垂直居中 */
            text-align: center;
            line-height: 30px;
            /* 设置圆角 ,单位使用百分比,自适应*/
            border-radius: 50%;
            /* 块级元素变成行内元素 */
            display: inline-block;
        }
        /* 兄弟选择器(通用兄弟选择器) */
        /* *指所有元素,“~”后面可以加上*也可以加具体的属性名称 */

        .bg-4~* {
            background-color: yellow;
        }
    </style>
    <!-- <link rel="stylesheet" href="static/css/demo1.css"> -->
</head>

<body>
    <ul>
        <li id="bg-1">1</li>
        <li class="bg-2">2</li>
        <li id="bg-1">3</li>
        <li class="bg-4">4</li>
        <li class="bg-5">5</li>
        <li class="bg-6">6</li>
        <li id="bg-1">7</li>
        <li id="bg-1">8</li>
    </ul>
</body>

</html>点击 "运行实例" 按钮查看在线实例
四:伪类选择器
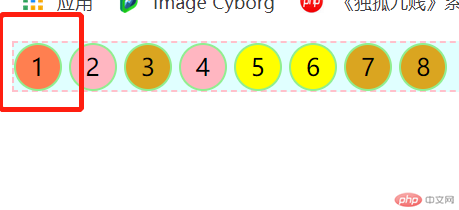
4.1、:first-child 匹配属于父元素中的首个子元素
4.2、:last-child 匹配属于其父元素中的最后一个子元素

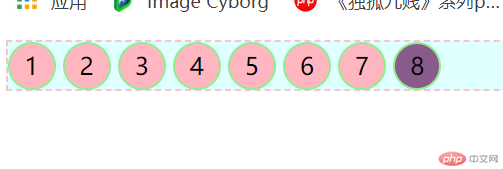
4.3、:nth-child(n)匹配属于其父元素中的第n个子元素


4.4、 :nth-of-type(n)是选择父元素的第n个同类型的子元素 只要前面指定了元素类型
官方解释:
p:nth-child(2) 选择属于其父元素的第二个子元素的每个 <p> 元素。
p:nth-of-type(2) 选择属于其父元素第二个 <p> 元素的每个 <p> 元素。
大白话
p:nth-child(2) 选择p同级元素中的(从前到后的)第二个元素
p:nth-of-type(2) 选择p同级元素中的第二个p元素
<!DOCTYPE html>
<html>
<head>
<style>
p:nth-of-type(2)
{
background:#ff0000;
}
</style>
</head>
<body>

<h1>这是标题</h1>
<p>第一个段落。</p>
<p>第二个段落。</p>
<p>第三个段落。</p>
<p>第四个段落。</p>
<p>第五个段落。</p>

</body>
</html>点击 "运行实例" 按钮查看在线实例
五::nth-child(n)和:nth-of-type(n)区别
关注点不同,如果关注点是位置,就用nth-child(n);如果既关注位置,也关注类型,用nth-of-child(n)
六;padding
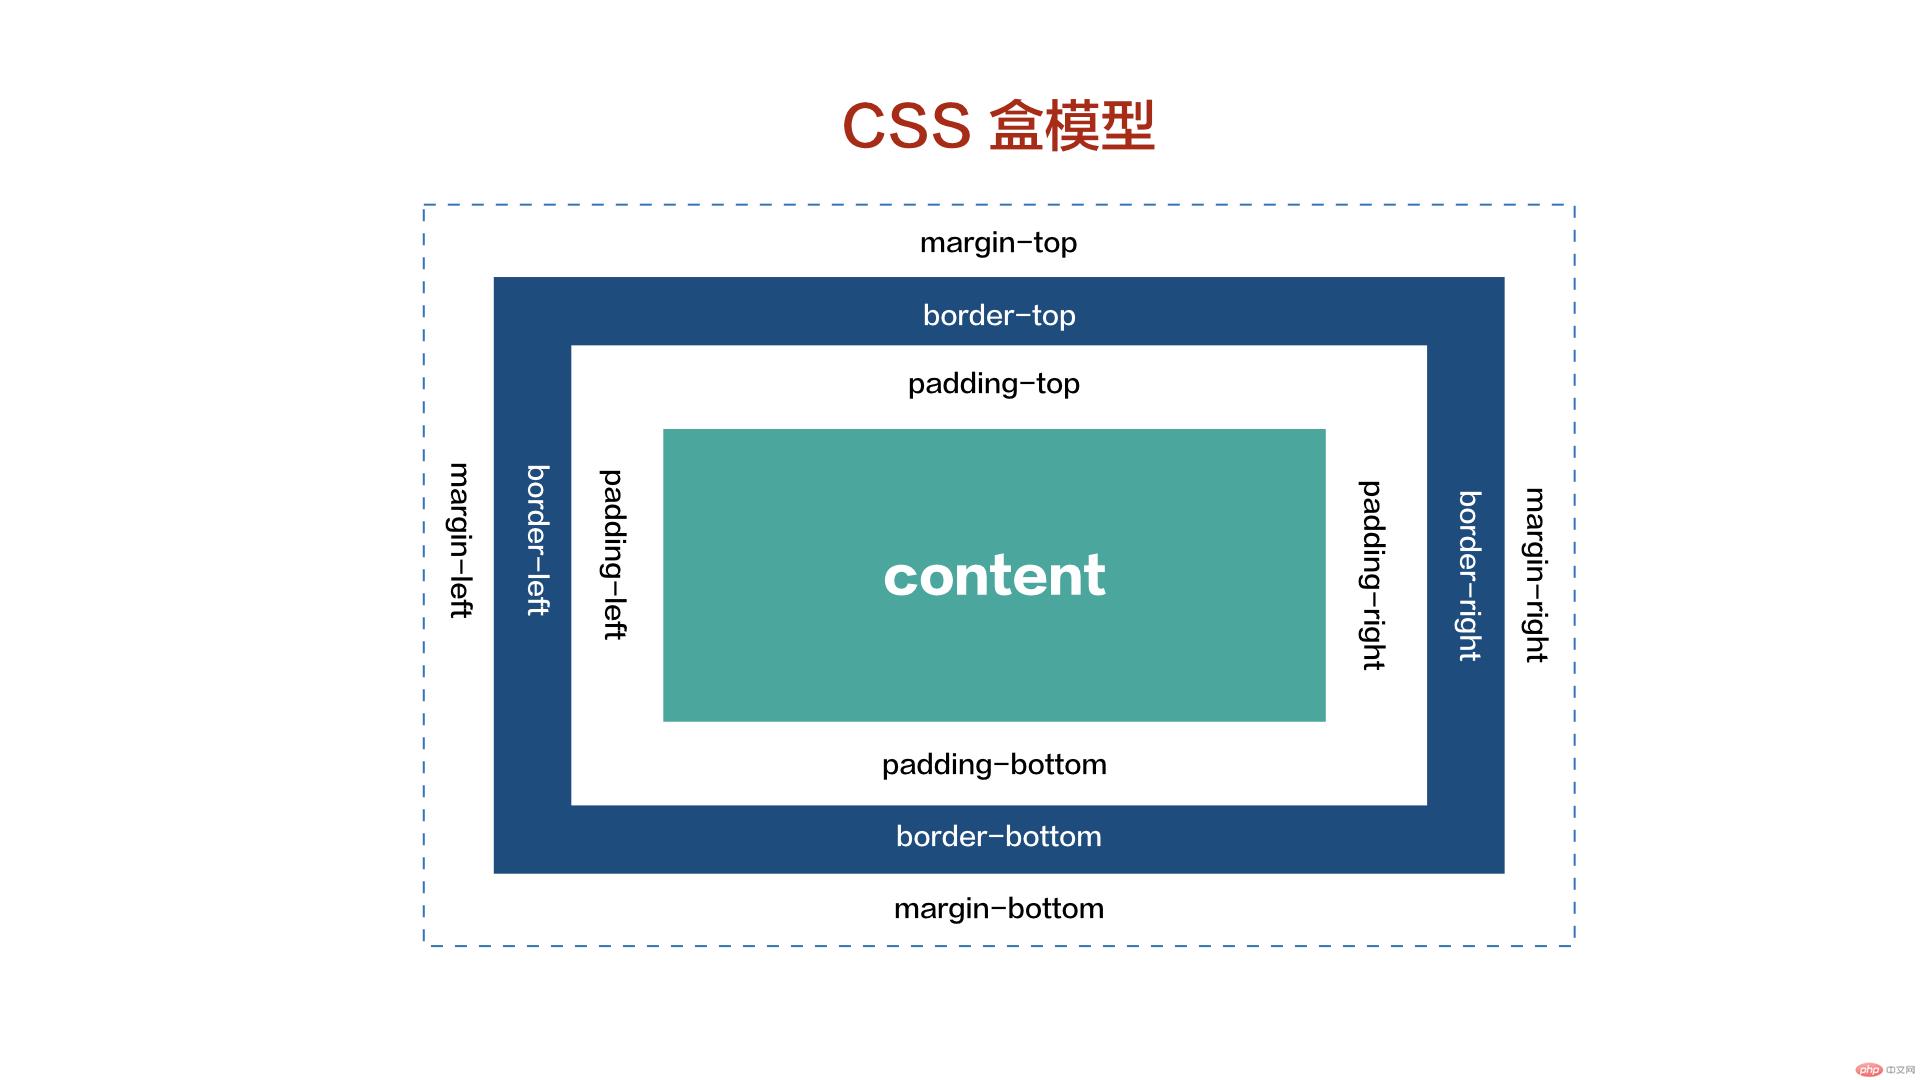
CSS padding 属性定义元素边框与元素内容之间的空白区域,不可见。如果想调整盒子的大小可以调整内容区,内边距,边框。
CSS padding 属性定义元素的内边距。padding 属性接受长度值或百分比值,但不允许使用负值。会强制变成0.
盒子的大小 = content + border + padding + margin
造成padding影响盒子的width或者height的原因是我们在设置css样式的时候给定了width或height,如果没给定,相应的就不会受到padding的影响
6.1宽度分离通过添加一个中间层实现
<!DOCTYPE html>
<html lang="en">

<head>
    <meta charset="UTF-8">
    <meta name="viewport" content="width=device-width, initial-scale=1.0">
    <meta http-equiv="X-UA-Compatible" content="ie=edge">
    <title>内边距</title>
    <link rel="stylesheet" href="static/css/demo2.css">
    <style type="text/css">
        /* 宽度分离 通过增加一个中间层*/

        .warp {
            width: 300px;
        }

        .box2 {
            padding: 50px;
            border: 1px dashed #e95295;
        }
    </style>
</head>

<body>


    <!-- 宽度分离 -->
    <div class="warp">
        <div class="box2">
            <img src="static/images/girl.jpg" alt="美女" width="200px">
        </div>
    </div>


</body>

</html>点击 "运行实例" 按钮查看在线实例
6.2 box-sizing
<!DOCTYPE html>
<html lang="en">

<head>
    <meta charset="UTF-8">
    <meta name="viewport" content="width=device-width, initial-scale=1.0">
    <meta http-equiv="X-UA-Compatible" content="ie=edge">
    <title>内边距</title>
    <link rel="stylesheet" href="static/css/demo2.css">
    <style type="text/css">
        /* box-sizing */

        .box3 {
            box-sizing: border-box;
            background-color: #316745;
            padding: 50px;
            width: 300px;
        }
    </style>
</head>

<body>


    <!-- box-sizing  -->
    <div class="box3">
        <img src="static/images/girl.jpg" alt="美女" width="200px">
    </div>
</body>

</html>点击 "运行实例" 按钮查看在线实例
七:margin的三大特性:同级塌陷,嵌套传递,自动挤压。
7.1同级塌陷
<!DOCTYPE html>
<html lang="en">

<head>
    <meta charset="UTF-8">
    <meta name="viewport" content="width=device-width, initial-scale=1.0">
    <meta http-equiv="X-UA-Compatible" content="ie=edge">
    <title>外边距</title>
    <style type="text/css">
    .box1 {
    width: 100px;
    height: 100px;
    background-color: #884898;
}

.box2 {
    width: 120px;
    height: 120px;
    background-color: #bb5548;
}

.box1 {
    margin-bottom: 60px
}

.box2 {
    margin-top: 30px;
}
    </style>
    <!-- <link rel="stylesheet" href="static/css/demo3.css"> -->
</head>

<body>
    <!-- 同级塌陷 -->
    <div class="box1"></div>
    <div class="box2"></div>
</body>

</html>点击 "运行实例" 按钮查看在线实例
7.2嵌套传递 将子元素的外边距修改成父元素的内边距并且修改高度
<!DOCTYPE html>
<html lang="en">

<head>
    <meta charset="UTF-8">
    <meta name="viewport" content="width=device-width, initial-scale=1.0">
    <meta http-equiv="X-UA-Compatible" content="ie=edge">
    <title>外边距</title>
    <style type="text/css">
        /* 嵌套传递 */
        /* 将子元素的外边距修改成父元素的内边距并且修改高度 */

        .box3 {
            width: 200px;
            height: 200px;
            background-color: #74325c;
        }

        .box4 {
            width: 100px;
            height: 100px;
            background-color: #f8b500;
        }

        .box3 {
            padding-top: 50px;
            height: 150px;
        }
    </style>
    <!-- <link rel="stylesheet" href="static/css/demo3.css"> -->
</head>

<body>

    <!-- 嵌套传递 -->
    <!-- 将子元素的外边距转换为父元素的内边距并且修改高度 -->
    <div class="box3">
        <div class="box4"></div>
    </div>
</body>

</html>点击 "运行实例" 按钮查看在线实例
7.3自动挤压
<!DOCTYPE html>
<html lang="en">

<head>
    <meta charset="UTF-8">
    <meta name="viewport" content="width=device-width, initial-scale=1.0">
    <meta http-equiv="X-UA-Compatible" content="ie=edge">
    <title>外边距</title>
    <style type="text/css">
        /* 自动挤压 */

        .box5 {
            height: 200px;
            width: 150px;
            background-color: #007b43;
        }

        .box5 {
            margin: 30px auto;
        }
    </style>
    <!-- <link rel="stylesheet" href="static/css/demo3.css"> -->
</head>

<body>


    <!-- 自动挤压 -->
    <div class="box5"></div>
</body>

</html>点击 "运行实例" 按钮查看在线实例
以上就是选择器、margin以及padding的内容 不忘初心,砥砺前行。