Correction status:qualified
Teacher's comments:图文结合的相当精彩, 一看就懂


1.实例演示相邻选择器与兄弟选择器,并分析异异同
<!DOCTYPE html>
<html lang="en">

<head>
    <meta charset="UTF-8">
    <meta name="viewport" content="width=device-width, initial-scale=1.0">
    <meta http-equiv="X-UA-Compatible" content="ie=edge">
    <link rel="stylesheet" href="static/css/style1.css">
    <title>选择器应用</title>
</head>

<body>
    <h3>选择器应用</h3>
    <ul>
        <li>1</li>
        <li>2</li>
        <li id="bg-yellow">3</li>
        <li class="bg-red">4</li>
        <li id="bg-blue">5</li>
        <li>6</li>
        <li>7</li>
        <li class="bg-grey">8</li>
        <li>9</li>
        <li>10</li>
    </ul>
</body>

</html>
点击 "运行实例" 按钮查看在线实例
css代码
/* 标签选择器 */

ul {
    float: left;
    margin: 20px 0 0;
    padding: 0;
}

ul li {
    float: left;
    width: 50px;
    height: 50px;
    border: 1px solid black;
    list-style: none;
    text-align: center;
    line-height: 50px;
    margin-left: 20px;
    border-radius: 50%;
    box-shadow: 2px 2px 1px #222222;
    background: yellowgreen;
}


/* id选择器 */

#bg-blue {
    background: lightblue;
}


/* 类选择 器*/

.bg-red {
    background: red
}


/* 群组选择器 */

#bg-blue,
.bg-red {
    border: 4px solid;
}


/* 属性选择器 */

li[id='bg-yellow'] {
    background: yellow;
}


/* 相邻选择器 */

#bg-blue+* {
    background: fuchsia;
}


/* 兄弟选择器 */

.bg-grey~* {
    background: darkred;
}点击 "运行实例" 按钮查看在线实例
运行结果:

相邻选择器(eg:#bg-blue+*{background: fuchsia;})是用来选择同一父级元素下面的某一个元素的后一个元素进行样式配置。
兄弟选择器(eg:#bg-blue~*{background: fuchsia;})是选择选择同一父级元素下面的某一个元素的后面所有元素进行样式配置。
两者的共同点是都需要在同一父级元素下,都需要通过另一个元素来进行定位。
2.实例演示:nth-child() 和 :nth-of-type()选择器,并分析异同
<!DOCTYPE html>
<html lang="en">

<head>
    <meta charset="UTF-8">
    <meta name="viewport" content="width=device-width, initial-scale=1.0">
    <meta http-equiv="X-UA-Compatible" content="ie=edge">
    <link rel="stylesheet" href="static/css/style2.css">
    <title>伪类:子元素选择器和伪类:类型选择器</title>
</head>

<body>
    <h3>伪类:子元素选择器和伪类:类型选择器</h3>
    <ul>
        <li>1</li>
        <li>2</li>
        <li id="bg-yellow">3</li>
        <li class="bg-red">4</li>
        <li id="bg-blue">5</li>
        <li>6</li>
        <li>7</li>
        <li class="bg-grey">8</li>
        <li>9</li>
        <li>10</li>
        <br>
        <p>11</p>
        <p>12</p>
        <p>13</p>
        <p>14</p>
    </ul>
</body>

</html>
点击 "运行实例" 按钮查看在线实例
ul {
    float: left;
    margin: 20px 0 0;
    padding: 0;
}

ul li {
    float: left;
    width: 50px;
    height: 50px;
    border: 1px solid black;
    list-style: none;
    text-align: center;
    line-height: 50px;
    margin-left: 20px;
    border-radius: 50%;
    box-shadow: 2px 2px 1px #222222;
    background: yellowgreen;
}

ul p {
    float: left;
    width: 50px;
    height: 50px;
    border: 1px solid black;
    list-style: none;
    text-align: center;
    line-height: 50px;
    margin-left: 20px;
    border-radius: 50%;
    box-shadow: 2px 2px 1px #222222;
    background: yellowgreen;
}


/* 伪类:子选择器(nth-chid) */

ul :nth-child(5) {
    background: teal;
}

ul :last-child {
    background: aquamarine;
}

ul :first-child {
    background: aquamarine;
}

ul :nth-last-child(3) {
    background: blueviolet;
}


/* 伪类:类选择器(:nth-of-type()) */

ul li:nth-of-type(4) {
    background: honeydew;
}

ul li:nth-last-of-type(4) {
    background: #777777
}

ul p:nth-of-type(3) {
    background: pink;
}点击 "运行实例" 按钮查看在线实例
运行结果:

nth-chid()(eg:ul:nth-chid(5) 其中ul表示父级元素,5表示子元素在第五个)可以用来对同一父级元素下面所有的子元素进行样式配置;
nth-of-type()(eg:ul li: nth-of-type(5) 其中ul表示父级元素,li表示子元素中的li类,5表示第五个li的) 可以用来对同一父级元素下面的某一类子元素中的所有子元素进行样式配置;当类标签不添加时,nth-of-type()将对所有类中的同一位置的元素进行样式配置;
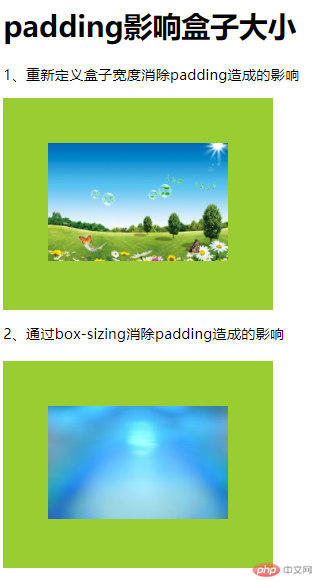
3.实例演示:padding 对盒子大小的影响与解决方案, 使用宽度分离或box-sizing
<!DOCTYPE html>
<html lang="en">

<head>
    <meta charset="UTF-8">
    <meta name="viewport" content="width=device-width, initial-scale=1.0">
    <meta http-equiv="X-UA-Compatible" content="ie=edge">
    <link rel="stylesheet" href="static/css/style3.css">
    <title>padding影响盒子大小</title>
</head>

<body>
    <h1>padding影响盒子大小</h1>
    <p>1、重新定义盒子宽度消除padding造成的影响</p>
    <div class="box1">
        <img src="static/images/bg.jpg" alt="">
    </div>
    <p>2、通过box-sizing消除padding造成的影响</p>
    <div class="box2">
        <img src="static/images/bg1.jpg" alt="">
    </div>
</body>

</html>
点击 "运行实例" 按钮查看在线实例
.box1 {
    width: 300px;
    /* height: 300px; */
    background: yellowgreen;
    padding: 50px;
}

img {
    width: 200px;
}

.box1 {
    width: 200px
}

.box2 {
    margin-top: 20px;
    width: 300px;
    background: yellowgreen;
    padding: 50px;
    box-sizing: border-box;
}点击 "运行实例" 按钮查看在线实例
运行结果:

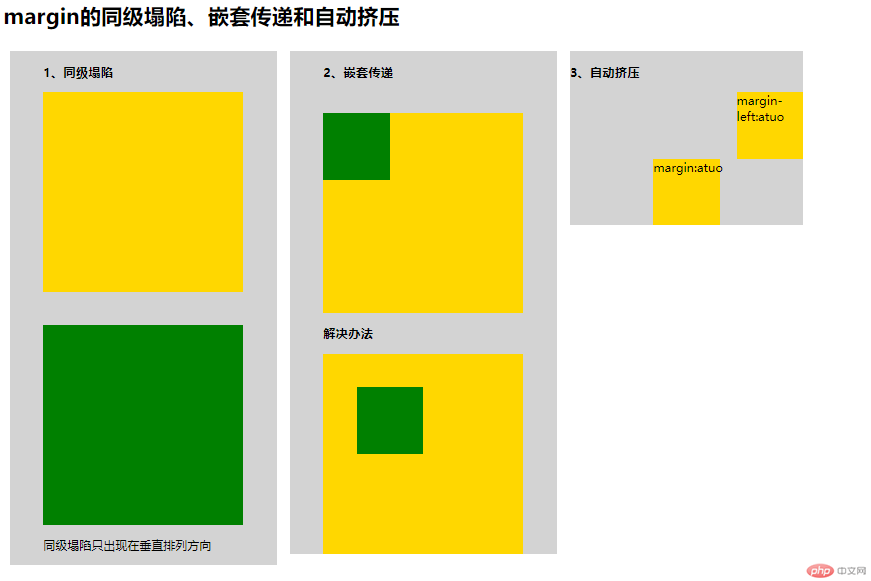
4.实例演示: margin中的同级塌陷, 嵌套传递与自动挤压, 并提出解决方案或应用场景
<!DOCTYPE html>
<html lang="en">

<head>
    <meta charset="UTF-8">
    <meta name="viewport" content="width=device-width, initial-scale=1.0">
    <meta http-equiv="X-UA-Compatible" content="ie=edge">
    <link rel="stylesheet" href="static/css/style4.css">
    <title>margin的同级塌陷、嵌套传递和自动挤压</title>
</head>

<body>
    <h1>margin的同级塌陷、嵌套传递和自动挤压</h1>
    <div>
        <div class="left">
            <h3>1、同级塌陷</h3>
            <div class="boxl1"></div>
            <div class="boxl2"></div>
            <p>同级塌陷只出现在垂直排列方向</p>
        </div>
        <div class="center">
            <h3>2、嵌套传递</h3>
            <div class="boxc1">
                <div class="boxc2"></div>
            </div>
            <h3>解决办法</h3>
            <div class="boxc3">
                <div class="boxc4"></div>
            </div>
        </div>
        <div class="right">
            <h3>3、自动挤压</h3>
            <div class="boxr1">margin-left:atuo</div>
            <div class="boxr2">margin:atuo</div>
        </div>
    </div>

</body>

</html>
点击 "运行实例" 按钮查看在线实例
css代码
.left,
.center,
.right {
    float: left;
    margin: 10px;
    background: lightgray;
    width: 350px;
    padding-left: 50px;
}

.boxl1 {
    width: 300px;
    height: 300px;
    margin-bottom: 50px;
    background: gold;
}

.boxl2 {
    width: 300px;
    height: 300px;
    margin-top: 20px;
    background: green;
}

.boxc1 {
    width: 300px;
    height: 300px;
    background: gold;
}

.boxc2 {
    width: 100px;
    height: 100px;
    margin-top: 50px;
    background: green;
}

.boxc3 {
    width: 300px;
    height: 300px;
    background: gold;
    box-sizing: border-box;
    padding: 50px;
}

.boxc4 {
    width: 100px;
    height: 100px;
    /* margin-top: 50px; */
    background: green;
}

.right {
    padding: 0;
}

.boxr1 {
    width: 100px;
    height: 100px;
    margin-left: auto;
    background: gold;
}

.boxr2 {
    width: 100px;
    height: 100px;
    margin: auto;
    background: gold;
}点击 "运行实例" 按钮查看在线实例
运行结果:
