


⒈实例演示相邻选择器与兄弟选择器,并分析异同
相邻选择器
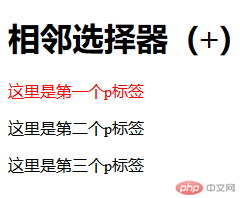
定义:相邻选择器(Adjacent sibling selector)可选择紧接在另一元素后的元素,且二者有相同父元素。
<!DOCTYPE html>
<html lang="en">

<head>
    <meta charset="UTF-8">
    <meta name="viewport" content="width=device-width, initial-scale=1.0">
    <meta http-equiv="X-UA-Compatible" content="ie=edge">
    <title>相邻选择器</title>
    <style type="text/css">
        h1+* {
            color: red;
        }
    </style>
</head>

<body>
    <h1>相邻选择器(+)</h1>
    <p>这里是第一个p标签</p>
    <p>这里是第二个p标签</p>
    <p>这里是第三个p标签</p>
</body>

</html>点击 "运行实例" 按钮查看在线实例
<!DOCTYPE html>
<html lang="en">

<head>
    <meta charset="UTF-8">
    <meta name="viewport" content="width=device-width, initial-scale=1.0">
    <meta http-equiv="X-UA-Compatible" content="ie=edge">
    <title>相邻选择器</title>
    <style type="text/css">
        p+* {
            color: red;
        }
    </style>
</head>

<body>
    <h1>相邻选择器(+)</h1>
    <p>这里是第一个p标签</p>
    <p>这里是第二个p标签</p>
    <p>这里是第三个p标签</p>
</body>

</html>点击 "运行实例" 按钮查看在线实例
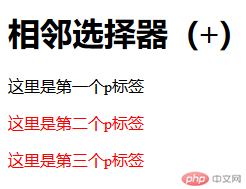
分析:“这里是第二个p标签”和“这里是第三个p标签”为啥都被选中了???
原因:p+*{},选取所有位于p标签后的第一个p元素
第一个p标签不会被选中,前面不是p标签
第二个p标签会被选中,它是第一个p标签紧邻的p标签
第三个p标签也会被选中,第三个p标签的上一个标签也是p标签,满足p+*{}的条件:p标签后的第一个p标签
兄弟选择器
定义:作用是查找某一个指定元素的后面的所有兄弟节点
<!DOCTYPE html>
<html lang="en">

<head>
    <meta charset="UTF-8">
    <meta name="viewport" content="width=device-width, initial-scale=1.0">
    <meta http-equiv="X-UA-Compatible" content="ie=edge">
    <title>兄弟选择器</title>
    <style type="text/css">
        h1~* {
            color: red;
        }
    </style>
</head>

<body>
    <h1>兄弟选择器(~)</h1>
    <p>这里是第一个p标签</p>
    <p>这里是第二个p标签</p>
    <p>这里是第三个p标签</p>
</body>

</html>点击 "运行实例" 按钮查看在线实例
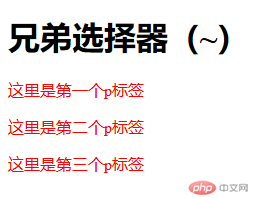
从两个例子来看,‘+’选择器则表示某元素后相邻的元素,也就是紧挨着的,是单一的(特殊情况:循环多个)。而‘~’选择器则表示某元素后所有同级的指定元素,强调所有的。
⒉实例演示:nth-child() 和 :nth-of-type()选择器,并分析异同
:nth-child()
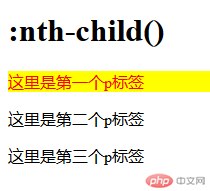
定义:该选择器选取父元素的第N个子元素,与类型无关。
<!DOCTYPE html>
<html lang="en">

<head>
    <meta charset="UTF-8">
    <meta name="viewport" content="width=device-width, initial-scale=1.0">
    <meta http-equiv="X-UA-Compatible" content="ie=edge">
    <title>伪类</title>
    <style type="text/css">
        p:nth-child(2) {
            color: red;
            background-color: yellow;
        }
    </style>
</head>

<body>
    <h1>:nth-child()</h1>
    <p>这里是第一个p标签</p>
    <p>这里是第二个p标签</p>
    <p>这里是第三个p标签</p>
</body>

</html>点击 "运行实例" 按钮查看在线实例
| :nth-child(n)的详细用法: | |
| nth-child(3) | 表示选择列表中的第三个元素。 |
| nth-child(2n) | 表示列表中的偶数标签,即选择第2、第4、第6……标签 |
| nth-child(2n-1) | 表示列表中的奇数标签,即选择第1、第3、第5……标签 |
| nth-child(n+3) | 表示选择列表中的标签从第3个开始到最后(>=3) |
| nth-child(-n+3) | 表示选择列表中的标签从0到3,即小于3的标签(<=3) |
:nth-of-type()
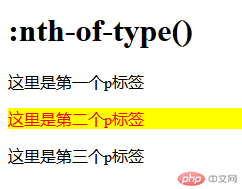
定义:选择器匹配属于父元素的特定类型的第N个子元素的每个元素,与元素类型有关
<!DOCTYPE html>
<html lang="en">

<head>
    <meta charset="UTF-8">
    <meta name="viewport" content="width=device-width, initial-scale=1.0">
    <meta http-equiv="X-UA-Compatible" content="ie=edge">
    <title>伪类</title>
    <style type="text/css">
        p:nth-of-type(2) {
            color: red;
            background-color: yellow;
        }
    </style>
</head>

<body>
    <h1>:nth-of-type()</h1>
    <p>这里是第一个p标签</p>
    <p>这里是第二个p标签</p>
    <p>这里是第三个p标签</p>
</body>

</html>点击 "运行实例" 按钮查看在线实例
⒊实例演示:padding 对盒子大小的影响与解决方案, 使用宽度分离或box-sizing
宽度分离
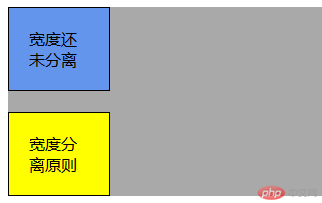
即CSS中的width属性不与影响宽度的padding/border(有时候包括margin)属性一同使用,即一个div的宽度设计分离成一个父div给定width属性,一个子div在父div下给定padding/border这些属性,如此一来,便于维护,在width不变的情况下(width不改变,只),只需要修改padding/border值就可以完成。
<!DOCTYPE html>
<html>

<head>
    <meta http-equiv="Content-Type" content="text/html; charset=utf-8" />
    <title></title>
    <style type="text/css">
        body,
        html {
            width: 100%;
            height: 100%;
        }

        #main {
            width: 80%;
            height: auto;
            background: darkgray;
        }

        .one {
            width: 60px;
            padding: 20px;
            border: 1px solid black;
            background: cornflowerblue;
        }

        .father {
            width: 102px;
        }

        .son {
            padding: 20px;
            border: 1px solid black;
            background: yellow;
        }
    </style>

</head>

<body>
    <div id="main">
        <div class="one">
            宽度还未分离
        </div>
        <br />
        <div class="father">
            <div class="son">
                宽度分离原则
            </div>
        </div>
    </div>
</body>

</html>点击 "运行实例" 按钮查看在线实例
box-sizing
定义:允许以特定的方式定义匹配某个区域的特定元素。
<!DOCTYPE html>
<html lang="en">

<head>
    <meta charset="UTF-8">
    <meta name="viewport" content="width=device-width, initial-scale=1.0">
    <meta http-equiv="X-UA-Compatible" content="ie=edge">
    <title>box-sizing</title>
    <style>
        .test {
            width: 200px;
            height: 70px;
            padding: 10px;
            border: 15px solid #999;
            box-sizing: content-box;
            box-sizing: content-box;
            background: #eee;
        }

        .test2 {
            width: 200px;
            height: 70px;
            padding: 10px;
            border: 15px solid #999;
            box-sizing: border-box;
            box-sizing: border-box;
            background: #eee;
            margin-top: 20px;
        }
    </style>
</head>

<body>
    <div class="test">content-box</div>
    <div class="test2">border-box</div>
</body>

</html>点击 "运行实例" 按钮查看在线实例
⒋实例演示: margin中的同级塌陷, 嵌套传递与自动挤压, 并提出解决方案或应用场景
同级塌陷
在父子盒子嵌套的时候会出现子元素设置子元素margin的时候失效。
<!DOCTYPE html>
<html lang="en">

<head>
    <meta charset="UTF-8">
    <meta name="viewport" content="width=device-width, initial-scale=1.0">
    <meta http-equiv="X-UA-Compatible" content="ie=edge">
    <title>margin同级塌陷</title>
    <style type="text/css">
        .father {
            background-color: red;
            width: 300px;
            height: 200px;
        }

        .son {
            background-color: green;
            width: 200px;
            height: 100px;
            margin-top: 50px;
            margin-bottom: 50px;
        }
    </style>
</head>

<body>
    <div class="father">
        <div class="son">
        </div>
    </div>
</body>

</html>点击 "运行实例" 按钮查看在线实例
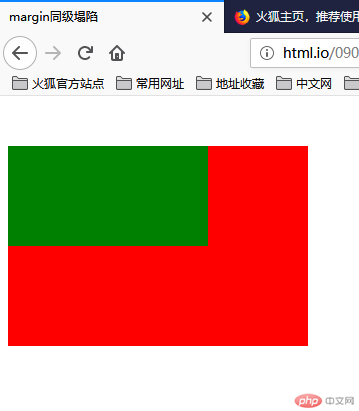
可见绿色的小的子元素设置的margin均失效
解决方式:
给父元素一个边框border
<!DOCTYPE html>
<html lang="en">

<head>
    <meta charset="UTF-8">
    <meta name="viewport" content="width=device-width, initial-scale=1.0">
    <meta http-equiv="X-UA-Compatible" content="ie=edge">
    <title>margin同级塌陷</title>
    <style type="text/css">
        .father {
            background-color: red;
            width: 300px;
            height: 200px;
            border: 1px solid red;
        }

        .son {
            background-color: green;
            width: 200px;
            height: 100px;
            margin-top: 50px;
            margin-bottom: 50px;
        }
    </style>
</head>

<body>
    <div class="father">
        <div class="son">
        </div>
    </div>
</body>

</html>点击 "运行实例" 按钮查看在线实例
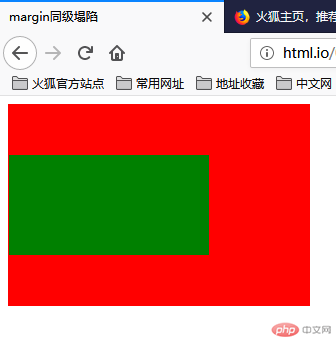
margin有效
嵌套传递
<!DOCTYPE html>
<html lang="en">

<head>
    <meta charset="UTF-8">
    <meta name="viewport" content="width=device-width, initial-scale=1.0">
    <meta http-equiv="X-UA-Compatible" content="ie=edge">
    <title>margin嵌套传递</title>
    <style type="text/css">
        .box1 {
            width: 300px;
            height: 300px;
            background-color: lightpink;
        }

        .box2 {
            width: 200px;
            height: 200px;
            background-color: aquamarine;
            margin-top: 50px;
        }
    </style>
</head>

<body>
    <div class="box1">
        <div class="box2"></div>
    </div>
</body>

</html>点击 "运行实例" 按钮查看在线实例
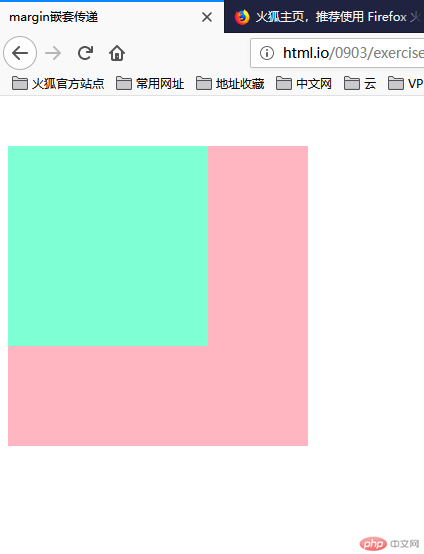
问题是,给正常流的子元素一个垂直外边距margin-top就会使得父元素跟着往下走,而子元素和父元素的边距则没有发生变化。
解决方式:
<!DOCTYPE html>
<html lang="en">

<head>
    <meta charset="UTF-8">
    <meta name="viewport" content="width=device-width, initial-scale=1.0">
    <meta http-equiv="X-UA-Compatible" content="ie=edge">
    <title>margin嵌套传递</title>
    <style type="text/css">
        .box1 {
            padding-top: 50px;
            box-sizing: border-box;
            width: 300px;
            height: 300px;
            background-color: lightpink;
        }

        .box2 {
            width: 200px;
            height: 200px;
            background-color: aquamarine;
            /* margin-top: 50px; */
        }
    </style>
</head>

<body>
    <div class="box1">
        <div class="box2"></div>
    </div>
</body>

</html>点击 "运行实例" 按钮查看在线实例
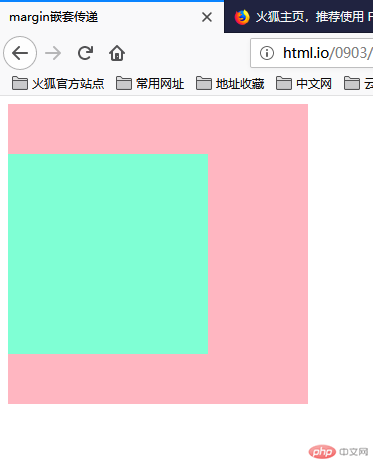
修改父元素的高度,增添padding-top样式模拟(常用);
自动挤压
<!DOCTYPE html>
<html lang="en">

<head>
    <meta charset="UTF-8">
    <meta name="viewport" content="width=device-width, initial-scale=1.0">
    <meta http-equiv="X-UA-Compatible" content="ie=edge">
    <title>自动挤压</title>
    <style type="text/css">
        .box {
            width: 50px;
            height: 50px;
            background-color: red;
            margin-left: auto;
        }
    </style>
</head>

<body>
    <div class="box"></div>
</body>

</html>点击 "运行实例" 按钮查看在线实例
margin-left: auto时,浏览器会自动跑到右边挤压
margin-right:auto时,浏览器会自动跑到左边挤压
margin-left: auto; margin-right:auto时,浏览器会自欧东居中
解决方式:
给margin往左或者往右添加个属性,这样不会出现自动挤压了。