


0x01 浮动
首先,了解一下两种布局:
流动布局(文档流):元素排列顺序与元素在html文档中的编写顺序是一致的(从左往右,从上到下)。
浮动布局:在垂直方向上仍然在文档流中,但在水平方向上可以向左右两边自由浮动。注意:浮动只能在水平上,只能向左或向右,没有居中。
然后我们了解一下浮动元素的特性:
1. 浮动元素脱离文档流(浏览器将布局的权限交给用户)指的是水平方向上不再受标准流的影响。而在水平方向上,浮动元素对它前面的元素没有影响,只会影响浮动元素后面的元素。
2. 对于浮动元素后面的元素:块元素或内联元素的表现形式是不同的,排列方式也是不同的;但是,当一个元素(不论是内联元素还是本来就是块元素)浮动起来之后,它就变成了一个块元素。因为浮动后,该元素就不再受到文档的控制了,要想让其可见,必须设置宽和高。
最后了解脱离文档流的手段:
1. 浮动(严格意义上并不是完全脱离文档流,只是在水平方向上脱离文档流,可以自由移动,在垂直方向上仍在文档流中)
2. 绝对定位
以下是相关示例:
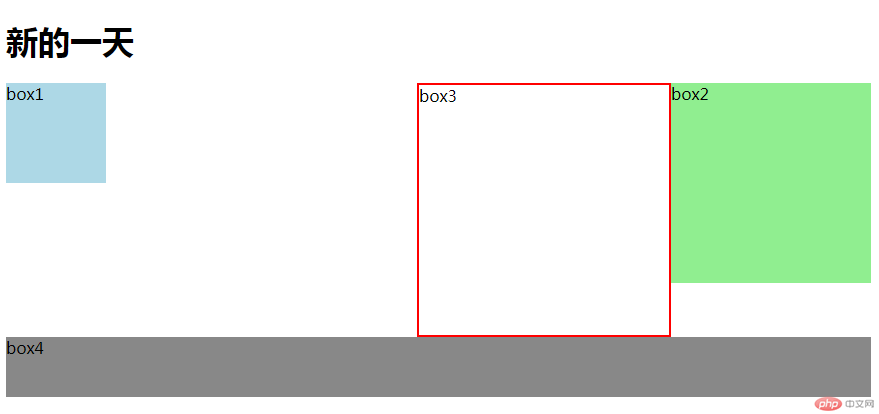
1. 同级元素浮动及清除影响:
html文档:
<!DOCTYPE html>
<html lang="en">

<head>
    <meta charset="UTF-8">
    <meta name="viewport" content="width=device-width, initial-scale=1.0">
    <meta http-equiv="X-UA-Compatible" content="ie=edge">
    <link rel="stylesheet" href="static/css/demo1.css">
    <title>浮动</title>
</head>

<body>
    <h1>新的一天</h1>
    <div class="box1">box1</div>
    <div class="box2">box2</div>
    <div class="box3">box3</div>
    <div class="box4">box4</div>
</body>

</html>
点击 "运行实例" 按钮查看在线实例
对应的css样式表(demo1.css):
.box1 {
    width: 100px;
    height: 100px;
    background-color: lightblue;
}

.box2 {
    width: 200px;
    height: 200px;
    background: lightgreen;
}


/* 当元素浮动之后相当于创建了一个新的区域存在
所有浮动的元素会在沿着元素的上边沿排队
由于它们脱离的文档流,它们后面的元素就会往上跑,占据浮动元素原来的位置 */

.box1 {
    float: left;
}

.box2 {
    float: right;
}

.box3 {
    width: 250px;
    height: 250px;
    border: 2px solid red;
}

.box3 {
    float: right;
}

.box4 {
    width: 100%;
    height: 60px;
    ;
    background-color: #888;
}


/* 同级元素清除浮动的影响 */

.box4 {
    /* clear: left;
    clear: right; */
    clear: both;
}点击 "运行实例" 按钮查看在线实例
2. 嵌套元素浮动及清除影响:
html文档:
<!DOCTYPE html>
<html lang="en">

<head>
    <meta charset="UTF-8">
    <meta name="viewport" content="width=device-width, initial-scale=1.0">
    <meta http-equiv="X-UA-Compatible" content="ie=edge">
    <link rel="stylesheet" href="static/css/demo2.css">
    <title>嵌套元素浮动相关</title>
</head>

<body>
    <div class="box1">
        <div class="box2">
            子元素
        </div>
        <!-- <div class="clear"></div> -->
    </div>
</body>

</html>
点击 "运行实例" 按钮查看在线实例
对应的css样式表(demo2.css):
.box1 {
    width: 200px;
    /* height: 100px; */
    border: 2px dashed red;
}

.box2 {
    /* 让子元素继承父元素的宽度,自适应变化 */
    width: inherit;
    height: 300px;
    background-color: lightblue;
}


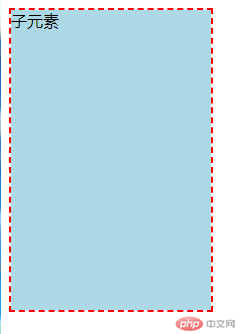
/* 当子元素浮动后,(如果父元素本身没有设置高度,在实际情况中,父元素常常不设置高度,靠子元素的内容撑起)
父元素会失去高度,发生塌陷。
这是因为子元素浮动后,在水平方向上脱离了文档流,导致父元素无法包裹造成的。  */

.box2 {
    float: left;
}


/* 解决方法:
    1.  给父元素设置与子元素一样的高度。但通常不会使用这种方法,因为无法自适应高度。 */


/* .box1 {
    height: 300px;
} */


/* 2.  父元素与子元素一起浮动。这种方案一般是不用的,因为假如父元素还有父元素,那父元素的父元素也要浮动,那最终会到达body */


/* .box1 {
    float: left;
} */


/* 3.  添加一个与子元素同级的元素块,专门用于清除浮动;这个方案没有兼容性问题,但会增加一个冗余的元素块,代码可读性变差 */


/* .clear {
    clear: both;
} */


/* 4.  给父元素添加一个overflow(溢出隐藏),将其样式设置为hidden,专门清除浮动;这是最常用的方法 */

.box1 {
    overflow: hidden;
}点击 "运行实例" 按钮查看在线实例
0x02 定位
定位:将元素在页面重新排列。有四种方式:
1. 静态定位:这是默认的定位方式,也就是我们常说的文档流/流动布局。它的值为:static。
2. 相对定位:元素仍在文档流中,只是相对于它原来的位置发生偏移。它的值为:relative。
3. 绝对定位:元素脱离的文档流,相对于离它最近的且具有定位属性的父元素进行定位。如果它所有的父元素都没有定位属性,那它就相对于body进行定位,这种情况就是固定定位。它的值为:absolute。
4. 固定定位:始终相对于浏览器窗口进行定位。根据浏览器的区别分为body/html,不过没有太大的区别。它的值为:fixed。
以下是相对定位和绝对定位的示例:
html文档:
<!DOCTYPE html>
<html lang="en">

<head>
    <meta charset="UTF-8">
    <meta name="viewport" content="width=device-width, initial-scale=1.0">
    <meta http-equiv="X-UA-Compatible" content="ie=edge">
    <link rel="stylesheet" href="static/css/demo3.css">
    <title>相对定位 & 绝对定位</title>
</head>

<body>
    <!-- 相对定位 -->
    <div class="box1"></div>
    <div class="box2"></div>

    <!-- 绝对定位 -->
    <div class="box4"></div>
    <div class="box3"></div>
</body>

</html>
点击 "运行实例" 按钮查看在线实例
对应的css样式表(demo3.css):
* {
    margin: 0;
    padding: 0;
}

.box1 {
    width: 100px;
    height: 100px;
    background-color: black;
    position: relative;
    left: 50px;
    top: 50px;
}

.box2 {
    width: 100px;
    height: 100px;
    background-color: red;
}

.box3 {
    width: 100px;
    height: 100px;
    background-color: coral;
    position: absolute;
    left: 100px;
    top: 100px;
}

.box4 {
    width: 100px;
    height: 100px;
    background-color: green;
}点击 "运行实例" 按钮查看在线实例
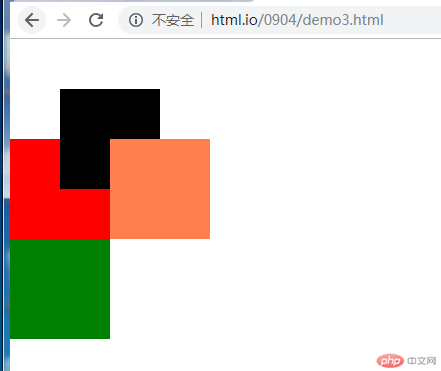
由上图可以看出:
1. 黑色盒子和红色盒子是演示相对定位的:我给黑色盒子设置了相对定位,使其往右往下移动了50px,但红色盒子并没有往上走占据黑色盒子原来的位置,这说明了设置相对定位后,该元素并没有脱离文档流。
2. 珊瑚色盒子和绿色盒子是演示绝对定位的:我给珊瑚色设置了绝对定位,由于它没有父元素有定位属性,所以它是相对于浏览器窗口进行定位的。我让它往右往下移动了100px,然后它遮盖了黑色盒子的部分,且绿色盒子占据了它原来的位子,说明它脱离了文档流。
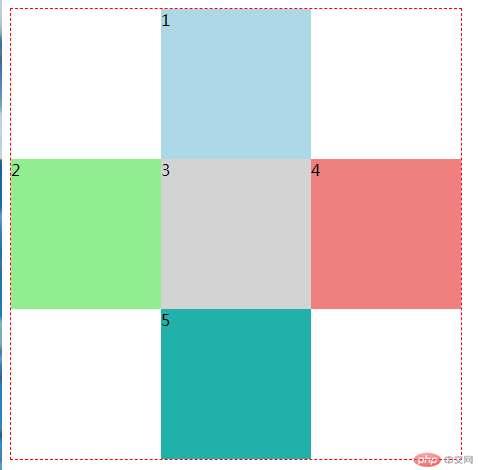
定位小案例之十字架:
html文档:
<!DOCTYPE html>
<html lang="en">

<head>
    <meta charset="UTF-8">
    <meta name="viewport" content="width=device-width, initial-scale=1.0">
    <meta http-equiv="X-UA-Compatible" content="ie=edge">
    <link rel="stylesheet" href="static/css/demo4.css">
    <title>Document</title>
</head>

<body>
    <div class="parent">
        <div class="box1">1</div>
        <div class="box2">2</div>
        <div class="box3">3</div>
        <div class="box4">4</div>
        <div class="box5">5</div>
    </div>
</body>

</html>
点击 "运行实例" 按钮查看在线实例
对应的css样式表(demo4.css):
.box1 {
    width: 150px;
    height: 150px;
    background-color: lightblue;
}

.box2 {
    width: 150px;
    height: 150px;
    background-color: lightgreen;
}

.box3 {
    width: 150px;
    height: 150px;
    background-color: lightgray;
}

.box4 {
    width: 150px;
    height: 150px;
    background-color: lightcoral;
}

.box5 {
    width: 150px;
    height: 150px;
    background-color: lightseagreen;
}


/* 相对定位 */


/* .box1 {
    position: relative;
    left: 150px;
}

.box3 {
    position: relative;
    left: 150px;
    bottom: 150px;
}

.box4 {
    position: relative;
    left: 300px;
    bottom: 300px;
}

.box5 {
    position: relative;
    left: 150px;
    bottom: 300px;
} */


/* 绝对定位 */


/* 在使用绝对定位时,父元素一般设置为相对定位 */

.parent {
    position: relative;
    border: 1px dashed red;
    width: 450px;
    height: 450px;
}

.box1 {
    position: absolute;
    left: 150px;
}

.box2 {
    position: absolute;
    top: 150px;
}

.box3 {
    position: absolute;
    left: 150px;
    top: 150px;
}

.box4 {
    position: absolute;
    left: 300px;
    top: 150px;
}

.box5 {
    position: absolute;
    left: 150px;
    top: 300px;
}点击 "运行实例" 按钮查看在线实例
0x03 三列布局的实现
以下是三列布局的相互示例:
html文档:
<!DOCTYPE html>
<html lang="en">

<head>
    <meta charset="UTF-8">
    <meta name="viewport" content="width=device-width, initial-scale=1.0">
    <meta http-equiv="X-UA-Compatible" content="ie=edge">
    <link rel="stylesheet" href="static/css/demo7.css">
    <title>三列布局</title>
</head>

<body>
    <div class="container">
        <div class="header">头部</div>

        <div class="main">
            <div class="left">左侧</div>
            <div class="content">内容区</div>
            <div class="right">右侧</div>
        </div>

        <div class="footer">底部</div>
    </div>
</body>

</html>
点击 "运行实例" 按钮查看在线实例
对应的css样式表(demo7.css):
.container {
    width: 1000px;
    margin: 0 auto;
}

.header,
.footer {
    height: 60px;
    background-color: #888;
}

.main {
    /* min-height: 600px; */
    /* 高度靠内容撑开 */
    background-color: lightblue;
    margin: 5px auto;
}

.left {
    width: 200px;
    min-height: 600px;
    background-color: lightgreen;
}

.content {
    /* 宽度靠margin的自动挤压实现 */
    min-height: 600px;
    background-color: lightseagreen
}

.right {
    width: 200px;
    min-height: 600px;
    background-color: lightcoral;
}


/* 绝对定位实现 */


/* .main {
    position: relative;
}

.left {
    position: absolute;
    left: 0;
    top: 0;
}

.right {
    position: absolute;
    right: 0;
    top: 0;
}

.content {
    margin-left: 200px;
    margin-right: 200px;
    margin: 0 200px;
}  */


/* 浮动实现 */

.left {
    float: left;
}

.right {
    float: right;
}

.content {
    float: left;
    /* 注意:浮动时要记得给元素添加宽度,否则会出错 */
    width: 600px;
}

.main {
    overflow: hidden;
}点击 "运行实例" 按钮查看在线实例
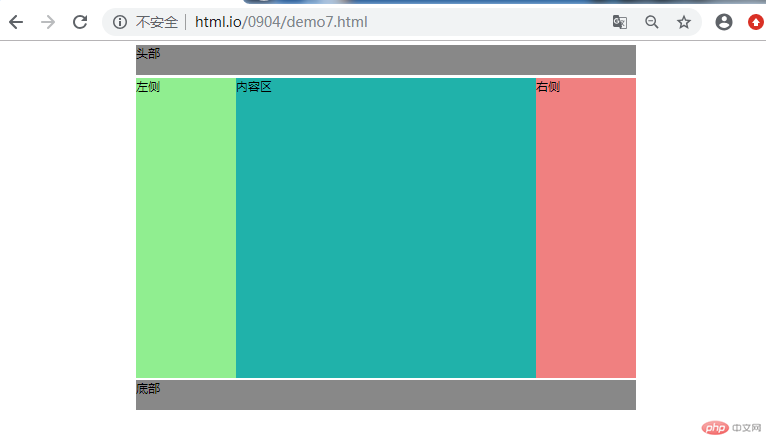
0x04 总结
1. 子元素浮动造成父元素高度折叠的原因是:当子元素浮动后,(如果父元素本身没有设置高度,在实际情况中,父元素常常不设置高度,靠子元素的内容撑起)父元素会失去高度,发生塌陷。这是因为子元素浮动后,在水平方向上脱离了文档流,导致父元素无法包裹造成的。为了消除其产生的影响,有四种方法:
(1)给父元素设置与子元素一样的高度。但通常不会使用这种方法,因为无法自适应高度。
(2)父元素与子元素一起浮动。这种方案一般是不用的,因为假如父元素还有父元素,那父元素的父元素也要浮动,那最终会到达body。
(3)添加一个与子元素同级的元素块,专门用于清除浮动;这个方案没有兼容性问题,但会增加一个冗余的元素块,代码可读性变差。
(4)给父元素添加一个overflow(溢出隐藏),将其样式设置为hidden,专门清除浮动;这是最常用的方法。
2. 对于三列布局,通常有两种实现方式:绝对定位和浮动。有几个值得注意的地方:
(1)对于主体部分,不需要设置高和宽。它的宽由body宽度决定,100%自适应。它的高由内容撑开。
(2)对于主体内容块,只需要提供一个最小高度即可。这是为了防止内容区的内容不够撑起内容区高度导致内容区塌陷。
(3)使用浮动实现时,要记得给主体内容区元素添加宽度,否则会出错。使用定位实现时,主体内容区的宽度靠margin的自动挤压实现。