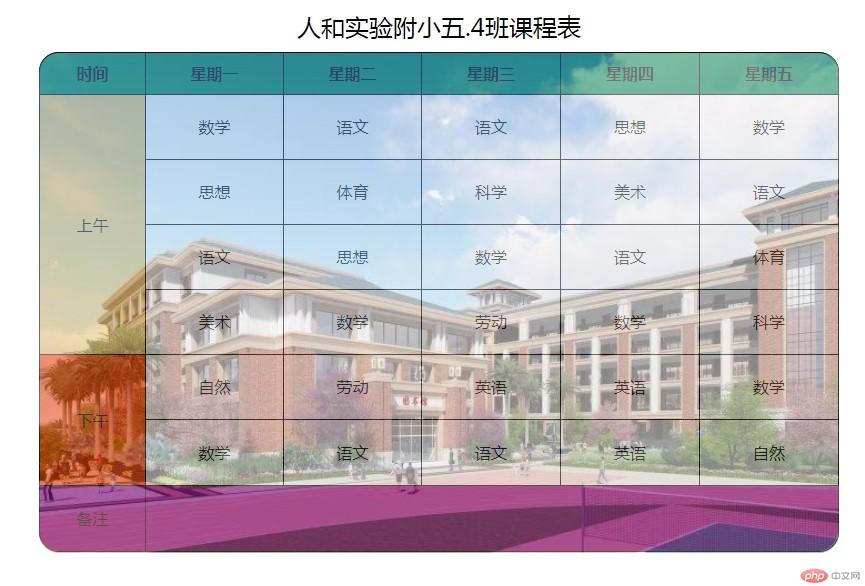


今天对之前的学习进行了一个总结,利用css来对表格进行一个精确的控制显示。
8月29日入坑,开始学习,开发环境phpstudy,编辑器PHPstorm,浏览器google和火狐。
8月30日,开始学习html文档结构和常用标签,例如h1-h6,p,div,img,js,css,video,表单,表格,其中比较复杂的是表单和表格。
9月02日,学习css的基础知识,css的基本选择器标签选择器,类选择器,id选择器,它们的优先级为id选择器最高,类选择器次之,标签选择器最低;css的引入方式内联引入(直接写在标签的style属性上,优先级最高),其次是内部引入(写在头部的style标签内,优先级第二),最后是外部引入(使用link引入.css文件,优先级最低,一般情况下我们都使用的是外部引入,将html和css文件分离开来,减小html文件体积)。
9月03日,学习了一些比较复杂的选择器,兄弟选择器用~连接,相邻选择器用+连接,它们的区别在于相邻只能选择位于元素后的且紧紧想邻的,而兄弟选择器会选择位于元素后所有同父级元素的元素,nth-child() 和 :nth-of-type()选择器,它们的区别在于一个不指定类型,一个需要指定类型,当指定类型的时候,就只会选择该类型的选择器的序号,不是该类型的选择器不参与排序,
padding内边距会撑大盒子,解决方法为宽度分离和设置盒子为边框盒子;margin中的同级塌陷, 嵌套传递与自动挤压。
9月04日,学习css布局原理,利用浮动,相对定位和绝对定位来进行页面布局。需注意的是浮动的子元素会对父元素造成高度折叠,这个时候需要给父元素添加overflow:hidden的属性。
9月05日,学习了两种网站的三列布局方式,双飞翼布局和圣杯布局。双飞翼布局通过宽度分离,圣杯通过border-box解决问题。
9月06日,总结一周,学习使用css精确控制表格。
作业:使用CSS制作一张带有四个圆角的表格
<!doctype html>
<html lang="en">
<head>
    <meta charset="UTF-8">
    <meta name="viewport"
          content="width=device-width, user-scalable=no, initial-scale=1.0, maximum-scale=1.0, minimum-scale=1.0">
    <meta http-equiv="X-UA-Compatible" content="ie=edge">
    <!--<link rel="stylesheet" href="index.css">-->
    <style>/*根据网上的教程,设置表格的右下边框,设置单元格的左上边框,让边框线单独不重复*/
    /*第一步,设置表格的右下边框,不分开设置表格和单元格的边框,会导致边框线是设置的两倍*/
    table{
        border-right: 1px solid black;
        border-bottom: 1px solid black;
        border-radius: 20px;
        width: 800px;
        height:500px;
        text-align:center;
        /*设置border-collapse有三个值,默认值(边框分离,每个单元格的边框是分开的)separate,collapse(边框合并,将单元格的边框合并,),inherit继承父元素*/
        /*border-collapse: collapse;*/
        /*设置相邻单元格的边框的距离,仅在边框分离下有效*/
        border-spacing:0;
        position: relative;
        margin:0 auto;
    }
    table caption{
        font-size: 1.5rem;
        margin: 10px auto;
    }
    /*第二步,设置单元格的,左上边框*/
    th,td{
        border-left:1px solid black;
        border-top:1px solid black;
        padding: 10px;
        margin: 0;
    }
    /*设置表的第一行的背景色为青色*/
    th{
        background-color: #008856;
    }
    /*设置上午单元格背景色*/
    tbody tr:first-of-type >td:first-of-type{
        background-color: #f0c674;
    }
    /*设置下午单元格背景色*/
    tbody tr:nth-of-type(5)>td:first-of-type{
        background-color: orangered;
    }
    /*设置备注一行的背景色*/
    tbody tr:last-of-type{
        background-color: darkmagenta;
    }

    /*设置表格的左上为圆角,直接设置第一个th单元格的左上为圆角就行了*/
    /*最后发现单元格的顺序是左上top-left,右上top-right,左下bottom-left,右下bottom-right*/
    thead tr:first-of-type>th:first-of-type{
        /*设置第一个th单元格左上圆角*/
        border-top-left-radius: 20px;
        /*border-radius: 20px 0 0 0;*/
    }
    thead tr:first-of-type>th:last-of-type{
        border-top-right-radius: 20px;
        /*border-radius: 0 20px 0 0;*/
    }
    tbody tr:last-of-type > td:first-of-type{
        border-bottom-left-radius: 20px;
        /*border-radius: 0 0 0 20px;*/
    }
    tbody tr:last-of-type > td:last-of-type{
        border-bottom-right-radius: 20px;
        /*border-radius: 0 0 20px 0;*/
    }
    table:before{
        content:'';   /*这是用于显示内容的*/
        width: 800px;
        height:500px;
        position: absolute;
        top: 52px;
        left:0;
        background-image: url("xx.jpg");
        background-size:cover;
        opacity: 0.5;
        border-radius: 20px;
    }
    </style>
    <title>圆角表格</title>
</head>
<body>
    <div class="content">
        <table>
            <caption>人和实验附小五.4班课程表</caption>
            <thead>
            <tr>
                <th>时间</th>
                <th>星期一</th>
                <th>星期二</th>
                <th>星期三</th>
                <th>星期四</th>
                <th>星期五</th>
            </tr>
            </thead>
            <tbody>
            <tr>
                <!--设置上午单元格跨越四行-->
                <td rowspan="4">上午</td>
                <td>数学</td>
                <td>语文</td>
                <td>语文</td>
                <td>思想</td>
                <td>数学</td>
            </tr>
            <tr>

                <td>思想</td>
                <td>体育</td>
                <td>科学</td>
                <td>美术</td>
                <td>语文</td>
            </tr>
            <tr>

                <td>语文</td>
                <td>思想</td>
                <td>数学</td>
                <td>语文</td>
                <td>体育</td>
            </tr>
            <tr>

                <td>美术</td>
                <td>数学</td>
                <td>劳动</td>
                <td>数学</td>
                <td>科学</td>
            </tr>
            <tr>
                <!--设置下午单元格跨越两行-->
                <td rowspan="2">下午</td>
                <td>自然</td>
                <td>劳动</td>
                <td>英语</td>
                <td>英语</td>
                <td>数学</td>
            </tr>
            <tr>

                <td>数学</td>
                <td>语文</td>
                <td>语文</td>
                <td>英语</td>
                <td>自然</td>
            </tr>
            <tr>
                <td>备注</td>
                <!--设置备注内容单元格跨越5列-->
                <td colspan="5"></td>
            </tr>
            </tbody>
        </table>
    </div>
</body>
</html>点击 "运行实例" 按钮查看在线实例
运行截图

最后,总结一下border-radius:10px 20px 30px 40px;设置圆角时四个值分别对应border-top-left-radius:10px;,border-top-right-radius:20px;,border-bottom-right-radius:30px;,border-bottom-left-radius:40px;,即为左上10像素,右上20像素,右下30像素,左下40像素!