


基本选择器
<!DOCTYPE html>
<html lang="en">
<head>
    <meta charset="UTF-8">
    <meta name="viewport" content="width=device-width, initial-scale=1.0">
    <meta http-equiv="X-UA-Compatible" content="ie=edge">
    <link rel="stylesheet" href="./css/1.css">
    <title>Document</title>
</head>
<body>
    <!-- id,class,属性等选择器 -->
    <ul>
        <li id="red">A</li>
        <li>B</li>
        <li class="blue">C</li>
        <li class="green">D</li>
        <li>E</li>
        <li>F</li>
        <li>G</li>
        <li>H</li>
        <li>I</li>
    </ul>
</body>
</html>
点击 "运行实例" 按钮查看在线实例
ul {
    list-style-type: none;
}
/* 标签选择器 */
li {
    /* li本来是块级元素,这里转换为行内块 */
    display: inline-block;
    width: 50px;
    height: 50px;
    /* 变为球体 */
    border-radius: 50%;
    text-align: center;
    line-height: 50px;
    background: #fff;
    box-shadow: 2px 2px 5px grey;
}

/* 群组选择器 */
/* 多个选择器设置相同样式 */
#red, .blue {
    background: wheat;
}

/* id选择器,选择器中优先级最高 */
#red {
    color: red;
    font-weight: bolder;
}
/* class选择器,选择器中优先级最高 */
.blue {
    color: lightskyblue;
    font-weight: bolder;
}

/* 属性选择器 */
li[id] {
    border: 2px solid black
}点击 "运行实例" 按钮查看在线实例
效果图:比较简单直观

相邻选择器,兄弟选择器异同
相邻选择器:+ 选择相邻的后面一个元素,必须是紧挨着的
兄弟选择器:~ 选择后面同级的所有指定元素
<!DOCTYPE html>
<html lang="en">
<head>
    <meta charset="UTF-8">
    <meta name="viewport" content="width=device-width, initial-scale=1.0">
    <meta http-equiv="X-UA-Compatible" content="ie=edge">
    <link rel="stylesheet" href="./css/1.css">
    <title>Document</title>
</head>
<body>
    <ul>
        <li id="red">A</li>
        <li>B</li>
        <li class="blue">C</li>
        <li class="green">D</li>
        <li>E</li>
        <li class="pink">F</li>
        <li>G</li>
        <li>H</li>
        <li>I</li>
    </ul>

    <ul class="list2">
        <li>A</li>
        <li>B</li>
        <li>C</li>
        <li>D</li>
    </ul>
</body>
</html>
点击 "运行实例" 按钮查看在线实例
/* 相邻选择器 */
/* 选择相邻的后面一个元素,必须是紧挨着的 */
/* 注意:只选择一个元素 */
.green + li {
    background: wheat;
}

/* 兄弟选择器 */
/* 选择后面同级的所有指定元素 */
.pink ~ li {
    background: pink
}


/* 利用相邻选择器实现选择 除第一个子元素之外的所有元素 */
/* 这里仔细想一想,其实是对 ul 下的每一个 li 进行了 相邻元素的选择,
    每一个 li 都是前一个 li 的相邻元素,除了第一个 li 无法被 相邻选择器 获取到 */
.list2 li + li {
    background-color: green;
}
/* 与 下面这种方式相同 */
.list2 li:first-of-type ~ li {
    background-color: red
}点击 "运行实例" 按钮查看在线实例
效果图:

可以看到:
相邻选择器只会选择一个元素
兄弟选择器可以选择多个元素
nth-child() 与 nth-of-type() 异同
<!DOCTYPE html>
<html lang="en">
<head>
    <meta charset="UTF-8">
    <meta name="viewport" content="width=device-width, initial-scale=1.0">
    <meta http-equiv="X-UA-Compatible" content="ie=edge">
    <link rel="stylesheet" href="./css/1.css">
    <title>Document</title>
</head>
<body>
    <p>伪类子类选择器</p>
    <ol>
        <li class="b">1</li>
        <li class="special">2</li>
        <li class="special">3</li>
        <li>4</li>
        <li class="special">5</li>
        <li class="b">6</li>
        <li>7</li>
        <li>8</li>
    </ol>

    <div class="test">
        <p>段落一</p>
        <p class="c-red">段落一</p>
        <span class="c-blue">spanA</span>
        <p class="c-red">段落三</p>
        <span class="c-blue">spanB</span>
    </div>
</body>
</html>
点击 "运行实例" 按钮查看在线实例
/* 伪类子类选择器 */

/* 第一个子元素 */
ol :first-child {
    background: lightblue;
}
/* 最后一个子元素 */
ol :last-child {
    background: lightcoral;
}

/* 选择第5个子元素 */
/* 注意: 索引是从 1  开始的 */
ol :nth-child(5) {
    background: lightseagreen;
}

/* 选择第一个 li 子元素 */
/* 注意: :first-of-type前面只能放标签类型,并不能使用 其他选择器 */
ol li:first-of-type {
    border: 2px solid black;
}

ol li:last-of-type {
    border: 2px solid black;
}
ol :nth-of-type(6) {
    background: lightgreen;
}

/* first-child 与 first-of-type区别 */
/* :first-child: 只和位置有关,只会选择其父元素下的第一个子元素,
如果加了指定类型,往往会选择不到

/* first-of-type: 更加强大,与类型和位置都有关,可以选择其父元素下 指定类型的对应位置子元素 */

.test span:first-child {
    /* 经测试,这里 是选择不到的 sapnA 的,因为 .test 第一个子元素是 p*/
    color: red
}

.test .c-blue:first-of-type {
    /* 可以选择到第一个 class=c-blue的span元素 */
    color: blue
}点击 "运行实例" 按钮查看在线实例
效果图:
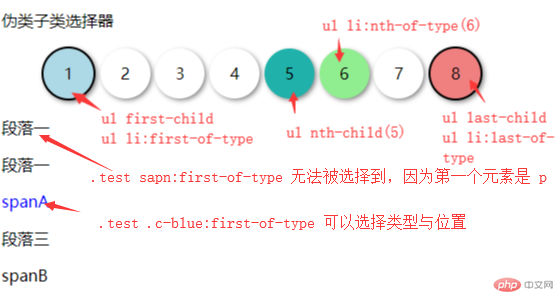
这两类选择器 写法都是一样,不过 加了 nth-of-type 要强大一点,可以同时指定 类型 和 位置进行选择
插个 background 知识点
<!DOCTYPE html>
<html lang="en">

<head>
    <meta charset="UTF-8">
    <meta name="viewport" content="width=device-width, initial-scale=1.0">
    <meta http-equiv="X-UA-Compatible" content="ie=edge">
    <style>
        .wrap>div {
            float: left;
            margin: 10px;
            width: 300px;
            height: 200px;
            padding: 20px;
            border: 20px dashed grey;
        }

        .wrap {
            width: 1600px;
            border: none;
            padding: 0;
            overflow: hidden;
        }

        .wrap:after {
            content: "";
            display: table;
            height: 0;
            clear: both;
        }

        .box1 {
            background-color: lightseagreen;
            /* 设置背景的绘制区域: 默认值, 包含边框区 */
            background-clip: border-box;
        }

        .box2 {
            background-color: lightseagreen;
            /* 设置背景的绘制区域: 仅内容区 */
            background-clip: content-box;
        }

        .box3 {
            background-color: lightseagreen;
            /* 设置背景的绘制区域: 内容区 + 内边距区 */
            background-clip: padding-box;
        }

        .box4 {
            background-image: url("./images/1.jpg");
        }

        .box5 {
            background-image: url("./images/1.jpg");
            background-repeat: repeat-x;
        }

        .box6 {
            background-image: url("./images/1.jpg");
            background-repeat: repeat-y;
        }

        .box7 {
            background-image: url("./images/1.jpg");
            background-repeat: no-repeat;
        }

        .box8 {
            background-image: url("./images/1.jpg");
            background-repeat: no-repeat;
            /* background-position位置有3种写法
            /*background-position: left center; 默认左上角*/
            /*background-position: 30px 50px;*/
            /*background-position: 10% 20%;*/
            background-position: right bottom;
        }
        .box9 {
            background-image: url("./images/1.jpg");
            background-repeat: no-repeat;
            background-position: 30px 50px;
        }
        .box10 {
            background-image: url("./images/1.jpg");
            background-repeat: no-repeat;
            background-position: center;
        }

        .box11 {
            background-image: url("./images/1.jpg");
            background-position: center;
            background-repeat: no-repeat;
            /* 滚动方式 */
            /* background-attachment: scroll; 默认 */

            /* 固定在页面上,页面滚动,图片不会滚动 */
            background-attachment: fixed;
        }

        .box12 {
            /* 多个背景图设置 逗号隔开 */
            background-image: url("./images/1.jpg"), url("./images/3.jpg");
            background-repeat: no-repeat no-repeat;
            background-position: left bottom, right top;
        }
    </style>
    <title>Document</title>
</head>

<body>
    <div class="wrap">
        <div class="box1">只设置背景色,可以看到默认背景绘制区域是包含边框的</div>
        <div class="box2">绘制区域为内容区<br> background-clip: content-box</div>
        <div class="box3">绘制区域为包含padding区<br> background-clip: padding-box</div>
    </div>
    <div class="wrap">
        <div class="box4">背景图片默认重复铺满区域</div>
        <div class="box5">x轴方向重复<br>background-repeat: repeat-x</div>
        <div class="box6">y轴方向重复<br>background-repeat: repeat-y</div>
        <div class="box7">图片不重复<br>background-repeat: no-repeat</div>
    </div>
    <div class="wrap">
        <div class="box8">背景图片位置<br /> background-position: right nottom</div>
        <div class="box9">背景图片位置<br /> background-position: 30px 50px</div>
        <div class="box10">背景图片居中<br /> background-position: center</div>
    </div>
    <div class="wrap">
        <div class="box11">背景图片固定在页面上<br>background-attachment: fixed;</div>
    </div>
    <div class="wrap">
        <div class="box12">设置多个背景图</div>
    </div>

</body>

</html>点击 "运行实例" 按钮查看在线实例
效果图:
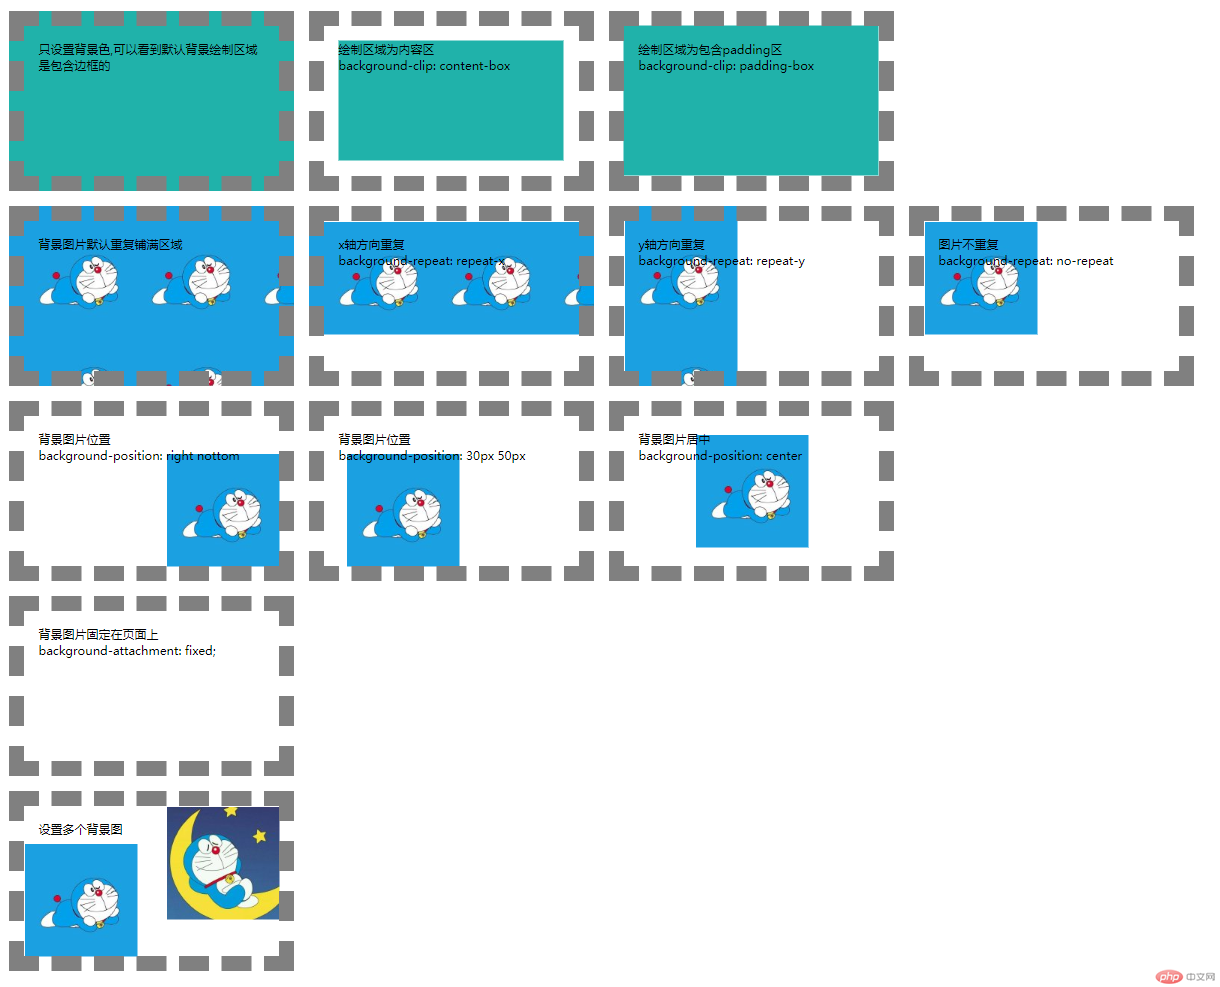
background 这一块的属性还是要多做了才能熟悉。
padding认识
<!DOCTYPE html>
<html lang="en">

<head>
    <meta charset="UTF-8">
    <meta name="viewport" content="width=device-width, initial-scale=1.0">
    <meta http-equiv="X-UA-Compatible" content="ie=edge">
    <style>
        .box1 {
            float: left;
            width: 150px;
            height: 150px;
            padding: 50px;
            background: lightgreen;
            border: 25px solid wheat
        }

        .box2 {
            float: left;
            margin-left: 30px;
            /* 使用该属性将宽高固定 */
            box-sizing: border-box;
            width: 300px;
            height: 300px;
            padding: 50px;
            background: lightgreen;
            border: 25px solid wheat
        }
    </style>
    <title>padding</title>
</head>

<body>
    <div class="box1">
        <img src="./images/1.jpg" alt="">
    </div>

    <div class="box2">
        <img src="./images/1.jpg" alt="">
    </div>
</body>

</html>点击 "运行实例" 按钮查看在线实例
效果图:
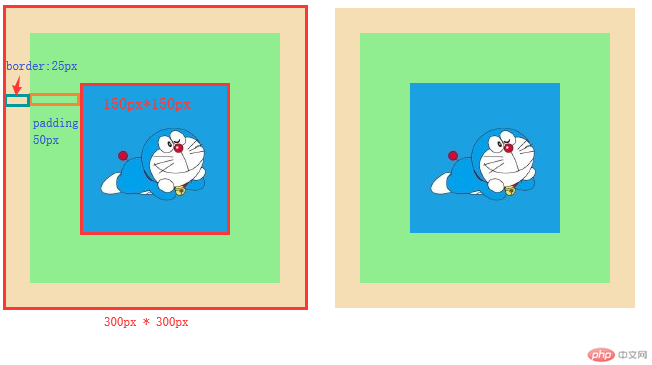
box-sizing:content-box 是盒子的默认宽高计算方式( content 内容区的宽高)
使用了 box-sizing: border-box 将 盒子的宽高 计算方式 改变为了(content + padding + border),这样设置会少去很多麻烦。
margin 同级塌陷
<!DOCTYPE html>
<html lang="en">

<head>
    <meta charset="UTF-8">
    <meta name="viewport" content="width=device-width, initial-scale=1.0">
    <meta http-equiv="X-UA-Compatible" content="ie=edge">
    <style>
        body {
            height: 800px;
        }
        .box1 {
            width: 100px;
            height: 100px;
            background-color: wheat;
            margin-bottom: 50px;
        }

        .box2 {
            margin-top: 30px;
            width: 100px;
            height: 100px;
            background-color: wheat;
        }
    </style>
    <title>margin</title>
</head>

<body>
    <!--1. 同级塌陷-->
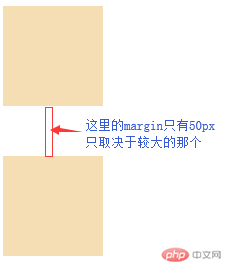
    <!-- 理解点为2点:一是 同级:相同级别,即兄弟元素 -->
    <!-- 二是 塌陷: 垂直方向上,margin的具体值取决于较大的那一个-->
    <div class="box1"></div>
    <div class="box2"></div>
</body>

</html>点击 "运行实例" 按钮查看在线实例
margin 嵌套传递
当给子元素一个margin-top时,该margin会传递至父元素上,以致于会出现以下效果:
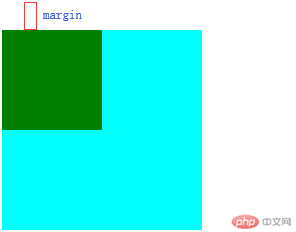
但这并不是我们想要的效果,以下为解决方法。
给父元素设置border; 不过会改变父元素的宽高
给父元素设置 overflow: hidden; 不过子元素超出部分会被隐藏
将 子元素的 margin 转换为 父元素的 padding;此法较好,不过需注意父元素宽高的计算
在父元素中第一个子元素前添加一个空元素,一般用 伪类实现
<!DOCTYPE html>
<html lang="en">

<head>
    <meta charset="UTF-8">
    <meta name="viewport" content="width=device-width, initial-scale=1.0">
    <meta http-equiv="X-UA-Compatible" content="ie=edge">
    <style>
        body {
            height: 800px;
        }

        .box3 {
                    width: 200px;
                    height: 200px;
                    background-color: cyan;
                    /* border: 1px solid red; */
                    /* overflow: hidden; */
                    /* padding: 30px; */
                }

                /* .box3:before {
                    content: "";
                    display: block;
                } */

        .box4 {
            margin-top: 30px;
            width: 100px;
            height: 100px;
            background-color: green;
        }
    </style>
    <title>margin</title>
</head>

<body>
    <!--2. 嵌套传递-->
    <!-- 子元素的 margin会传递至父元素上 -->
    <!-- 解决办法:我认为比较好的且不会较大改变元素本来属性的几种方法  -->
    <!-- 1. 给父元素设置border; 不过会改变父元素的宽高 -->
    <!-- 2. 给父元素设置 overflow: hidden; 最常用的方法,不过子元素超出部分会被隐藏 -->
    <!-- 3. 将 子元素的 margin 转换为 父元素的 padding; 此法较好,不过需注意父元素宽高的计算 -->
    <!-- 4. 在父元素中第一个子元素前添加一个空元素,一般用 伪类实现 -->
    <div class="box3">
        <div class="box4"></div>
    </div>
</body>

</html>点击 "运行实例" 按钮查看在线实例
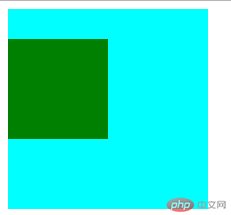
margin 自动挤压
<!DOCTYPE html>
<html lang="en">

<head>
    <meta charset="UTF-8">
    <meta name="viewport" content="width=device-width, initial-scale=1.0">
    <meta http-equiv="X-UA-Compatible" content="ie=edge">
    <style>
        body {
            height: 800px;
        }

        .box5 {
            /* 当设置了 margin左右边距 又没有设置具体值时,元素就会默认最大 margin 值 */
            /* 在垂直方向不会出现挤压效果 */
            /* margin-left: auto; */
            /* 左右挤压使得元素水平居中 */
            margin: auto;
            width: 100px;
            height: 100px;
            background-color: lightblue;
        }
    </style>
    <title>margin</title>
</head>

<body>
    <!--3. 自动挤压-->
    <div class="box5"></div>

</body>

</html>点击 "运行实例" 按钮查看在线实例
