


CSS不仅可以为表格提供强大的样式控制,还可以模拟出表格,实现其功能。元素的浮动是现在网页布局的重要工具。元素的定位对布局也十分重要。本篇博文通过一些实例演示来学习表格的样式控制和元素的浮动与定位相关知识。
1. 制作一张商品信息表,内容自定,要求用到行与列的合并
<!DOCTYPE html>
<html lang="en">
<head>
    <meta charset="UTF-8">
    <title>商品信息表</title>
    <style>
        table {
            box-sizing: border-box;
            box-shadow: 1px 1px 5px #333333;
            color: #444444;
            /*将表格中所有边框线进行折叠*/
            border-collapse: collapse;
            width: 600px;
            margin: 30px auto;
        }
        /*给单元格加上边框*/
        th, td {
            border: 1px solid black;
            text-align: center;
            padding: 20px 10px;
        }
        /*设置标题*/
        caption {
            font-size: 1.5rem;
            margin-bottom: 10px;
        }
        /*在奇数行实现隔行变色效果*/
        tbody > tr:nth-of-type(odd){
            background-color: lightblue;
        }
        /*设置表头*/
        thead > tr {
            background: linear-gradient(lightseagreen,white);
        }
        /*设置底部*/
        tfoot tr {
            background: linear-gradient(to top,lightpink,white);
        }
        tbody > tr:nth-of-type(3) > td:nth-of-type(3) {
            background: linear-gradient(lightblue,white);
        }
    </style>
</head>
<body>
<table>
    <caption><h3>手机商品信息表</h3></caption>
    <thead>
    <tr>
        <th>编号</th>
        <th>手机名称</th>
        <th>手机单价</th>
        <th>***数量</th>
        <th>价格</th>
    </tr>
    </thead>
    <tbody>
    <tr>
        <td>1</td>
        <td>Apple iPhone 11</td>
        <td>5999.00</td>
        <td>1</td>
        <td>5999.00</td>
    </tr>
    <tr>
        <td>2</td>
        <td>HUAWEI Mate 30 Pro</td>
        <td>5799.00</td>
        <td>3</td>
        <td>17397.00</td>
    </tr>
    <tr>
        <td>3</td>
        <td>小米9</td>
        <td rowspan="2">2699.00</td>
        <td>6</td>
        <td>16194.00</td>
    </tr>
    <tr>
        <td>4</td>
        <td>魅族 16s Pro</td>
        <td>2</td>
        <td>5398.00</td>
    </tr>
    <tr>
        <td>6</td>
        <td>三星 Galaxy Note10</td>
        <td>6599.00</td>
        <td>1</td>
        <td>6599.00</td>
    </tr>
    </tbody>
    <tfoot>
    <tr>
        <td colspan="4">价格总计:</td>
        <td>51587.00</td>
    </tr>
    </tfoot>
</table>
</body>
</html>点击 "运行实例" 按钮查看在线实例


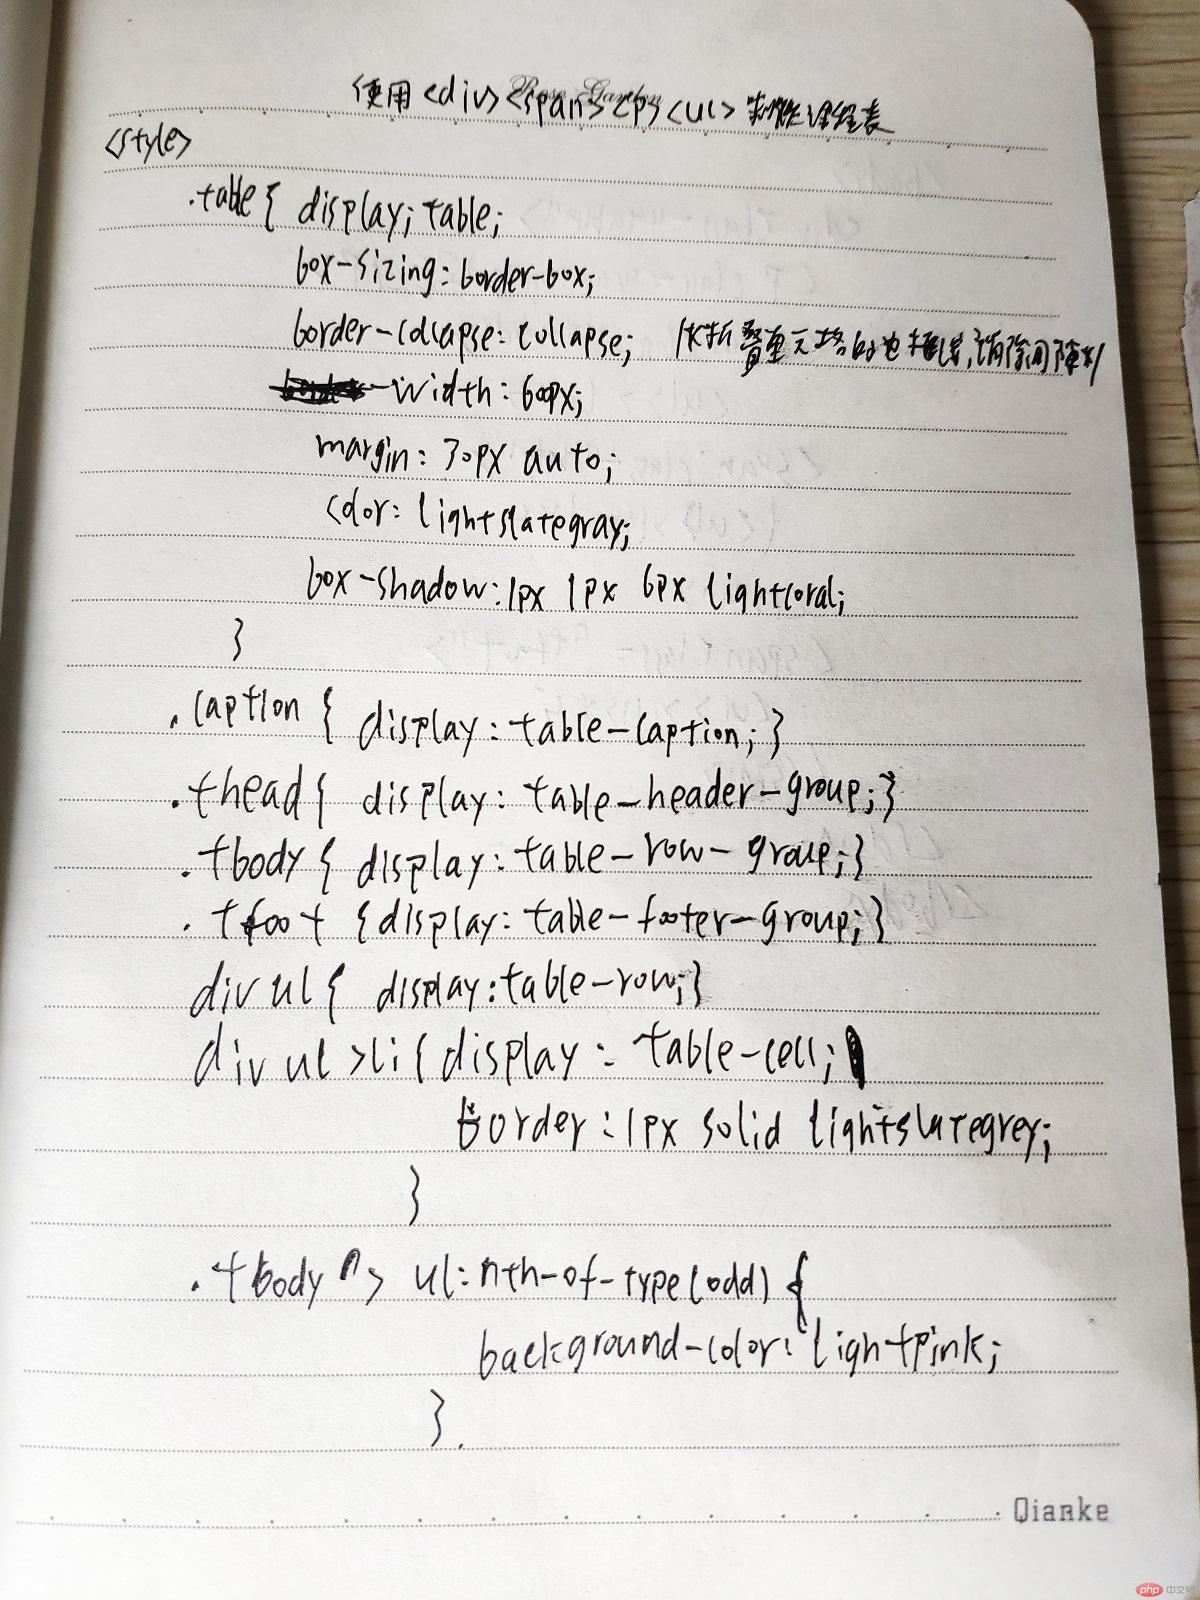
2. 使用<div><span><p><ul>...等标签来制作一张课程表
<!DOCTYPE html>
<html lang="en">
<head>
    <meta charset="UTF-8">
    <title>课程表</title>
    <style>
        .table {
            /*以<table>标签样式显示*/
            display: table;
            box-sizing: border-box;
            /*折叠单元格的边框线,消除间隙*/
            border-collapse: collapse;
            width: 600px;
            margin: 30px auto;
            color: lightslategray;
            box-shadow: 1px 1px 6px lightcoral;
        }
        .caption {
            /*以<caption>标签样式显示*/
            display: table-caption;
            text-align: center;
            font-size: 1.6rem;
            font-weight: bold;
        }
        .thead {
            /*以<thead>标签样式显示*/
            display: table-header-group;
            text-align: center;
            font-size: 1.2rem;
            font-weight: bold;
            color: lightcoral;
            text-shadow: 1px 1px 0 black;
            background: linear-gradient(lightseagreen,white);
        }
        .tbody {
            /*以<tbody>标签样式显示*/
            display: table-row-group;
        }
        .tfoot {
            /*以<tfoot>标签样式显示*/
            display: table-footer-group;
            background: linear-gradient(to top, lavender, white);
        }
        /*将所有<div>下的<ul>转为<tr>标签样式*/
        div ul {
            display: table-row;
        }
        /*将所有的<li>转为<td>标签样式*/
        div ul > li {
            display: table-cell;
            border: 1px solid lightslategrey;
            text-align: center;
            padding: 10px;
        }
        .tbody > ul:nth-of-type(odd) {
            background-color: lightpink;
        }
        .tbody > ul:nth-of-type(even) {
            background-color: lightgoldenrodyellow;
        }
    </style>
</head>
<body>
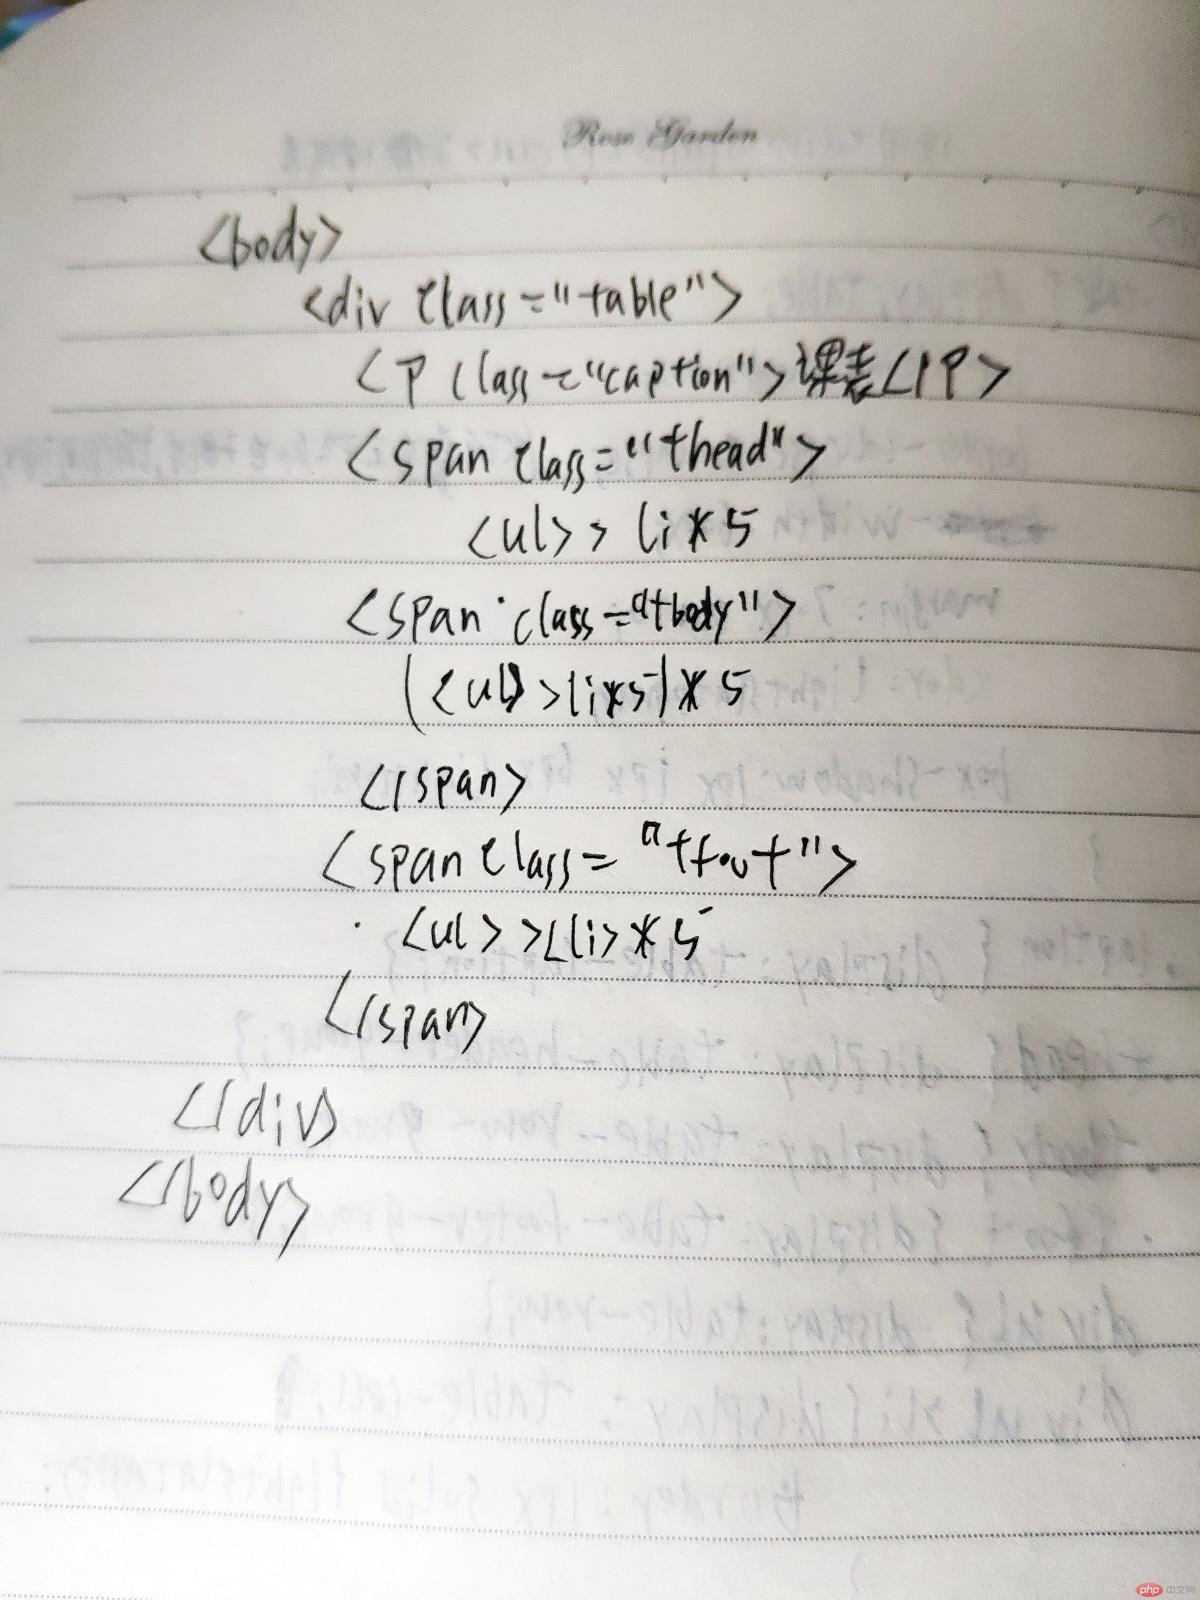
<div class="table">
    <p class="caption">课程表</p>
    <span class="thead">
    <ul>
        <li>星期一</li>
        <li>星期二</li>
        <li>星期三</li>
        <li>星期四</li>
        <li>星期五</li>
    </ul>
    </span>
    <span class="tbody">
    <ul>
        <li>语文</li>
        <li>数学</li>
        <li>英语</li>
        <li>语文</li>
        <li>数学</li>
    </ul>
    <ul>
        <li>音乐</li>
        <li>科学</li>
        <li>数学</li>
        <li>英语</li>
        <li>数学</li>
    </ul>
    <ul>
        <li>语文</li>
        <li>语文</li>
        <li>英语</li>
        <li>体育</li>
        <li>数学</li>
    </ul>
    <ul>
        <li>科学</li>
        <li>英语</li>
        <li>体育</li>
        <li>数学</li>
        <li>语文</li>
    </ul>
    <ul>
        <li>语文</li>
        <li>英语</li>
        <li>劳动</li>
        <li>数学</li>
        <li>体育</li>
    </ul>
    <ul>
        <li>数学</li>
        <li>体育</li>
        <li>科学</li>
        <li>数学</li>
        <li>语文</li>
    </ul>
    </span>
    <span class="tfoot">
    <ul>
        <li>自习</li>
        <li>游戏</li>
        <li>自习</li>
        <li>游戏</li>
        <li>自习</li>
    </ul>
    </span>
</div>
</body>
</html>点击 "运行实例" 按钮查看在线实例

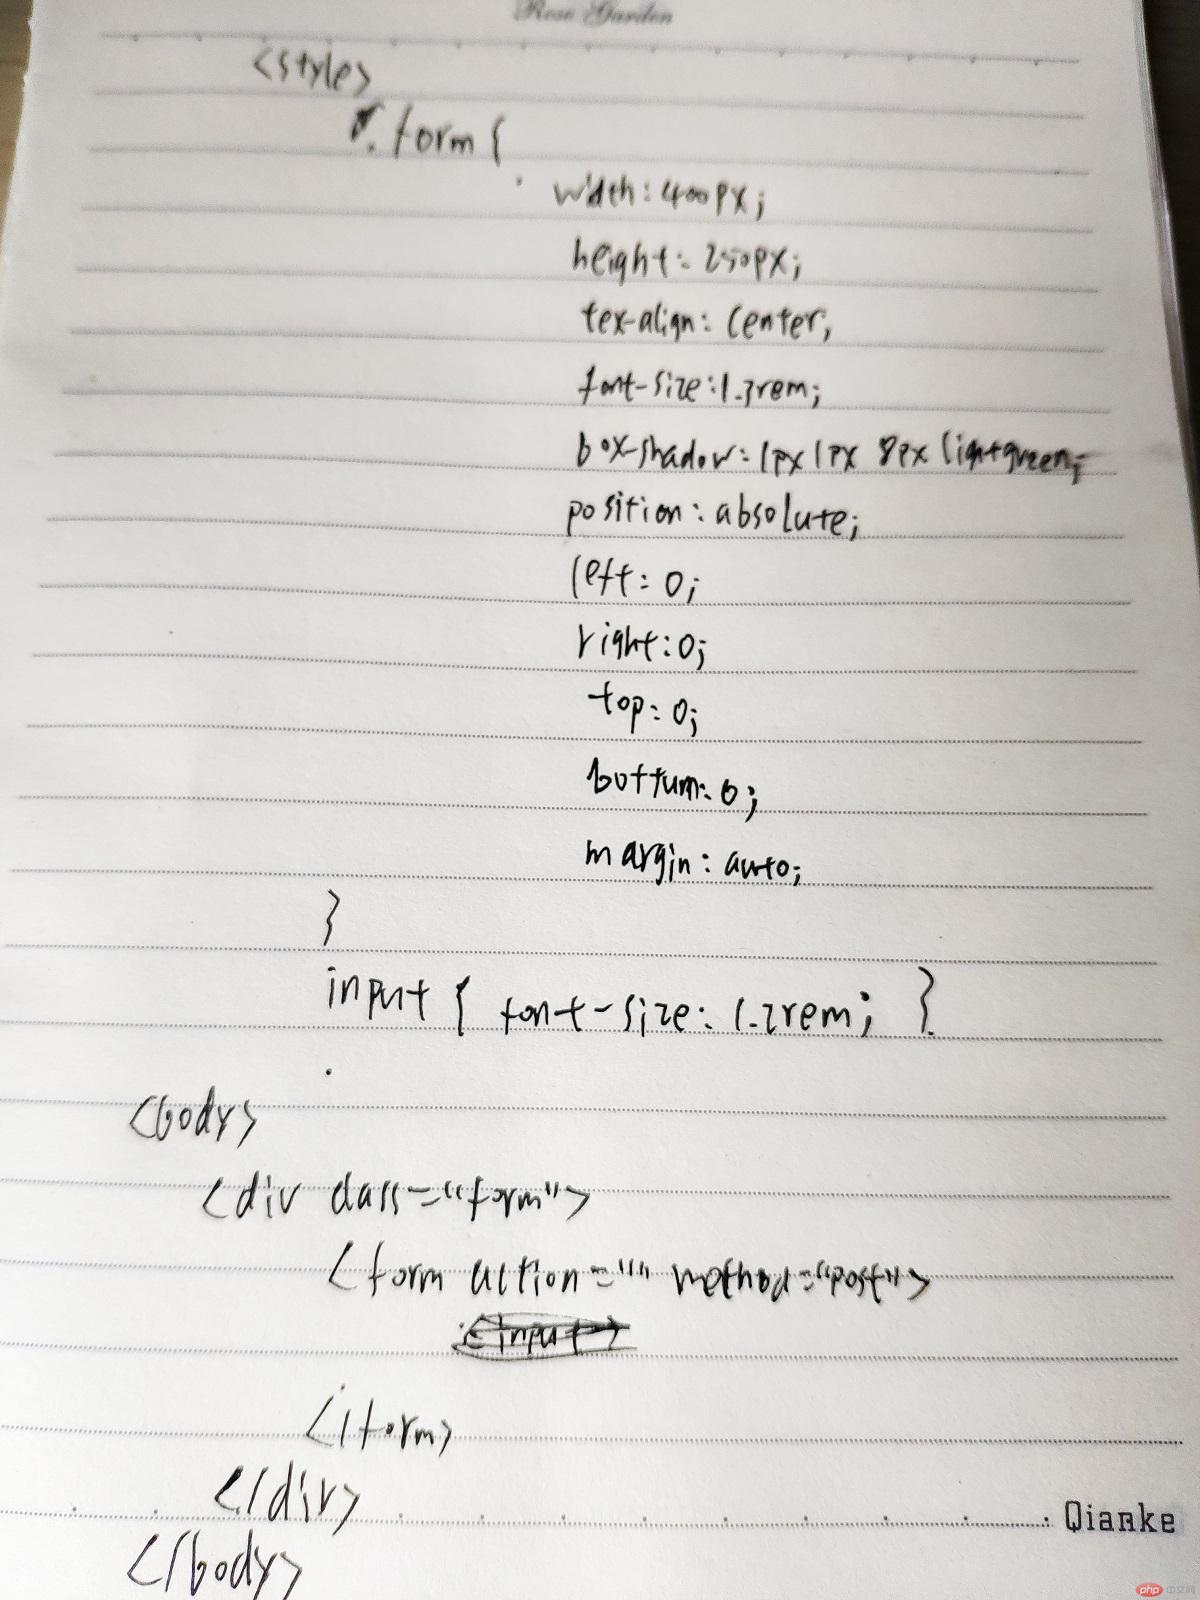
3. 使用绝对定位,实现用户登录框在页面中始终居中显示
<!DOCTYPE html>
<html lang="en">
<head>
    <meta charset="UTF-8">
    <title>用户登录</title>
    <style>
        .form {
            width: 400px;
            height: 250px;
            text-align: center;
            font-size: 1.3rem;
            box-shadow: 1px 1px 8px lightseagreen;
            position: absolute;
            left: 0;
            right: 0;
            top: 0;
            bottom: 0;
            margin: auto;
        }
        input {
            font-size: 1.2rem;
        }
        button {
            font-size: 1.2rem;
            padding: 6px 12px;
            color: white;
            background-color: lightblue;
            letter-spacing: 5px;
            margin-left: -24%;
        }
    </style>
</head>
<body>
<div class="form">
    <form action="" method="post">
        <p>
            <label for="username">账号:</label>
            <input type="text" name="username" id="username" placeholder="请输入账号" required>
        </p>
        <p>
            <label for="password">密码:</label>
            <input type="password" name="password" id="password" placeholder="不少于6位" required>
        </p>
        <p>
            <button>登录</button>
        </p>
    </form>
</div>
</body>
</html>点击 "运行实例" 按钮查看在线实例

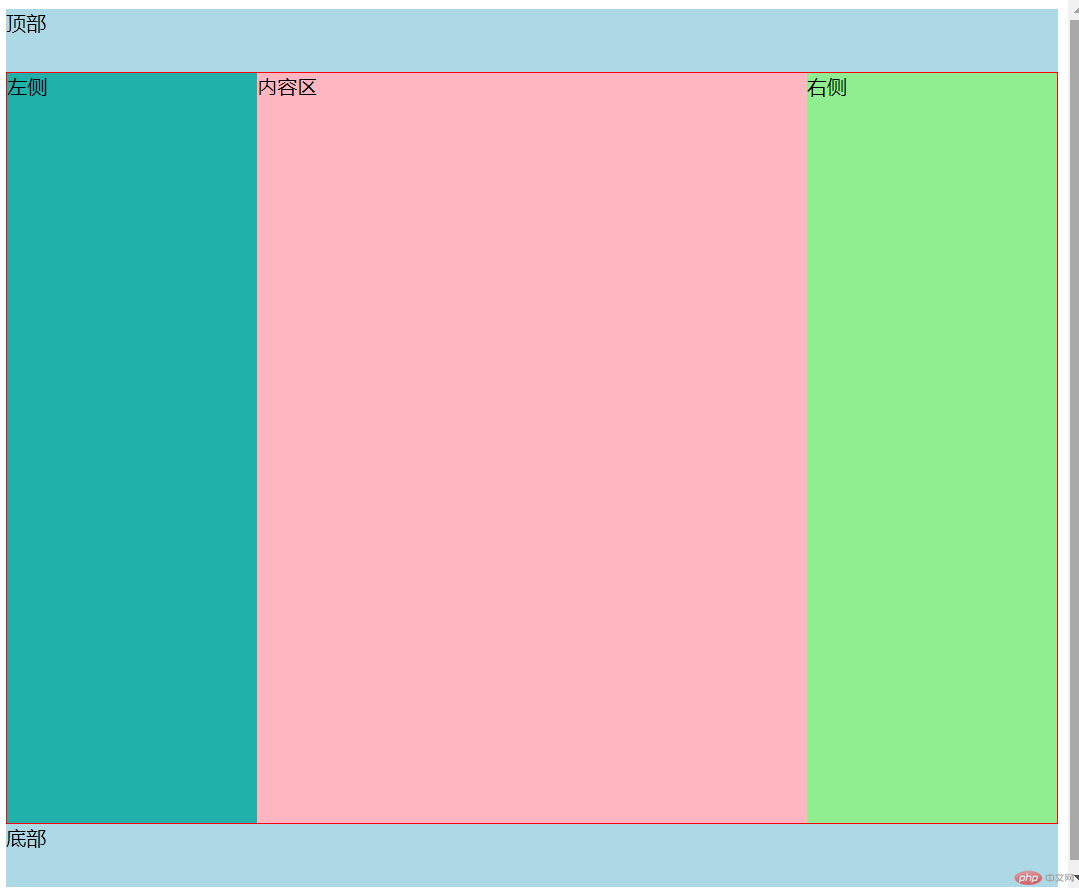
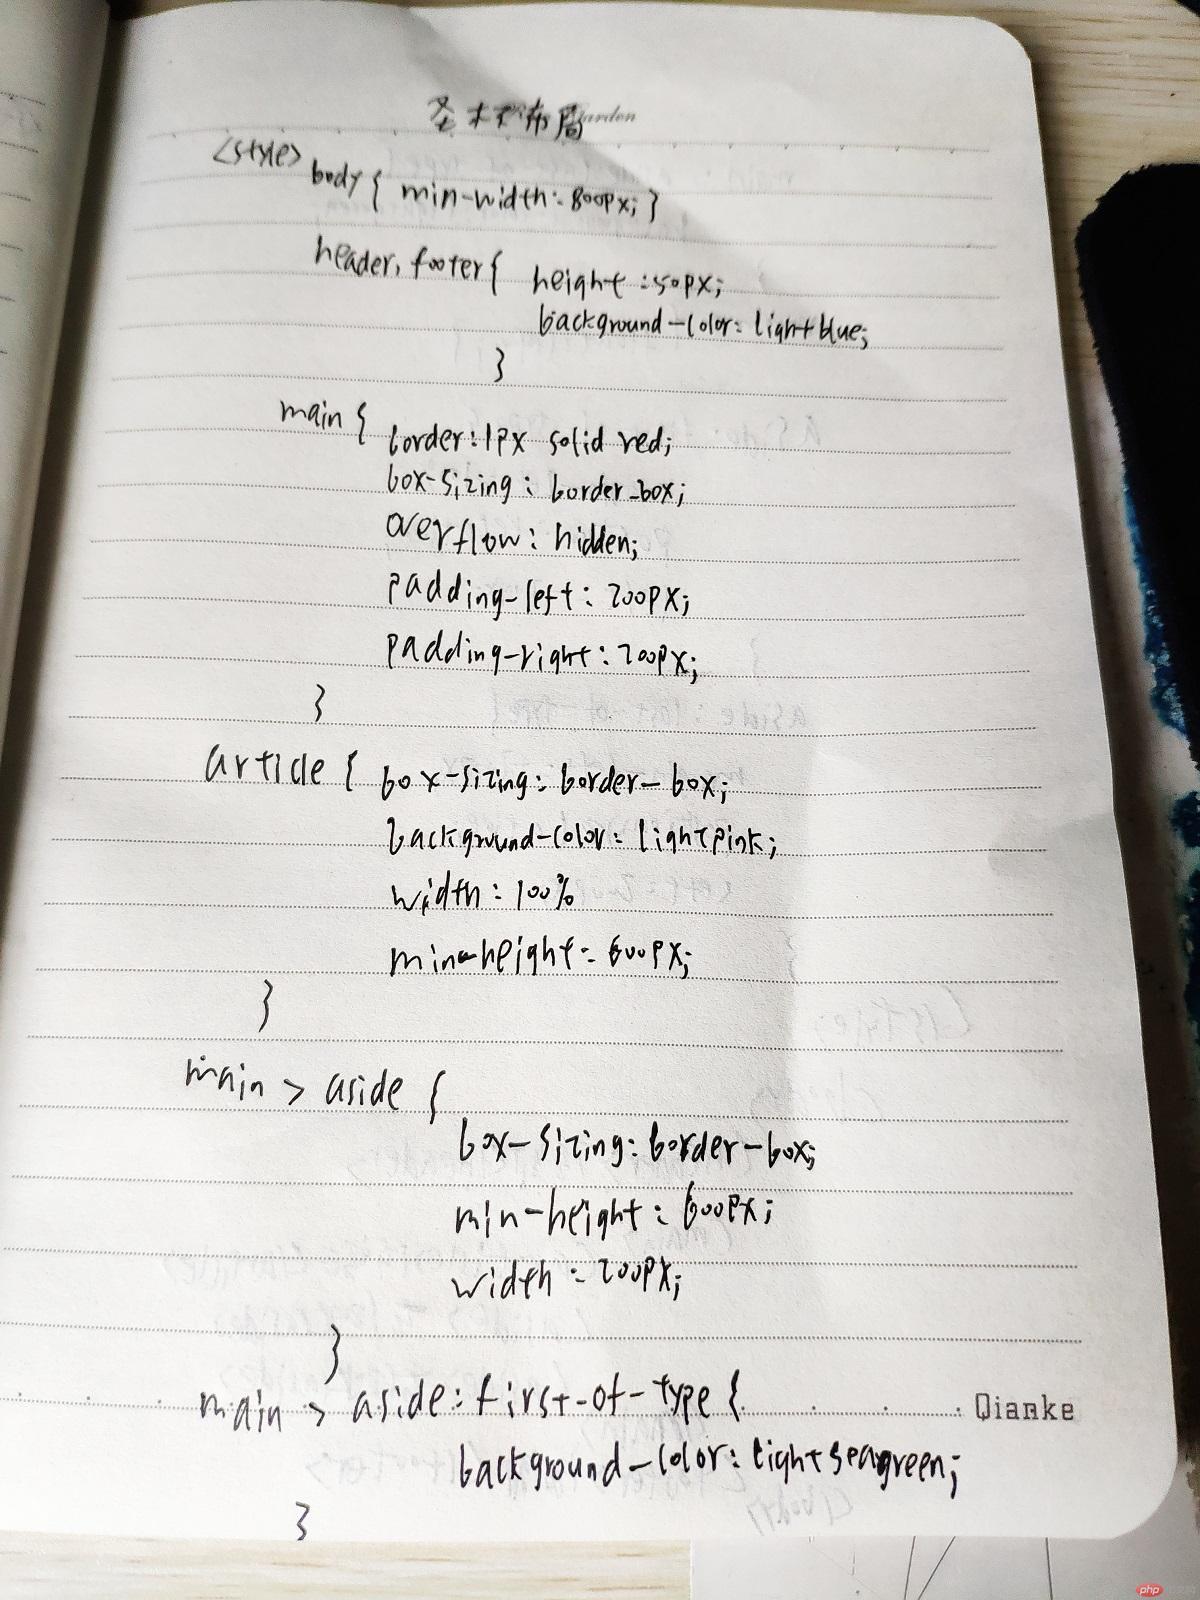
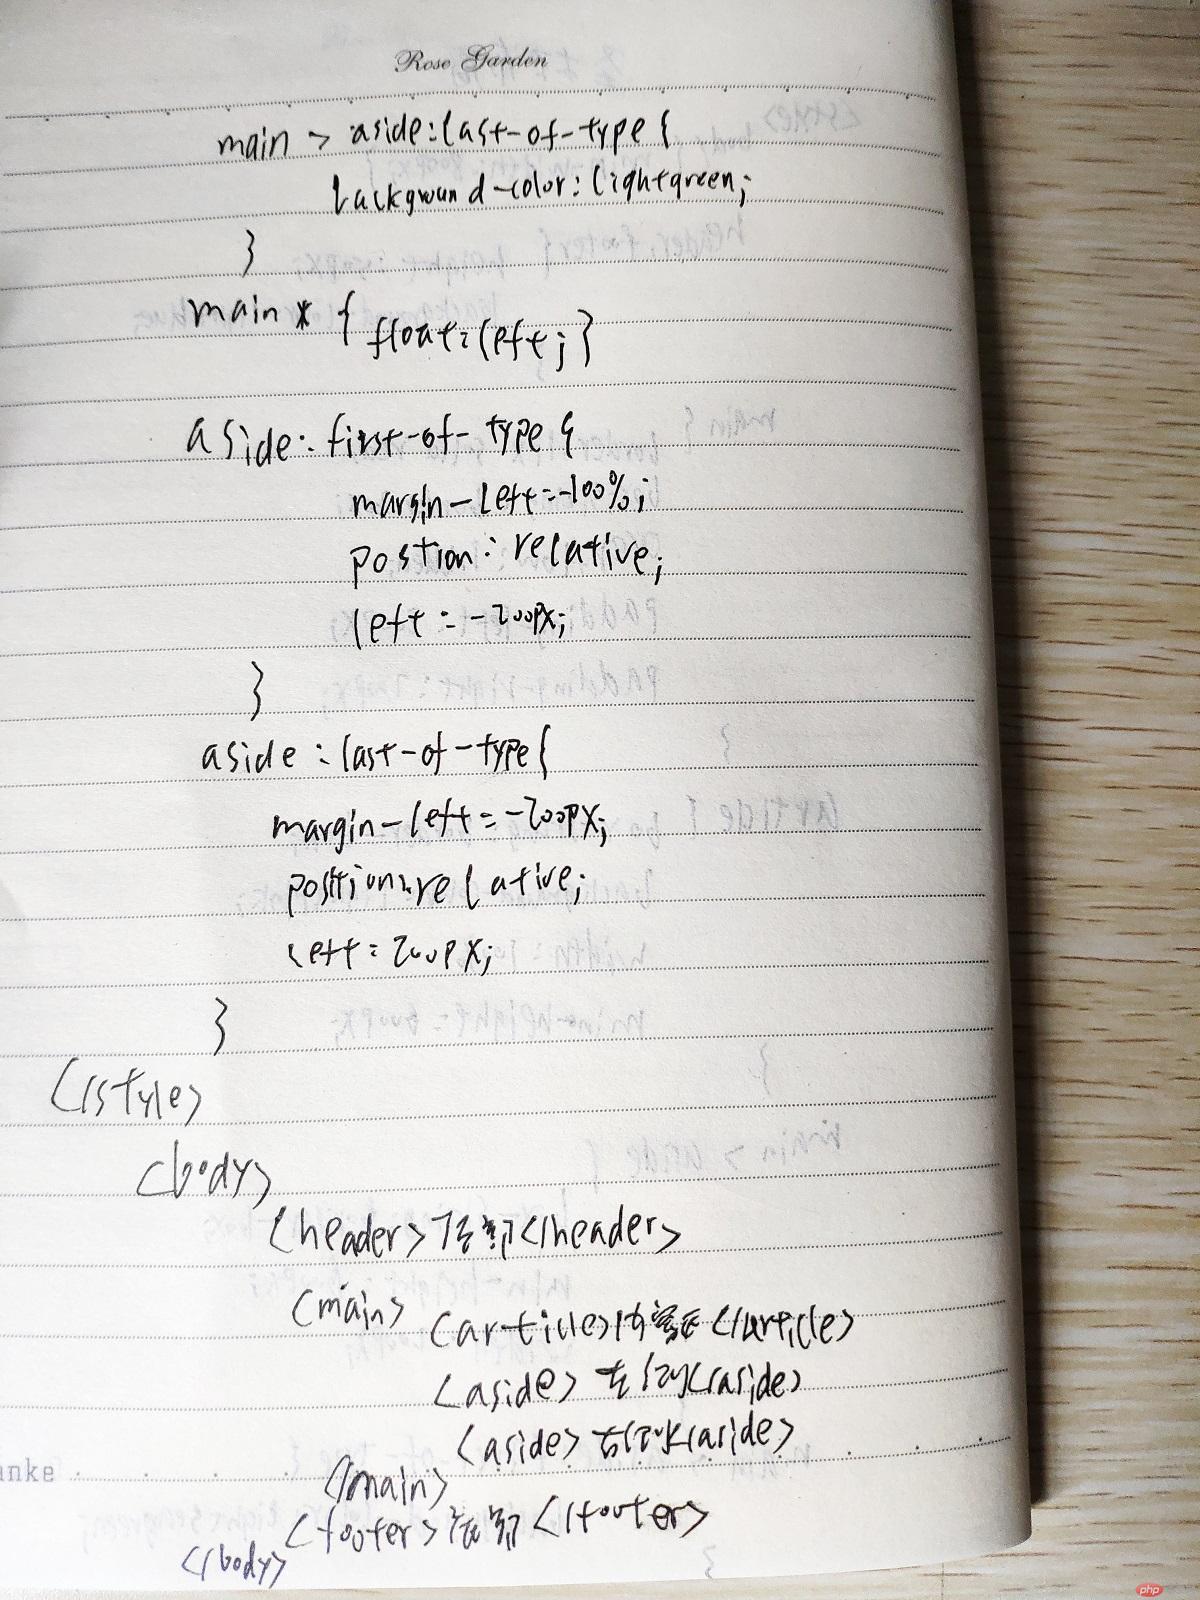
4. 模仿课堂案例, 实现圣杯布局,并写出完整流程与布局思路
完整流程:首先设置中间内容区与左右两侧内容区,然后设置盒子的左右内边距,接着将中间内容区充满盒子内容区,最后通过相对定位使左右两侧内容区分别移动到左右内边距中。
布局思路:圣杯布局是在父元素上设置了padding-left和padding-right,再给左右两边的内容设置position为relative,通过左移和右移来使得左右两边的内容得以很好的展现
<!DOCTYPE html>
<html lang="en">
<head>
    <meta charset="UTF-8">
    <title>圣杯布局</title>
    <style>
        body {
            min-width: 800px;
        }
        header, footer {
            height: 50px;
            background-color: lightblue;
        }
        main {
            border: 1px solid red;
            box-sizing: border-box;
            /*将main转为BFC块, 使浮动元素包含在内, 撑开父级*/
            overflow: hidden;
            padding-left: 200px;
            padding-right: 200px;
        }
        article {
            box-sizing: border-box;
            background-color: lightpink;
            width: 100%;
            min-height: 600px;
        }
        main > aside {
            box-sizing: border-box;
            min-height: 600px;
            width: 200px;
        }
        main > aside:first-of-type {
            background-color: lightseagreen;
        }
        main > aside:last-of-type {
            background-color: lightgreen;
        }
        main * {
            float: left;
        }
        aside:first-of-type {
            margin-left: -100%;
            position: relative;
            left: -200px;
        }
        aside:last-of-type {
            margin-left: -200px;
            position: relative;
            left: 200px;
        }
    </style>
</head>
<body>
<header>顶部</header>
<main>
    <article>内容区</article>
    <aside>左侧</aside>
    <aside>右侧</aside>
</main>
<footer>底部</footer>
</body>
</html>点击 "运行实例" 按钮查看在线实例
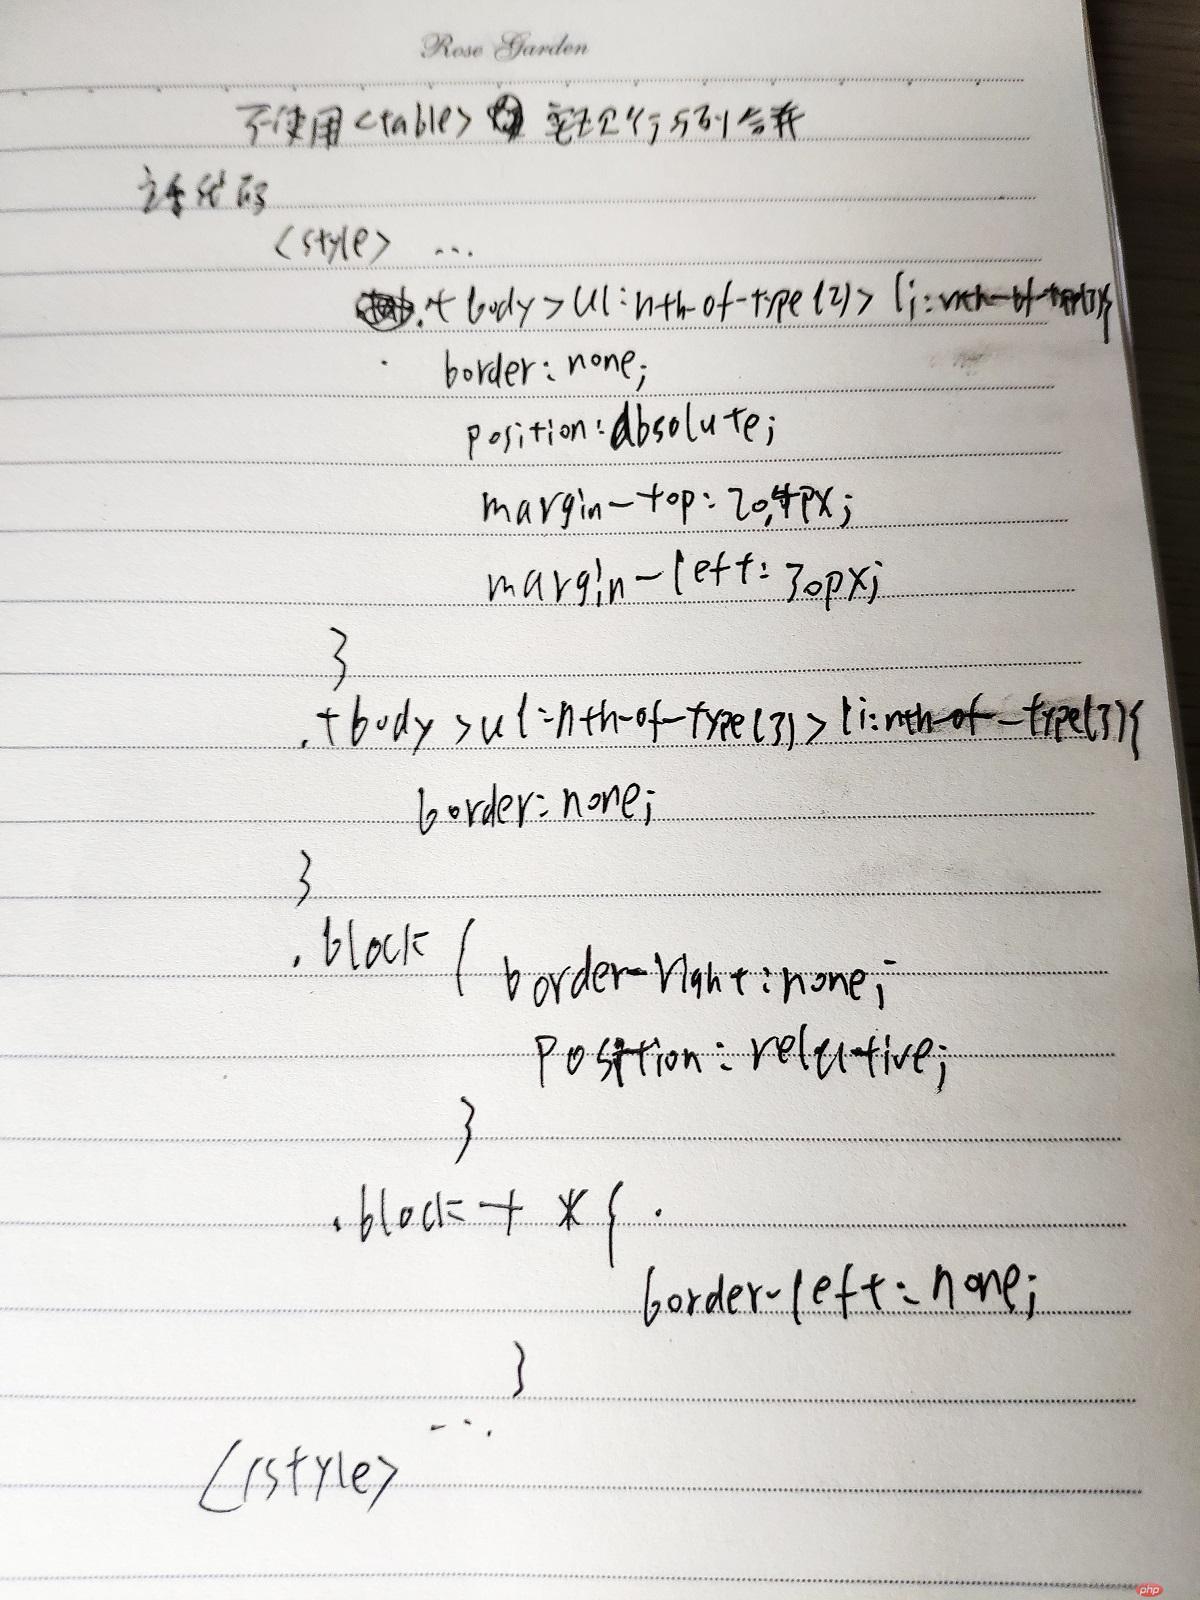
5. (选做): 不使用<table>...写表格时,如何实现行与列合并
<!DOCTYPE html>
<html lang="en">
<head>
    <meta charset="UTF-8">
    <title>课程表</title>
    <style>
        .table {
            /*以<table>标签样式显示*/
            display: table;
            box-sizing: border-box;
            /*折叠单元格的边框线,消除间隙*/
            border-collapse: collapse;
            border: 1px solid lightslategrey;
            width: 600px;
            margin: 30px auto;
            color: lightslategray;
            box-shadow: 1px 1px 6px lightcoral;
        }
        .caption {
            /*以<caption>标签样式显示*/
            display: table-caption;
            text-align: center;
            font-size: 1.6rem;
            font-weight: bold;
        }
        .thead {
            /*以<thead>标签样式显示*/
            display: table-header-group;
            text-align: center;
            font-size: 1.2rem;
            font-weight: bold;
            color: lightcoral;
            text-shadow: 1px 1px 0 black;
            background: linear-gradient(lightseagreen,white);
        }
        .tbody {
            /*以<tbody>标签样式显示*/
            display: table-row-group;
        }
        .tfoot {
            /*以<tfoot>标签样式显示*/
            display: table-footer-group;
            background: linear-gradient(to top, lavender, white);
        }
        /*将所有<div>下的<ul>转为<tr>标签样式*/
        div ul {
            display: table-row;
        }
        /*将所有的<li>转为<td>标签样式*/
        div ul > li {
            display: table-cell;
            border: 1px solid lightslategrey;
            text-align: center;
            padding: 10px;
        }
        .tbody > ul:nth-of-type(2) > li:nth-of-type(3) {
            border: none;
            position: absolute;
            margin-top: 20.4px;
            margin-left: 30px;
        }
        .tbody > ul:nth-of-type(3) > li:nth-of-type(3) {
            border: none;
        }
        .block {
            border-right: none;
            position: relative;
        }
        .block + * {
            border-left: none;
        }
    </style>
</head>
<body>
<div class="table">
    <p class="caption">课程表</p>
    <span class="thead">
    <ul>
        <li>星期一</li>
        <li>星期二</li>
        <li>星期三</li>
        <li>星期四</li>
        <li>星期五</li>
    </ul>
    </span>
    <span class="tbody">
    <ul>
        <li>语文</li>
        <li>数学</li>
        <li>英语</li>
        <li>语文</li>
        <li>数学</li>
    </ul>
    <ul>
        <li>音乐</li>
        <li>科学</li>
        <li>数学</li>
        <li>英语</li>
        <li>数学</li>
    </ul>
    <ul>
        <li>语文</li>
        <li>语文</li>
        <li></li>
        <li>体育</li>
        <li>数学</li>
    </ul>
    <ul>
        <li>科学</li>
        <li>英语</li>
        <li>体育</li>
        <li>数学</li>
        <li>语文</li>
    </ul>
    <ul>
        <li>语文</li>
        <li>英语</li>
        <li>劳动</li>
        <li>数学</li>
        <li>体育</li>
    </ul>
    <ul>
        <li>数学</li>
        <li>体育</li>
        <li>科学</li>
        <li>数学</li>
        <li>语文</li>
    </ul>
    </span>
    <span class="tfoot">
    <ul>
        <li class="block">自习</li>
        <li></li>
        <li>游戏</li>
        <li>自习</li>
        <li>游戏</li>
    </ul>
    </span>
</div>
</body>
</html>点击 "运行实例" 按钮查看在线实例
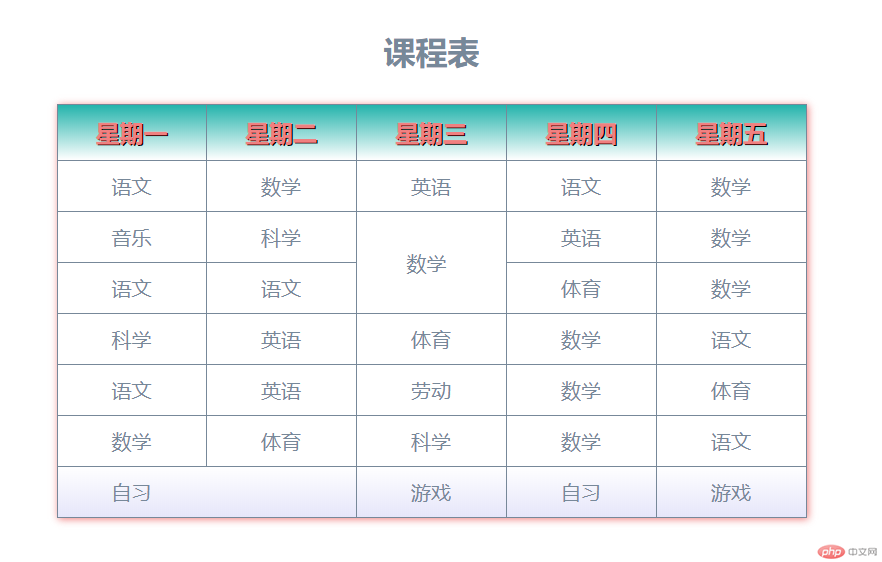
6. (选做): 将圣杯布局中的左右二列,使用绝对定位来实现
<!DOCTYPE html>
<html lang="en">
<head>
    <meta charset="UTF-8">
    <title>圣杯布局</title>
    <style>
        body {
            min-width: 800px;
        }
        header, footer {
            height: 50px;
            background-color: lightblue;
        }
        main {
            border: 1px solid red;
            box-sizing: border-box;
            /*将main转为BFC块, 使浮动元素包含在内, 撑开父级*/
            overflow: hidden;
            padding-left: 200px;
            padding-right: 200px;
            /*添加相对定位*/
            position: relative;
        }
        article {
            box-sizing: border-box;
            background-color: lightpink;
            width: 100%;
            min-height: 600px;
        }
        main > aside {
            box-sizing: border-box;
            min-height: 600px;
            width: 200px;
        }
        main > aside:first-of-type {
            background-color: lightseagreen;
        }
        main > aside:last-of-type {
            background-color: lightgreen;
        }
        main * {
            float: left;
        }
        aside:first-of-type {
            position: absolute;
            left: 0;
        }
        aside:last-of-type {
            position: absolute;
            right: 0;
        }
    </style>
</head>
<body>
<header>顶部</header>
<main>
    <article>内容区</article>
    <aside>左侧</aside>
    <aside>右侧</aside>
</main>
<footer>底部</footer>
</body>
</html>点击 "运行实例" 按钮查看在线实例

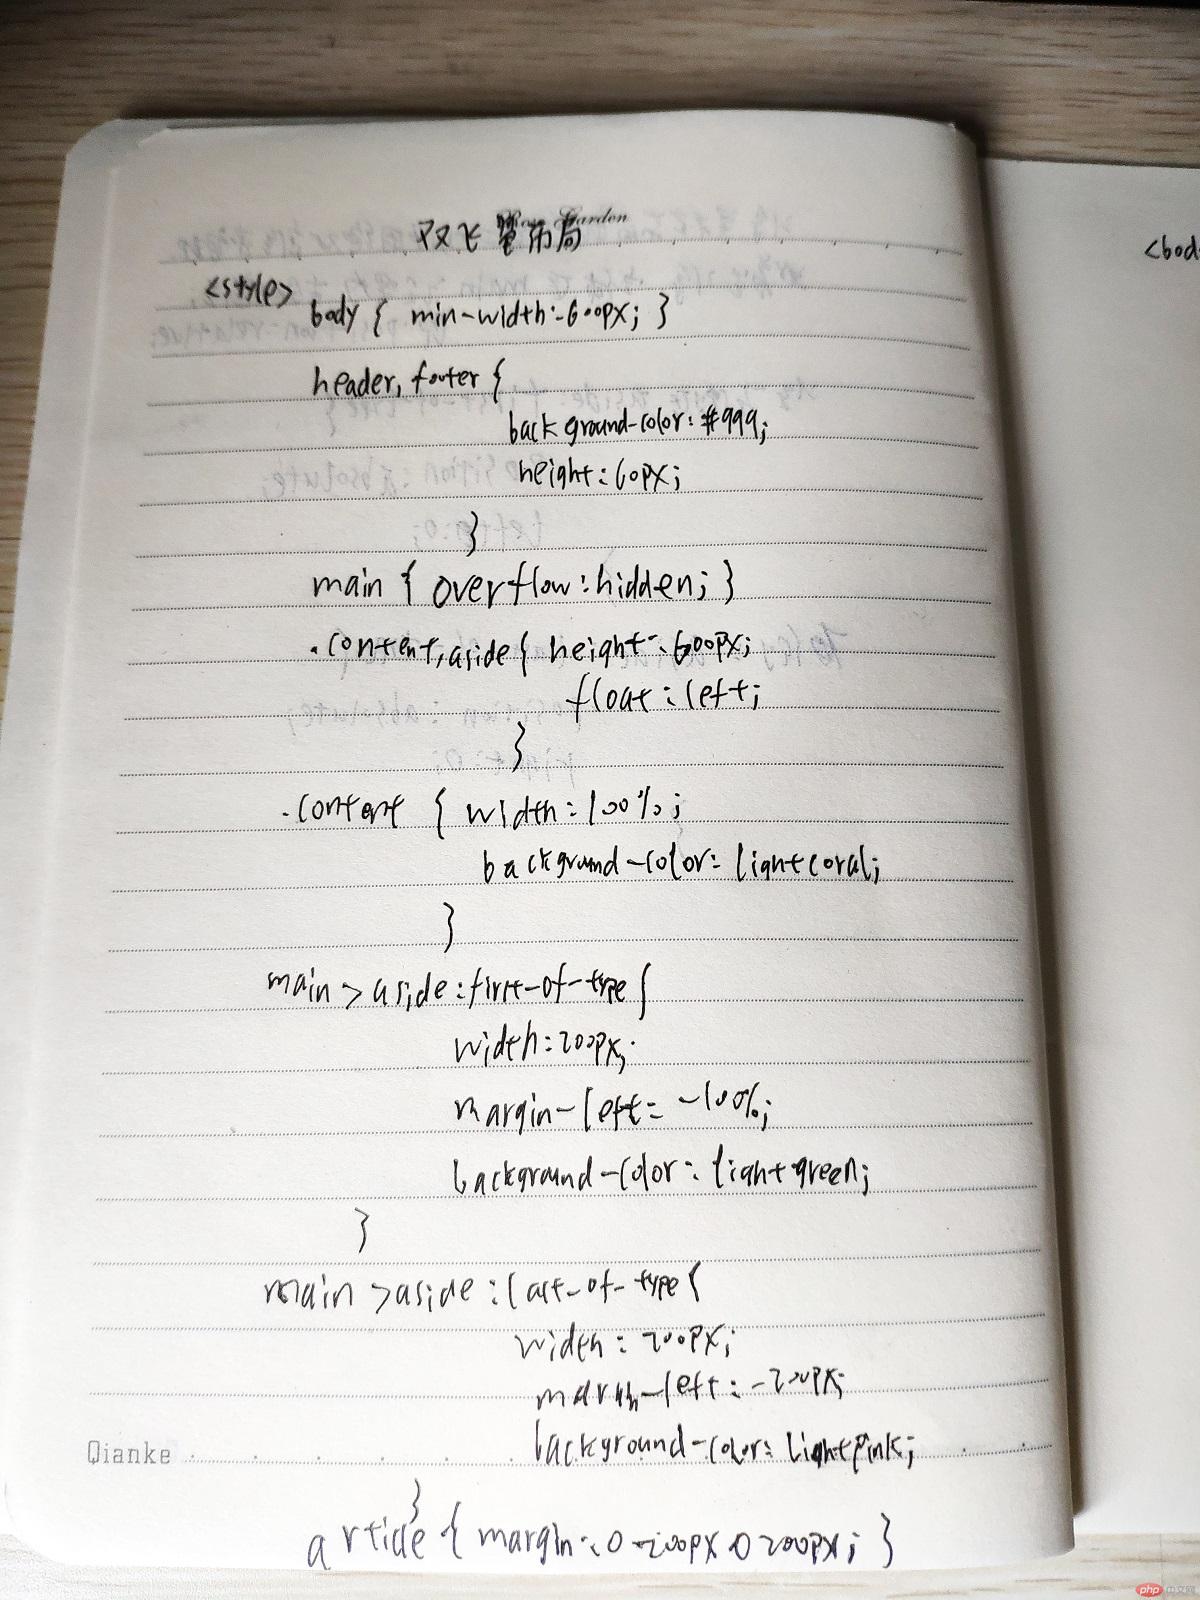
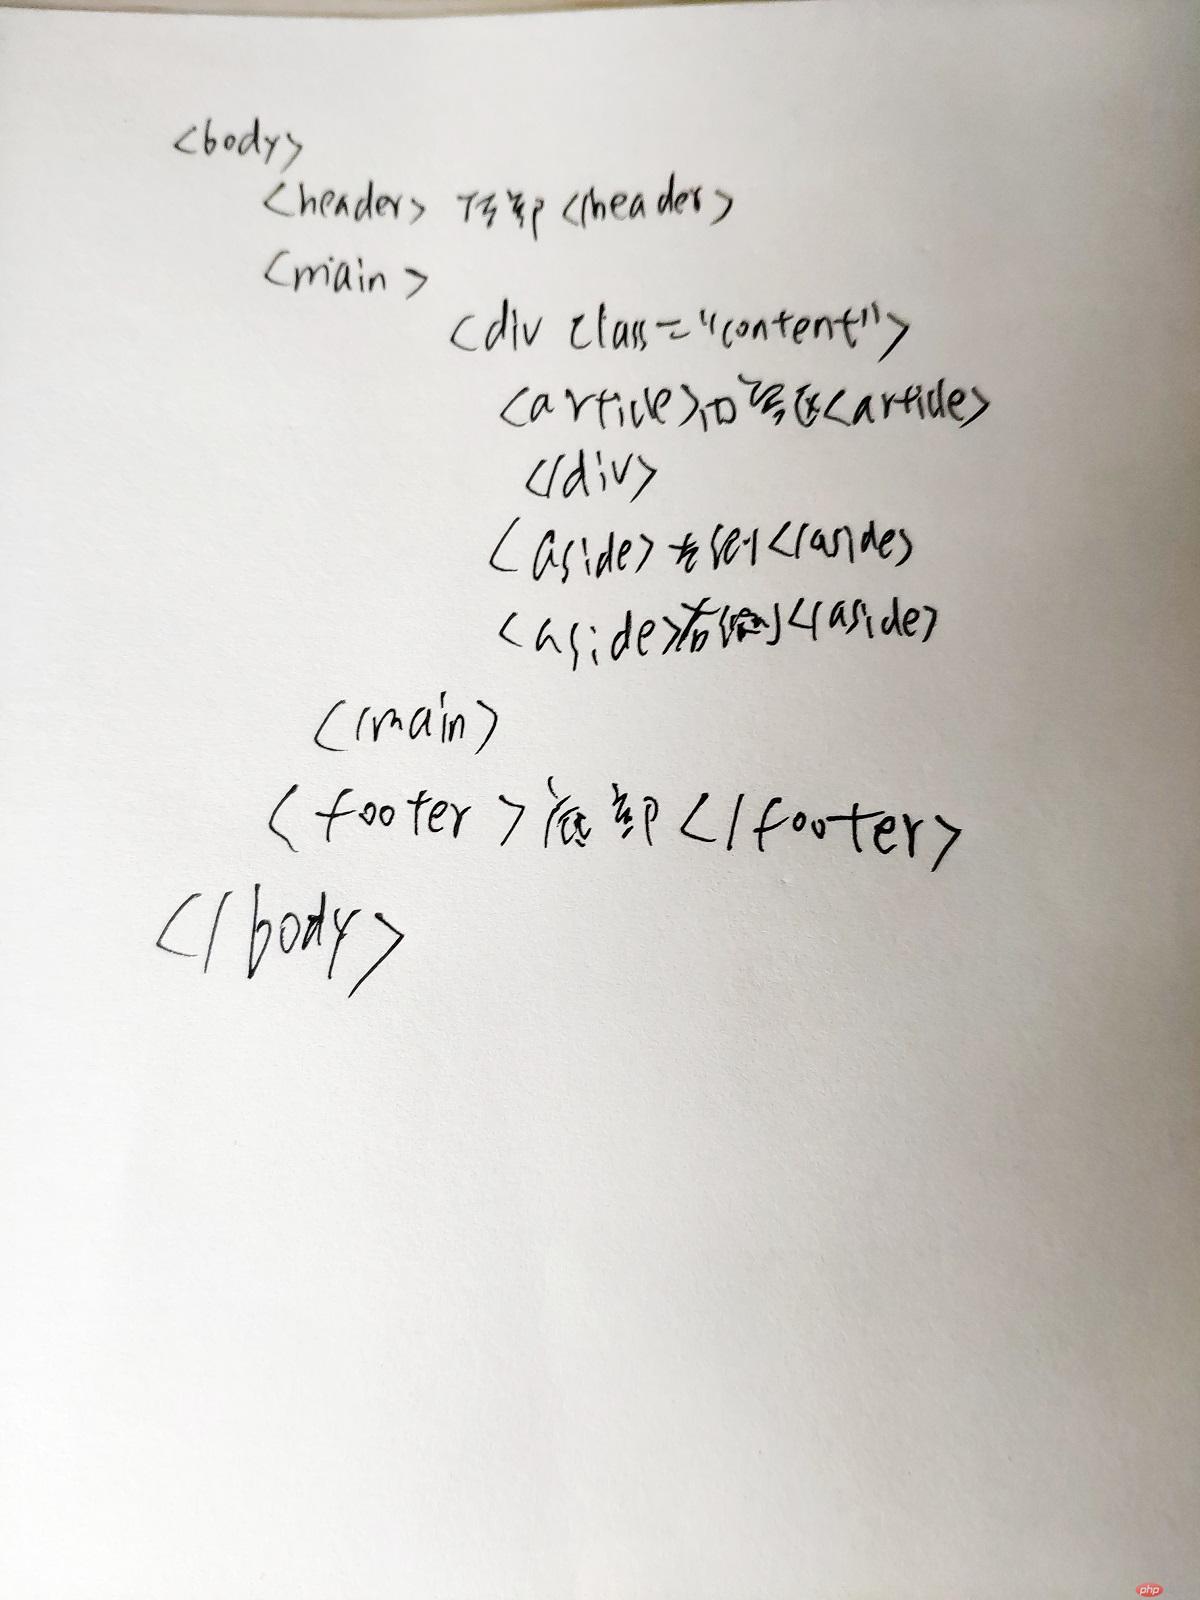
7. (选做): 与圣杯类似的"双飞翼"布局如何实现,并实例演示
实现:左侧、右侧和中间内容区都设置左浮动,设置中间内容区宽度为100%,设置负边距,左侧设置负边距为100%,右侧设置负边距为自身宽度,设置内容区的margin值为左右两个侧栏留出空间,margin值大小为left和right宽度。
<!DOCTYPE html>
<html lang="en">
<head>
    <meta charset="UTF-8">
    <title>双飞翼布局</title>
    <style>
        body {
            min-width: 600px;
        }
        header, footer {
            background-color: #999;
            height: 60px;
        }
        main {
            overflow: hidden;
        }
        .content, aside {
            height: 600px;
            float: left;
        }
        .content {
            width: 100%;
            background-color: lightcoral;
        }
        main > aside:first-of-type {
            width: 200px;
            margin-left: -100%;
            background-color: lightgreen;
        }
        main > aside:last-of-type {
            width: 200px;
            margin-left: -200px;
            background-color: lightpink;
        }
        article {
            margin: 0 200px 0 200px;
        }
    </style>
</head>
<body>
<header>顶部</header>
<main>
    <div class="content">
    <article>内容区</article>
    </div>
    <aside>左侧</aside>
    <aside>右侧</aside>
</main>
<footer>底部</footer>
</body>
</html>点击 "运行实例" 按钮查看在线实例

8. 总结
学会了表格的样式控制和用CSS模拟实现表格,学会了元素的定位,实现了圣杯布局和双飞翼布局。