Correction status:qualified
Teacher's comments:作业非常认真, 总结也很好, 就是太简略了


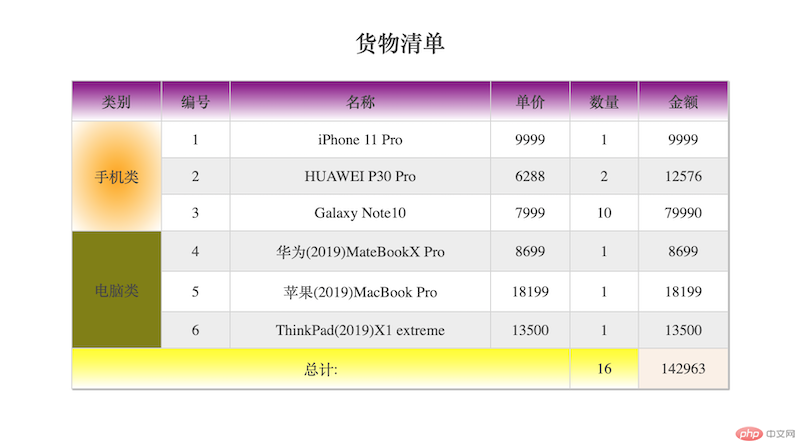
1.制作一张商品信息表,内容自定,要求用到行与列的合并
<!DOCTYPE html>
<html lang="en">
<head>
    <meta charset="UTF-8">
    <title>制作一张商品信息表,内容自定,要求用到行与列的合并</title>
    <link rel="stylesheet" href="static/css/style1.css">
</head>
<body>
    <table>
        <caption><h3>货物清单</h3></caption>
        <!--表头-->
        <thead>
            <tr>
                <th>类别</th>
                <th>编号</th>
                <th>名称</th>
                <th>单价</th>
                <th>数量</th>
                <th>金额</th>
            </tr>
        </thead>
        <!--主体-->
        <tbody>
            <tr>
                <td rowspan="3" align="center">手机类</td>
                <td>1</td>
                <td>iPhone 11 Pro</td>
                <td>9999</td>
                <td>1</td>
                <td>9999</td>
            </tr>
            <tr>
                <td>2</td>
                <td>HUAWEI P30 Pro</td>
                <td>6288</td>
                <td>2</td>
                <td>12576</td>
            </tr>
            <tr>
                <td>3</td>
                <td>Galaxy Note10</td>
                <td>7999</td>
                <td>10</td>
                <td>79990</td>
            </tr>
            <tr>
                <td rowspan="3" align="center">电脑类</td>
                <td>4</td>
                <td>华为(2019)MateBookX Pro</td>
                <td>8699</td>
                <td>1</td>
                <td>8699</td>
            </tr>
            <tr>
                <td>5</td>
                <td>苹果(2019)MacBook Pro</td>
                <td>18199</td>
                <td>1</td>
                <td>18199</td>
            </tr>
            <tr>
                <td>6</td>
                <td>ThinkPad(2019)X1 extreme</td>
                <td>13500</td>
                <td>1</td>
                <td>13500</td>
            </tr>
        </tbody>
        <!--页眉-->
        <tfoot>
        <tr>
            <td colspan="4" align="center">总计:</td>
            <td>16</td>
            <td>142963</td>
        </tr>
        </tfoot>
    </table>
</body>
</html>
点击 "运行实例" 按钮查看在线实例
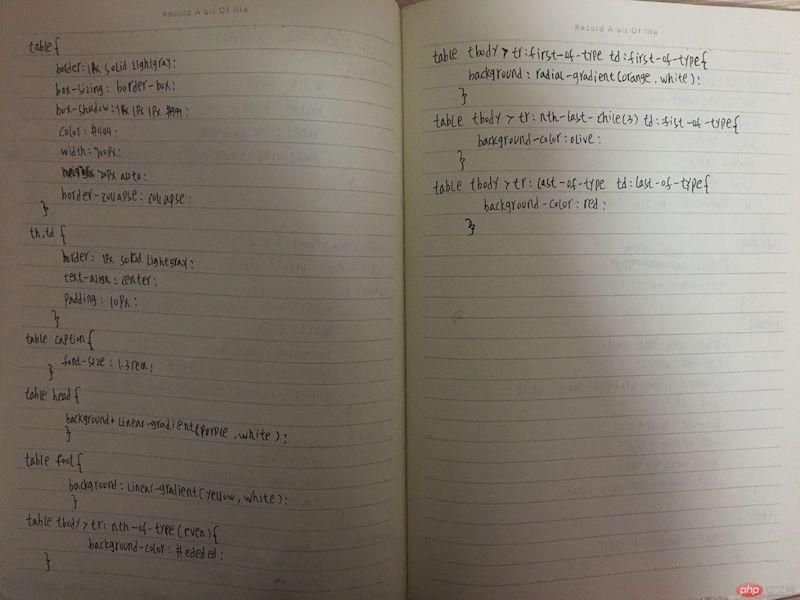
table{
    border: 1px solid lightgray;
    box-sizing: border-box;
    box-shadow: 1px 1px 1px #999 ;
    color: #444;
    width: 700px;
    margin: 20px auto;
    border-collapse: collapse;
}

th,td{
    border: 1px solid lightgray;
    text-align: center;
    padding: 10px;
}

table caption{
    font-size: 1.3rem;
}

table thead{
    background: linear-gradient(purple,white);
}

table tfoot{
    background: linear-gradient(yellow,white);
}

table tbody > tr:nth-of-type(even){
    background-color: #ededed;
}

table tbody > tr:first-of-type td:first-of-type{
    background: radial-gradient(orange, white);
}

table tbody > tr:nth-last-child(3) td:first-of-type{
    background-color: olive;
}

table tfoot > tr:last-of-type td:last-of-type{
    background-color: linen;
}
效果图
手抄代码
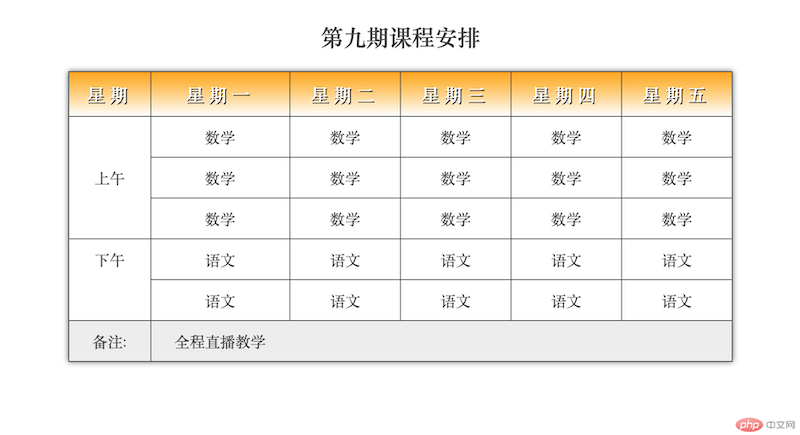
2使用<div><span><p><ul>...等标签来制作一张课程表
<!DOCTYPE html>
<html lang="en">
<head>
    <meta charset="UTF-8">
    <title>使用div、span、p、ul 等标签来制作一张课程表 </title>
    <link rel="stylesheet" href="static/css/style2.css">
</head>
<body>
    <div class="table">
        <h2 class="caption">第九期课程安排</h2>
        <section class="thead">
            <ul>
                <li>星期</li>
                <li>星期一</li>
                <li>星期二</li>
                <li>星期三</li>
                <li>星期四</li>
                <li>星期五</li>
            </ul>
        </section>
        <section class="tbody">
            <ul>
                <li class="yincang1"></li>
                <li>数学</li>
                <li>数学</li>
                <li>数学</li>
                <li>数学</li>
                <li>数学</li>
            </ul>
            <ul>
                <li class="yincang2">上午</li>
                <li>数学</li>
                <li>数学</li>
                <li>数学</li>
                <li>数学</li>
                <li>数学</li>
            </ul>
            <ul>
                <li></li>
                <li>数学</li>
                <li>数学</li>
                <li>数学</li>
                <li>数学</li>
                <li>数学</li>
            </ul>
            <ul>
                <li class="yincang3">下午</li>
                <li>语文</li>
                <li>语文</li>
                <li>语文</li>
                <li>语文</li>
                <li>语文</li>
            </ul>
            <ul>
                <li></li>
                <li>语文</li>
                <li>语文</li>
                <li>语文</li>
                <li>语文</li>
                <li>语文</li>
            </ul>
        </section>
        <section class="tfoot">
            <ul>
                <li>备注:</li>
                <li class="textCenter">全程直播教学</li>
                <li></li>
                <li></li>
                <li></li>
                <li></li>
            </ul>
        </section>
    </div>
</body>
</html>
点击 "运行实例" 按钮查看在线实例
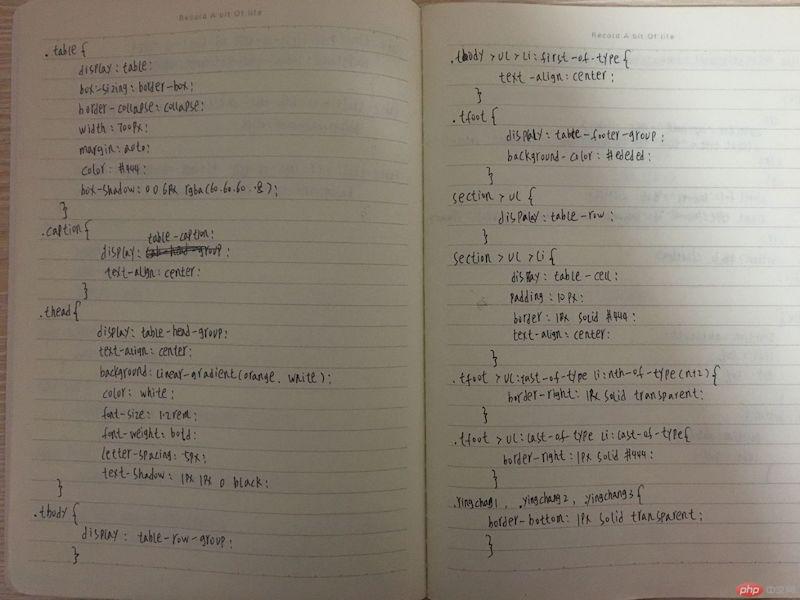
.table{
    display: table;
    box-sizing: border-box;
    border-collapse: collapse;
    width: 700px;
    margin: auto;
    color: #444444;
    box-shadow: 0 0 6px rgba(60,60,60,.8);
}

.caption{
    display: table-caption;
    text-align: center;
}

.thead{
    display: table-header-group;
    text-align: center;
    background: linear-gradient(orange,white);
    color: white;
    font-size: 1.2rem;
    font-weight: bold;
    letter-spacing: 5px;
    text-shadow: 1px 1px 0 black;
}

.tbody{
    display: table-row-group;
}

.tbody > ul > li:first-of-type {
    text-align: center;
}

.tfoot{
    display: table-footer-group;
    background-color: #ededed;
}

section > ul{
    display: table-row;
}

section > ul > li{
    display: table-cell;
    padding: 10px;
    border: 1px solid #444;
    text-align: center;
}

/*合并*/
.tfoot > ul:last-of-type li:nth-of-type(n+2){
    border-right: 1px solid transparent;
}

.tfoot > ul:last-of-type li:last-of-type{
    border-right: 1px solid #444444;
}

.yincang1 , .yincang2 , .yincang3{
    border-bottom: 1px solid transparent;
}
效果图
手抄代码
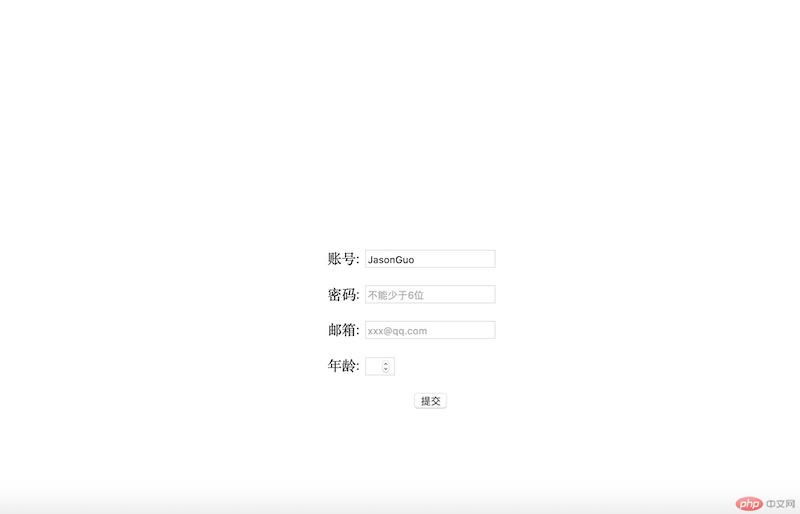
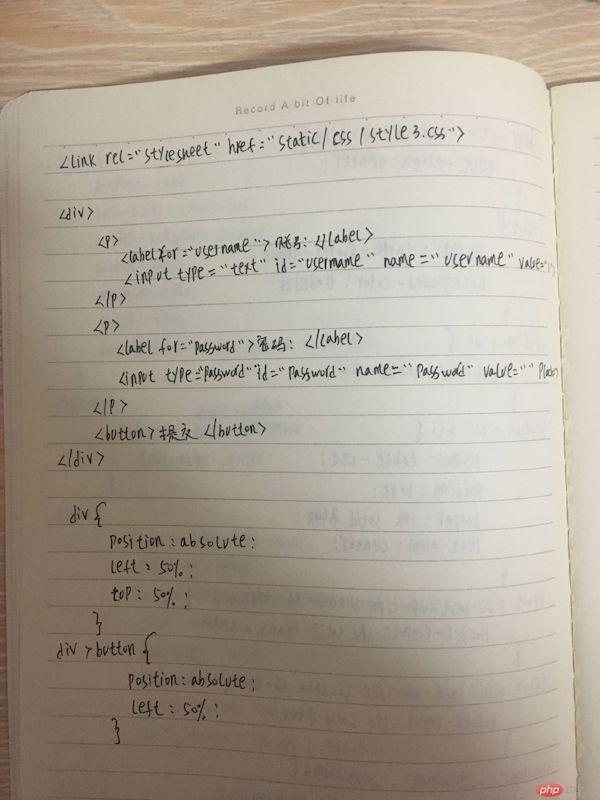
3.使用绝对定位,实现用户登录框在页面中始终居中显示
<!DOCTYPE html>
<html lang="en">
<head>
    <meta charset="UTF-8">
    <title>使用绝对定位,实现用户登录框在页面中始终居中显示</title>
    <link rel="stylesheet" href="static/css/style6.css">
</head>
<body>
    <div>
        <p>
            <label for="username">账号:</label>
            <input type="text" id="username" name="username" value="JasonGuo">
        </p>
        <p>
            <label for="password">密码:</label>
            <input type="password" id="password" name="password" value="" placeholder="不能少于6位">
        </p>
        <p>
            <label for="email">邮箱:</label>
            <input type="email" id="email" name="email" value="" placeholder="xxx@qq.com">
        </p>
        <p>
            <label for="age">年龄:</label>
            <input type="number" id="age" name="age" value="" min="16" max="80">
        </p>
        <button>提交</button>
    </div>
</body>
</html>
点击 "运行实例" 按钮查看在线实例
div{
    position: absolute;
    left: 50%;
    top: 50%;
}

div > button{
    position: absolute;
    left: 50%;
}
运行效果
手抄代码
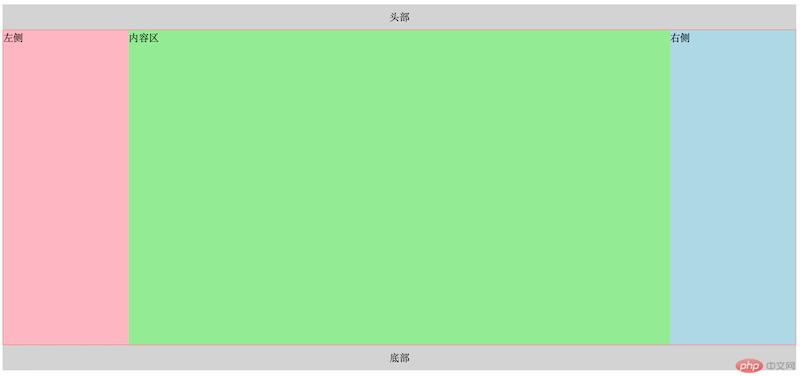
4.模仿课堂案例, 实现圣杯布局,并写出完整流程与布局思路
思路:
1.先将div分为头部,中间内容区域,尾部;
2.再将中间部分分为左边-中间-右边;
3.然后将主体内容设为浮动和相对定位 , 然后将主体区转为BFC块;
4.设置left的 margin-left: -100%和left: -200px,拉到最左侧;设置 margin-left: -220px; 把right拉回第一行,最后设置 right: -220px,拉到最右侧
<!DOCTYPE html>
<html lang="en">
<head>
    <meta charset="UTF-8">
    <title>模仿课堂案例, 实现圣杯布局,并写出完整流程与布局思路</title>
    <link rel="stylesheet" href="static/css/style5.css">
</head>
<body>
    <header>头部</header>
    <div id="box">
        <div id="contentDiv">内容区</div>
        <div id="leftDiv">左侧</div>
        <div id="rightDiv">右侧</div>
    </div>
    <footer>底部</footer>
</body>
</html>
点击 "运行实例" 按钮查看在线实例
header,footer{
    height: 40px;
    background-color: lightgray;
    line-height: 40px;
    text-align: center;
}

#box{
    border: 1px solid lightcoral;
    box-sizing: border-box;
    overflow: auto;
    padding-left: 200px;
    padding-right: 200px;
}

#contentDiv{
    background-color: lightgreen;
    min-height: 500px;
    width: 100%;
    float: left;
    box-sizing: border-box;
}

#leftDiv{
    background-color: lightpink;
    min-height: 500px;
    width: 200px;
    float: left;
    position: relative;
    left: -200px;
    margin-left: -100%;
    box-sizing: border-box;
}

#rightDiv{
    background-color: lightblue;
    min-height: 500px;
    width: 200px;
    float: left;
    position: relative;

    left: 200px;
    margin-left: -200px;
    box-sizing: border-box;
}
运行效果
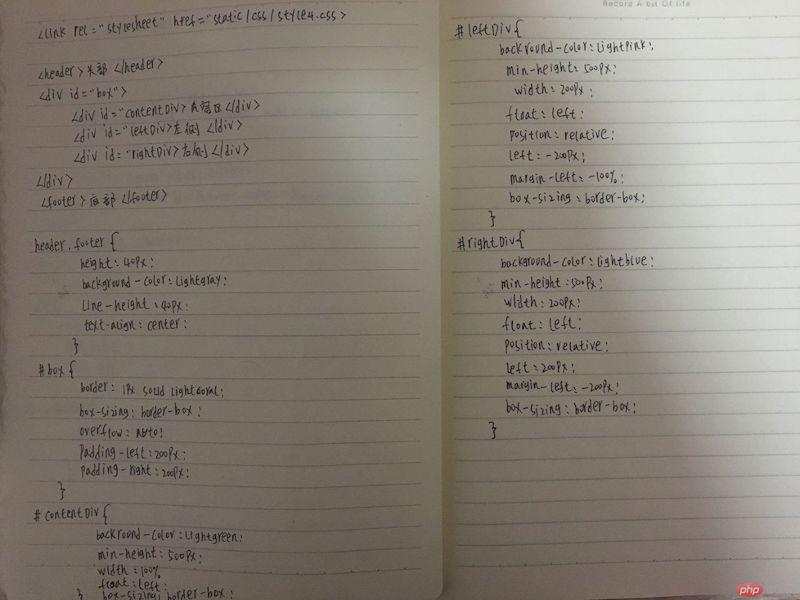
手抄代码
总结:
1、display属性可以设置页面元素的显示类型,使用起来更加灵活通用;
2、左浮动和右浮动,浮动只会对后面的元素造成影响,浮动元素是块级元素,当子元素浮动时,会导致父元素失去高度而折叠可以通过添加伪元素::after, 给父元素添加overflow属性转为BFC块,使其计算高度时包括浮动元素。
3、学习了元素的定位,a.默认为静态定位,垂直独占一行,水平自动换行;b.相对定位,必须设置偏移量才生效,在本身位置上偏移;c.绝对定位,完全从文档流中接管元素的定位权, 既彻底脱离了文档流;d.固定定位,始终会出现在窗口可视区域内,适用于广告导航。
4.学习了圣杯布局