Correction status:qualified
Teacher's comments:这些布局方案, 看上去是不是有点麻烦呢, 你可能会想明明有更简单的定位不去用,非要这样搞, 放心, 这些都是前端前辈大神苦心研究出来的, 时间长了, 你就体会出他们的良苦用心了


作业一
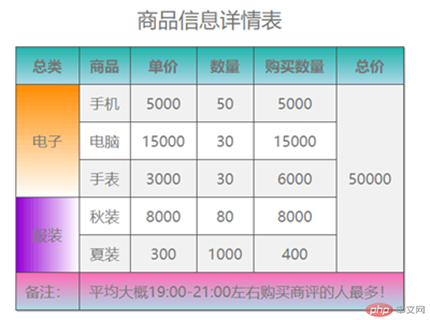
1、设置表格的样式和背景颜色
2、在html中合并关键词 rowspan="3"
3、odd代表着基数 上下合并的技巧<td colspan="3" rowspan="5" >50000</td>
/*写表格样式*/
table{
    /*border: 1px solid #666;*/
    color: #777;
    box-sizing: border-box;
    box-shadow: 1px 1px 1px #999;
    /*将表格中的边框折叠*/
    border-collapse: collapse;
}

td,th{
    /*背景样式设置*/
    border: 1px solid #444;
    /*文字居中*/
    text-align: center;

    /*给每个单元格添加内边距*/
    padding: 10px;
}

table{
    /  *表格的宽度*/
    width: 700px;

    /*表格居中和上下间距*/
    margin: 20px auto;
}

table caption{
    /*表格的标题*/
    font-size: 1.4rem;
    /*表格间距*/
    margin-bottom: 15px;
}

/*文本居中或者是文本对齐的方式*/
th,td{

}

/*隔行变色 odd基数*/
tbody tr:nth-of-type(odd){
    background-color: #edededcd;
}

/*表头渐变色*/
table thead > tr:first-child{
    background: linear-gradient(lightseagreen,lightblue);
}

/*脚部渐变色*/
table tfoot > tr:first-of-type{
    background: linear-gradient(hotpink,lightblue);
}

/*设置电子单元格的背景色*/
table tbody > tr:first-of-type > td:first-of-type{
    background:linear-gradient(darkorange,white);
}

/*设置服装单元格的背景色*/
table tbody > tr:nth-last-of-type(2) > td:first-of-type{
    background: linear-gradient(to right, darkviolet,white);
}
作业二
<!DOCTYPE html>
<html lang="en">
<head>
    <meta charset="UTF-8">
    <title>张大侠的课程表</title>
    <link rel="stylesheet" href="/static4/css/style2.css">
</head>
<body>
<article class="table">
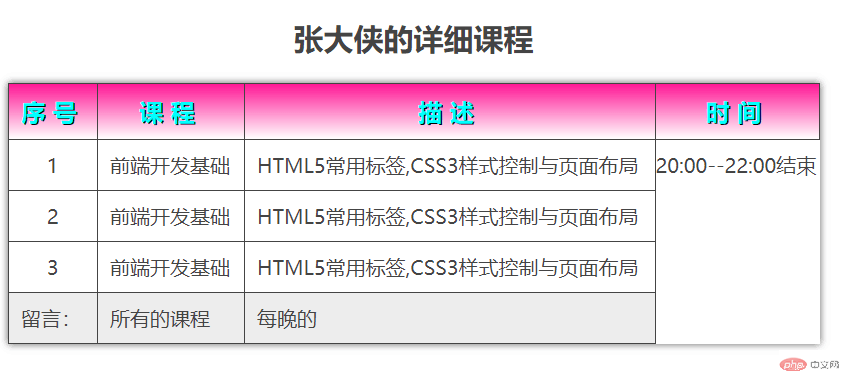
    <h2 class="caption">张大侠的详细课程</h2>
    <section  class="thead" >
    <div>
        <p>序号</p>
        <p>课程</p>
        <p>描述</p>
        <p colspan="3" >时间</p>
    </div>

    </section>
    <section class="tbody">
<div >
    <p>1</p>
    <p>前端开发基础</p>
    <p>HTML5常用标签,CSS3样式控制与页面布局</p>
    <span >20:00--22:00结束</span>
</div>

<div>
    <p>2</p>
    <p>前端开发基础</p>
    <p>HTML5常用标签,CSS3样式控制与页面布局</p>

</div>
<div>
    <p >3</p>
    <p>前端开发基础</p>
    <p>HTML5常用标签,CSS3样式控制与页面布局</p>

</div>
    </section>

    <section class="tfoot">
<div >

    <p>留言:</p>
    <p>所有的课程</p>
    <p>每晚的</p>

</div>

.table {
    /*以<table>标签样式显示*/
    display: table;

    /*设置表格的基本样式*/
    /*确保内部单元格如何变化,宽度总不变*/
    box-sizing: border-box;

    /*因为后面单元格也会设置边框,所以这里的边框只是可选*/
    /*border: 1px solid #444;*/

    /*折叠单元格之间的边框线, 消除间隙*/
    border-collapse: collapse;

    width: 650px;
    margin: auto;
    color: #444;

    /*设置表格的轮廓阴影向四周发散,使之更美观(可选)*/
    box-shadow: 0 0 6px rgba(60,60,60,.8);
}

.caption {
    /*以<caption>标签样式显示*/
    display: table-caption;
    text-align: center;
}

/*表头*/
.thead{
    display: table-row-group;

    text-align: center;
    font-weight: bold;
    font-size: 1.2rem;

    /*拉开字间距*/
    letter-spacing: 6px;
    /*背景色*/
    background: linear-gradient(deeppink,white);
    color:cyan;
    /*描边*/
    text-shadow: 1px 1px 0 black;
}

.tbody{
    /*序号列文本对齐*/
    display: table-row-group;

}

.tbody > div > p:first-of-type{
    text-align: center;
}


/*将所有的ul转为行*/
section div{
    display: table-row;
}

/*将所有的p转为单元格*/
section div p {
    display: table-cell;

    border: 1px solid #444;
    padding: 10px;
}

.tfoot{
    display: table-row-group;
    background-color: #ededed;
}
.span{

    display: table-row-group;
    border: 1px solid #444;
    padding: 10px;
    text-align: center;

}
作业三
1、position: absolute绝对定位
定位常用四个类型:
静态定位:position: static
相对定位:position: relative 偏移量top、boottom、left、right
绝对定位:position:
固定定位:
<!DOCTYPE html>
<html lang="en">
<head>
    <meta charset="UTF-8">
    <title>首页登录</title>
    <link rel="stylesheet" href="/static4/css/style2.css">
</head>
<body>
<article>
    <section>
        <form action="">
            <p>
            <h2 content="">用户登录</h2>
            <label for="username">用户账号:</label>
                <input type="text" name="username" id="username" value="">
            </p>

            <p>
                <label for="password">用户密码:</label>
                <input type="password" name="password" id="password" value="" >
            </p>

            <p>
                <button>返回首页</button>
                <button>登录</button>
            </p>
        </form>
    </section>
</article>

body{

    margin:auto;
    padding: auto;
    width: 400px;
    height: 400px;
    background: lightseagreen;
}
article{
    top:50px;
    left: 50px;
    width: 100%;
    height: 100%;
}
section{
    position: absolute;
    background-color: deeppink;
    padding: 100px;
    width: 200px;
    left: 50%;
    top: 50%;
    margin-top: -200px;
    margin-left: -150px;
}

</body>
</html>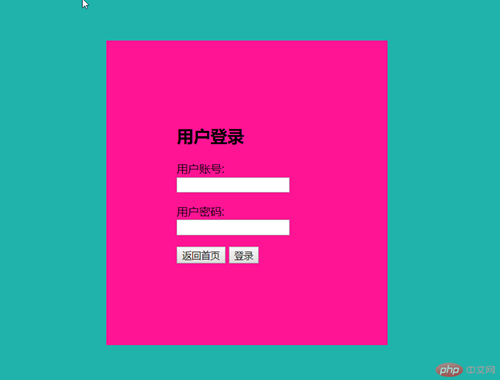
作业四
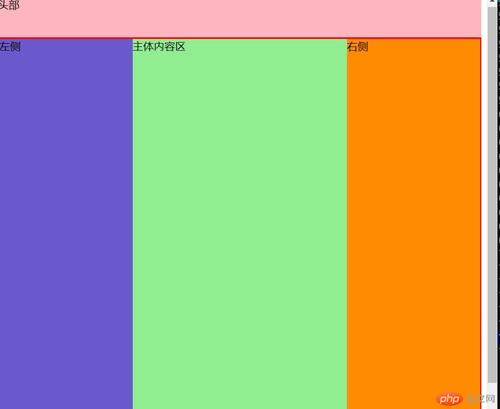
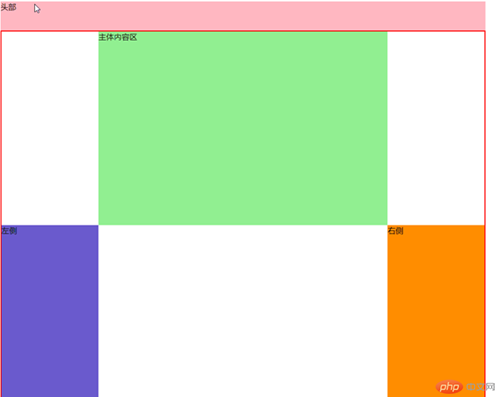
1、分为五个部分,首先将头部、主体、左侧、右侧、底部制作出来
2、通过左侧导航栏和右侧导航栏,将中间主体区给挤出来 用padding挤,
3、通过相对定位使用margin-left: -100%, 通过计算出然后根据情况-200px,同时做到屏幕适应
<!DOCTYPE html>
<html lang="en">
<head>
    <meta charset="UTF-8">
    <title>圣杯</title>
    <link rel="stylesheet" href="/static4/css/style6.css">
</head>
<body>
    <header>头部</header>
<main>
    <article>主体内容区</article>
    <aside>左侧</aside>
    <aside>右侧</aside>

</main>
<footer>底部</footer>
</body>
</html>
作业五
1、相对定位的使用可以很好的调试位置 position: relative;
2、main >aside:last-of-type 使用避开BUG |main > aside:first-child 在特殊的场景下不是很使用
<!DOCTYPE html>
<html lang="en">
<head>
    <meta charset="UTF-8">
    <title>圣杯</title>
    <link rel="stylesheet" href="/static4/css/style6.css">
</head>
<body>
    <header>头部</header>
<main>
    <article>主体内容区</article>
    <aside>左侧</aside>
    <aside>右侧</aside>

</main>
<footer>底部</footer>
</body>
</html>
总结:
1、头部、主体、左侧、右侧、底部语义化后多网站的页面制作更深的体会!
2、浮动定位和布局,让语义化的变得更加清晰!