Correction status:qualified
Teacher's comments:很认真, 也很努力


11月1日,2日,3日作业
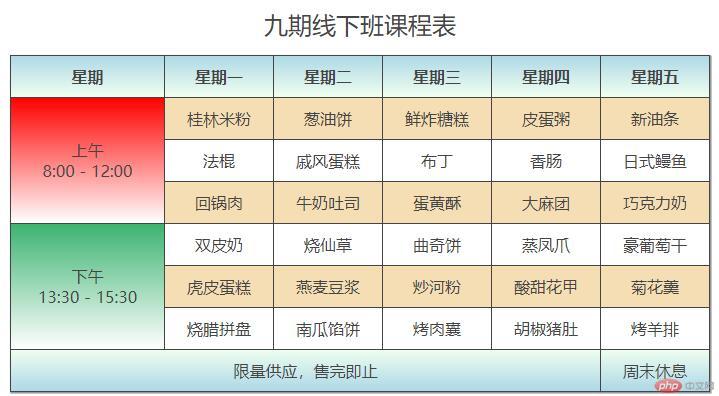
一、制作一张商品信息表,内容自定,要求用到行与列的合并
/*给表格添加表格线*/
table {
    border: 1px solid #444;
    color: #444;
    box-sizing: border-box;
    /*box-shadow: 水平 垂直 扩散范围(虚化) 影音颜色;*/
    box-shadow: 1px 1px 1px #999;
    /*将表格中的边框进行折叠*/
    border-collapse: collapse;

}

/*给单元格划线*/
th,td {
    border: 1px solid #444;

}


table {
    /*设置表格宽度*/
    width: 700px;
    /*设置居中*/
    margin:20px auto;
}


table caption{
    /*设置标题字体*/
    font-size: 1.5rem;
    margin-bottom: 15px;
}

th,td{
    /*设置单元格内文本居中,默认不设置是左对齐*/
    text-align: center;
    /*内边距*/
    padding:10px;
}

tbody tr:nth-of-type(odd){
    background-color: wheat;
}

table thead > tr:first-of-type{
    background: linear-gradient(lightblue,honeydew);
}

table tfoot > tr:last-of-type{
    background: linear-gradient(honeydew,lightblue);
    }

/*将上午单元格的背景色*/
table tbody > tr:first-of-type > td:first-of-type {
    background:  linear-gradient(red,white);
}
/*下午单元格的背景色*/
table tbody > tr:nth-last-of-type(3)>td:first-of-type{
    background: linear-gradient(mediumseagreen,white);
}点击 "运行实例" 按钮查看在线实例

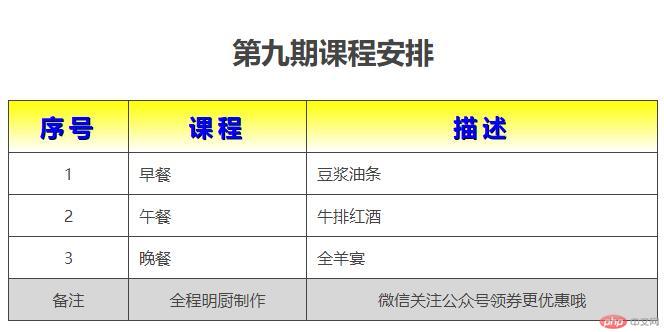
二、使用<div><span><p><ul>...等标签来制作一张课程表
<!DOCTYPE html>
<html lang="en">
<head>
    <meta charset="UTF-8">
    <title>使用<div><span><p><ul>...等标签来制作一张课程表 </title>
    <link rel="stylesheet" href="static/css/style22.css">
</head>
<body>
<div class="table">
    <p class="caption">第九期课程安排</p>
    <span class="thead">
        <ul>
            <li>序号</li>
            <li>课程</li>
            <li>描述</li>
        </ul>
    </span>

<!--    主体-->
    <span class="tbody">
        <ul>
            <li>1</li>
            <li>早餐</li>
            <li>豆浆油条</li>
        </ul>
        <ul>
            <li>2</li>
            <li>午餐</li>
            <li>牛排红酒</li>
        </ul>
        <ul>
            <li>3</li>
            <li>晚餐</li>
            <li>全羊宴</li>
        </ul>
    </span>
    <span class="tfoot">
        <ul>
            <li>备注</li>
            <li>全程明厨制作</li>
            <li>微信关注公众号领券更优惠哦</li>
        </ul>
    </span>
</div>
</body>
</html>
/*将有所的ul变成行*/
span ul {
    display: table-row;
}


/*!*将有所的li转成单元格*!*/
span  li {
    display: table-cell;
    /*设置单元格边框*/
    border:1px solid #444;
    /*让文本和边框之间有边距*/
    padding: 10px;
}
关键是将ul,li转换成单元格cell,此前教程的section li{display:table-cell ;}对应成 span li{ display:table-cell ;}
,如果改成div,也同样操作,其他因为已经设置了class属性影响不大,同视频教程
点击 "运行实例" 按钮查看在线实例
点击 "运行实例" 按钮查看在线实例

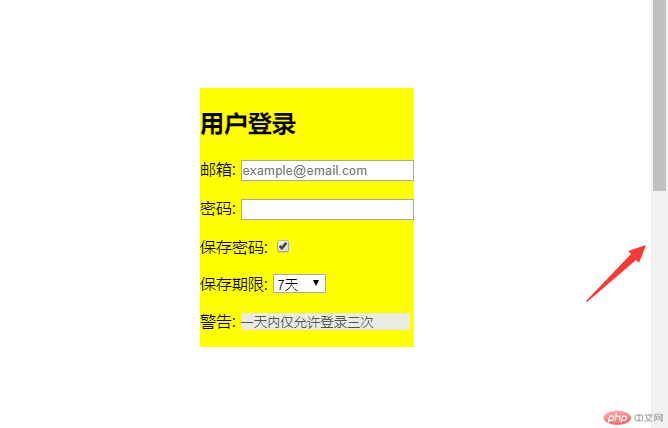
三、使用绝对定位,实现用户登录框在页面中始终居中显示
main{
    /*border: 1px solid;*/
    /*定位父级;定位上下文*/
    /*自生必须设置定位属性,相对绝对都行,但要有*/
    position:absolute;
    left:50%;
    top:50%;
    width: 800px;
    height: 2000px;
}

form{
    /*border: 1px solid red;*/
    width: 300px;
    height: 300px;
    box-sizing: border-box;
    background-color: yellow;
    margin:auto;
}

/*以上代码还有缺陷,中心位置是边框左上角的点,而不是整个用户登录框的中心点,要设置偏移*/
main>form:first-of-type{
    position: relative;
    margin-left: -150px;
    margin-top: -150px;
    /*固定定位*/
    position: fixed;
}点击 "运行实例" 按钮查看在线实例

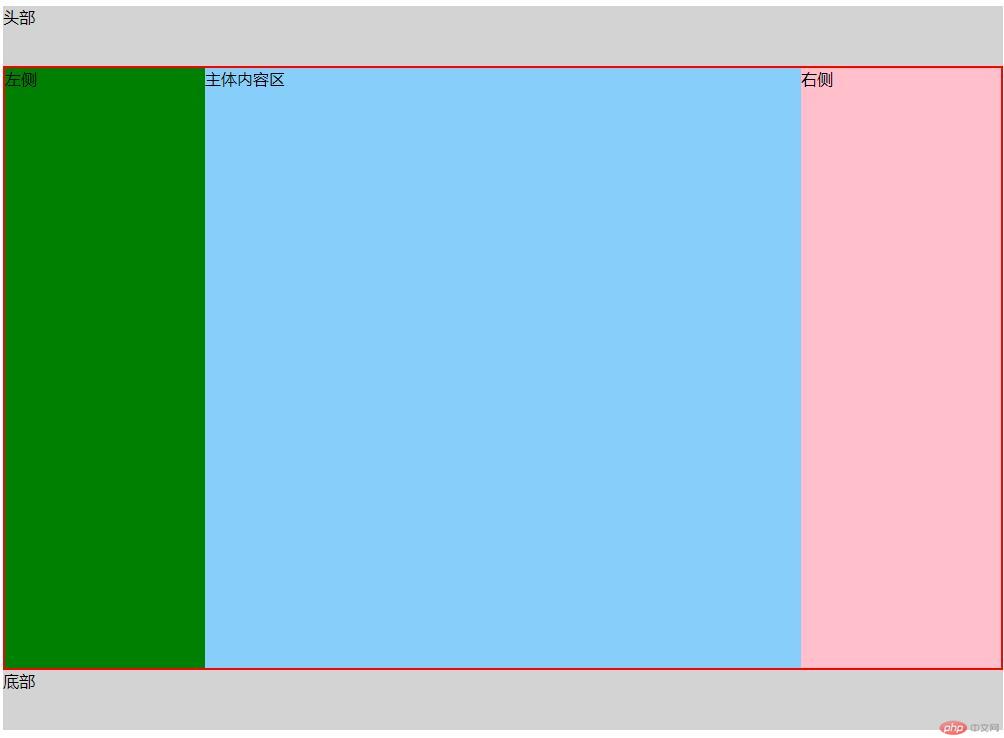
四、模仿课堂案例, 实现圣杯布局,并写出完整流程与布局思路
body{
    width: 1000px;
}

header,footer{
    height: 60px;
    background-color: lightgray;
}

/*主体区*/
main{
    /*参考边框*/
    border: 2px solid red;

    /*给左右边栏预留空间*/
    padding-left: 200px;
    padding-right: 200px;
    box-sizing: border-box;

    /*设置BFC*/
    overflow: hidden;
}

/*主题内容区*/
main>article {
    box-sizing: border-box;
    background-color: lightskyblue;
    width:100%;
    min-height: 600px;

}

/*设置左右两边栏的通用样式*/
main>aside{
    box-sizing: border-box;
    min-height: 600px;
    width: 200px;
}

main>aside:first-of-type{
    /*注意这里不能用first-child,否则没法选中*/
    background-color: green;
    }

main>aside:last-of-type{
    /*注意这里不能用first-child,否则没法选中*/
    background-color: pink;
}


main>article,
main>aside:first-of-type,
main>aside:last-of-type{
    /*群组选择器*/
    float:left;
}

main>aside:first-of-type{
    margin-left: -100%;
    /*相对定位拉到位置*/
    position: relative;
    left:-200px;
}


main>aside:last-of-type{
    margin-left: -200px;
    position: relative;
    left: 200px;
}点击 "运行实例" 按钮查看在线实例

注意左侧边栏和右侧边栏推拉的方向和数据,设置相对位置偏移,左边是向左拉同等宽度,右边是从左推相等宽度
五、 (选做): 不使用<table>...写表格时,如何实现行与列合并
六、 (选做): 将圣杯布局中的左右二列,使用绝对定位来实现
七、 (选做): 与圣杯类似的"双飞翼"布局如何实现,并实例演示