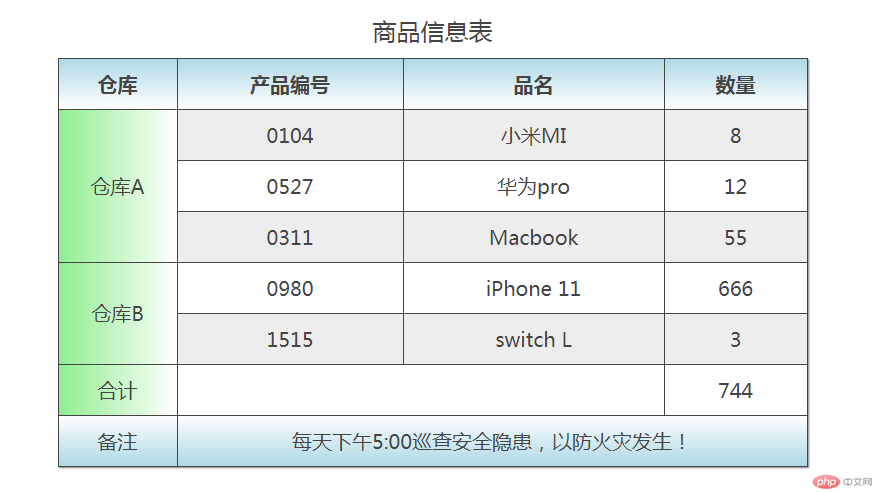
一、制作一张商品信息表,内容自定,要求用到行与列的合并
<!DOCTYPE html>
<html lang="en">
<head>
	<meta charset="UTF-8">
	<title>table表格样式</title>
	<link rel="stylesheet" type="text/css" href="static/css/style1.css">
</head>
<body>
	<table>
		<caption>商品信息表</caption>
		<thead>
			<tr>
				<th>仓库</th>
				<th>产品编号</th>
				<th>品名</th>
				<th>数量</th>
			</tr>
		</thead>
		<tbody>
			<tr>
				<td rowspan="3">仓库A</td>
				<td>0104</td>
				<td>小米MI</td>
				<td>8</td>
			</tr>
			<tr>
				<td>0527</td>
				<td>华为pro</td>
				<td>12</td>
			</tr>
			<tr>
				<td>0311</td>
				<td>Macbook</td>
				<td>55</td>
			</tr>
			<tr>
				<td rowspan="2">仓库B</td>
				<td>0980</td>
				<td>iPhone 11</td>
				<td>666</td>
			</tr>
			<tr>
				<td>1515</td>
				<td>switch L</td>
				<td>3</td>
			</tr>
			<tr>
				<td>合计</td>
				<td colspan="2"></td>
				<td>744</td>
			</tr>
		</tbody>
		<tfoot>
			<tr>
			<td>备注</td>
			<td colspan="3">每天下午5:00巡查安全隐患,以防火灾发生!</td>
			</tr>
		</tfoot>
	</table>
</body>
</html>
table {
	box-sizing: border-box;
	/*边框折叠*/
	border-collapse: collapse;
	color: #444;
	margin: 20px auto;
	width: 600px;
	box-shadow: 1px 1px 1px #999
}
caption{
	margin:10px;
	font-size: 1.2rem;
}
td,th{
	border: 1px solid #444;
	text-align: center;
	padding:10px;
}
tbody > tr:nth-of-type(odd){
	background-color:#ededed;
}

thead tr:nth-child(1){
	background: linear-gradient(lightblue,white);
}
tfoot tr:nth-child(1){
	background: linear-gradient(white,lightblue);
}
/*仓库A单元格*/
tbody>tr:first-of-type>td:first-of-type{
	background: linear-gradient(to right,lightgreen,white);
}
/*仓库B单元格*/
tbody>tr:nth-of-type(4)>td:first-of-type{
	background: linear-gradient(to right,lightgreen,white);
}
/*合计单元格*/
tbody>tr:last-of-type>td:first-of-type{
	background: linear-gradient(to right,lightgreen,white);
}
效果
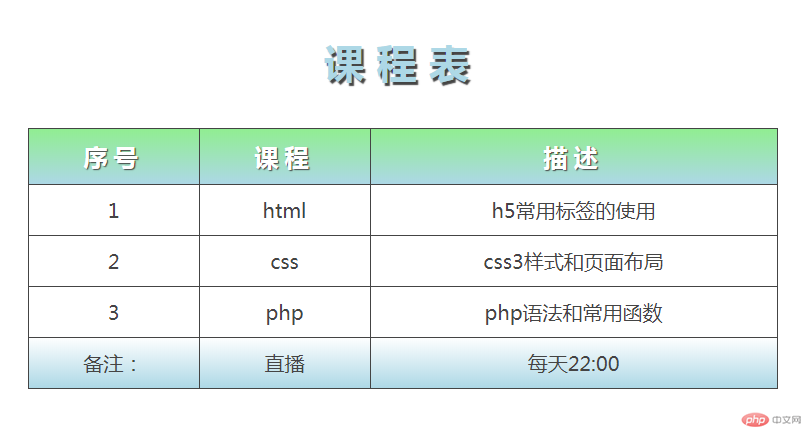
二、使用<div><span><p><ul>...等标签来制作一张课程表
<!DOCTYPE html>
<html lang="en">
<head>
	<meta charset="UTF-8">
	<title>不使用table做表格</title>
	<link rel="stylesheet" type="text/css" href="static/css/style2.css">
</head>
<body>
	<article class="table">
	<h3 class="caption">课程表</h3>
	<section class="thead">
		<div>
			<span>序号</span>
			<span>课程</span>
			<span>描述</span>
		</div>
	</section>
	<section class="tbody">
		<div>
			<span>1</span>
			<span>html</span>
			<span>h5常用标签的使用</span>
		</div>
		<div>
			<span>2</span>
			<span>css</span>
			<span>css3样式和页面布局</span>
		</div>
		<div>
			<span>3</span>
			<span>php</span>
			<span>php语法和常用函数</span>
		</div>
	</section>
	<section class="tfoot">
		<div>
			<span>备注:</span>
			<span>直播</span>
			<span>每天22:00</span>
		</div>
	</section>
	</article>
</body>
</html>
.table{
	display: table;
	box-sizing: border-box;
	border-collapse: collapse;
	border:1px solid #444;
	width: 600px;
	margin:auto;
	color: #444;
}
.caption{
	display: table-caption;
	text-align: center;
	letter-spacing: 10px;
	font-size: 2rem;
	color: lightblue;
	text-shadow: 2px 2px 1px #444
}
.thead{
	display: table-header-group;
	text-align: center;
	font-weight: bold;
	font-size: 1.2rem;
	letter-spacing: 5px;
	color:    white;
	text-shadow: 1px 1px 1px #444;
	background:linear-gradient(lightgreen,lightblue);
}
.tbody{
	display: table-row-group;

}
.tfoot{
	display: table-footer-group;
	background: linear-gradient(#fff,lightblue)
}

/*将所有div转为行*/
section div{
	display:table-row;
}
/*所有span转换为单元格*/
section div span{
	display: table-cell;
	border:1px solid #444;
	padding: 10px;
	text-align:    center;
}
效果
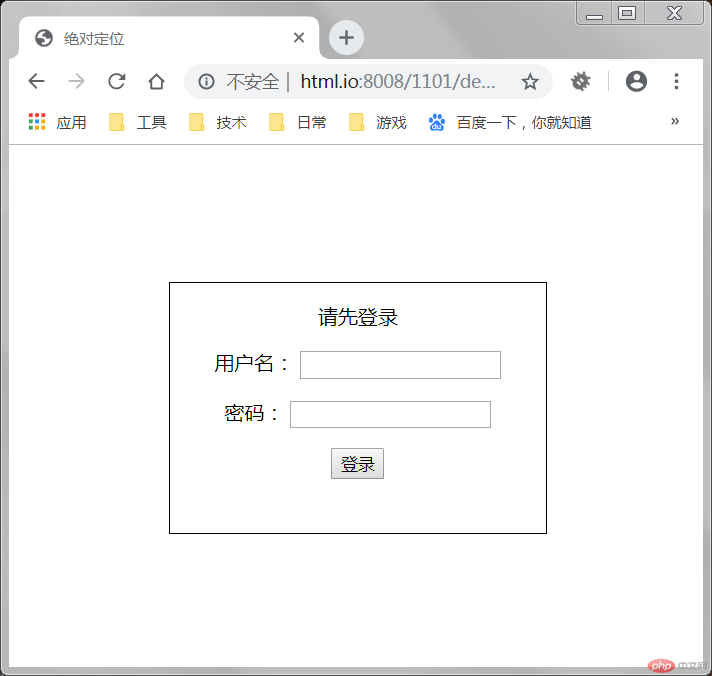
三、使用绝对定位,实现用户登录框在页面中始终居中显示
<!DOCTYPE html>
<html lang="en">
<head>
	<meta charset="UTF-8">
	<title>绝对定位</title>
	<link rel="stylesheet" type="text/css" href="static/css/style3.css">
</head>
<body>
	<div class="login">
		<p>请先登录</p>
		<form action="" method="post">
		<p>
			<label for="username">用户名:</label>
			<input type="username" name="username" id="username">
		</p>
		<p>
			<label for="password">密码:</label>
			<input type="password" name="password" id="password">
		</p>
		<button>登录</button>
		</form>
	</div>
</body>
</html>
.login{
	position: absolute;
	height: 200px;
	width: 300px;
	border:1px solid black;
	text-align: center;
	left: 50%;
	top:50%;
	margin-left: -150px;
	margin-top: -100px;
}
效果
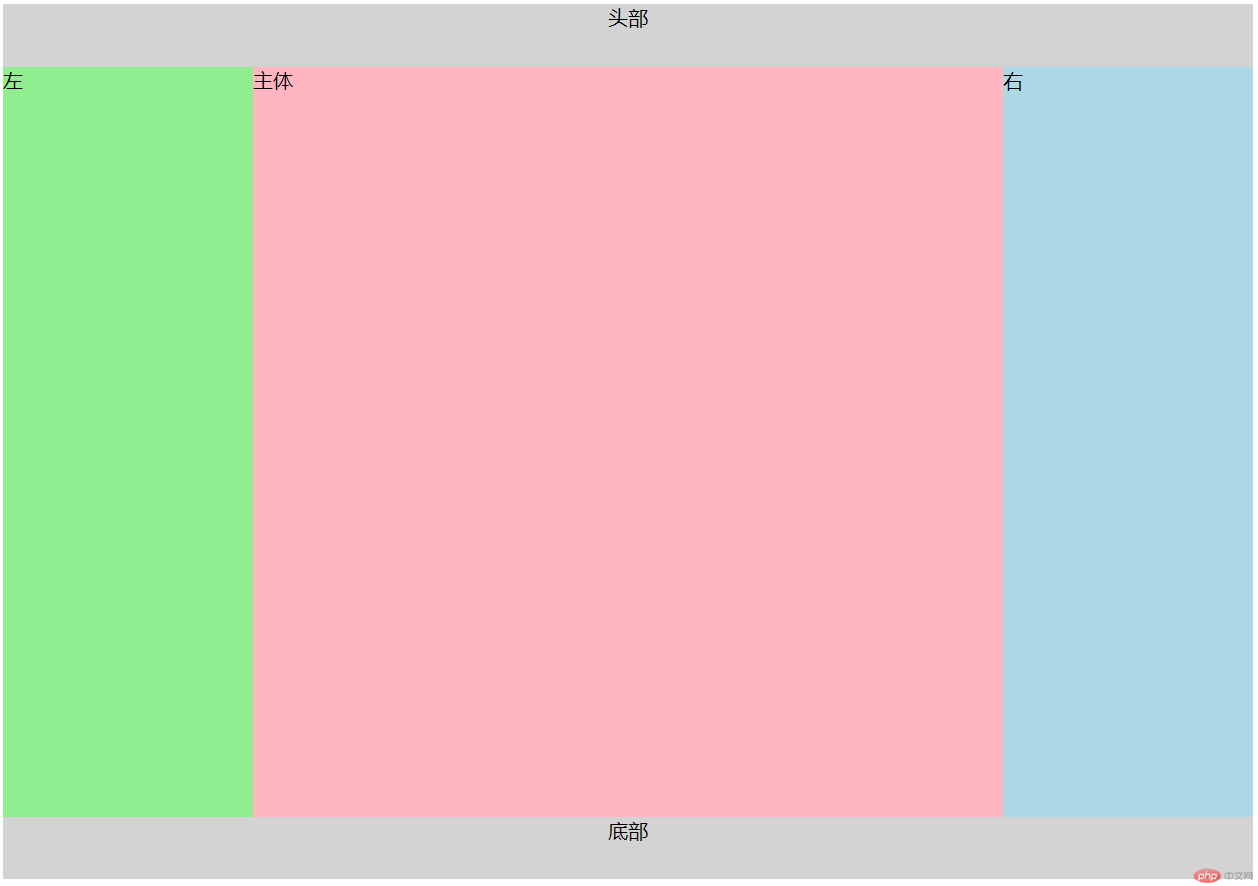
四、模仿课堂案例, 实现圣杯布局,并写出完整流程与布局思路
圣杯布局还是很有意思的,首先html页面元素有头部、底部、左边栏、右边栏和主体部分。主体部分标签放在左右边栏前面优先渲染。
定义body宽度,防止PC端浏览器错位。设置左右边栏和主体部分高度和宽度,因为没有内容撑起这几个块儿元素。思路是在整个main标签里给左右两边分别向内挤出来200px作为左右侧边的位置,也就是padding-left:200px、padding-right:200px,中间的100%就是主体部分。
所以给主体部分设置宽度100%,左右宽度各为200px。然后设置这三个元素左浮动。
利用margin:-100%把左边拉到main的最左边,注意,不会影响到padding-left预留的200px,然后再使用相对定位往左边推200px,也就是left:-200px让左边归位。
右边只用margin:200px即可达到main的最右边位置,不会影响到padding-right预留的200px,再使用相对定位把右边栏往右推200px,也就是left:200px完成基本布局。也就是左右两边栏宽度固定,中间自适应。
<!DOCTYPE html>
<html lang="en">
<head>
	<meta charset="UTF-8">
	<title>圣杯布局</title>
	<link rel="stylesheet" type="text/css" href="static/css/style4.css">
</head>
<body>
	<header>头部</header>
	<main>
		<!-- 主题内容区优先渲染 -->
		<article>主体</article>
		<aside class="left">左</aside>
		<aside class="right">右</aside>
	</main>
	<footer>底部</footer>
</body>
</html>
body{
	width: 1000px;
}
header,footer{
	height: 50px;
	background: lightgrey;
	text-align: center;
}
main > article,
.left,
.right{
	float: left;
}
main{
	box-sizing: border-box;
	padding-left: 200px;
	padding-right: 200px;
	overflow: hidden;
}
main > article{
	background-color: lightpink;
	width: 100%;
	min-height: 600px;
}
aside{
	min-height: 600px;
	width: 200px;
}
.left{
	background-color: lightgreen;
	margin-left: -100%;
	position: relative;
	left: -200px;
}
.right{
	background-color: lightblue;
	margin-left: -200px;
	position: relative;
	left:200px;
}
结果
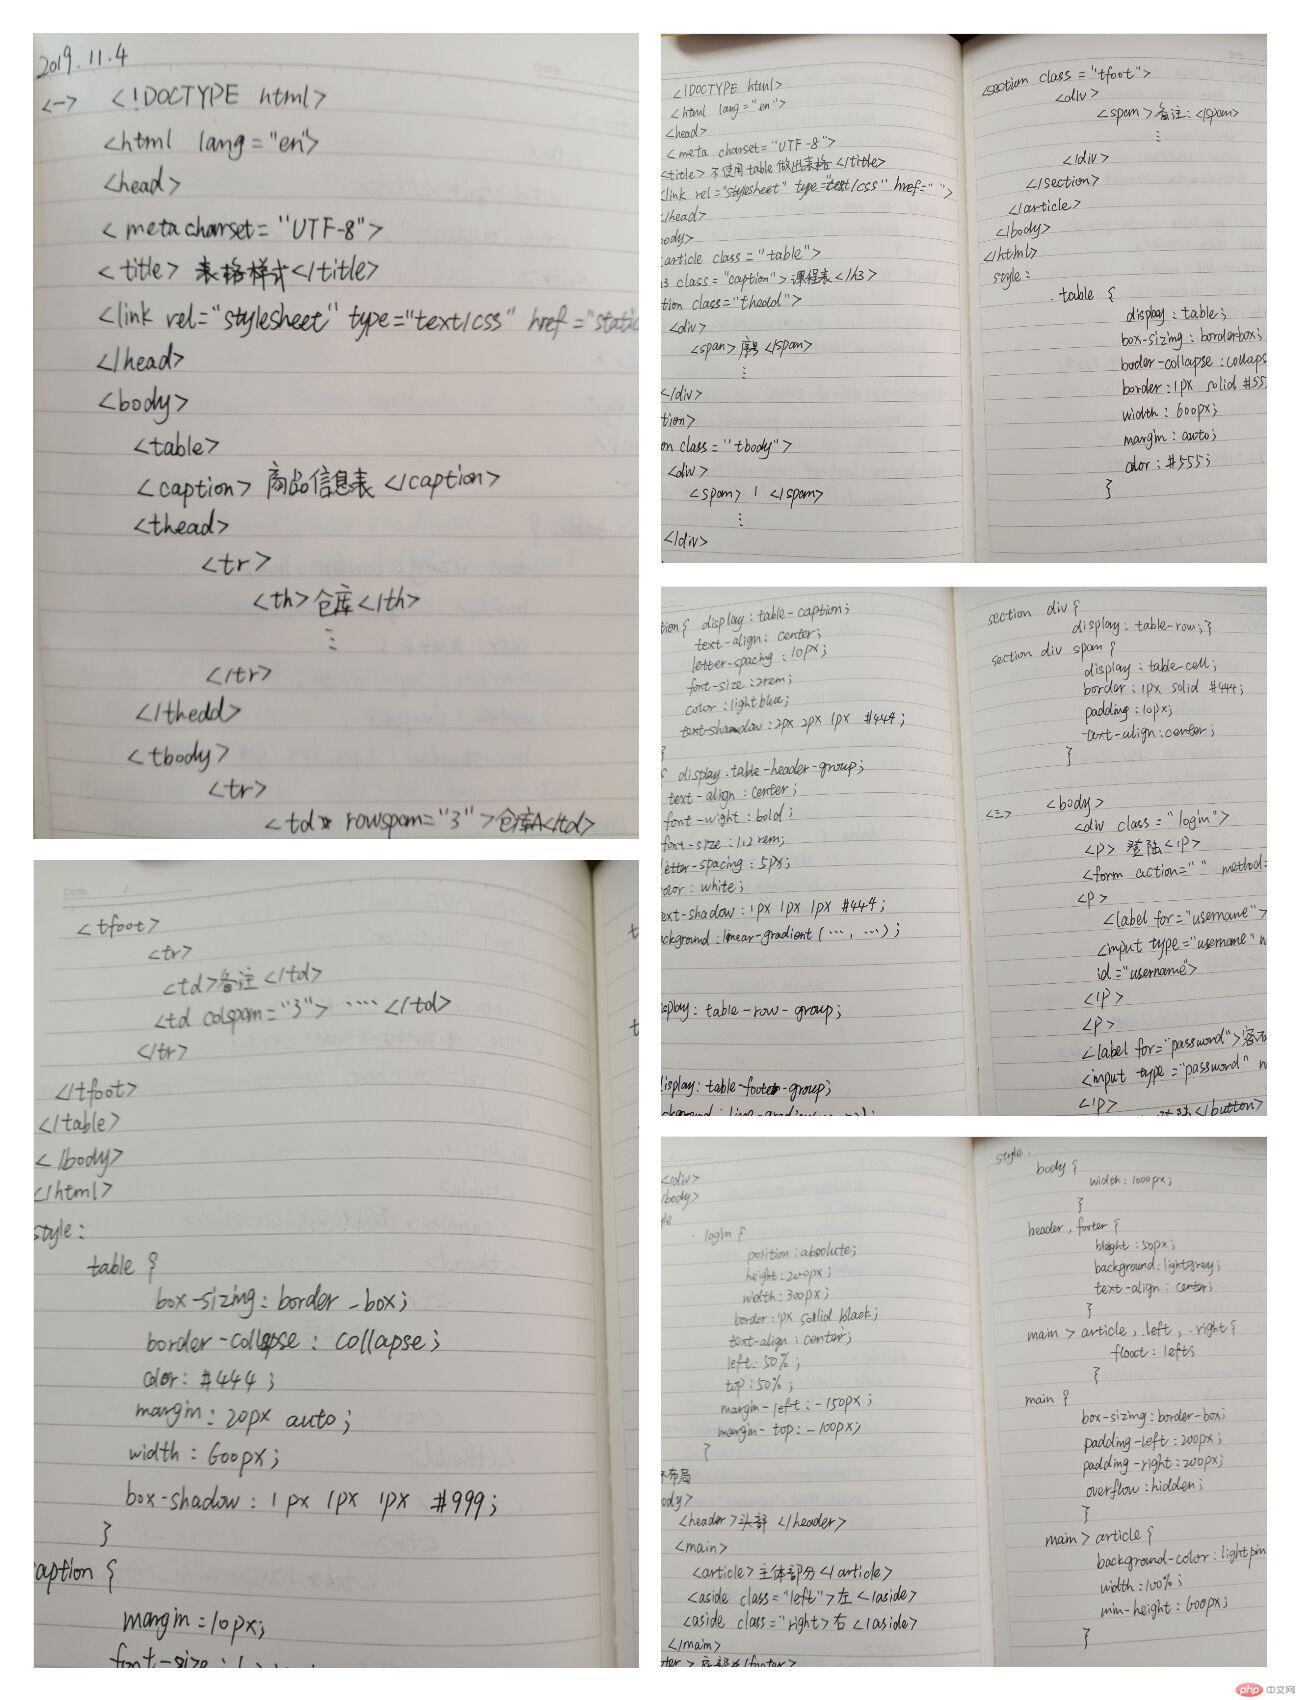
手抄代码:
总结:本次作业又把之前几节课学的内容复习了一下,表格和选择器。掌握的更加熟悉。定位布局方面,绝对定位掌握的不是很好,如果把body或者html设置成定位父级,绝对定位的元素就会向上偏移无法解决只好让定位父级是初始包含块,还需要更多的学习和练习。
Correction status:qualified
Teacher's comments:有时 , 你把自己当成浏览器的设计者, css的开发者, 如果换做你, 你会怎么在页面中显示这些元素, 很多概念就好明白了


![[Web front-end] Node.js quick start](https://img.php.cn/upload/course/000/000/067/662b5d34ba7c0227.png)


