Correction status:qualified
Teacher's comments:电脑部分做完了, 手写的呢?


<style>
       table{
           border-collapse: collapse;
           font-size: 16px;
       }
       caption{
           border: 1px solid #000;
           border-bottom: 0;
           padding: 10px;
           font-size: 18px;
       }
       th, td{
           border: 1px solid #000;
           padding: 10px;
           text-align: center;
       }
</style>
<body>
    <table>
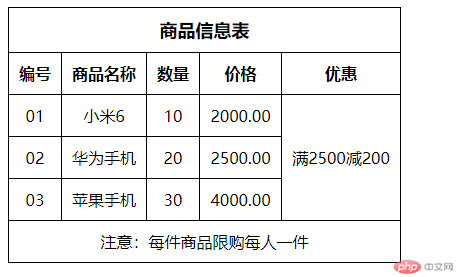
        <caption><strong>商品信息表</strong></caption>
        <thead>
            <tr>
                <th>编号</th>
                <th>商品名称</th>
                <th>数量</th>
                <th>价格</th>
                <th>优惠</th>
            </tr>
        </thead>
        <tbody>
            <tr>
                <td>01</td>
                <td>小米6</td>
                <td>10</td>
                <td>2000.00</td>
                <td rowspan="3">
                    满2500减200
                </td>
            </tr>
            <tr>
                <td>02</td>
                <td>华为手机</td>
                <td>20</td>
                <td>2500.00</td>
            </tr>
            <tr>
                <td>03</td>
                <td>苹果手机</td>
                <td>30</td>
                <td>4000.00</td>
            </tr>
        </tbody>
        <tfoot>
            <tr>
                <td colspan="5">注意:每件商品限购每人一件</td>
            </tr>
        </tfoot>
    </table>
</body>
<style>
        *{
            padding: 0;
            margin: 0;
            box-sizing: border-box;
        }
        .ttable{
            border: 1px solid #000;
            width: 550px;
            height: 382px;
            margin: 0 auto;
        }
       ul{
           list-style: none;
       }
       p{
           text-align: center;
           padding: 10px;
           font-size: 18px;
           border-bottom: 1px solid #000;
       }
       .thead{
           border-bottom: 1px solid #000;
       }
        .thead li{
            width: 19.2%;
            display: inline-block;
            padding: 10px;
            text-align: center;
            border-right: 1px solid #000;
        }
        .tboody ul{
            display: inline-block;
            width: 19.2%;
        }
        .tboody ul li{
            width: 100%;
            padding: 10px;
            text-align: center;
            border-right: 1px solid #000;
            border-bottom: 1px solid #000;
        }
        .thead ul li:last-of-type{
            border-right: 0;
        }
        .tboody ul li:last-of-type{
            border-bottom: 0;
        }
        .tboody ul:last-of-type li{
            border-right: 0;
        }
    </style>
<div class="ttable">
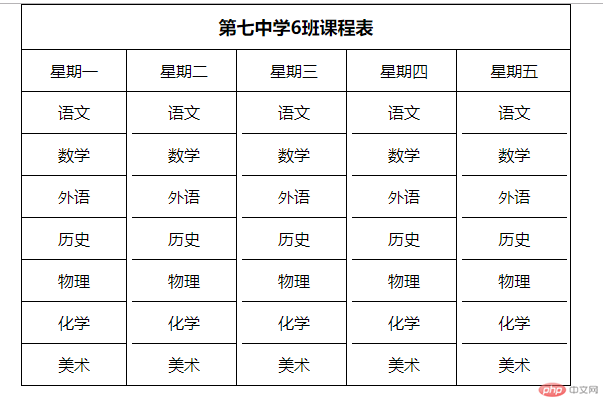
        <p><strong>第七中学6班课程表</strong></p>
        <section class="thead">
            <ul>
                <li>星期一</li>
                <li>星期二</li>
                <li>星期三</li>
                <li>星期四</li>
                <li>星期五</li>
            </ul>
        </section>
        <section class="tboody">
            <ul>
                <li>语文</li>
                <li>数学</li>
                <li>外语</li>
                <li>历史</li>
                <li>物理</li>
                <li>化学</li>
                <li>美术</li>
            </ul>
            <ul>
                <li>语文</li>
                <li>数学</li>
                <li>外语</li>
                <li>历史</li>
                <li>物理</li>
                <li>化学</li>
                <li>美术</li>
            </ul>
            <ul>
                <li>语文</li>
                <li>数学</li>
                <li>外语</li>
                <li>历史</li>
                <li>物理</li>
                <li>化学</li>
                <li>美术</li>
            </ul>
            <ul>
                <li>语文</li>
                <li>数学</li>
                <li>外语</li>
                <li>历史</li>
                <li>物理</li>
                <li>化学</li>
                <li>美术</li>
            </ul>
            <ul>
                <li>语文</li>
                <li>数学</li>
                <li>外语</li>
                <li>历史</li>
                <li>物理</li>
                <li>化学</li>
                <li>美术</li>
            </ul>
        </section>
    </div>
<style>
        *{
            margin: 0;
            padding: 0;
        }
        .login{
            width: 400px;
            height: 300px;
            border: solid 1px #a5acac;
            position: absolute;
            left: 50%;
            top: 50%;
            margin-top: -150px;
            margin-left: -200px;
        }
        .login h3{
            text-align: center;
            height: 50px;
            line-height: 50px;
            border-bottom: 1px solid #000;
        }
        .login label{
            display: inline-block;
            width: 70px;
            height: 30px;
            line-height: 30px;
        }
        .login input{
            height: 30px;
            line-height: 30px;
            box-sizing: border-box;
        }
        .login p{
            padding: 10px;
            text-align: center;
        }
        .login button{
            margin-right: 10px;
            width: 50px;
        }
    </style>
<form class="login">
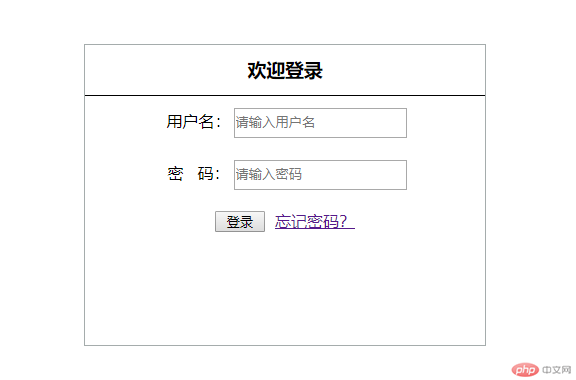
        <h3>欢迎登录</h3>
        <p><label for="username">用户名:</label><input type="text" id="username" name="username" required placeholder="请输入用户名"></p>
        <p><label for="password">密   码:</label><input type="text" id="password" name="password" required placeholder="请输入密码"></p>
        <p><button>登录</button><a href="">忘记密码?</a></p>
</form>
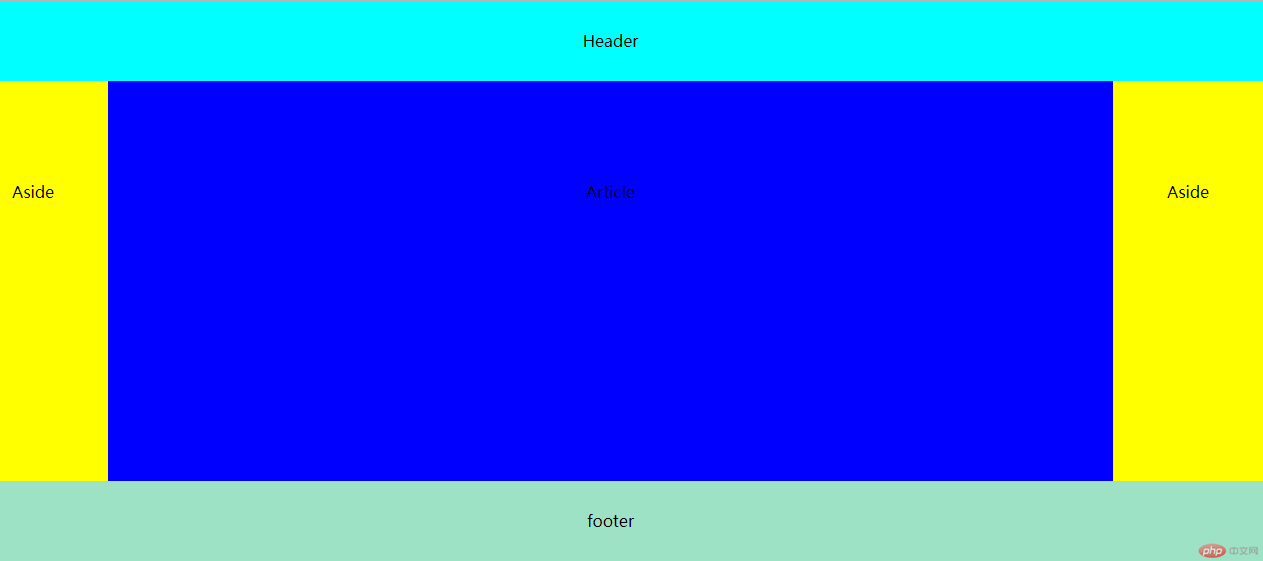
圣杯布局的产生是为了解决在多列水平布局的时候,主体内容加载延后的问题,该布局在不影响布局的情况使下主体内容排序第一,使浏览器优先加载主体内容。
<style>
        *{
            padding: 0;
            margin: 0;
            text-align: center;
        }
        header{
            background: aqua;
        }
        footer{
            background: #9de2c4;
        }
        header,footer{
            height: 80px;
            line-height: 80px;
        }
        main{
            padding: 0 150px;
            overflow: hidden;
        }
        main *{
            float: left;
            min-height: 300px;
            padding-top: 100px;
        }
        main article{
            width: 100%;
            background: blue;
        }
        main aside{
            width: 150px;
            background: yellow;
            position: relative;
        }
        main aside:first-of-type{
            margin-left: -100%;
            left: -150px;
        }
        main aside:last-of-type{
            margin-left: -150px;
            left: 150px;
        }
    </style>
<body>
    <header>Header</header>
    <main>
        <article>Article</article>
        <aside>Aside</aside>
        <aside>Aside</aside>
    </main>
    <footer>footer</footer>
</body>
思路:将内容所在的标签都设置浮动,即<main>下面的标签都浮动,左浮动、右浮动都可以。然后把<article>的宽度设置为100%,让它独占一行,把<main> 标签的 padding-left padding-right 属性值设置为两个 <aside> 的宽度,为其预留显示位置。
因为<article>的width:100%,所以可以对<aside>元素用margin-left或者margin-right的负值,这里根据前面设置的浮动来,左浮动用margin-left,右浮动用margin-right。
最后将两个 <aside> 移动到 <main> 标签为其预留的位置,给<aside> 添加 position:relative 属性相对定位,然后设置第一个<aside>的left或者right值,根据前面来决定,margin-left用left,margin-right用right,然后再根据<aside>的宽度设置正负值即可。