Correction status:qualified
Teacher's comments:代码很不错, 写得也认真, 手写很整齐


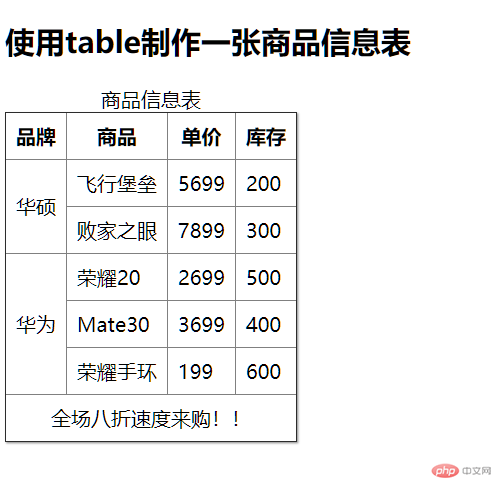
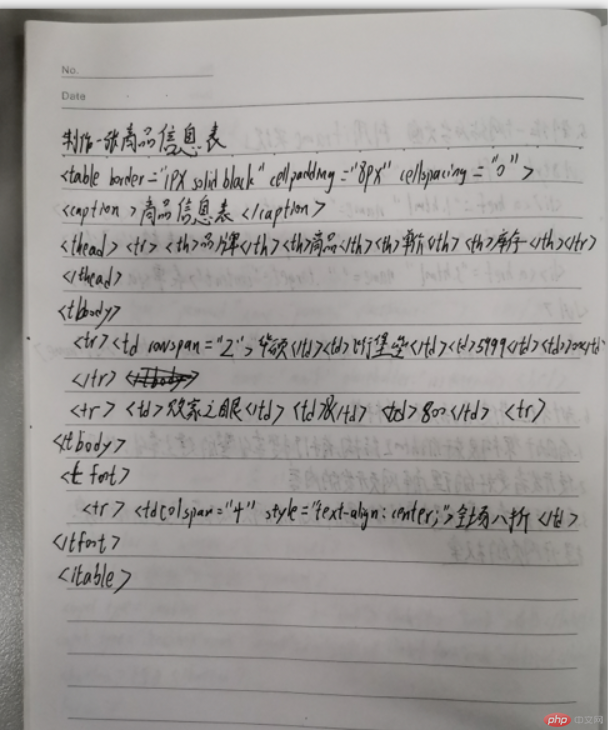
一、制作一张商品信息表,内容自定,要求用到行与列的合并
<!DOCTYPE html>
<html>
	<head>
		<meta charset="utf-8">
		<title></title>
		<style>
			table{
				box-sizing: border-box;
				box-shadow: 1px 1px 1px #999;/* 添加阴影 */
				border-collapse: collapse;/* 折叠单元格边框间隙 */
			}
		</style>
	</head>
	<body>
		<h2>使用table制作一张商品信息表</h2>
		<table border="1px solid black" cellpadding="8px" cellspacing="0">
			<caption>商品信息表</caption>
			<thead>
				<tr>
					<th>品牌</th>
					<th>商品</th>
					<th>单价</th>
					<th>库存</th>
				</tr>
			</thead>
			<tbody>
				<tr>
					<!-- rowspan合并两行 -->
					<td rowspan="2">华硕</td>
					<td>飞行堡垒</td>
					<td>5699</td>
					<td>200</td>
				</tr>
				<tr>
					<td>败家之眼</td>
					<td>7899</td>
					<td>300</td>
				</tr>
				<tr>
					<td rowspan="3">华为</td>
					<td>荣耀20</td>
					<td>2699</td>
					<td>500</td>
				</tr>
				<tr>
					<td>Mate30</td>
					<td>3699</td>
					<td>400</td>
				</tr>
				<tr>
					<td>荣耀手环</td>
					<td>199</td>
					<td>600</td>
				</tr>
			</tbody>
			<tfoot>
				<tr>
					<td colspan="4" style="text-align: center;">全场八折速度来购!!</td>
				</tr>
			</tfoot>
		</table>
	</body>
</html>点击 "运行实例" 按钮查看在线实例
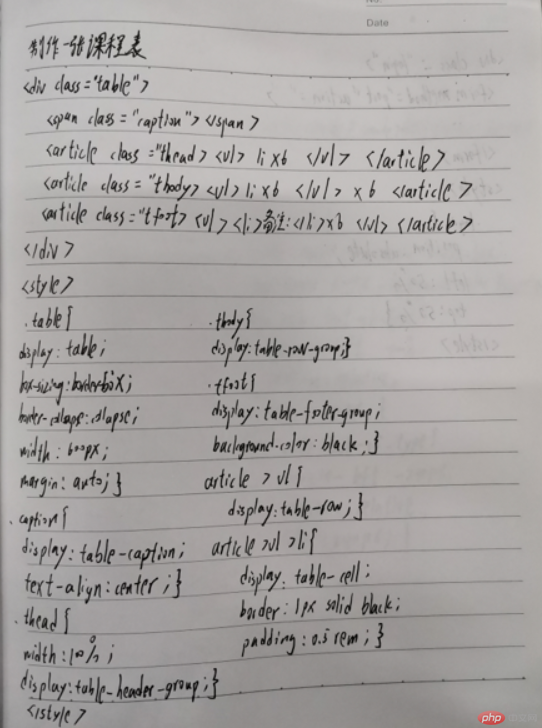
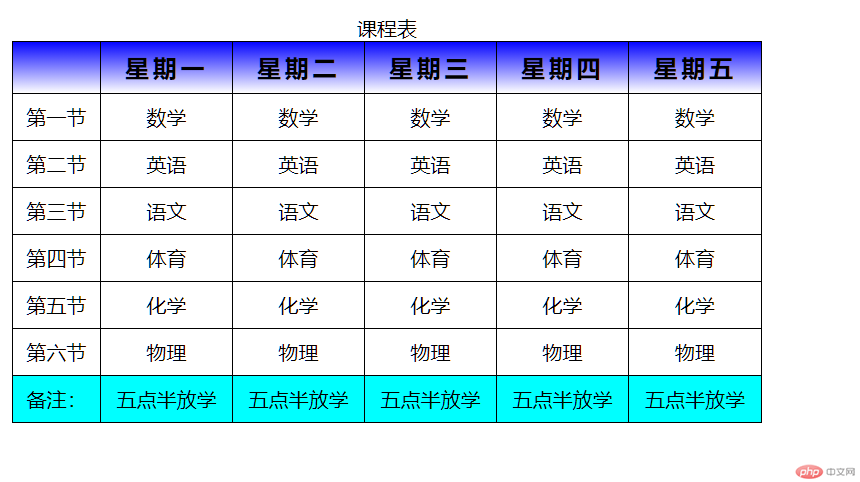
二、使用<div><span><p><ul>...等标签来制作一张课程表
<!DOCTYPE html>
<html>
	<head>
		<meta charset="utf-8">
		<title></title>
		<style>
			.table{
				/* 以table标签样式来显示 */
				display: table;
				/* 确保内部单元格无论如何改变,宽度总不变 */
				box-sizing: border-box;
				/*折叠单元格之间的边框线, 消除间隙*/
				border-collapse: collapse;
				width: 600px;
				margin: auto;
			}
			.caption{
				/* 以<caption>标签样式来显示 */
				display: table-caption;
				text-align: center;
			}
			.thead{
				/* 以thead标签样式来显示 */
				width: 100%;
				display: table-header-group;
				text-align: center;
				/* 设置字体大小 */
				font-size: 1.2rem;
				/* 字体加粗 */
				font-weight: bold;
				/* 字间距 */
				letter-spacing: 3px;
				/* 设置背景色 */
				background: linear-gradient(blue,white);
			}
			.tbody{
				/* 以tbody标签样式来显示 */
				display: table-row-group;
				text-align: center;
			}
			.tfoot{
				display: table-footer-group;
				background-color: #00FFFF;
				text-align: center;
			}
			/* 将所有ul标签转换为tr标签样式 */
			article > ul{
				display: table-row;
			}
			/* 将所有li标签转换为td标签样式 */
			article > ul > li{
				display: table-cell;
				border: 1px solid black;
				/* 设置单元素内容与边框之间的内边距 */
				padding: 0.5rem;
			}
		</style>
	</head>
	<body>
		<h2>使用div span p ul等标签来制作一张课程表</h2>
		<div class="table">
			<span class="caption">课程表</span>
			<article class="thead">
				<ul>
					<li></li>
					<li>星期一</li>
					<li>星期二</li>
					<li>星期三</li>
					<li>星期四</li>
					<li>星期五</li>
				</ul>
			</article>
			<article class="tbody">
				<ul>
					<li>第一节</li>
					<li>数学</li>
					<li>数学</li>
					<li>数学</li>
					<li>数学</li>
					<li>数学</li>
				</ul>
				<ul>
					<li>第二节</li>
					<li>英语</li>
					<li>英语</li>
					<li>英语</li>
					<li>英语</li>
					<li>英语</li>
				</ul>
				<ul>
					<li>第三节</li>
					<li>语文</li>
					<li>语文</li>
					<li>语文</li>
					<li>语文</li>
					<li>语文</li>
				</ul>
				<ul>
					<li>第四节</li>
					<li>体育</li>
					<li>体育</li>
					<li>体育</li>
					<li>体育</li>
					<li>体育</li>

				</ul>
				<ul>
					<li>第五节</li>
					<li>化学</li>
					<li>化学</li>
					<li>化学</li>
					<li>化学</li>
					<li>化学</li>
				</ul>
				<ul>
					<li>第六节</li>
					<li>物理</li>
					<li>物理</li>
					<li>物理</li>
					<li>物理</li>
					<li>物理</li>
				</ul>
			</article>
			<article class="tfoot">
				<ul>
					<li>备注:</li>
					<li>五点半放学</li>
					<li>五点半放学</li>
					<li>五点半放学</li>
					<li>五点半放学</li>
					<li>五点半放学</li>
				</ul>
			</article>
		</div>
	</body>
</html>点击 "运行实例" 按钮查看在线实例
三、使用绝对定位,实现用户登录框在页面中始终居中显示
<!DOCTYPE html>
<html>
	<head>
		<meta charset="utf-8">
		<title></title>
		<style type="text/css">
			.login{
			    position: absolute;
				left: 50%;
				top: 50%;
			}
		</style>
	</head>
	<body>
		<div class="login">
			<form action="" method="post">
				<!-- for的值必须与name的值保持一致 -->
				<label for="username">姓名:</label>
				<input type="text" name="username" id="username" placeholder="请输入姓名" /><br />
				<label for="password">密码:</label>
				<input type="password" name="password" id="password" placeholder="请输入密码" /><br />
				<button>登录</button>
			</form>
		</div>
	</body>
</html>点击 "运行实例" 按钮查看在线实例
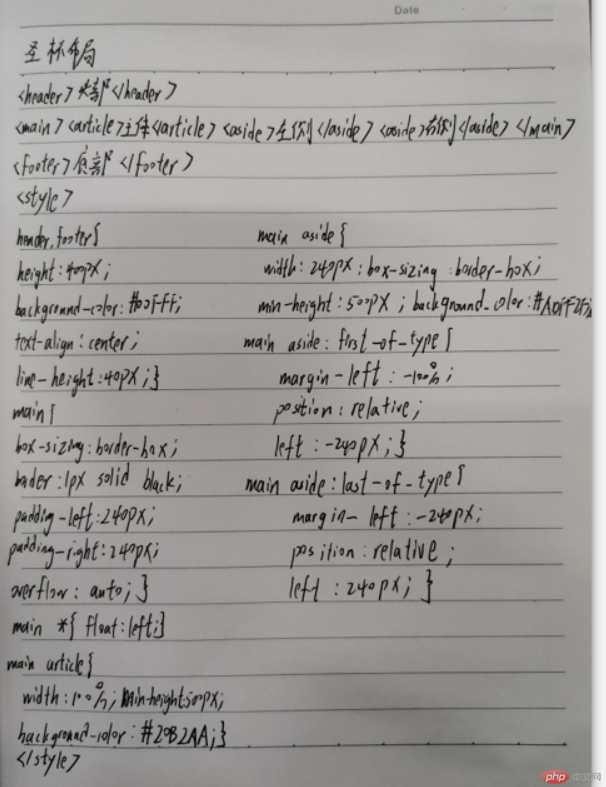
四、模仿课堂案例, 实现圣杯布局,并写出完整流程与布局思路
布局思路与流程:
1.在圣杯布局中主体内容区需要优先渲染,而代码是从上往下依次执行所以就将article定义在左右两侧的前面 2.左右两列固定,主题内容区自适应:通过设置padding预留出左右边栏的位置,再让主题内容区全部左浮动,通过设置article的width:100% 让主体内容自适应,再通过设置margin让左右边栏移动到合适的位置,最后通过设置position让左右边栏移动到预留的位置
<!DOCTYPE html>
<html>
	<head>
		<meta charset="utf-8">
		<title>圣杯布局</title>
		<style>
			header,footer{
				height: 40px;
				background-color: #00FFFF;
				text-align: center;
				line-height: 40px;/* 使文字上下居中 */
			}
			main{
				/*使盒子大小不受内边距与边框的影响*/
				box-sizing: border-box;
				border: 1px solid black;
				/* 通过设置左侧与右侧的内边距将主体挤到中间并预留出左侧与右侧的空间 */
				padding-left: 240px;
				padding-right: 240px;
				/*将main转为BFC块, 使浮动元素包含在内, 撑开父级*/
				overflow: auto;

			}
			main *{
				/* 浮动时会使父级元素包不住浮动元素通过在父级元素处设置overflow:auto解决 */
				float: left;
			}
			main article{
				text-align: center;
				background-color: #20B2AA;
				/* 使article占据父容器全部空间,设置为百分比让其自适应 */
				width: 100%;
				min-height: 500px;/* 设置最小高度 */
			}
			main aside{
				width: 240px;
				box-sizing: border-box;
				min-height: 500px;
				background-color: #ADFF2F;
				text-align: center;
			}
			main aside:first-of-type{
				/* margin为负值反方向移动 100%表示移动一个父元素的值 */
				margin-left: -100%;
				/* 相对定位相对于原来的位置发生偏移 */
				position: relative;
				left: -240px;
			}
			main aside:last-of-type{
				margin-left: -240px;
				position: relative;
				left: 240px;
			}
		</style>
	</head>
	<body>
		<header>头部</header>
		<main>
			<article>主体</article>
			<aside>左侧</aside>
			<aside>右侧</aside>
		</main>
		<footer>底部</footer>
	</body>
</html>点击 "运行实例" 按钮查看在线实例
五、将圣杯布局中的左右二列,使用绝对定位来实现
<!DOCTYPE html>
<html>
	<head>
		<meta charset="utf-8">
		<title>圣杯布局</title>
		<style>
			header,footer{
				height: 40px;
				background-color: #00FFFF;
				text-align: center;
				line-height: 40px;/* 使文字上下居中 */
			}
			main{
				/*使盒子大小不受内边距与边框的影响*/
				box-sizing: border-box;
				border: 1px solid black;
				/* 通过设置左侧与右侧的内边距将主体挤到中间并预留出左侧与右侧的空间 */
				padding-left: 240px;
				padding-right: 240px;
				/*将main转为BFC块, 使浮动元素包含在内, 撑开父级*/
				overflow: auto;
				/* 设置相对定位让其可以作为定位父级 */
				position: relative;

			}
			main *{
				/* 浮动时会使父级元素包不住浮动元素通过在父级元素处设置overflow:auto解决 */
				float: left;
			}
			main article{
				text-align: center;
				background-color: #20B2AA;
				/* 使article占据父容器全部空间,设置为百分比让其自适应 */
				width: 100%;
				min-height: 500px;/* 设置最小高度 */
			}
			main aside{
				width: 240px;
				box-sizing: border-box;
				min-height: 500px;
				background-color: #ADFF2F;
				text-align: center;
			}
			main aside:first-of-type{
				position: absolute;
				top: 0;
				left: 0;
			}
			main aside:last-of-type{
				position: absolute;
				top: 0;
				right: 0;
			}
		</style>
	</head>
	<body>
		<header>头部</header>
		<main>
			<article>主体</article>
			<aside>左侧</aside>
			<aside>右侧</aside>
		</main>
		<footer>底部</footer>
	</body>
</html>点击 "运行实例" 按钮查看在线实例
六、与圣杯类似的"双飞翼"布局如何实现,并实例演示
双飞翼布局:双飞翼是主体内容区这个div中再加了一个div来放置内容,在给这个新的div设置margin-left和margin-right 。
<!DOCTYPE html>
<html>
	<head>
		<meta charset="utf-8">
		<title>双飞翼布局</title>
		<style type="text/css">
		 	#hd,#footer{
				height: 40px;
				background-color: #87CEEB;
				line-height: 40px;
				text-align: center;
			}
			#md{
				float: left;
				width:100%;
				border: 1px solid black;
				box-sizing: border-box;
			}
			#inside{
				box-sizing: border-box;
				background-color: #008000;
				margin-left: 240px;
				margin-right: 240px;
				height: 500px;
			}
			#left{
				box-sizing: border-box;
				margin-left: -100%;
				float: left;
				width: 240px;
				height: 500px;
				background-color: #FFFF00;
			}

			#right{
				box-sizing: border-box;
				margin-left: -240px;
				float: left;
				width: 240px;
				height: 500px;
				background-color: #FFFF00;
			}
			#footer{
				/* 清除浮动 */
				clear:both;
			}
		 </style>
	</head>
	<body>
		<div id="hd">
			头部
		</div>
		<div id="md">
			<div id="inside">
				主体
			</div>
		</div>
		<div id="left">
			左边栏
		</div>
		<div id="right">
			右边栏
		</div>
		<div id="footer">
			底部
		</div>
	</body>
</html>点击 "运行实例" 按钮查看在线实例