一、制作一张商品信息表,内容自定,要求用到行与列的合并
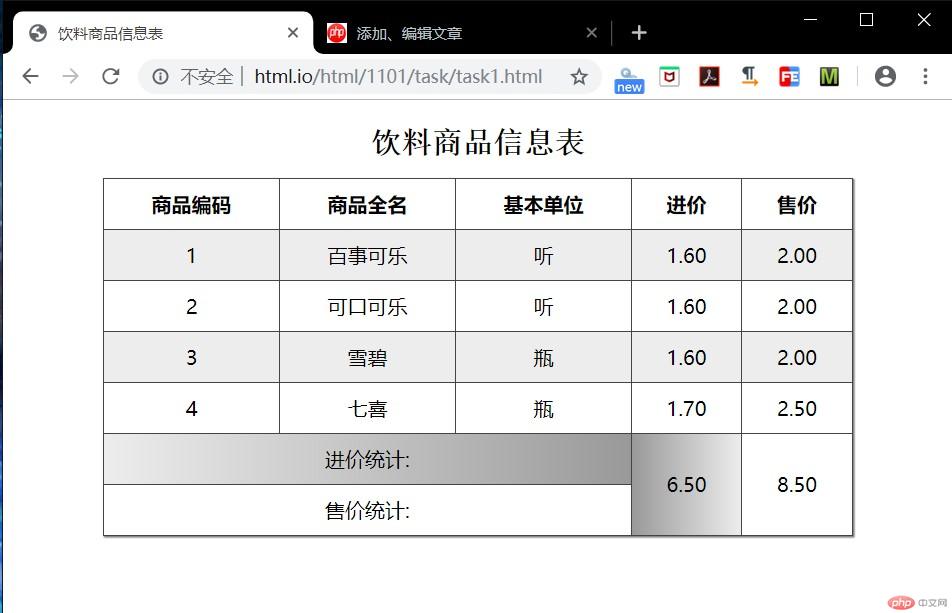
实例
<!DOCTYPE html>
<html lang="en">
<head>
    <meta charset="UTF-8">
    <title>饮料商品信息表</title>
    <style>
        table caption {
             font-family:"宋体";
             font-size:1.5rem;
             font-weight:bolder;
             margin-bottom: 15px;
             /*设置表格标题文字大小 加粗与下外边距*/
         }
         table {
             border: 1px solid #444;
             /*整体边框一个像素且灰色*/
             box-sizing: border-box;
             /*稳定盒子*/
             box-shadow: 1px 1px 1px #808080;
             /*添加阴影 */
             border-collapse:collapse;
             /*折叠边框线*/
             width: 600px;
             margin: 20px auto;
             /*设置表格宽与外边距*/
         }
        th , td {
            border: 1px solid #444;
            /*每个单元格1像素且灰色*/
            padding:10px 10px;
            /*设置每个单元格内边距*/
            text-align: center;
            /*单元格内文本居中*/
        }
        tbody > tr:nth-of-type(odd) {
            background-color:#ededed;
            /*!*用结构伪类 添加偶数行 背景浅灰   even奇数* odd偶数/*/
        }
        tfoot > tr:first-of-type > td:first-of-type{
            background:linear-gradient( to right , #ededed , #999);
        }
        /*用结构伪类找到tfoot下第一行第一个单元格 进行背景线性渐变*/
        tfoot > tr:first-of-type > td:nth-of-type(2){
            background:linear-gradient( to right , #999 , #ededed);
        }
    </style>
</head>
<body>
    <table>
        <caption>饮料商品信息表</caption>
    <thead>
         <tr>
           <th>商品编码</th>
           <th>商品全名</th>
           <th>基本单位</th>
           <th>进价</th>
           <th>售价</th>
         </tr>
    </thead>
        <tbody>
         <tr>
             <td>1</td>
             <td>百事可乐</td>
             <td>听</td>
             <td>1.60</td>
             <td>2.00</td>
         </tr>
         <tr>
             <td>2</td>
             <td>可口可乐</td>
             <td>听</td>
             <td>1.60</td>
             <td>2.00</td>
         </tr>
         <tr>
             <td>3</td>
             <td>雪碧</td>
             <td>瓶</td>
             <td>1.60</td>
             <td>2.00</td>
         </tr>
         <tr>
             <td>4</td>
             <td>七喜</td>
             <td>瓶</td>
             <td>1.70</td>
             <td>2.50</td>
         </tr>
    </tbody>
        <tfoot>
         <tr>
             <td colspan="3">进价统计:</td>
<!--             <td></td>-->
<!--             <td></td>-->
             <td rowspan="2">6.50</td>
             <td rowspan="2">8.50</td>
         </tr>
         <tr>
             <td colspan="3">售价统计:</td>
<!--             <td></td>-->
<!--             <td></td>-->
<!--             <td></td>-->
<!--             <td></td>-->
         </tr>
        </tfoot>
    </table>
</body>
</html>点击 "运行实例" 按钮查看在线实例
二、使用<div><span><p><ul>...等标签来制作一张课程表
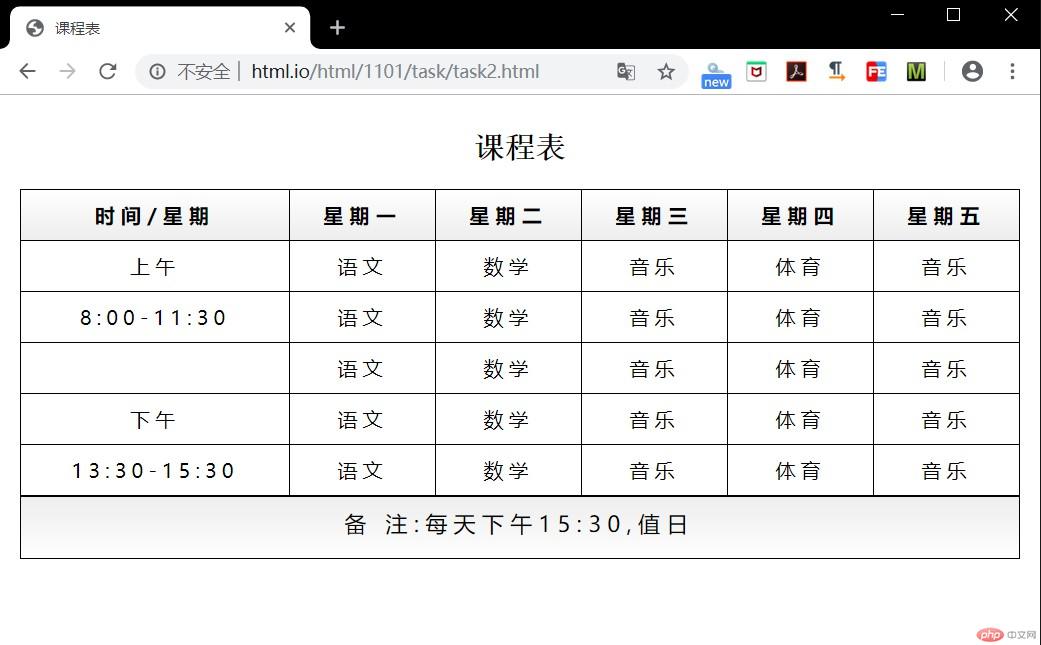
实例
<!DOCTYPE html>
<html lang="en">
<head>
    <meta charset="UTF-8">
    <title>课程表</title>
    <style>
        li {
            list-style: none;
        }
        span > ul {
                     display: table-row;
                 }
        span > ul >li {
            display: table-cell;
            border: 1px solid black;
            padding: 10px;
        }
        .caption {
            display: table-caption;
            text-align: center;
            font-size: 1.5rem;
            font-family: 宋体;
        }
        .timetable {
            display: table;
            box-sizing: border-box;
            /*border: 1px solid grey;*/
            border-collapse: collapse;
            width: 800px;
            margin: auto;
        }

        .thead {
            display: table-header-group;
            /*显示表格标题组*/
            text-align: center;
            font-weight: bolder;
            letter-spacing:5px;
            /*设置字间距*/
            background:linear-gradient( #ffffff , #ededed );
        }
        .timetable1{
            display: table;
            box-sizing: border-box;
            border-collapse: collapse;
            width: 800px;
            margin:auto;
        }
        .tbody {
            display: table-row-group;
            text-align: center;
            letter-spacing:4px;
        }
        .tr0{
            display: table-row;
        }
        .td0{
             display: table-cell;
         }

        .timetable2{
            display: table;
            box-sizing: border-box;
            width: 800px;
            margin: auto;
        }
        .tr{
            display: table-row;
        }
        .td{
            display: table-cell;
            width: 1000px;
            height: 30px;
        }
        .tfoot {
            display: table-footer-group;
            text-align: center;
            letter-spacing: 5px;
            font-size: 1.1rem;
            background:linear-gradient( #ededed , #ffffff   );
        }

    </style>
</head>
<body>

     <div class="timetable">
         <h2 class="caption">课程表</h2>
         <span class="thead">
             <ul>
                 <li>时间/星期</li>
                 <li>星期一</li>
                 <li>星期二</li>
                 <li>星期三</li>
                 <li>星期四</li>
                 <li>星期五</li>
             </ul>
         </span>
           <span class="tbody">
             <ul >
                 <li>上午</li>
                 <li>语文</li>
                 <li>数学</li>
                 <li>音乐</li>
                 <li>体育</li>
                 <li>音乐</li>
             </ul>
              <ul>
                 <li>8:00-11:30</li>
                 <li>语文</li>
                 <li>数学</li>
                 <li>音乐</li>
                 <li>体育</li>
                 <li>音乐</li>
             </ul>
             <ul >
                 <li ></li>
                 <li>语文</li>
                 <li>数学</li>
                 <li>音乐</li>
                 <li>体育</li>
                 <li>音乐</li>
             </ul>
             <ul>
                 <li>下午</li>
                 <li>语文</li>
                 <li>数学</li>
                 <li>音乐</li>
                 <li>体育</li>
                 <li>音乐</li>
             </ul>
             <ul>
                 <li>13:30-15:30</li>
                 <li>语文</li>
                 <li>数学</li>
                 <li>音乐</li>
                 <li>体育</li>
                 <li>音乐</li>
             </ul>
          </span>
         </div>

         <div class="timetable2">
           <span class="tfoot">
             <ul class="tr">
                 <li class="td">备 注:每天下午15:30,值日</li>
             </ul>
           </span>
         </div>

</body>
</html>点击 "运行实例" 按钮查看在线实例
三、使用绝对定位,实现用户登录框在页面中始终居中显示
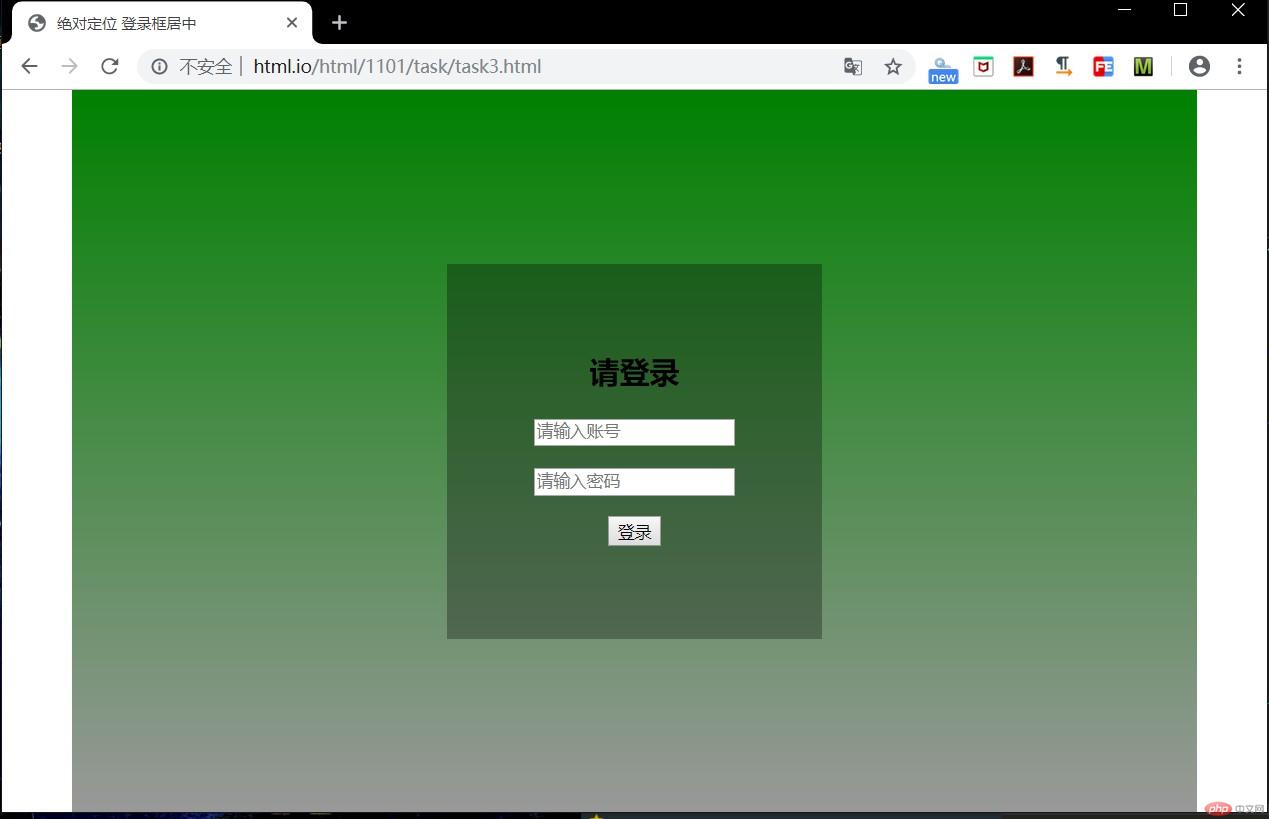
实例
<!DOCTYPE html>
<html lang="en">
<head>
    <meta charset="UTF-8">
    <title>绝对定位 登录框居中</title>
    <style>
        html , body{
          box-sizing: border-box;
            /*稳定盒子布局*/
          height:100%;
            /*页面高百分比*/
          margin:0px;
          padding:0px;
            /*清除内外边距*/
          /*border: 1px solid red;*/
      }
        .box1{
            box-sizing: border-box;
            /*稳定盒子布局*/
            width:900px;
            /*大盒子宽*/
            height:100%;
            /*大盒子高随页面*/
            position:relative;
            /*设置定位*/
            margin:auto;
            /*外边距自动*/
            background:linear-gradient(#008000 , #999999);
        }
            /*背景渐变*/
        .box2{
            box-sizing: border-box;
            width:300px;
            height: 300px;
            position: absolute;
            background-color:rgba(0 , 0 , 0 ,0.3);
            /*设置背景透明*/
            left:50%;
            top:50%;
            margin: -150px 0 0 -150px;
            text-align: center;
            padding: 50px;
        }
    </style>
</head>
<body class="login">
     <div class="box1">
         <div class="box2">
             <h2>请登录</h2>
             <form action="" method="post">
                 <p><input type="text" placeholder="请输入账号" ></p>
                 <P><input type="password" placeholder="请输入密码"></P>
                 <p><button>登录</button></p>
             </form>
         </div>
     </div>
</body>
</html>点击 "运行实例" 按钮查看在线实例
四、模仿课堂案例, 实现圣杯布局,并写出完整流程与布局思路 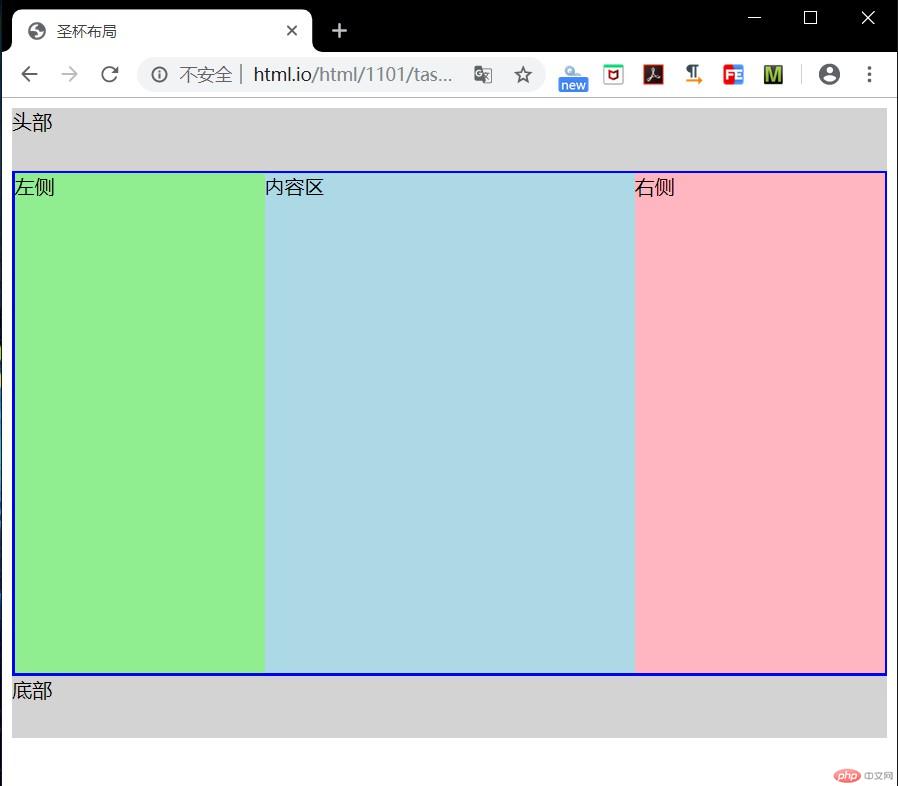
实例
<!DOCTYPE html>
<html lang="en">
<head>
    <meta charset="UTF-8">
    <title>圣杯布局</title>
    <style>
        header, footer {
            height: 50px;
            background-color: lightgrey;
        }
        /*设置主体区*/
        main {
            border: 2px solid blue;
            /*参考边框*/
            padding-left: 200px;
            /*左内边距: 显示左侧内容*/
            padding-right: 200px;
            /*右内边距: 显示右侧内容*/
            box-sizing: border-box;
            /*稳定盒子布局*/
            overflow: auto;
            /*将main转为BFC块, 使浮动元素包含在内, 撑开父级*/
        }

        /*主体内容区*/
        main > article {
            box-sizing: border-box;
            background-color: lightblue;
            width: 100%;
            /*占据父容器全部空间,百分比使之自适应*/
            min-height: 400px;
            /*使用最小高度弥补内容不足问题*/
        }

        /*设置左右二侧通用样式*/
        main > aside {
            box-sizing: border-box;
            min-height: 400px;
            width: 200px;
        }
        main > aside:first-of-type {
            background-color: lightgreen;
        }

        main  > aside:last-of-type{
            background-color: lightpink;
        }

        /*主体区内容全部浮动*/
        main > article,
        main > aside:first-of-type,
        main > aside:last-of-type {
            float: left;
        }

        aside:first-of-type {
            /*左侧通过负外边距拉到主体的左边*/
            margin-left: -100%;
            /*margin负值,可以元素反向移动*/
            /*-100%:从当前位置向左移动一个父元素宽度*/

            position: relative;
            left: -200px;
            /*将左侧通过相对定位,移入到预留的main的左内边距中*/
        }

        aside:last-of-type {
            margin-left: -200px;
            /*右侧可直接设置一个固定值即可*/
            position: relative;
            left: 200px;
            /*与左侧一样, 将右侧移入到它的预留空间中*/
        }

    </style>
</head>
<body>
    <header>头部</header>
    <main>
        <article>内容区</article>
        <aside>左侧</aside>
        <aside>右侧</aside>
    </main>
    <footer>底部</footer>
</body>
</html>点击 "运行实例" 按钮查看在线实例
总结:
学习表格控制 浮动 定位 主要目的了解布局 知道网页基本构造原理 合理灵活利用布局 提高代码效率与网页优化等
手抄:
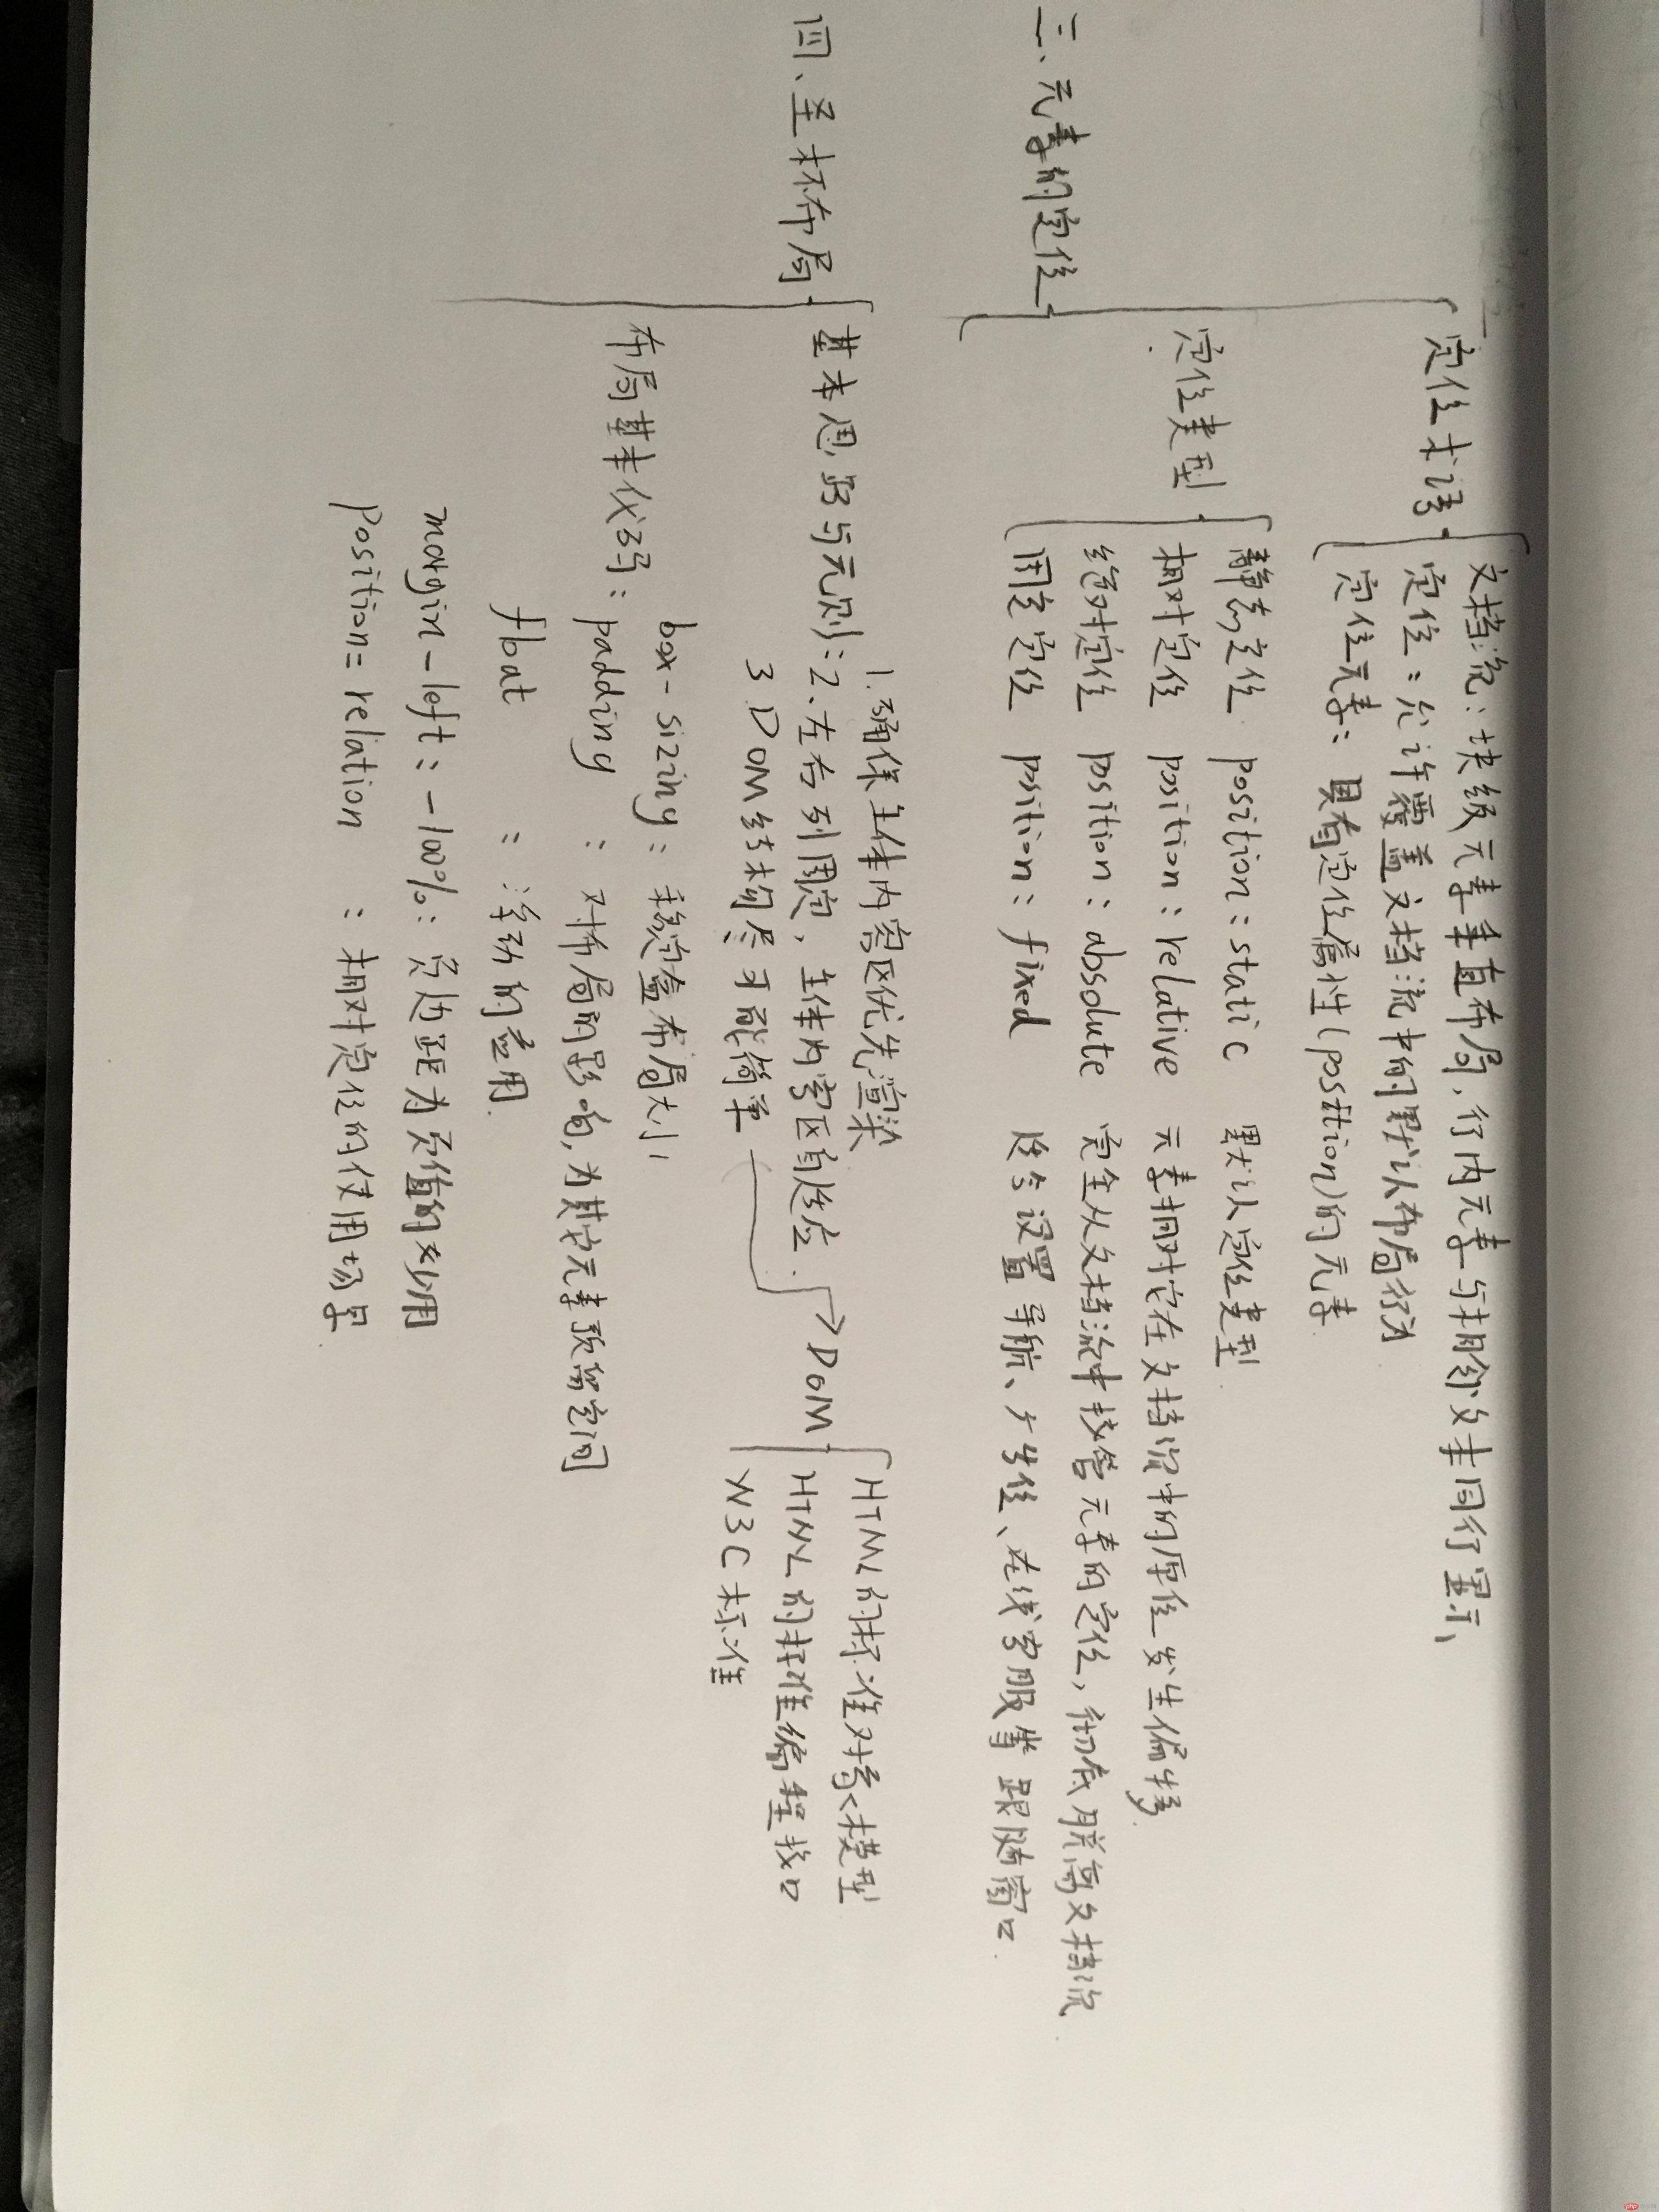
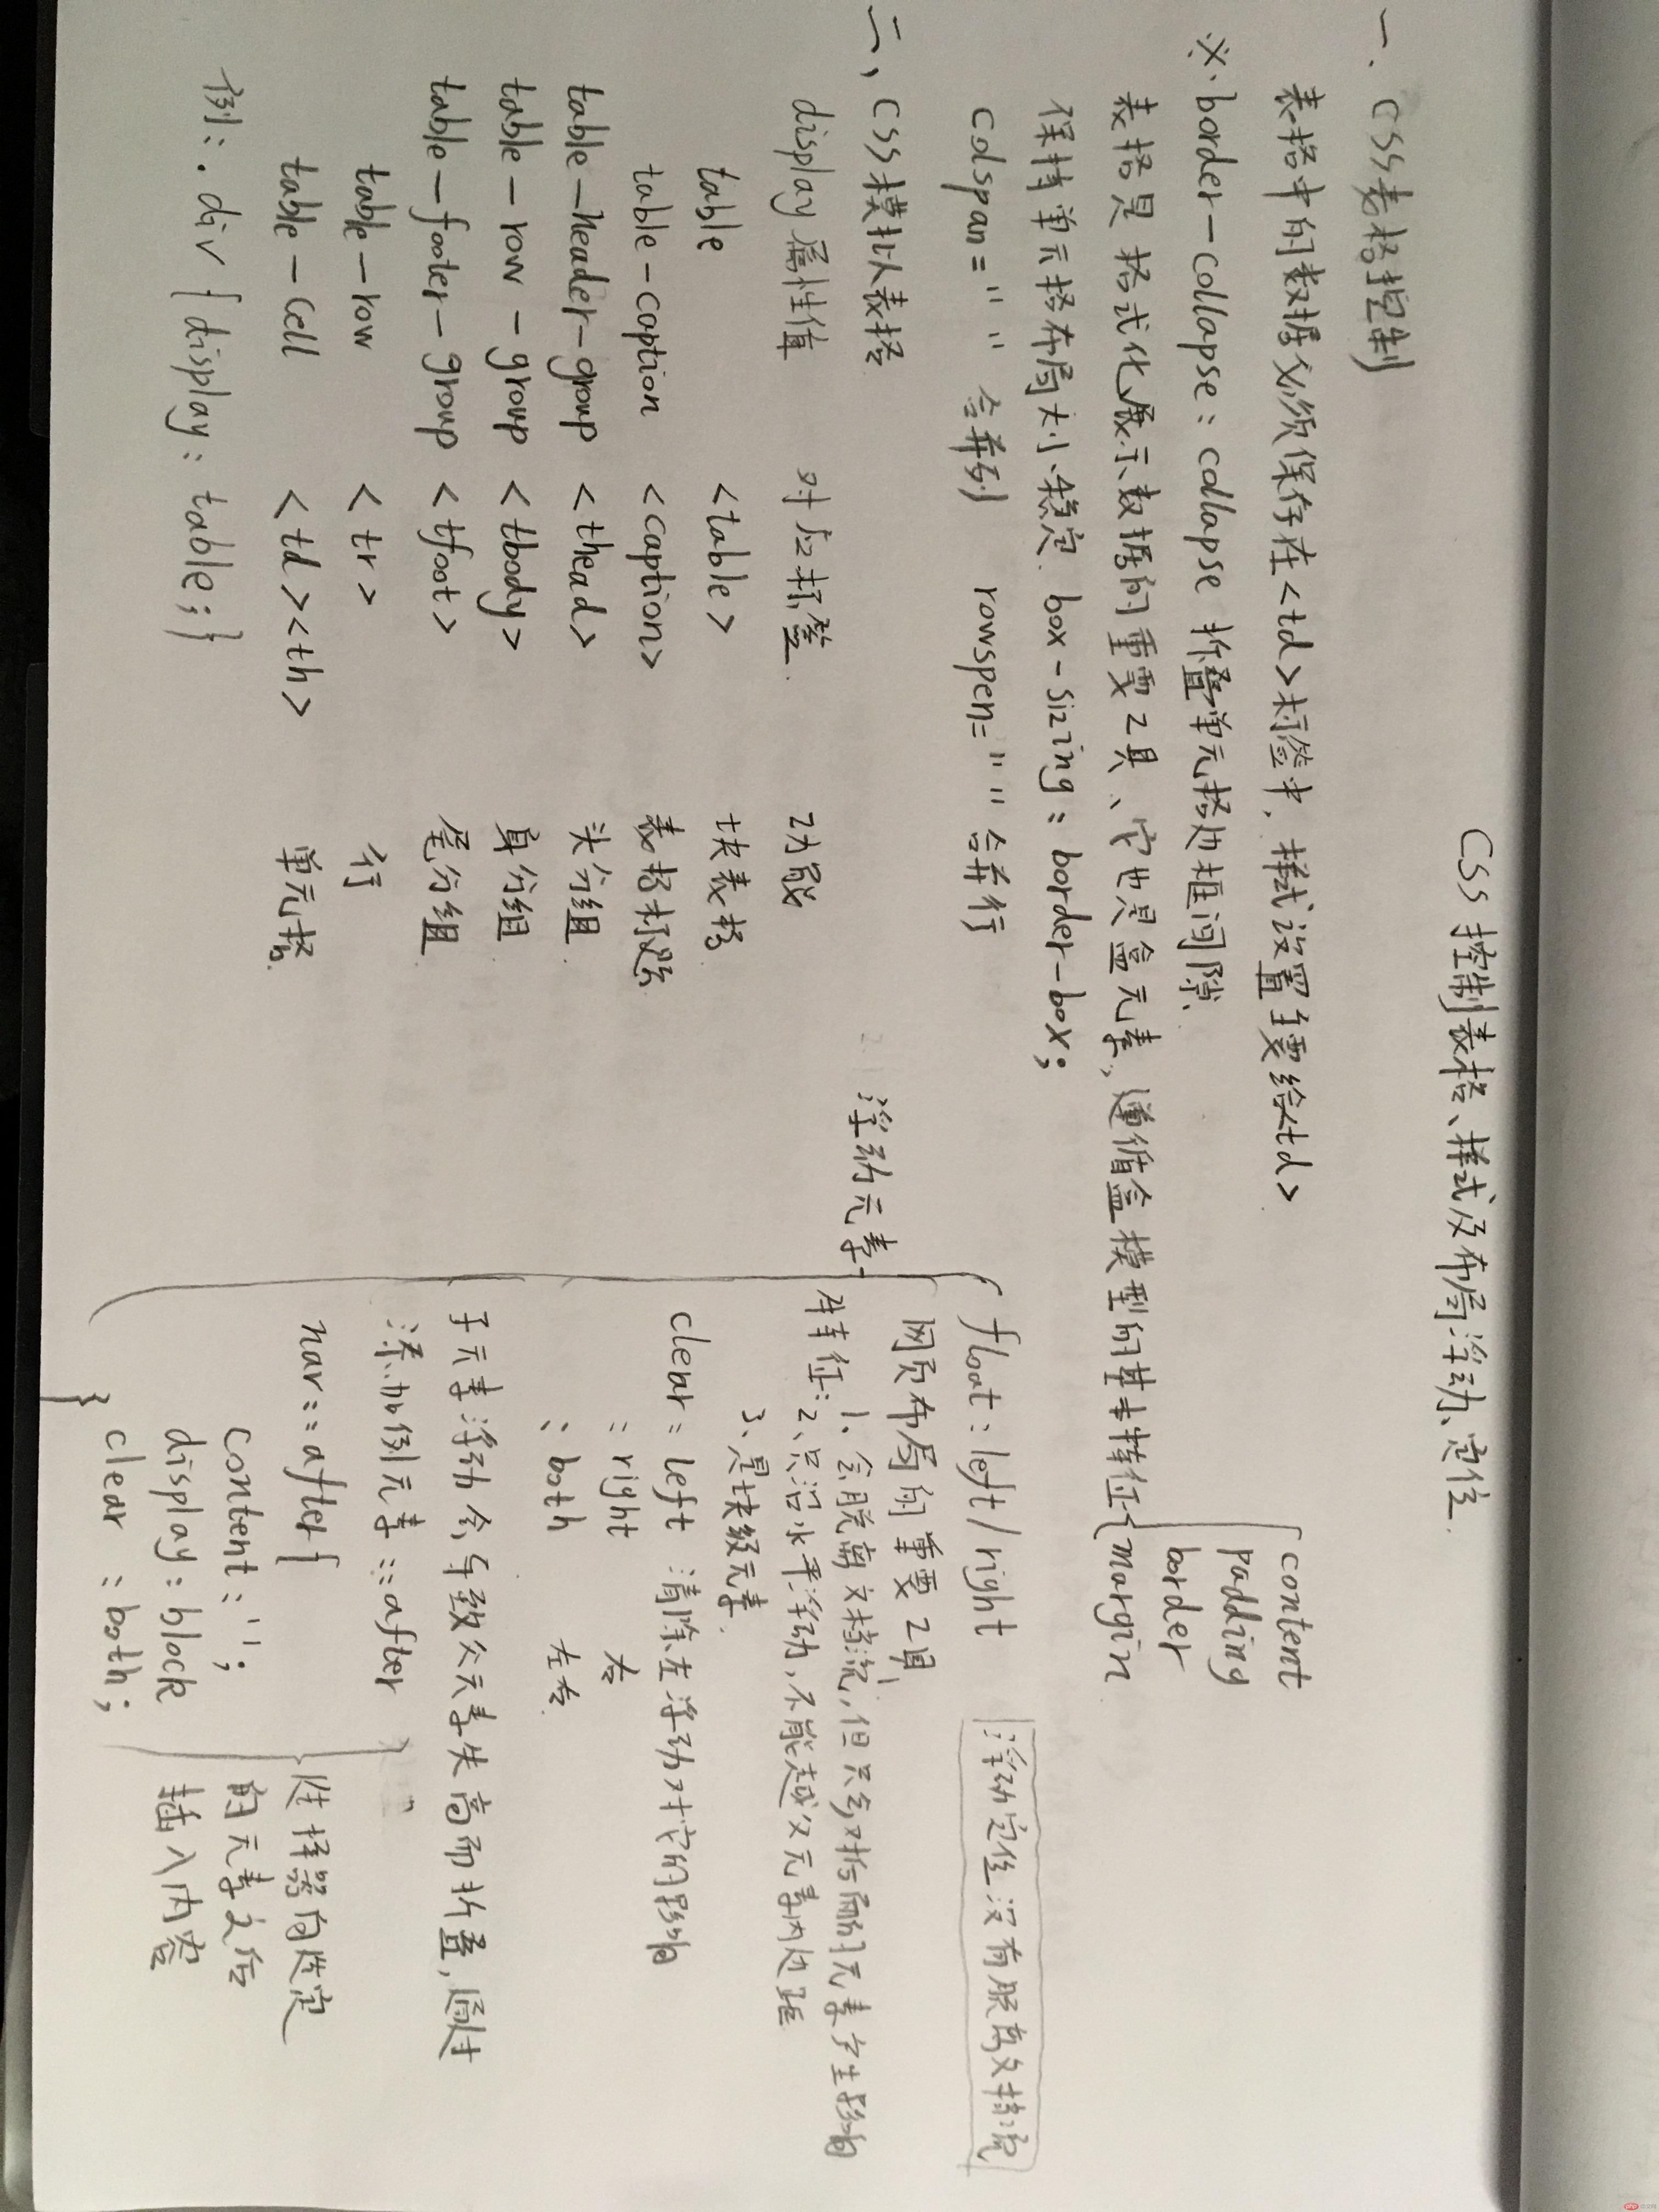 :
:
Correction status:qualified
Teacher's comments:代码整洁规范, 手写认真好看, 不错
Statement of this Website
The copyright of this blog article belongs to the blogger. Please specify the address when reprinting! If there is any infringement or violation of the law, please contact admin@php.cn Report processing!


![[Web front-end] Node.js quick start](https://img.php.cn/upload/course/000/000/067/662b5d34ba7c0227.png)


 :
: