

<style type="text/css">
    *{
        margin: 0;
        padding: 0;
    }
    body{
        padding: 100px;
    }
    .items{
        width: 100px;
        height: 100px;
        line-height: 100px;
        background: lightcoral;
        box-sizing: border-box;
        text-align: center;
        border: 2px dashed #333;
    }
    .container{
        border:solid 2px lightyellow;
        width: 500px;
        display: flex;
        flex-flow: row nowrap;
        box-sizing: border-box;
        margin-bottom: 10px;
    }
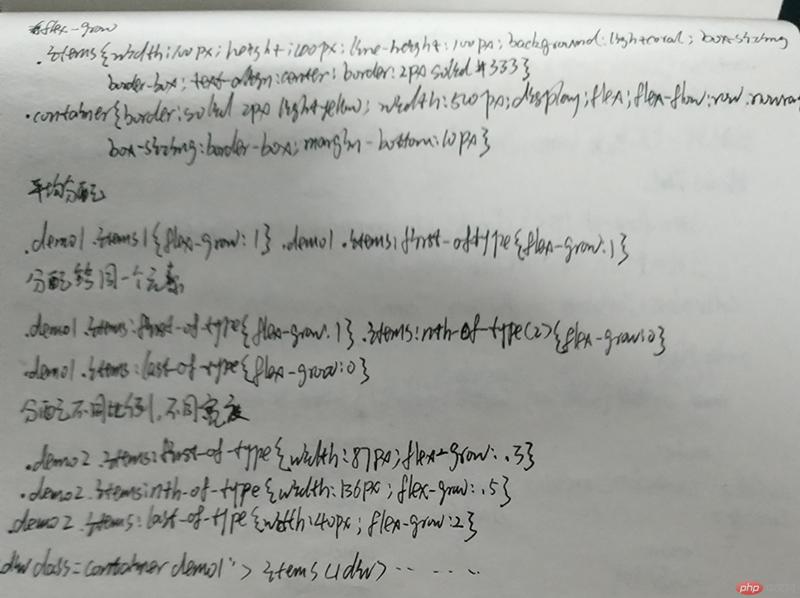
    /*平均分配*/
    .demo1 .items{
        flex-grow:1;
    }/* 将剩余宽度全部分配给第一个元素*/
    .demo1 .items:first-of-type{
        flex-grow:1
    }
    .demo1 .items:nth-of-type(2){
        flex-grow:0
    }
    .demo1 .items:last-of-type{
        flex-grow:0
    }/* 将剩余宽度按比例分配所有元素
   items元素宽度为100 container宽度为500,分配比例总和 1+2+4 = 7
   剩余宽度 : 500 - (100*3)=200px;
   分配增长比例计算 :
                   第一个items 1 / 7= 0.142
                   第二个items 2 / 7= 0.285
                   第三个items 4 / 7= 0.571
   计算每个元素的增长量 :
                   第一个items 0.142 x 200 = 28.4
                   第二个items 0.285 x 200 = 57
                   第三个items 0.571 x 200 = 114.2
   计算每个元素的最终宽度 :
                   第一个items 100 + 28.4 = 128.4
                   第二个items 100 + 57 = 157
                   第三个items 100 + 114.2 = 214.2
*/
    .demo2 .items:first-of-type{
        flex-grow:1
    }
    .demo2 .items:nth-of-type(2){
        flex-grow:2
    }
    .demo2 .items:last-of-type{
        flex-grow:4
    }/* 每个元素宽度不同,分配比例使用小数
   items1元素宽度为87px
   items2元素宽度为136px
   items3元素宽度为40px
   container宽度为500,分配比例总和 0.3+0.5+0.2 = 1
   剩余宽度 : 500 - (87+136+40)=237px;
   分配增长比例计算 :
                   第一个items 0.3 / 1= 0.3
                   第二个items 0.5 / 1= 0.5
                   第三个items 0.2 / 1= 0.2
   计算每个元素的增长量 :
                   第一个items 0.3 x 237 = 71.1
                   第二个items 0.5 x 237 = 118.5
                   第三个items 0.2 x 237 = 47.4
   计算每个元素的最终宽度 :
                   第一个items 87 + 71.1 = 158.1
                   第二个items 136 + 118.5 = 254.5
                   第三个items 40 + 47.4 = 87.4
*/.demo3 .items:first-of-type{
    width: 87px;
    flex-grow:.3}.demo3 .items:nth-of-type(2){
    width: 136px;
    flex-grow:.5}.demo3 .items:last-of-type{
    width: 40px;
    flex-grow:.2}</style><div class="container demo1">
    <div class="items">items1</div>
    <div class="items">items2</div>
    <div class="items">items3</div></div><div class="container demo2">
    <div class="items">items1</div>
    <div class="items">items2</div>
    <div class="items">items3</div></div><div class="container demo3">
    <div class="items">items1</div>
    <div class="items">items2</div>
    <div class="items">items3</div></div>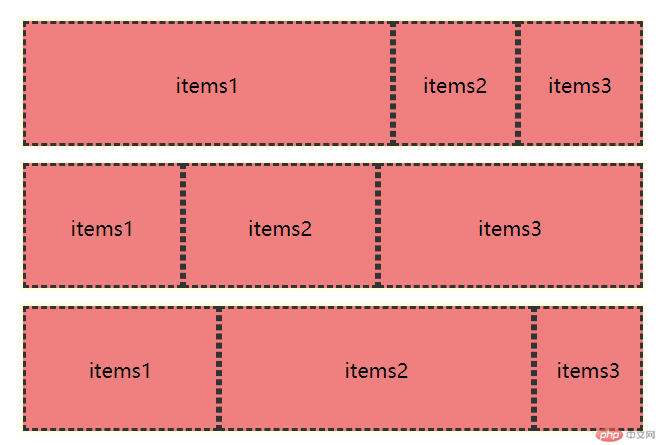
<style type="text/css">
    *{
        margin: 0;
        padding: 0;
    }
    body{
        padding: 100px;
    }
    .items{
        width: 210px;
        height: 100px;
        line-height: 100px;
        background: lightblue;
        box-sizing: border-box;
        text-align: center;
        border: 2px dashed #333;
    }
    .container{
        border:solid 2px lightyellow;
        width: 500px;
        display: flex;
        flex-flow: row nowrap;
        box-sizing: border-box;
        margin-bottom: 10px;
    }/*
items元素宽度为210 container宽度为500,待缩放 210 x 3 - 500 = 130px
平均分配缩放*/
    .demo1 .items{
        flex-shrink:1;
    }/* 将缩放宽度全部分配给最后一个元素*/
    .demo1 .items:first-of-type{
        flex-shrink:0
    }
    .demo1 .items:nth-of-type(2){
        flex-shrink:0
    }
    .demo1 .items:last-of-type{
        flex-shrink:1
    }/* 将缩放宽度按比例分配所有元素
   items元素宽度为210 container宽度为500,待缩放 210 x 3 - 500 = 130px
   分配缩放比例总和 2+3+5 = 10
   分配缩放比例计算 :
                   第一个items 2 / 10= 0.2
                   第二个items 3 / 10= 0.3
                   第三个items 4 / 10= 0.4
   计算每个元素的缩减量 :
                   第一个items 0.2 x 130 = 26
                   第二个items 0.3 x 130 = 39
                   第三个items 0.5 x 130 = 65
   计算每个元素的最终宽度 :
                   第一个items 210 - 26 = 184
                   第二个items 210 - 39 = 171
                   第三个items 210 - 65 = 145
*/
    .demo2 .items:first-of-type{
        flex-shrink:2
    }
    .demo2 .items:nth-of-type(2){
        flex-shrink:3
    }
    .demo2 .items:last-of-type{
        flex-shrink:5
    }/* 每个元素宽度不同,分配比例使用小数
   items1元素宽度为150px
   items2元素宽度为300px
   items3元素宽度为180px
   container宽度为500,分配比例总和 0.1+0.3+0.6 = 1
   超出宽度 : (150+300+180)- 500 =130px;
1.先计算出缩减因子的缩小比例 = 等待缩减空间 / 每个弹性元素的宽度与缩减因子乘积的总和
 130 / (150 x 0.1 + 300 x 0.3 + 180 x 0.6)  = 130 / 213 = 0.61

2. 计算每个元素的缩减量: 元素宽度 * ( 缩减因子 * 缩减因子的缩减比例)
        第一个items 150 x (0.1 x 0.61) = 9.15
        第二个items 300 x (0.3 x 0.61) = 54.9
        第三个items 180 x (0.6 x 0.61) = 65.88

3. 计算每个元素的最终缩减量:
        第一个items 150 - 9.15 = 140.85
        第二个items 300 - 54.9 = 245.1
        第三个items 180 - 65.88 = 114.12
*/.demo3 .items:first-of-type{
    width: 150px;
    flex-shrink:.1}.demo3 .items:nth-of-type(2){
    width: 300px;
    flex-shrink:.3}.demo3 .items:last-of-type{
    width: 180px;
    flex-shrink:.6}</style><div class="container demo1">
    <div class="items">items1</div>
    <div class="items">items2</div>
    <div class="items">items3</div></div><div class="container demo2">
    <div class="items">items1</div>
    <div class="items">items2</div>
    <div class="items">items3</div></div><div class="container demo3">
    <div class="items">items1</div>
    <div class="items">items2</div>
    <div class="items">items3</div></div>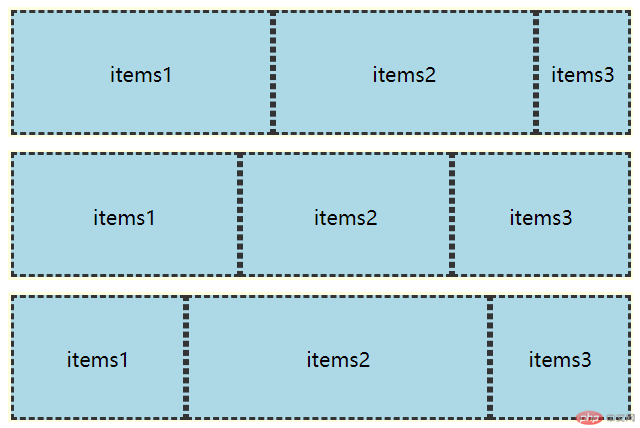
<style type="text/css">
    *{margin:0; padding:0}
    .container{
        width: 500px;
    }
    .items{
        height: 100px;
        line-height: 100px;
        background: lightblue;
        box-sizing: border-box;
        text-align: center;
        border: 2px dashed #333;
    }
    /*在设置宽度时,以设置宽度显示*/
    .items{
        width: 100px;
    }
    /*在未设置元素宽度时,以内容宽度显示*/
    .items{
        flex-basis:content;
    }
    /*在未设置元素宽度时,以内容宽度显示*/
    .items{
        flex-basis:content;
    }
    /*自动状态下, 将设置权限交给浏览器*/
    /*如果元素设置了宽度, 就按自定义宽度显示*/
    /*如果元素的宽度也是auto,或者没有定义, 就按内容宽度content显示*/
    .items{
        flex-basis: auto;
    }
    /*当元素存在自定义宽度和flex-basic基准宽度时,以flex-basic属性值为弹性元素的基准值*/
    .items{
        width: 100px;
        flex-basis: 150px;
    }</style><div class="container">
    <div class="items"></div>
    <div class="items"></div>
<div class="items"></div></div>align-self 属性的使用
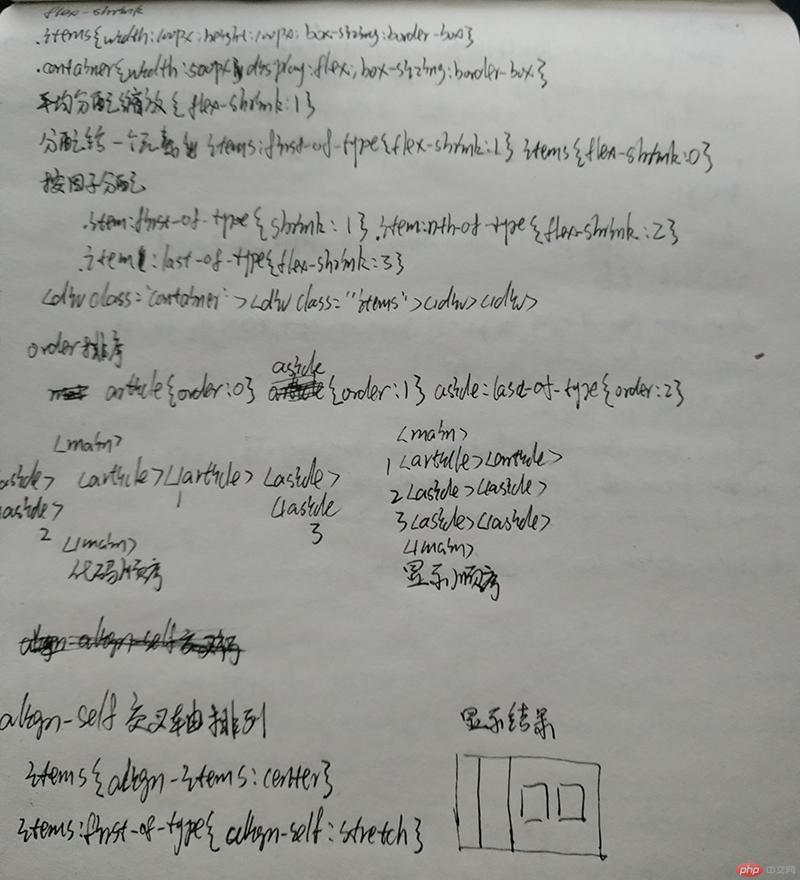
align-self是控制交叉轴单独元素的排列方式,该属性和align-content align-items的区别是,前两者定义整体交叉轴所有元素排列,align-self 控制单独元素。
<style type="text/css">
    body{
        padding: 100px;
    }
    main{
        display: flex;
        flex-flow: row wrap;
        width: 400px;
        height: 200px;
        box-sizing: border-box;
        border: solid 3px lightyellow;
        justify-content: space-evenly;
        align-items: center;
    }
    main *{
        width: 100px;
        height: auto;
        padding: 20px;
        box-sizing: border-box;
        background: lightgreen;
    }
    .item2{
        background: lightcoral;
        align-self:stretch    }</style><main>
    <div class="item1">item1</div>
    <div class="item2">item2</div>
    <div class="item3">item3</div></main>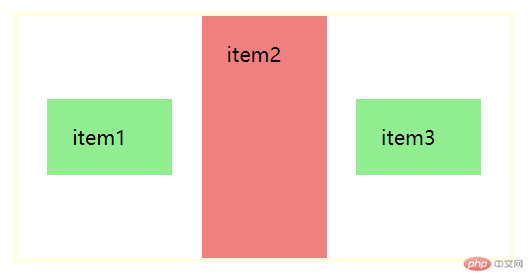
图中item1,item3已经被align-items居中,item2被align-self属性单独控制沾满一行。
order 属性的使用
order属性是针对flex弹性容器盒子的子元素排序产生的,元素定义了display:flex之后,可以使用order给子元素的显示顺序排列,并不会改变代码顺序。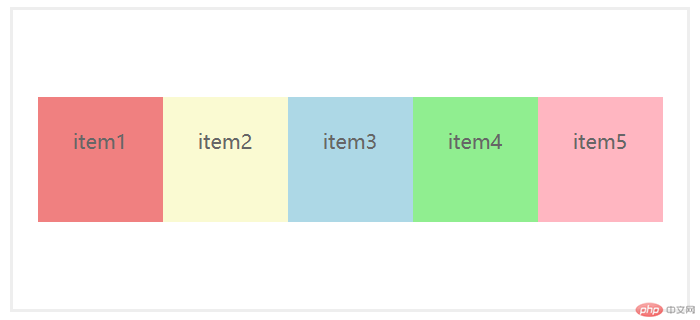
order:[自定义序列],只支持的整数,值可以是负数,排序为从小到大,数值越大,该元素排序越靠后。
所有元素的order属性默认值都是0,如果多个元素order值相同,并有小于该元素的order排序,那么相同的元素首先会排序到小于该order元素之后,然后相同的order元素按照代码先后顺序排序,不会有变化。
<style type="text/css">.order-box{
    display: flex;
    border: solid 2px #eee;
    padding: 20px;
    width: 500px;
    flex-flow: row wrap;
    justify-content: center;
    align-items: center;
    height: 200px;}.order-box > *{
    width:100px;
    height: 100px;
    text-align: center;
    color: #666;
    box-sizing: border-box;
    padding-top: 25px;}.order-box .item1{
    background: lightcoral;
    order:2;}.order-box .item2{
    background: lightgoldenrodyellow;
    order:1;}.order-box .item3{
    background: lightblue;
    order:2;}.order-box .item4{
    background: lightgreen;
    order:0;}.order-box .item5{
    background: lightpink;
    order:3;}</style><div class="order-box">
    <div class="item1">item1<br>order:2</div>
    <div class="item2">item2<br>order:1</div>
    <div class="item3">item3<br>order:2</div>
    <div class="item4">item4<br>order:0</div>
    <div class="item5">item5<br>order:3</div></div>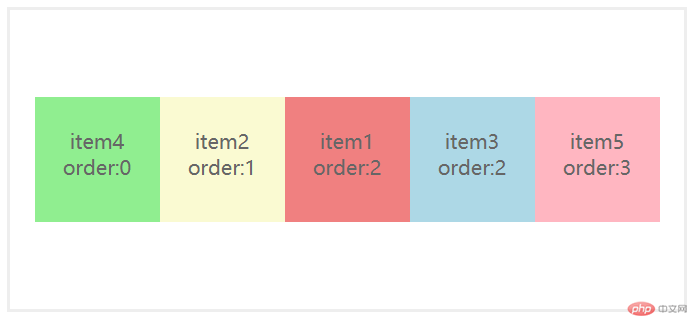
学习了order属性后,圣杯布局就相对简单了,我们只需要把主体内容放在第一段代码中,然后边栏放在后面,再使用 order 属性调整边栏的显示位置即可。
<style type="text/css">main{
    display: flex;
    flex-flow: row wrap;
    height: 300px;}header,footer{
    height: 100px;
    line-height: 100px;
    background: #eee;
    text-align: center;}main > *{
    padding-top: 100px;
    box-sizing: border-box;
    text-align: center;}article{
    background: lightcoral;
    flex:1 1 auto;
    order:1}aside{
    background: lightgreen;
    flex:0 0 auto;
    flex-basis: 200px;
    order:1}aside:first-of-type{
    order:0}</style><header>Header标签</header><main>
    <article>Article标签</article>
    <aside>Aside标签</aside>
    <aside>Aside标签</aside></main><footer>Footer标签</footer>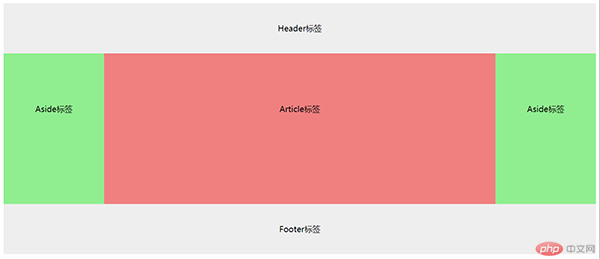
模仿了一下php中文网首页的一部分,还没全做完,时间不够了。
<style type="text/css">
    *{
        margin:0;
        padding: 0;
    }

    body{
        font-size: 14px;
        background: #f3f5f7;
    }
    ul,li{
        list-style: none;
    }
    input{
        border: none;
        outline: none;
        color: #333;
    }
    a{
        text-decoration: none;
        color: #333;
    }
    header{
        display: flex;
        height: 60px;
        flex-flow:row nowrap;
        background: linear-gradient(#404040, #161616);
        box-shadow: 0 3px 10px rgba(0,0,0,.7);
    }
    header .logo{
        width: 140px;
        height: 60px;
        background: url("images/logo.png") no-repeat center;
        background-size: 100%;
        margin:0 10px;
    }
    header nav{
        display: flex;
        flex-flow:row nowrap;
    }
    header nav a{
        color: rgba(255,255,255,.7);
        padding: 0 20px;
        transition:all .3s;
        line-height: 60px;
        box-sizing: border-box;
        margin:0 10px;
        font-size: 16px;
    }
    header nav a:hover{
        color: #fff;
        background: #494949;
        border-bottom: solid 2px #ea3a3a;
    }
    .user-box{
        display: flex;
        flex-flow: row wrap;
        flex:auto;
        justify-content: flex-end;
        padding-right: 10px;
        box-sizing: border-box;
    }
    .user-box a{
        background-size: 40%;
        background-repeat: no-repeat;
        background-position: center;
        height: 60px;
        width: 60px;
        flex:0 0 auto;
        opacity: .7;
        transition: all .3s;
    }
    .user-box a:hover{
        opacity: 1;
        background-color: #494949;
    }
    .user-box .user-avatar{
        background-image: url("images/avatar.png");
    }
    .user-box .user-notify{
        background-image: url("images/notify.png");
    }
    .layout{
        width: 1200px;
        margin: 0 auto;
    }
    .layout-row{
        margin-top: 30px;
        display: flex;
        flex-flow:row nowrap;
        border-radius:10px;
        box-shadow:0 3px 8px rgba(0,0,0,.3);
    }
    .side-nav{
        background: #2b333b;
        display: flex;
        flex-flow:column nowrap;
        justify-content: flex-start;
        flex-basis: 216px;
        overflow: hidden;
        border-top-left-radius:10px;
        border-bottom-left-radius:10px;
    }
    .side-nav a{
        color: rgba(255,255,255,.6);
        height: 60px;
        line-height: 60px;
        transition: all .3s;
        box-sizing: border-box;
        padding-left: 20px;
        position: relative;
        margin-bottom: 2px;
    }
    .side-nav a::after{
        content: "";
        display: block;
        border-right:solid 2px rgba(255,255,255,.6);
        border-bottom:solid 2px rgba(255,255,255,.6);
        position: absolute;
        width: 8px;
        height: 8px;
        transform: rotate(-45deg);
        right: 10%;
        top: 50%;
        margin-top: -4px;
    }
    .side-nav a:hover{
        background: #4b6279;
        color: #fff;
    }
    .banner-box{
        flex:1 1 auto;
        display: flex;
        overflow: hidden;
        flex-flow:column nowrap;
        border-top-right-radius: 10px;
        border-bottom-right-radius: 10px;
    }
    .banner-box .banner-bar{
        background: #fff;
        height: 60px;
        line-height: 60px;
        display: flex;
    }
    .banner-bar ul{
        display: flex;
        padding: 0 10px;
    }
    .banner-bar ul li{
        margin:0 15px;
        position: relative;
    }
    .new{
        padding-right: 24px;
    }
    .new.yellow::after{
        background-color: #ffb800;
    }
    .new.blue::after{
        background-color: #2f4056;
    }
    .new::after{
        content:"新";
        display: block;
        width:24px;
        height: 22px;
        font-size: 12px;
        line-height: 22px;
        text-align: center;
        border-radius: 2px;
        background: #ff5722;
        position: absolute;
        color: #fff;
        top: 50%;
        right:-5px;
        margin-top: -11px;
    }
    .banner-box{
        display: flex;
        background: #fff;
    }
    .banner-bar ul li a:hover{
        color: #4b6279;
    }
    .banner-bar .search-box{
        display: flex;
        flex:auto;
        box-sizing: border-box;
        padding: 0 20px 0 10px;
        align-items: center;
        position: relative;
    }
    .banner-bar .search-box a{
        display: block;
        position: absolute;
        width: 20px;
        height: 20px;
        background: url("images/search.png") no-repeat center;
        background-size: 100%;
        opacity: .4;
        top: 50%;
        right: 40px;
        margin-top: -10px;
    }
    .banner-bar .search-box input{
        background: #f1f0f0;
        height: 40px;
        line-height: 40px;
        font-size: 12px;
        padding: 0 10px;
        flex: 1 1 auto;
        box-sizing: border-box;
    }
    .banner-bar .search-box input:focus + .line{
        width: calc(100% - 30px);
        opacity: 1;
    }
    .banner-bar .search-box .line{
        display: block;
        width: 0;
        height: 1px;
        background: #6c8fb1;
        position: absolute;
        bottom: 50%;
        left: 10px;
        margin-bottom: -20px;
        opacity: 0;
        transition: all .3s
    }
    .banner-box .banner-main img{
        width: 100%;
        display: block;
    }
    .banner-items{
        display: flex;
        flex-flow:row nowrap;
        justify-content: space-evenly;
        align-items: center;
        flex:auto    }
    .banner-items a{
        flex-basis: 230px;
    }
    .banner-items img{
        display: block;
        width: 100%;
        border-radius: 10px;
    }
    .ad-row{
        overflow: hidden;
    }
    .ad-row a{
        text-align: center;
    }
    .ad-row a img{
        display: block;
    }</style><header>
    <a href="" class="logo"></a><nav><a href="">首页</a><a href="">视频教程</a><a href="">入门课程</a><a href="">社区问答</a><a href="">技术文章</a><a
        href="">编程词典</a><a href="">资源下载</a><a href="">工具下载</a></nav><div class="user-box"><a href="" class="user-notify"></a><a
        href="" class="user-avatar"></a></div></header><main class="layout">
    <section class="layout-row">
        <aside class="side-nav">
            <a href="">PHP开发</a>
            <a href="">前端开发</a>
            <a href="">服务端开发</a>
            <a href="">移动开发</a>
            <a href="">数据库</a>
            <a href="">服务器运维&下载</a>
            <a href="">在线工具箱</a>
            <a href="">常用类库</a>
        </aside>
        <div class="banner-box">
            <div class="banner-bar">
                <ul>
                    <li class="new"><a href="">PHP开发</a></li>
                    <li><a href="">独孤九贱</a></li>
                    <li class="new blue"><a href="">学习路线</a></li>
                    <li><a href="">在线工具</a></li>
                    <li class="new yellow"><a href="">趣味课堂</a></li>
                    <li><a href=""> 社区问答</a></li>
                    <li><a href="">课程直播</a></li>
                </ul>
                <div class="search-box">
                    <input type="text" placeholder="搜索你感兴趣的内容">
                    <span class="line"></span>
                    <a href=""></a>
                </div>
            </div>
            <div class="banner-main">
                <img src="images/index_banner2.jpg" alt="Think php 6.0">
            </div>
            <div class="banner-items">
                <a href=""><img src="images/index_yunv.jpg" alt="玉女心经"></a><a href=""><img src="images/index_php_item2.jpg" alt="每日小知识"></a><a href=""><img src="images/index_php_item3.jpg"
                                                                                                           alt="php实战"></a><a
                    href=""><img src="images/index_php_new4.jpg" alt="学习路线图"></a>
            </div>
        </div>
    </section>
    <section class="layout-row ad-row"><a href=""><img src="images/index_ad222.jpg" align="广告"></a></section></main>
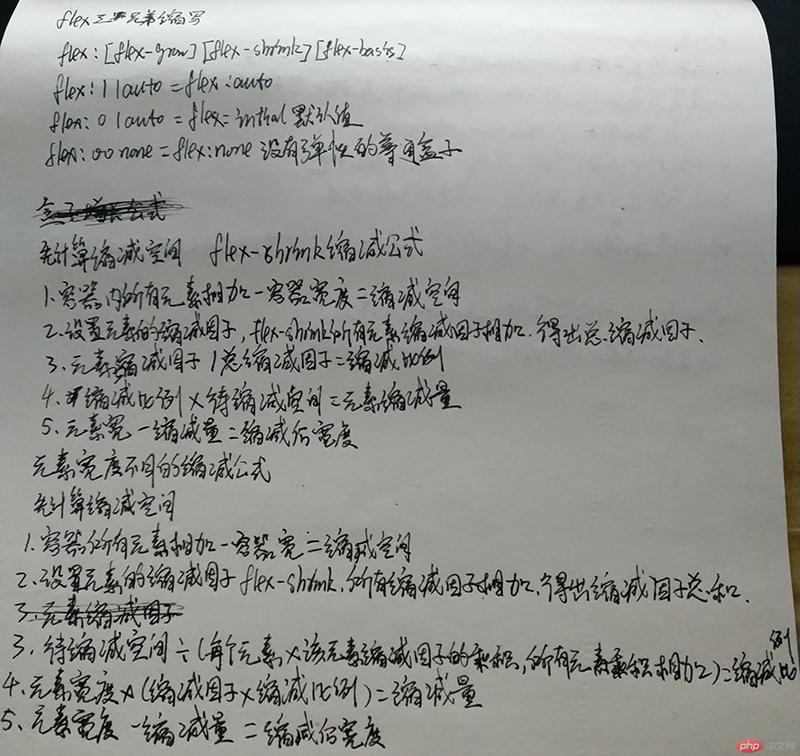
flex-grow flex-shrink flex-basis 三兄弟缩写flex:[flex-grow] [flex-shrink] [flex-basis]flex: 1 1 auto = flex: autoflex: 0 1 auto = intial 弹性盒子flex的默认值flex: 0 0 none = flex:none 没有弹性的普通盒子
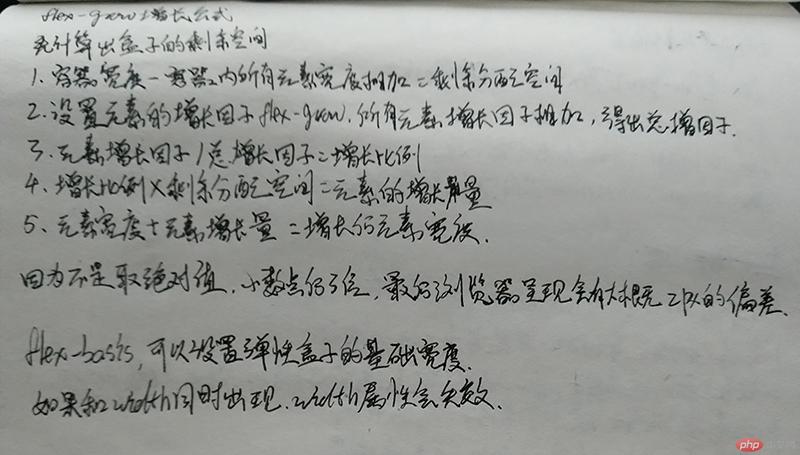
flex-grow 增长计算公式 先计算出盒子的剩余分配空间:
1.容器宽度 - 容器内所有元素宽度相加 = 剩余分配空间
2.设置元素的增长因子 flex-grow,所有元素增长因子相加,得出总增长因子
3.元素增长因子 / 总增长元素因子 = 增长比例
4.增长比例 * 剩余分配空间 = 元素的增长量
5.元素宽度 + 元素增长量 = 增长后元素宽度
flex-shrink 缩减计算公式
先计算缩减空间
1.容器内所有元素相加 - 容器宽度 = 缩减空间
2.设置元素的缩减因子 flex-shrink 所有元素缩减因子相加,得出总缩减因子
3.元素缩减因子 / 总缩减因子 = 缩减比例
4.缩减比例 * 待缩减空间 = 元素缩减量
5.元素宽度 - 元素缩减量 = 元素缩减后宽度
先计算缩减空间
1.容器内所有元素相加 - 容器宽度 = 缩减空间
2.设置元素的缩减因子 flex-shrink 所有元素缩减因子相加,得出总缩减因子
3.待缩减空间 / (每个元素宽度 * 该元素缩减因子的乘积相加总和) = 缩减比例
4.元素宽度 * (缩减因子 * 缩减比例)= 缩减量
5.元素宽度 - 缩减量 = 缩减后宽度。
因为取的不是绝对值,小数点后3位,最后浏览器呈现会有大概2px的误差,这是正常的。
flex-basis 的优先级高于width
1. 弹性元素设置了自定义宽度
2. 弹性容器设置了自定义宽度
3. 弹性元素总宽度在主轴上小于弹性容器的宽度,出现了多余空间
4. 弹性容器不允许换行
今天在模仿php中文网的时候发现了伪类的新用处,在这总结一下:
通常我们使用 :hover 和 :focus 等伪类,都是对该选择器自身属性产生变化,例如:
.a1{
    color:#f00}.a1:hover{
    color:#eee}
这是一个很简单的鼠标滑过改变文字颜色的案例,那么我们想要鼠标滑过一个元素,使其后代,或者兄弟元素产生变化应该怎么做呢?
其实css在伪类后还可以继续选择元素 例如:
<style type="text/css">
    .a1,.a2{
        width:100px;
        height:100px
    }
    .a1{
        background:#f00;
    }
    .a2{
        background:#000;
        overflow: hidden;
    }
    .a1:hover+.a2{
        background:#0f0
    }
    .a1:hover+.a2 > .a3{
        background: #000;
    }
    .a3{
        width: 50px;
        height: 50px;
        background: #fff;
        margin: 25px auto 0;
    }</style><div class="a1">a1元素</div><div class="a2">a2元素    <div class="a3">a3元素</div></div>
这个案例中,我们改变了a2和a2子元素a3的背景颜色,但是鼠标并没有经过a2,是在鼠标经过a1的时候使用兄弟选择器+后代选择器改变了颜色。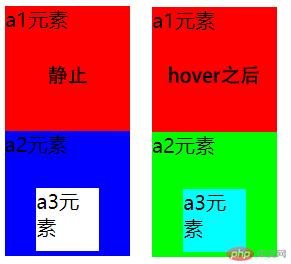
交叉轴的stretch是使交叉轴的元素占满一行,但是前提是交叉轴的width height 值没有被设置,如果有值则stretch不生效。
手抄代码不包含题5,省略了html重复行和没必要的css样式
