


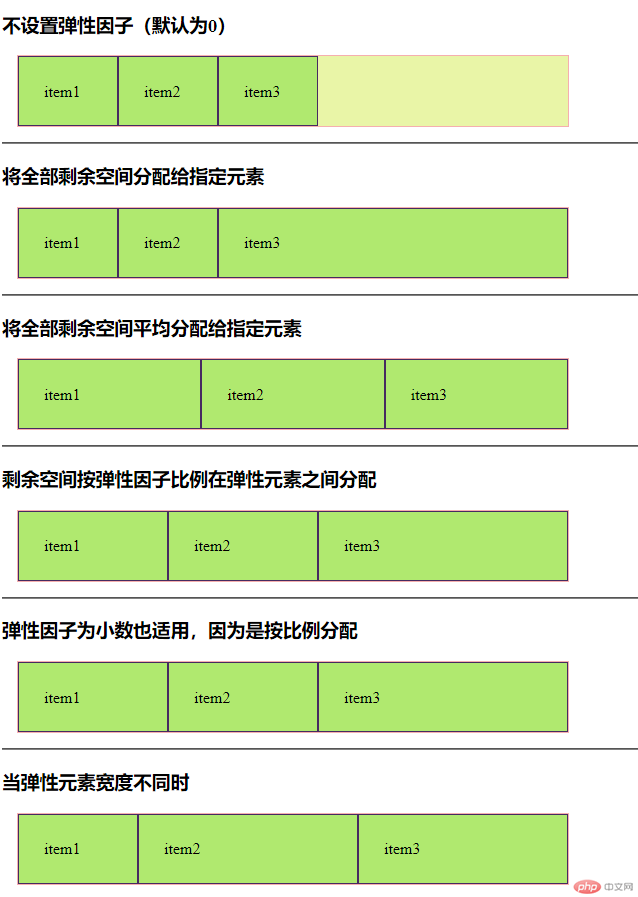
一、给弹性元素设置增长因子
<!DOCTYPE html>
<html lang="en">
<head>
    <meta charset="UTF-8">
    <meta name="viewport" content="width=device-width, initial-scale=1.0">
    <meta http-equiv="X-UA-Compatible" content="ie=edge">
    <link rel="stylesheet" href="css/style1.css">
    <title>给弹性元素设置增长因子</title>
</head>
<body>
    <h3>不设置弹性因子(默认为0)</h3>
    <div class="container flex demo1">
        <span class="item">item1</span>
        <span class="item">item2</span>
        <span class="item">item3</span>
    </div>
    <hr>

    <h3>将全部剩余空间分配给指定元素</h3>
    <div class="container flex demo2">
        <span class="item">item1</span>
        <span class="item">item2</span>
        <span class="item">item3</span>
    </div>
    <hr>

    <h3>将全部剩余空间平均分配给指定元素</h3>
    <div class="container flex demo3">
        <span class="item">item1</span>
        <span class="item">item2</span>
        <span class="item">item3</span>
    </div>

    <hr>

    <h3>剩余空间按弹性因子比例在弹性元素之间分配</h3>
    <div class="container flex demo4">
        <span class="item">item1</span>
        <span class="item">item2</span>
        <span class="item">item3</span>
    </div>
    <hr>

    <h3>弹性因子为小数也适用,因为是按比例分配</h3>
    <div class="container flex demo5">
        <span class="item">item1</span>
        <span class="item">item2</span>
        <span class="item">item3</span>
    </div>

    <hr>

    <h3>当弹性元素宽度不同时</h3>
    <div class="container flex demo6">
        <span class="item">item1</span>
        <span class="item">item2</span>
        <span class="item">item3</span>
    </div>


</body>
</html>
点击 "运行实例" 按钮查看在线实例
@import "public.css";

/* 增长因子适用场景:
1.弹性容器设置了自定义宽度;
2.弹性元素设置了自定义宽度;
3.弹性容器不允许换行。
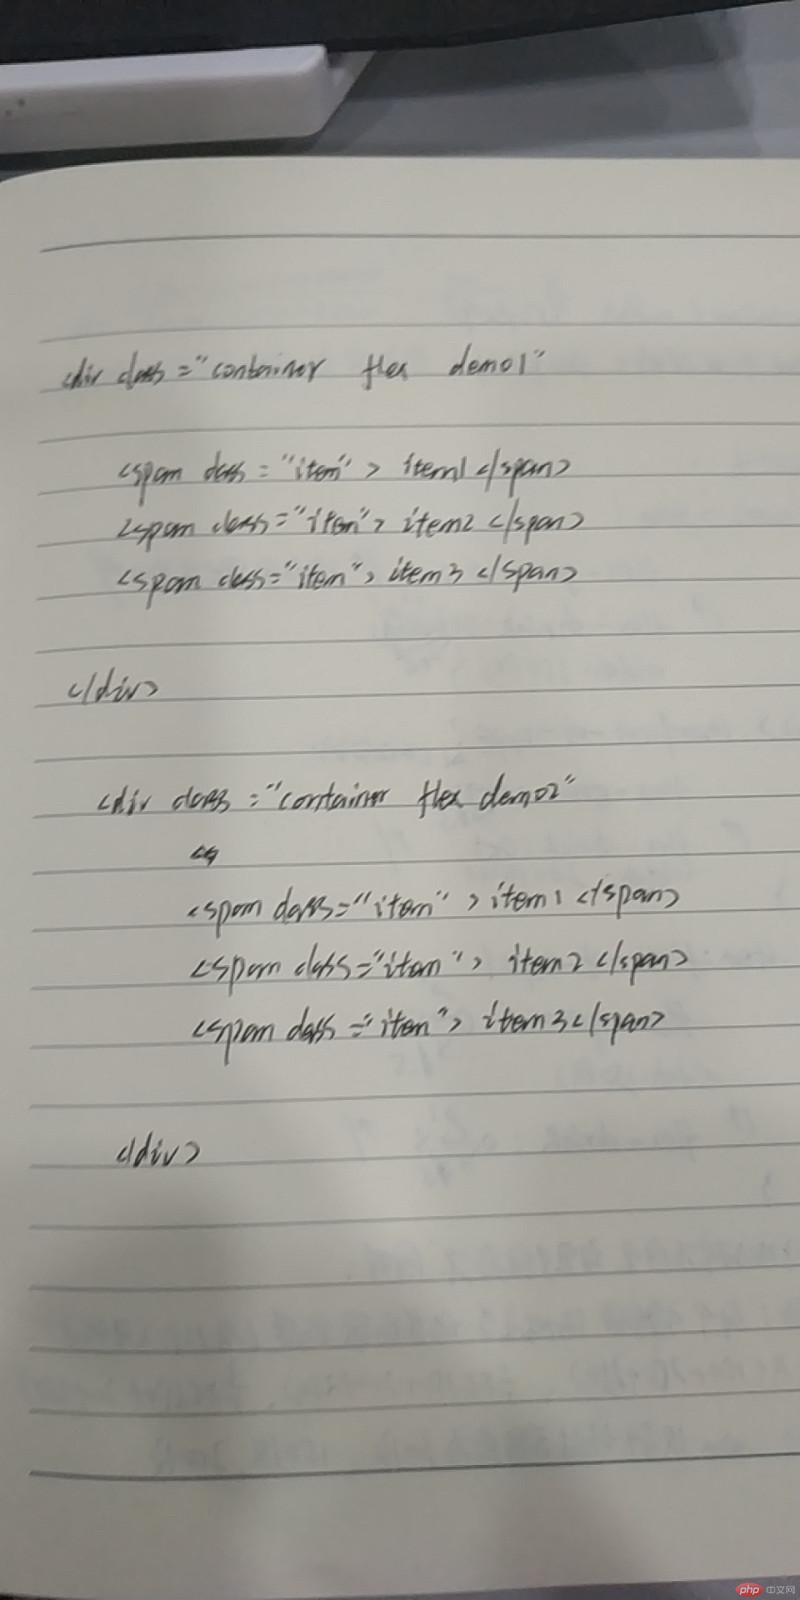
4.弹性元素总宽度在主轴方向上小于弹性容器宽度,有剩余空间 */
.container{
    width: 550px;
}
.item{
    width: 100px;
}

/* 不设置增长因子(默认) */
.demo1>.item{
    flex-grow: 0;
}


/* 将全部剩余空间分配给指定元素 */
.demo2>.item:first-of-type{
    flex-grow:0;
}
.demo2>.item:nth-of-type(2){
    flex-grow:0;
}
.demo2>.item:last-of-type{
    flex-grow:1;
}
/* 将全部剩余空间平均分配给指定元素 */
.demo3>.item:first-of-type{
    flex-grow:1;
}
.demo3>.item:nth-of-type(2){
    flex-grow:1;
}
.demo3>.item:last-of-type{
    flex-grow:1;
}

/* 将全部剩余空间平均分配给指定元素 */
.demo4>.item:first-of-type{
    flex-grow:1;
}
.demo4>.item:nth-of-type(2){
    flex-grow:1;
}
.demo4>.item:last-of-type{
    flex-grow:3;
}
/* 弹性因子为小数也适用,因为是按比例分配 */
/* 注意:弹性因子之和需大于等于1才能将剩余空间完全分配 */
.demo5>.item:first-of-type{
    flex-grow:0.2;
}
.demo5>.item:nth-of-type(2){
    flex-grow:0.2;
}
.demo5>.item:last-of-type{
    flex-grow:0.6;
}
/* 当弹性元素宽度不同时 */

.demo6>.item:first-of-type{
    flex-grow:1;
    width:100px
}
.demo6>.item:nth-of-type(2){
    flex-grow:1;
    width: 200px;
}
.demo6>.item:last-of-type{
    flex-grow:3;
    width: 150px;
}
/* 计算:
弹性因子之和:1+1+3=5;
剩余空间:550-(100+200+150)=100;
每个弹性元素分配到的剩余空间分别是:(1/5)x100、(1/5)x100、(3/5)x100 */点击 "运行实例" 按钮查看在线实例
.container{
    border: 1px solid rgb(245, 175, 175);
    background-color: rgb(233, 245, 167);
    margin: 15px;
}

.flex{
    display: flex;
}
.item{
    padding: 25px;
    border: 1px solid rgb(70, 42, 97);
    color: black;
    box-sizing: border-box;
    background-color: rgb(176, 233, 111);
}点击 "运行实例" 按钮查看在线实例
手抄:

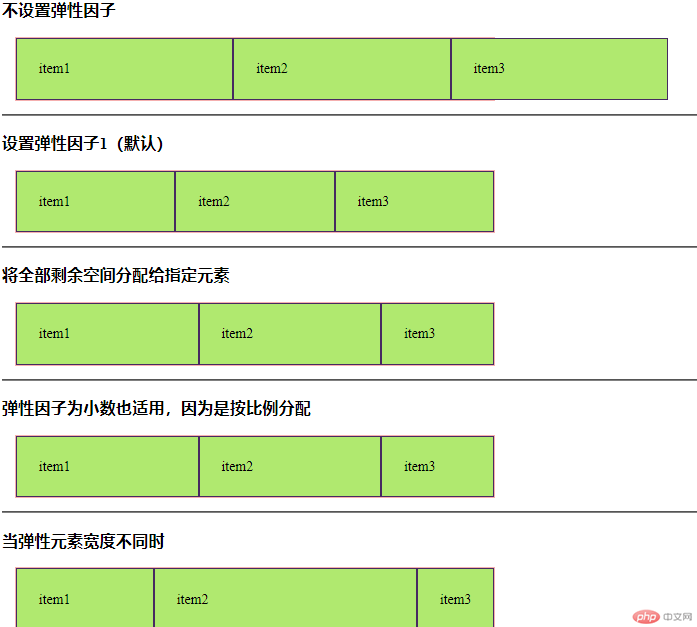
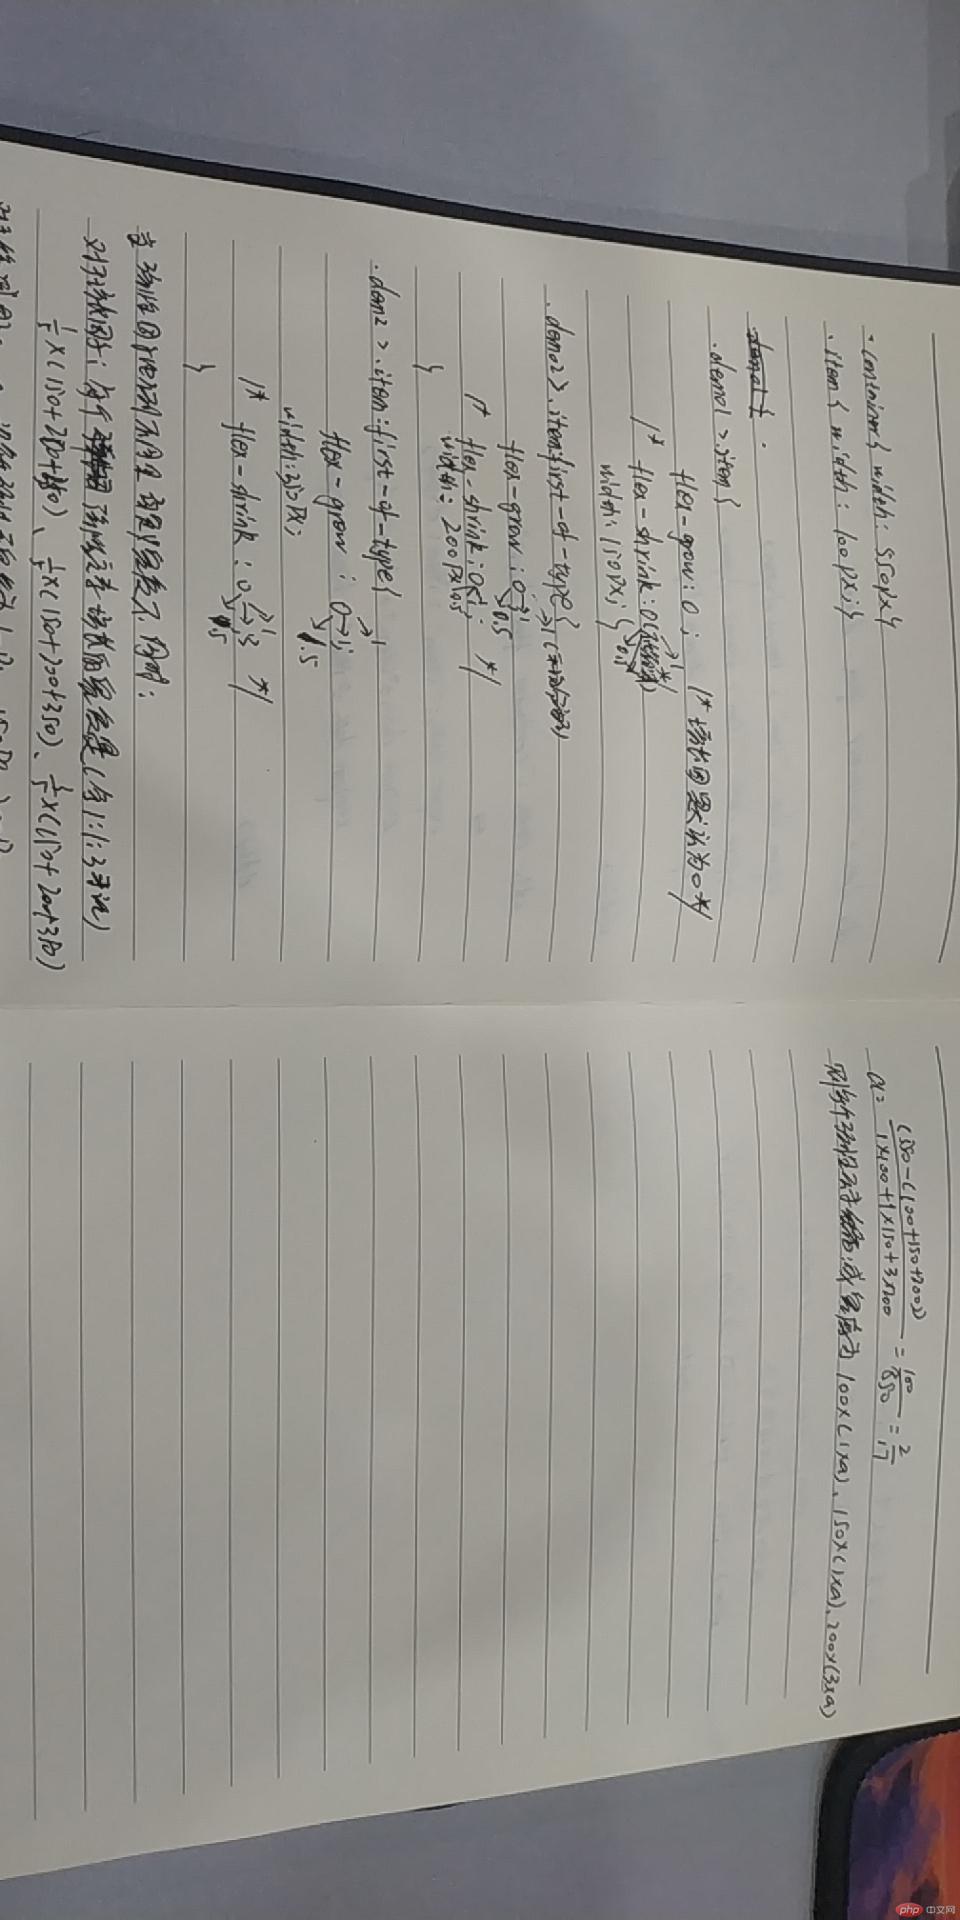
二、设置弹性元素的缩减因子
<!DOCTYPE html>
<html lang="en">
<head>
    <meta charset="UTF-8">
    <meta name="viewport" content="width=device-width, initial-scale=1.0">
    <meta http-equiv="X-UA-Compatible" content="ie=edge">
    <link rel="stylesheet" href="css/style2.css">
    <title>设置弹性元素的缩减因子</title>
</head>
<body>
        <h3>不设置弹性因子</h3>
        <div class="container flex demo0">
            <span class="item">item1</span>
            <span class="item">item2</span>
            <span class="item">item3</span>
        </div>
        <hr>
    <h3>设置弹性因子1(默认)</h3>
    <div class="container flex demo1">
        <span class="item">item1</span>
        <span class="item">item2</span>
        <span class="item">item3</span>
    </div>
    <hr>

    <h3>将全部剩余空间分配给指定元素</h3>
    <div class="container flex demo2">
        <span class="item">item1</span>
        <span class="item">item2</span>
        <span class="item">item3</span>
    </div>
    <hr>
<!--
    <h3>将全部剩余空间平均分配给指定元素</h3>
    <div class="container flex demo3">
        <span class="item">item1</span>
        <span class="item">item2</span>
        <span class="item">item3</span>
    </div>

    <hr>

    <h3>剩余空间按弹性因子比例在弹性元素之间分配</h3>
    <div class="container flex demo4">
        <span class="item">item1</span>
        <span class="item">item2</span>
        <span class="item">item3</span>
    </div>
    <hr> -->

    <h3>弹性因子为小数也适用,因为是按比例分配</h3>
    <div class="container flex demo5">
        <span class="item">item1</span>
        <span class="item">item2</span>
        <span class="item">item3</span>
    </div>

    <hr>

    <h3>当弹性元素宽度不同时</h3>
    <div class="container flex demo6">
        <span class="item">item1</span>
        <span class="item">item2</span>
        <span class="item">item3</span>
    </div>

</body>
</html>
点击 "运行实例" 按钮查看在线实例
@import "public.css";

/*
缩减因子使用场景:
1. 弹性元素设置了自定义宽度
2. 弹性容器设置了自定义宽度
3. 弹性元素总宽度在主轴上超过了弹性容器的宽度
4. 弹性容器不允许换行
*/
.container{
    width: 550px;
}
.item{
    width: 250px;
}

/* 不设置缩减因子,不缩减 */
.demo0>.item{
    flex-shrink: 0;
}
/* 设置缩减因子为1,所有弹性元素自动缩减 */
.demo1>.item{
    flex-shrink: 1;
}


/* 当三个缩减因子不相等时 */
.demo2>.item:first-of-type{
    flex-shrink:1;
}
.demo2>.item:nth-of-type(2){
    flex-shrink:1;
}
.demo2>.item:last-of-type{
    flex-shrink:3;
}

/* 计算:
多余缩减空间:250x3-550=200
每个元素缩减空间分别为:(1/5)x200、(1/5)x200、(3/5)x200 */

/* 将全部剩余空间平均分配给指定元素
.demo3>.item:first-of-type{
    flex-shrink:1;
}
.demo3>.item:nth-of-type(2){
    flex-shrink:1;
}
.demo3>.item:last-of-type{
    flex-shrink:1;
} */

/* 将全部剩余空间平均分配给指定元素
.demo4>.item:first-of-type{
    flex-shrink:1;
}
.demo4>.item:nth-of-type(2){
    flex-shrink:1;
}
.demo4>.item:last-of-type{
    flex-shrink:3;
} */
/* 弹性因子为小数也适用,负数无效 */
/* 注意:弹性因子之和需大于等于1才能将剩余空间完全分配 */
.demo5>.item:first-of-type{
    flex-shrink:0.2;
}
.demo5>.item:nth-of-type(2){
    flex-shrink:0.2;
}
.demo5>.item:last-of-type{
    flex-shrink:0.6;
}
/* 当弹性元素宽度不同时 */
/*
特别提示:
  1. 缩减因子的前掉是每个元素必须是等宽的(在主轴上空间相等)
  2. 如果不相等, 必须按一定的比例, 来调整这个元素的缩减因子
*/

.demo6>.item:first-of-type{
    flex-shrink:1;
    width:200px
}
.demo6>.item:nth-of-type(2){
    flex-shrink:1;
    width: 400px;
}
.demo6>.item:last-of-type{
    flex-shrink:3;
    width: 150px;
}
/* 计算:
a=200/(1x200+1x400+3x150);
每个弹性元素缩减的宽度为:200x(1xa)、400x(1xa)、150x(3xa) */点击 "运行实例" 按钮查看在线实例
手抄: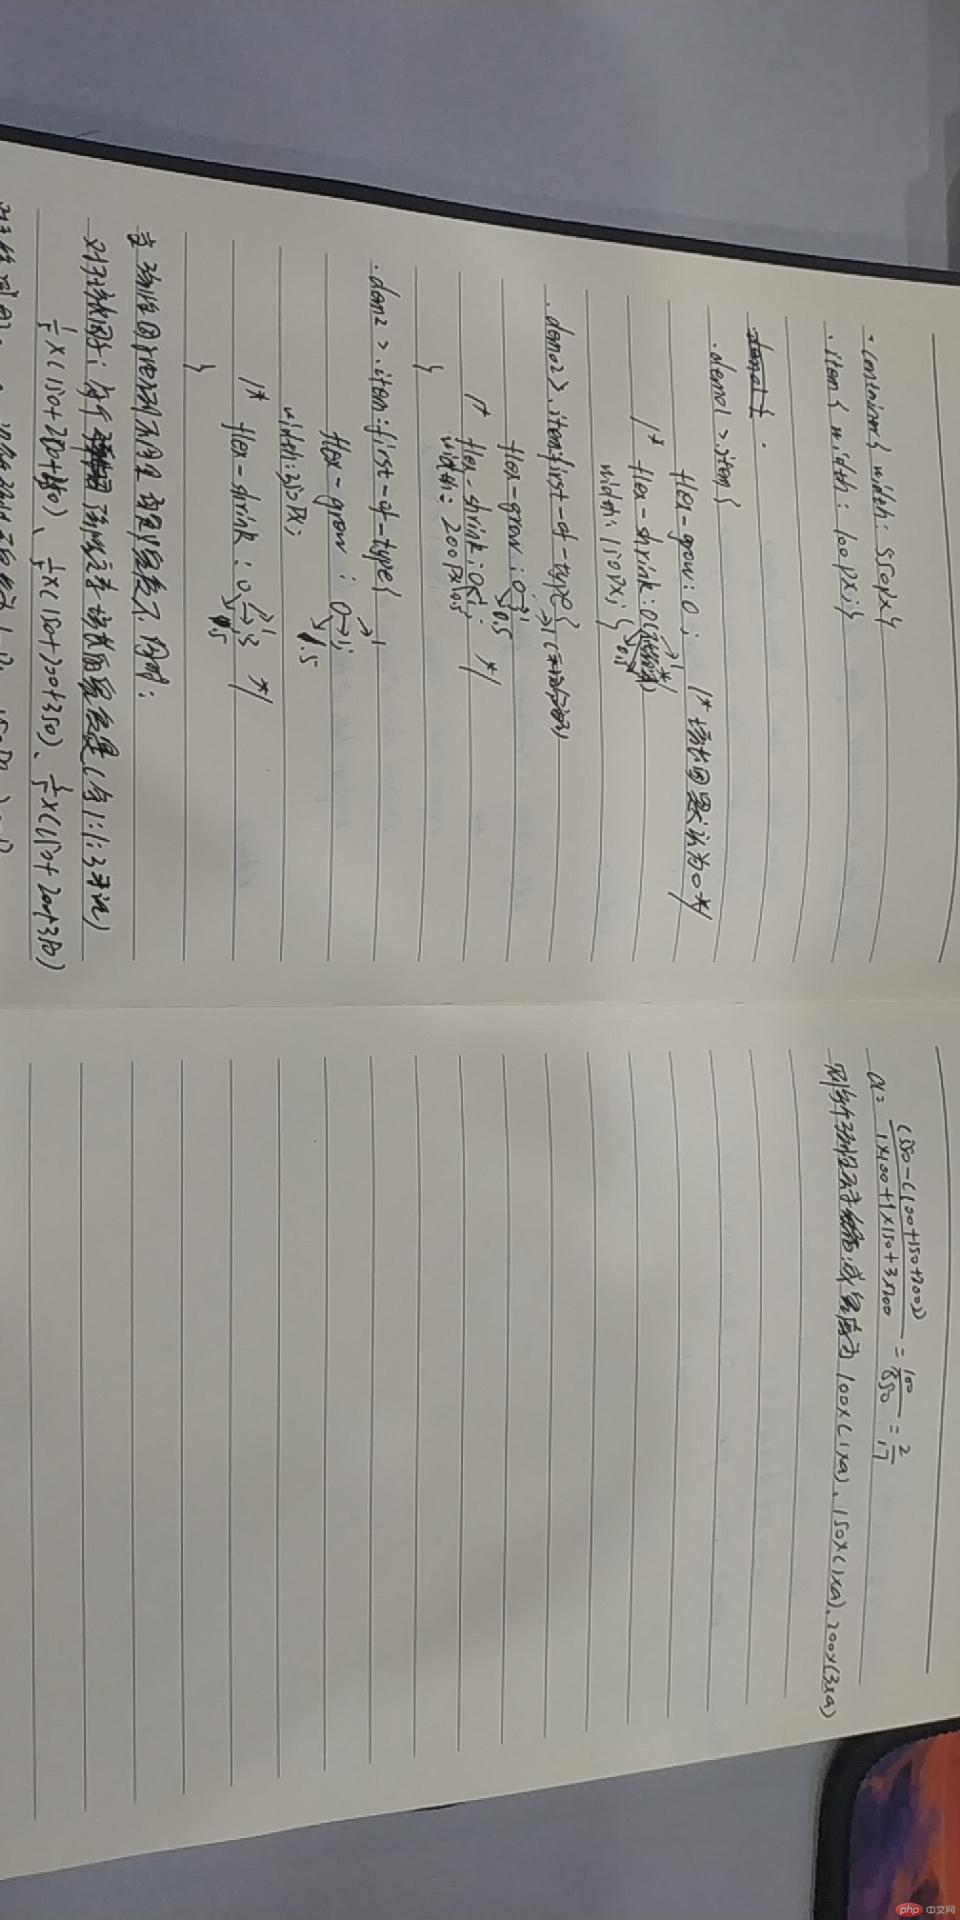
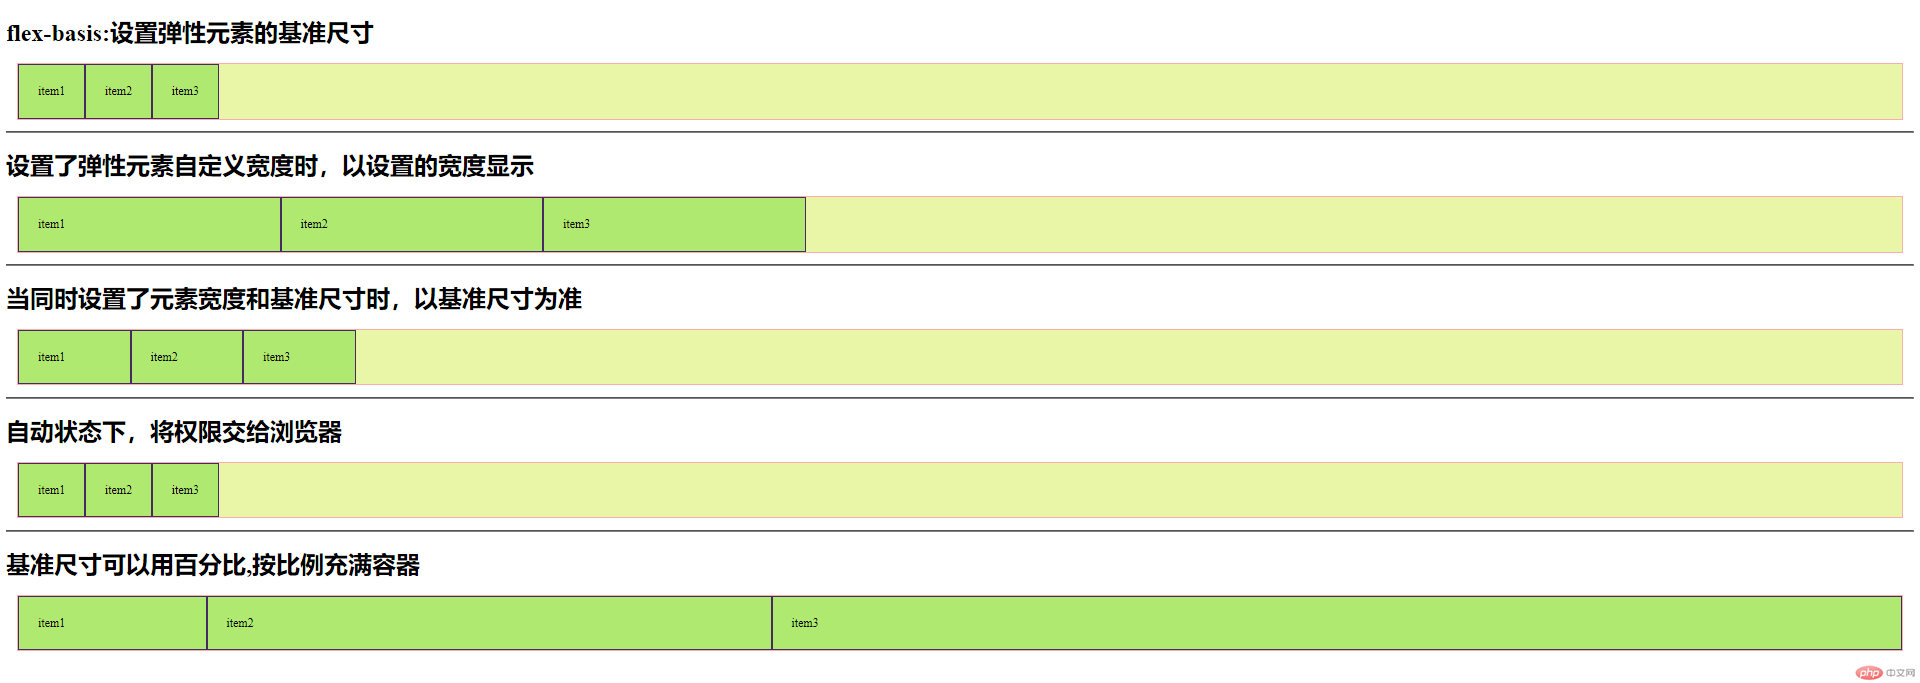
三、给弹性元素设置基准值
<!DOCTYPE html>
<html lang="en">
<head>
    <meta charset="UTF-8">
    <meta name="viewport" content="width=device-width, initial-scale=1.0">
    <meta http-equiv="X-UA-Compatible" content="ie=edge">
    <link rel="stylesheet" href="css/style3.css">
    <title>给弹性元素设置基准值</title>
</head>
<body>
    <h1>flex-basis:设置弹性元素的基准尺寸</h1>
    <div class="container flex demo1">
        <span class="item">item1</span>
        <span class="item">item2</span>
        <span class="item">item3</span>
    </div>

    <hr>
    <h1>设置了弹性元素自定义宽度时,以设置的宽度显示</h1>
    <div class="container flex demo2">
        <span class="item">item1</span>
        <span class="item">item2</span>
        <span class="item">item3</span>
    </div>

    <hr>
    <h1>当同时设置了元素宽度和基准尺寸时,以基准尺寸为准</h1>
    <div class="container flex demo3">
        <span class="item">item1</span>
        <span class="item">item2</span>
        <span class="item">item3</span>
    </div>

    <hr>
    <h1>自动状态下,将权限交给浏览器</h1>
    <div class="container flex demo4">
        <span class="item">item1</span>
        <span class="item">item2</span>
        <span class="item">item3</span>
    </div>

    <hr>
    <h1>基准尺寸可以用百分比,按比例充满容器</h1>
    <div class="container flex demo5">
        <span class="item">item1</span>
        <span class="item">item2</span>
        <span class="item">item3</span>
    </div>
</body>
</html>
点击 "运行实例" 按钮查看在线实例
@import "public.css";

/*
元素基准使用场景:
flex-basis 属性定义了在分配多余空间之前,
项目占据的主轴空间(main size),
浏览器根据这个属性,计算主轴是否有多余空间
1. 没有为弹性元素设置宽度
2. 为元素设置的宽度不满足当前需求
3.为每个弹性元素设置初始值/状态
*/

/* 在未设置元素自定义宽度时,以元素内容显示 */
.demo1>.item{
    flex-basis: content;
}

/* 设置了弹性元素自定义宽度时,以设置的宽度显示 */
.demo2>.item{
    width: 350px;
}
/* 当同时设置了元素宽度和基准尺寸时,以基准尺寸为准 */
.demo3>.item{
    width: 350px;
    flex-basis:150px;
}

/* 自动状态下,将权限交给浏览器
如果给元素设置了宽度,则按其显示
如果元素的宽度也是auto,或者没有定义,则按flex-basis:content显示 */
.demo4>.item{
    flex-basis:auto;
}

/* 基准尺寸可以用百分比,按比例充满容器 */

.demo5>.item:first-of-type{
    flex-basis:10%;
}
.demo5>.item:nth-of-type(2){
    flex-basis:30%;
}
.demo5>.item:last-of-type{
    flex-basis:60%;
}点击 "运行实例" 按钮查看在线实例
手抄:
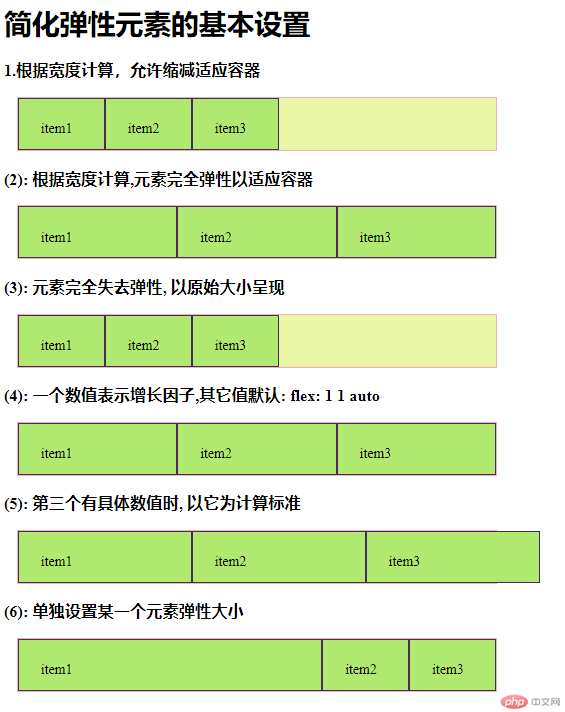
四、简化弹性元素的基本设置
<!DOCTYPE html>
<html lang="en">
<head>
    <meta charset="UTF-8">
    <meta name="viewport" content="width=device-width, initial-scale=1.0">
    <meta http-equiv="X-UA-Compatible" content="ie=edge">
    <link rel="stylesheet" href="css/style4.css">
    <title>简化弹性元素的基本设置</title>
</head>
<body>
    <h1>简化弹性元素的基本设置</h1>

    <h3>1.根据宽度计算,允许缩减适应容器</h3>
    <div class="container flex demo1">
        <span class="item">item1</span>
        <span class="item">item2</span>
        <span class="item">item3</span>
    </div>

<h3>(2): 根据宽度计算,元素完全弹性以适应容器</h3>
<div class="container flex demo2">
    <span class="item">item1</span>
    <span class="item">item2</span>
    <span class="item">item3</span>
</div>

<h3>(3): 元素完全失去弹性, 以原始大小呈现</h3>
<div class="container flex demo3">
    <span class="item">item1</span>
    <span class="item">item2</span>
    <span class="item">item3</span>
</div>

<h3>(4): 一个数值表示增长因子,其它值默认: flex: 1 1 auto</h3>
<div class="container flex demo4">
    <span class="item">item1</span>
    <span class="item">item2</span>
    <span class="item">item3</span>
</div>

<h3>(5): 第三个有具体数值时, 以它为计算标准</h3>
<div class="container flex demo5">
    <span class="item">item1</span>
    <span class="item">item2</span>
    <span class="item">item3</span>
</div>

<h3>(6): 单独设置某一个元素弹性大小 </h3>
<div class="container flex demo6">
    <span class="item">item1</span>
    <span class="item">item2</span>
    <span class="item">item3</span>
</div>
</body>
</html>
点击 "运行实例" 按钮查看在线实例
@import "public.css";

.container{
    width: 550px;
}

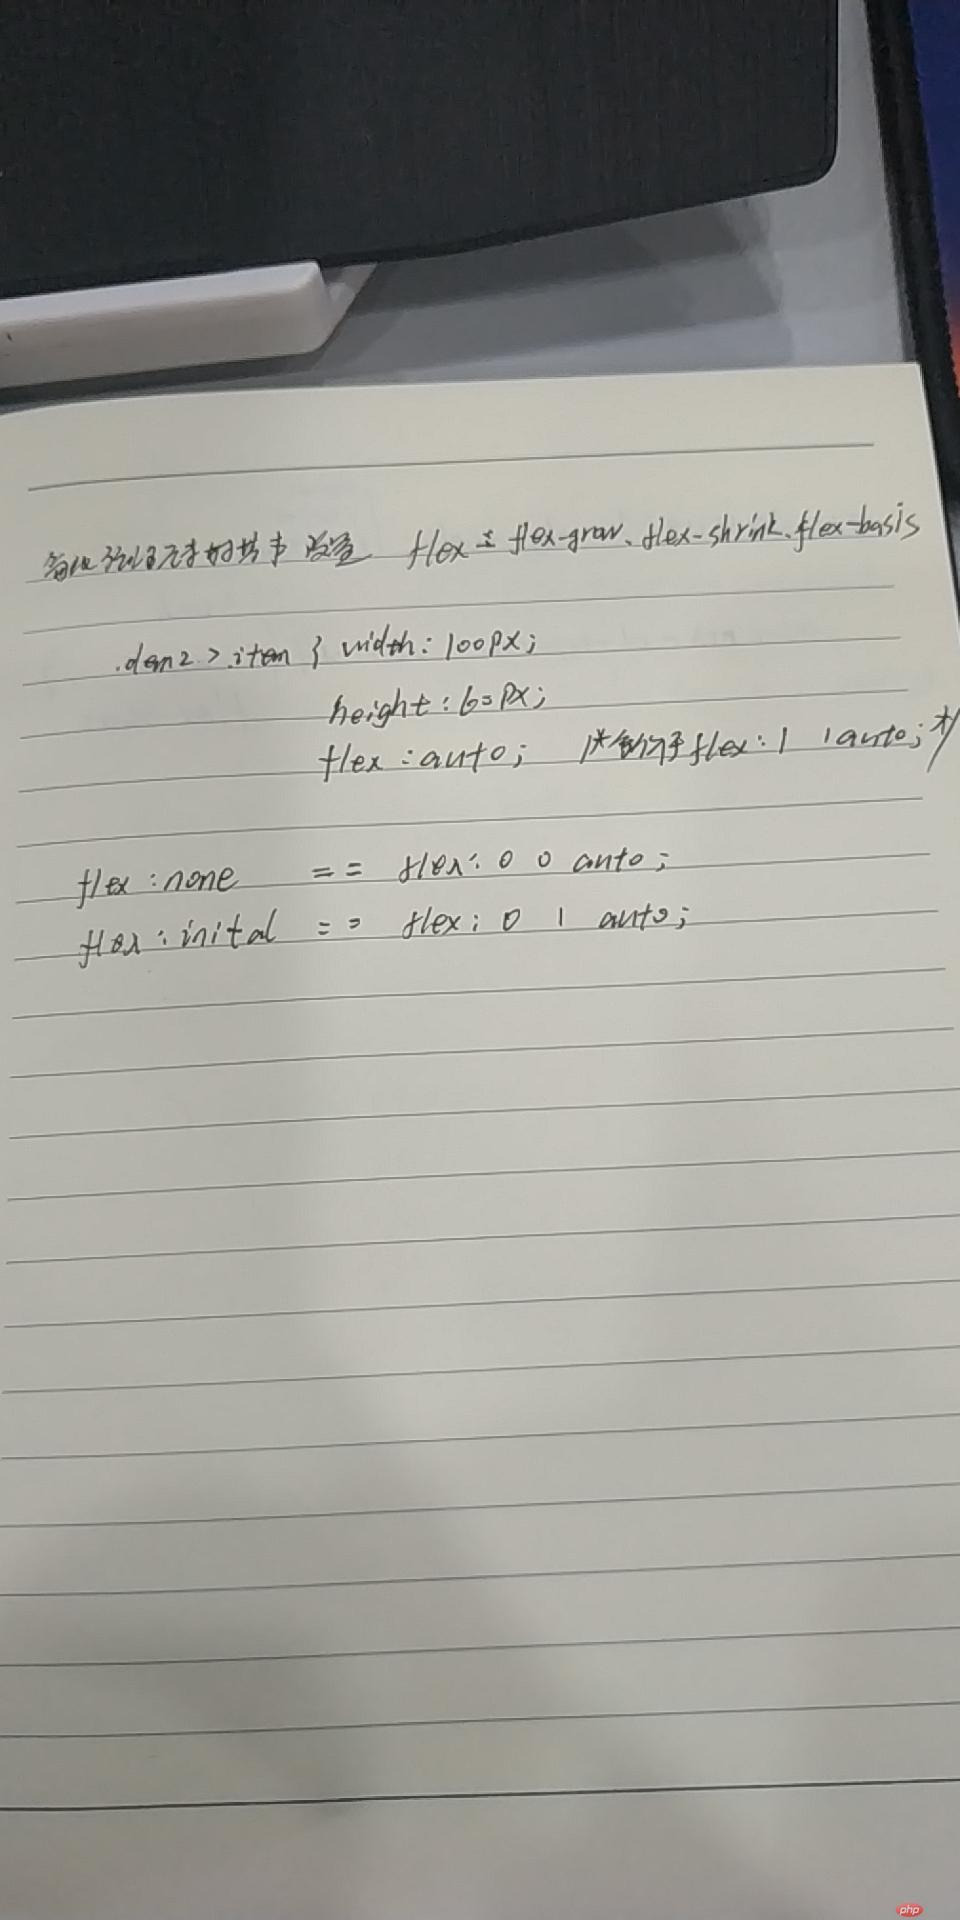
/* flex:flex-grow flex-shrink fllex-basis
flex:可简化flex-grow flex-shrink fllex-basis这三个属性
例如flex:0 0 auto,表示不增长、不缩减、宽度自动 */

/*根据width,height计算,并且允许缩减大小适应容器*/
.demo1 > .item {
    width: 100px;
    height: 60px;
    flex: initial;

    /*等价于初始值*/
    flex: 0 1 auto;
}

.demo2 > .item {
    width: 100px;
    height: 60px;
    flex: auto;

    /*等价于*/
    /*flex: 1 1 auto;*/
}

.demo3 > .item {
    width: 100px;
    height: 60px;
    flex: none;

    /*等价于: */
    flex: 0 0 auto;
}

/*一个数值代表增长因子*/
.demo4 > .item {
    width: 100px;
    height: 60px;
    flex: 1;
    /*等价于*/
    /*如果有多余空间,允许元素在主轴上伸缩*/
    /*flex-grow: 1;*/

    /*等价于:*/
    /*flex: 1 1 auto;*/
}
.demo5 > .item {
    width: 100px;
    height: 60px;
    flex: 1 0 200px;
}

.demo6 > .item {
    width: 100px;
    height: 60px;
}

.demo6 > .item:first-of-type {
    flex: 1 1 50%;
}
/*
实际上最后一个参数: 30%是无效的, 任何数都不会发生变化
因为第一个是1,表示可增长, 即将剩余空间全部分配给它,其它二个默认增长因子为0
*/点击 "运行实例" 按钮查看在线实例
手抄:
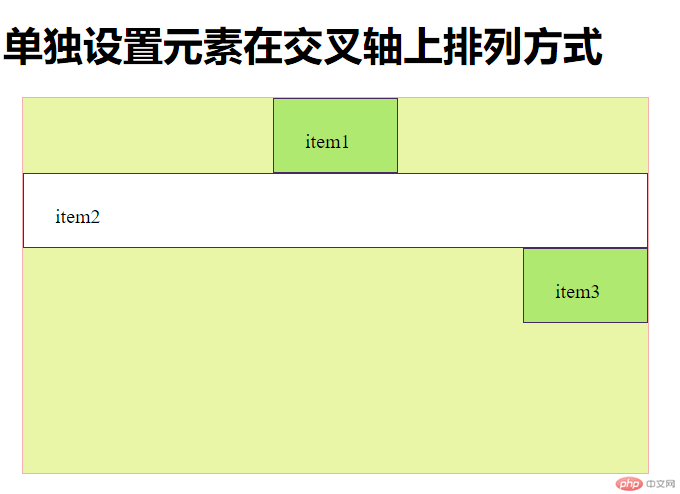
五、单独设置元素在交叉轴上排列方式
<!DOCTYPE html>
<html lang="en">
<head>
    <meta charset="UTF-8">
    <title>单独设置元素在交叉轴上排列方式</title>
    <link rel="stylesheet" href="css/style5.css">
</head>
<body>
<h1>单独设置元素在交叉轴上排列方式</h1>

<div class="container flex">
    <span class="item">item1</span>
    <span class="item">item2</span>
    <span class="item">item3</span>
</div>
</body>
</html>
点击 "运行实例" 按钮查看在线实例
@import "public.css";

.container{
    width: 500px;
    height: 300px;

    flex-flow: column nowrap;

    align-items:flex-end;
}

.item{
    width: 100px;
    height: 60px;
}

/* 单独调整第一个元素 */
.item:first-of-type{
    align-self:flex-start;
}

/* 单独调整最后一个元素 */
.item:first-of-type{
    align-self:center;
}

/* 将第二个元素设置自动扩展 */
.item:nth-last-of-type(2){
    background-color: #fff;

    width: auto;

    align-self: stretch;
}

/*这个属性很实用, 例如我们经常会将导航上用户登录/注册按钮单独放在右侧,就可以用到它*/点击 "运行实例" 按钮查看在线实例
手抄:
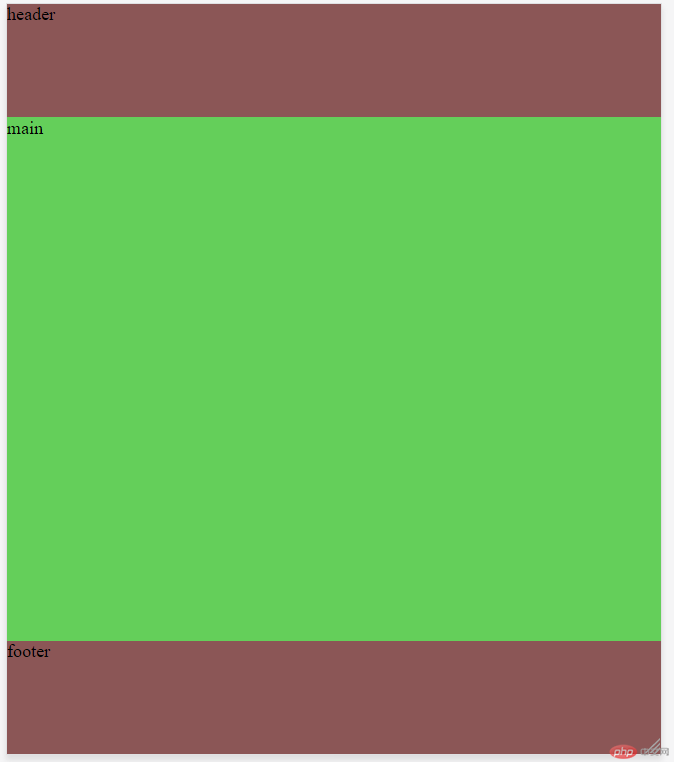
六、移动端首页样式
<!DOCTYPE html>
<html lang="en">
<head>
    <meta charset="UTF-8">
    <meta name="viewport" content="width=device-width, initial-scale=1.0">
    <meta http-equiv="X-UA-Compatible" content="ie=edge">
    <title>移动端首页样式</title>
    <style>
        *{
            margin: 0;
            padding: 0;
        }
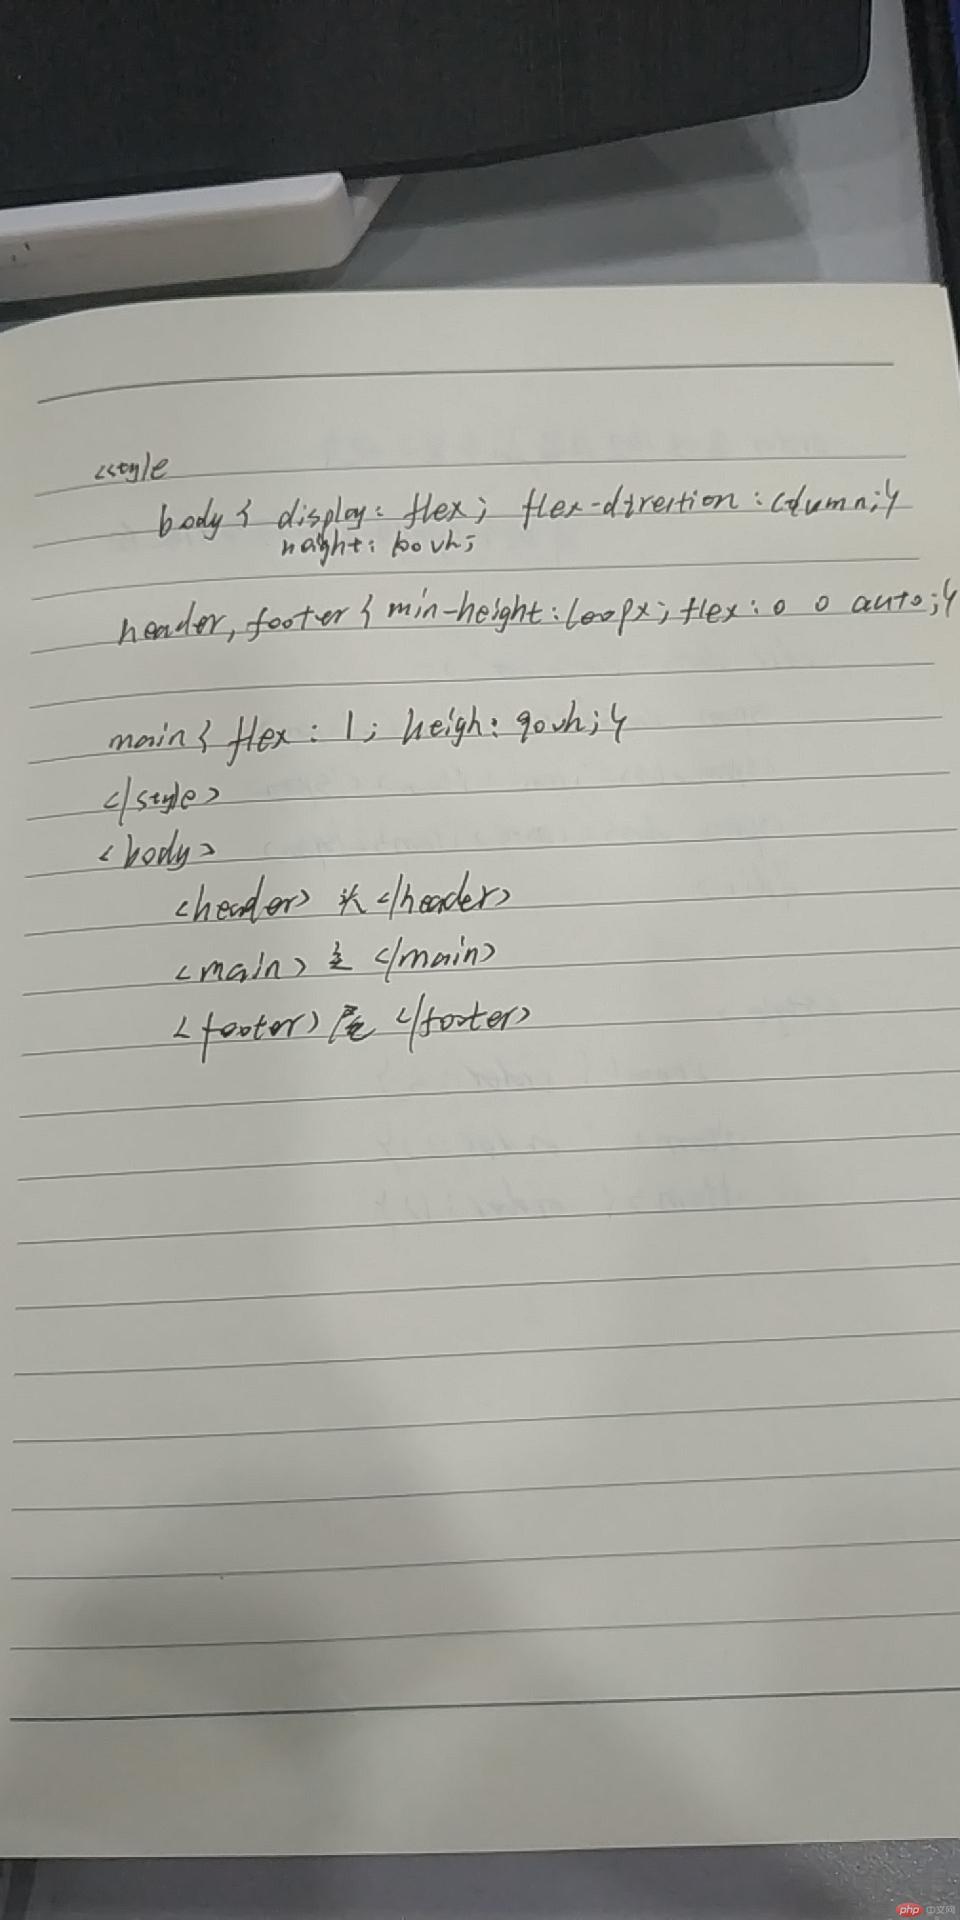
        body{
            height: 100vh;
            display: flex;
            flex-flow: column nowrap;
        }

        header,footer{
            min-height: 100px;
            background-color: rgb(139, 86, 86);
            flex: 0 0 auto;
        }
        main{

            background-color: rgb(100, 207, 90);
            /* 视口高度 */
            height: 90vh;
            flex:1;
        }
    </style>
</head>
<body>
    <header>header</header>
    <main>main</main>
    <footer>footer</footer>
</body>
</html>点击 "运行实例" 按钮查看在线实例
手抄:
七、order用法
order 属性 设置或检索弹性盒模型对象的子元素出现的順序。
<!DOCTYPE html>
<html lang="en">
<head>
    <meta charset="UTF-8">
    <meta name="viewport" content="width=device-width, initial-scale=1.0">
    <meta http-equiv="X-UA-Compatible" content="ie=edge">
    <title>order</title>
    <style>
        .container{
            display: flex;
        }
        .item1{
            order:4;
            background-color: rgb(241, 20, 20);
            margin: 15px;
        }
        .item2{
            order: 3;
            background-color: rgb(130, 250, 18);
            margin: 15px;
        }
        .item3{
            order: 2;
            background-color: rgb(12, 133, 247);
            margin: 15px;
        }
        .item4{
            order: 1;
            background-color: rgb(228, 18, 228);
            margin: 15px;
        }
    </style>
</head>
<body>
    <h1>order 属性 设置或检索弹性盒模型对象的子元素出现的順序。</h1>
    <div class="container">
    <div class="item1">item1</div>
    <div class="item2">item2</div>
    <div class="item3">item3</div>
    <div class="item4">item4</div>
</div>
</body>
</html>点击 "运行实例" 按钮查看在线实例

手抄: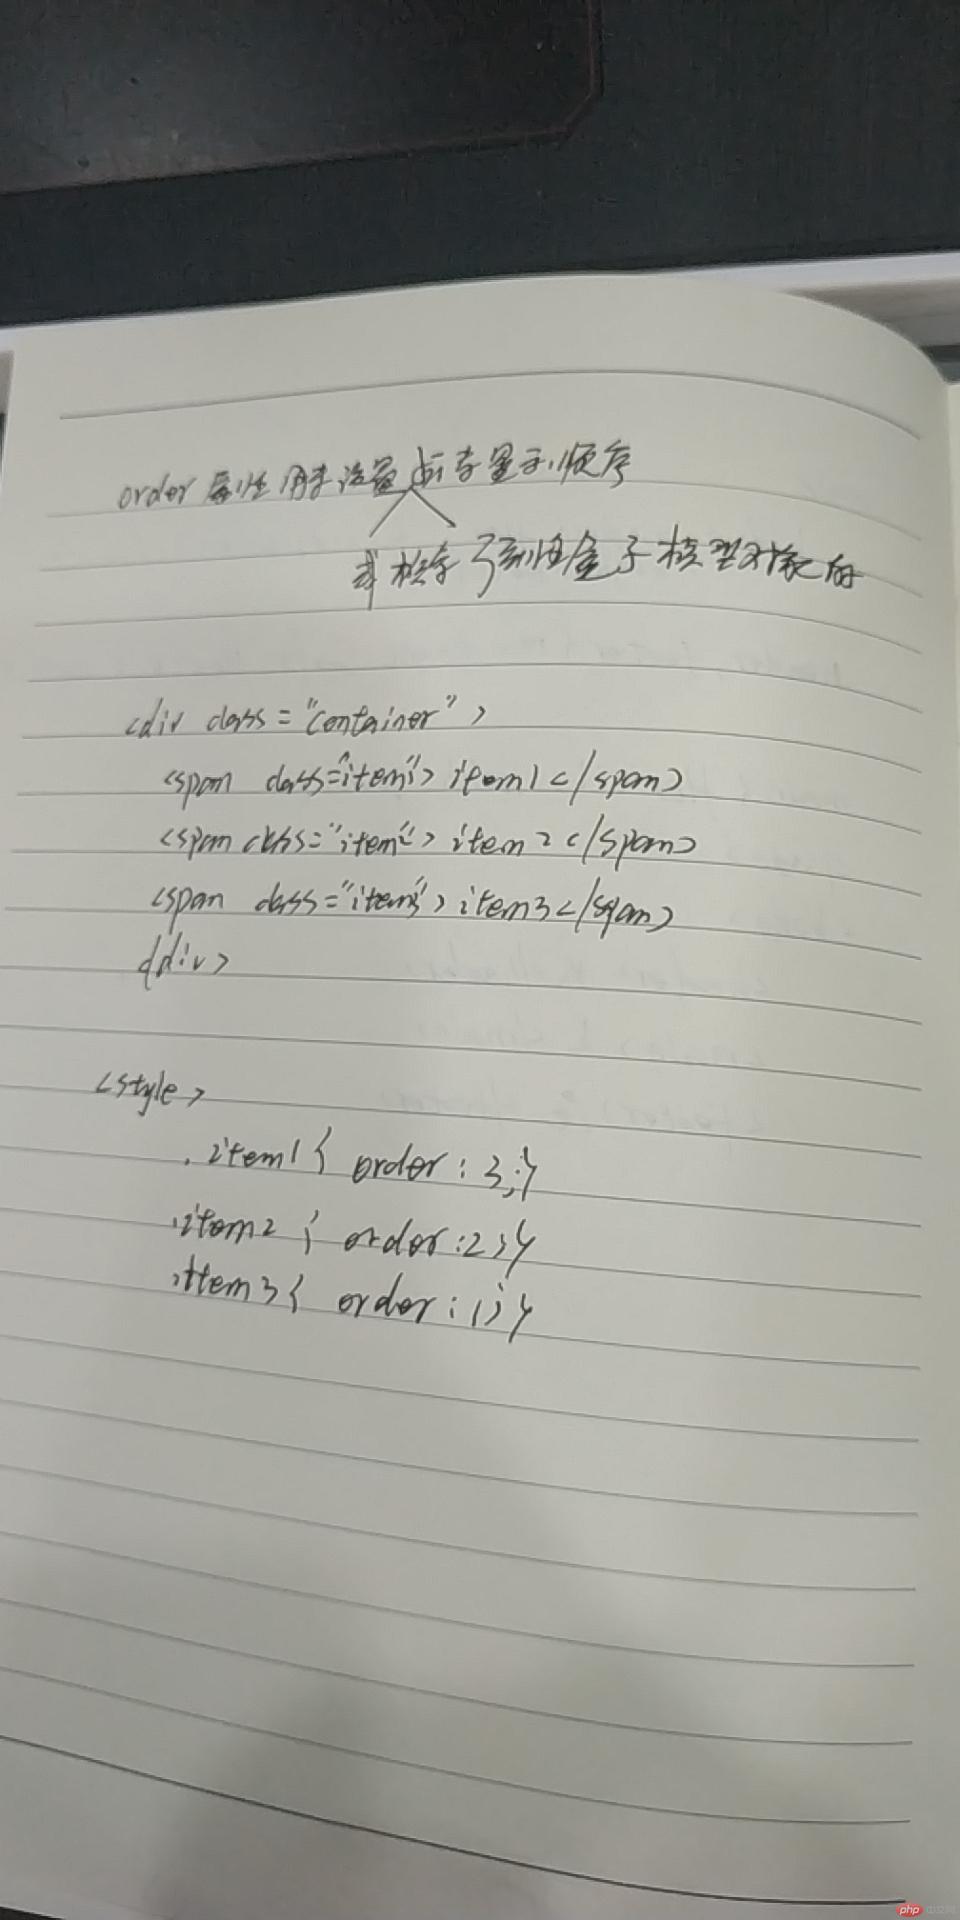
八、用flex改写圣杯布局
<!DOCTYPE html>
<html lang="en">
<head>
    <meta charset="UTF-8">
    <meta name="viewport" content="width=device-width, initial-scale=1.0">
    <meta http-equiv="X-UA-Compatible" content="ie=edge">
    <link rel="stylesheet" href="css/style8.css">
    <title>用flex改写圣杯布局</title>
</head>
<body>
    <header>hedaer</header>
    <main>
        <article>内容区</article>
        <aside class="left">左侧</aside>
        <aside class="right">右侧</aside>
    </main>
    <footer>foot</footer>

</body>
</html>
点击 "运行实例" 按钮查看在线实例
body,main{
    display: flex;

}
body{
    flex-direction: column;
}
header,footer{
    height: 100px;
    background-color: rgb(243, 138, 138);
}
main{
    box-sizing: border-box;
    border: 1px solid black;
    flex-flow: row nowrap;
}

article{
    order: 2;
    width: 100%;
    min-height: 600px;
    background-color: rgb(73, 231, 25);
}
.left{
    width: 200px;
    order: 1;
    background-color: rgb(52, 136, 247);
}

.right{
    width: 200px;
    order: 3;
    background-color: rgb(211, 240, 48);
}点击 "运行实例" 按钮查看在线实例
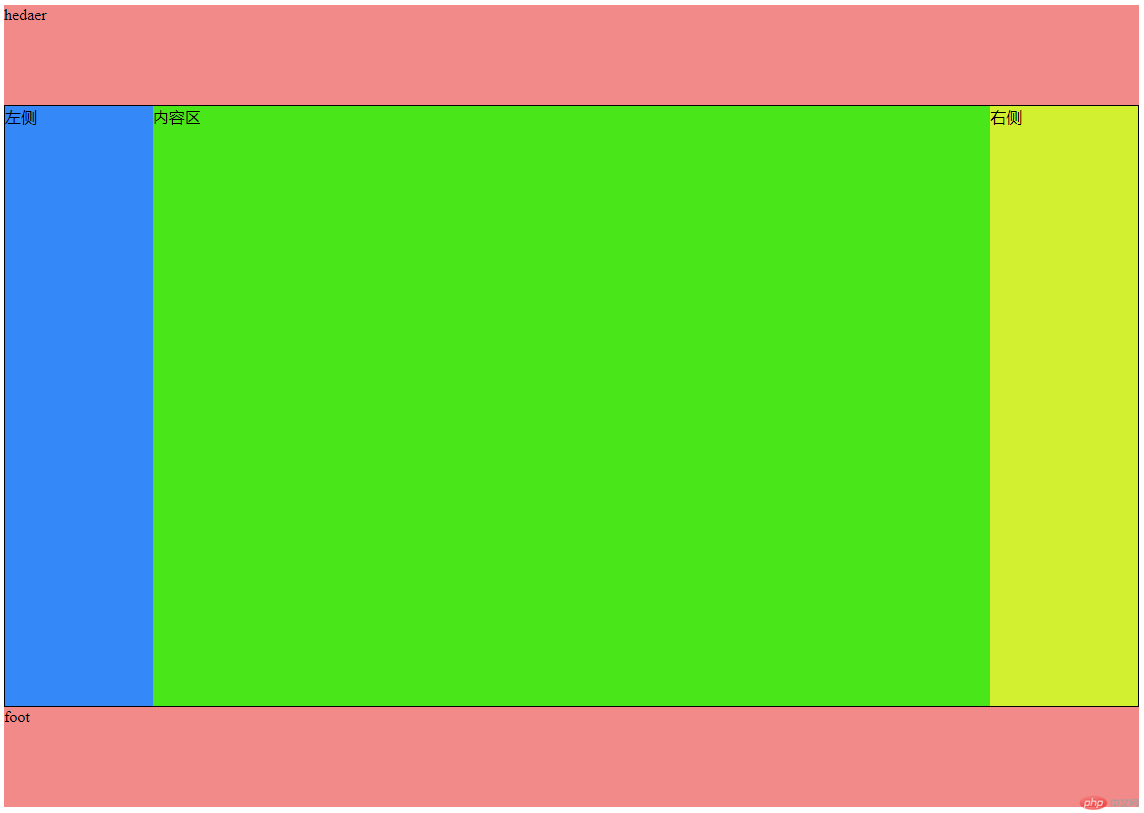
手抄: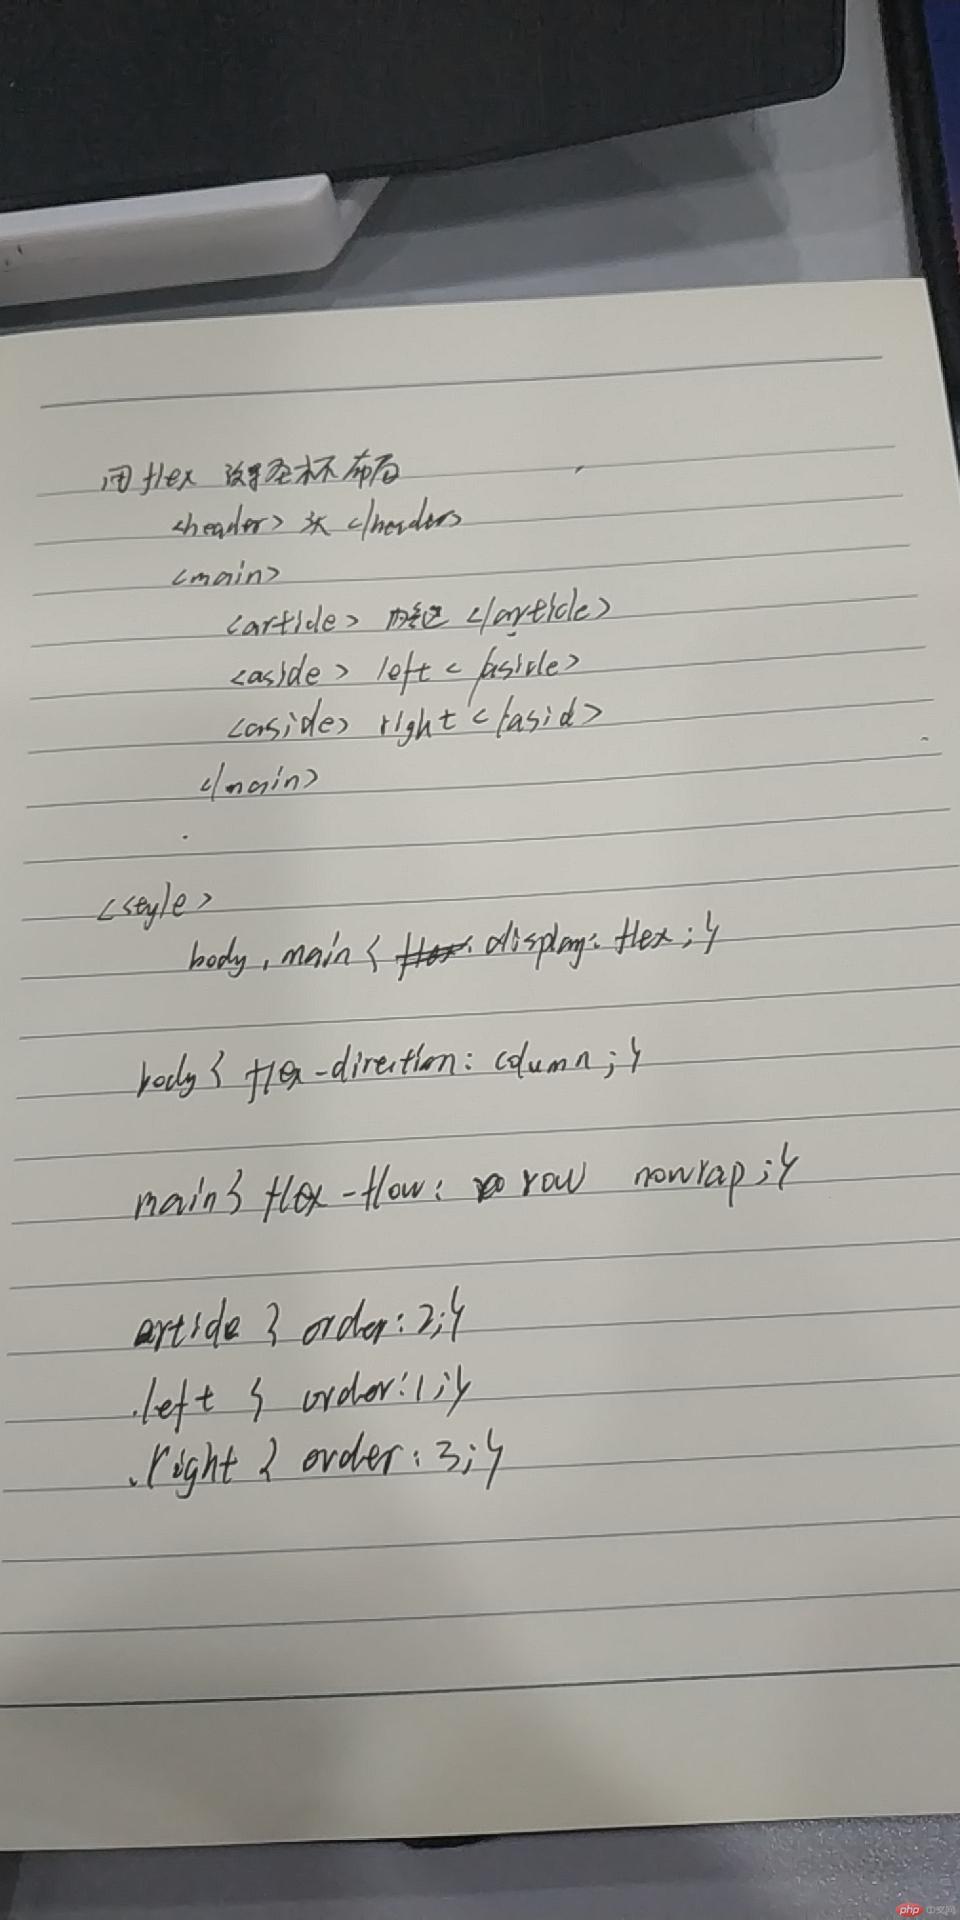
九、简易首页设计
<!DOCTYPE html>
<html lang="en">
<head>
    <meta charset="UTF-8">
    <meta name="viewport" content="width=device-width, initial-scale=1.0">
    <meta http-equiv="X-UA-Compatible" content="ie=edge">
    <link rel="stylesheet" href="css/style9.css">
    <title>简易首页</title>
</head>
<body>
        <header>
            <div class="hl1">
                <a href="">Liu'blog</a>
            </div>
            <form action="" id="form">
                    <div class="fh">

                <input id="inp" type="text" placeholder="请输入关键字搜索">
                    <button>搜素</button>

            </div>
            </form>
            <ul>
                <li><a href="">消息</a></li>
                <li> <a href="">登录</a> </li>
            </ul>
        </header>
        <main>
            <article>
                <ol class="ahead">
                    <li><a href="">首页</a></li>
                    <li>/ <a href="">正文</a> </li>
                    <div class="fx">
                            分享到  QQ\微信\微博
                        </div>
                </ol>
                <section>
                    <div class="ss">
                    <img src="imgs/2.jpg" width="742px" alt="">
                    <p>Vue是一套用于构建用户界面的渐进式框架, 被设计为可以自底向上逐层应用。</p>
                </div>
                </section>
                <section>
                        <div class="ss">
                        <img src="imgs/2.jpg" width="742px" alt="">
                        <p>Vue是一套用于构建用户界面的渐进式框架, 被设计为可以自底向上逐层应用。</p>
                    </div>
                    </section>
                    <section>
                            <div class="ss">
                            <img src="imgs/2.jpg" width="742px" alt="">
                            <p>Vue是一套用于构建用户界面的渐进式框架, 被设计为可以自底向上逐层应用。</p>
                        </div>
                        </section>
                        <footer>公安备案 豫公网安备41910402000171号</footer>

            </article>
            <aside class="left">
                <div class="l1">
                <a href="">
                <div class="tx">
                    <div class="tp">
                        <img src="imgs/1.jpg" width="150px" height="150px" alt="">
                    </div>
                </div>
                </a>
                <p class="s1">liu'blog</p>
                <p class="s2">何以解忧,唯有暴富</p>
            </div>
            <!-- <aside class="right">
                    <div class="rhead">

                            <a href="">热门</a>
                            <a href="">评论</a>
                          <a href="">随机</a>

                    </div>
                    <div class="contain">
                        <p>热门文章</p>

                    </div>
                </aside> -->

            <nav style="border-bottom: 1px solid rgb(218, 215, 215);">
                <p class="dh">导航</p>
                <ul>
                    <li> <a href="">首页</a> </li>
                    <li> <a href="">文件</a> </li>
                    <li> <a href="">视频</a> </li>
                    <li> <a href="">生活</a> </li>
                    <li> <a href="">分享</a> </li>

                </ul>
                <p class="dh">组成</p>
                <ul>
                    <li> <a href="">分类</a> </li>
                    <li> <a href="">页面</a> </li>
                    <li> <a href="">友链</a> </li>

                </ul>

            </nav>
            <div class="lfoot">
                <div class="lf1"> <a href="">管理</a> </div>
                <div class="lf1"> <a href="">文章</a> </div>
                <div class="lf1"> <a href="">评论</a> </div>
            </div>

            </aside>


        </main>


</body>
</html>
点击 "运行实例" 按钮查看在线实例
*{
    margin: 0;
    padding: 0;
}
body,main{
    display: flex;

}
body{
    flex-direction: column;
    box-sizing: border-box;
}
header,footer{
    height: 50px;
    background-color: #1199C4;
}
main{
    box-sizing: border-box;
    border: 1px solid black;
    flex-flow: row nowrap;
}

article{
    order: 2;
    width: 100%;
    min-height: 600px;
    background-color: #F9F9F9;
    box-sizing: border-box;
}
.left{
    width: 250px;
    order: 1;
    background-color:#DDE6E9;
    padding: 0;
    box-sizing: border-box;
    border: 1px;

}

.right{
    width: 220px;
    order: 3;
    background-color: #DDE6E9;
}

.tp{
    text-align: center;
    margin: 10px auto;
}
.tp>img{
    border-radius: 500px;
}
.s1{
    text-align: center;
    font-size: 22px;
    margin: 0 auto;
}
.s2{
    text-align: center;
    font-size: 12px;
    margin: 2px auto;
}
.l1{
    border-bottom: 1px solid rgb(218, 215, 215);
    background-color:#DDE6E9;
    margin-top: 0;
}
nav{
    margin-top: 12px;
    padding-left: 6px;
}

.dh{
    color: #AECDBE;
    text-align: left;

}
nav{
    padding-left: 15px;
}

nav>ul{
    margin: 8px auto;
    padding-left: 15px;
}

nav>ul>li{
    list-style-type: none;
    margin: 5px auto;

    background-color:#DDE6E9;
    display: block;
}
nav>ul>li>a{
    text-decoration: none;
    display: block;
    color: #A3BFD6;
    font-size: 20px;
    padding: 5px;
}
nav>ul>li>a:hover{
    color: white;
    background-color:#E4EAEC;
}

.lfoot{
    background-color:#f3f5f6;
    height: 55px;
    text-align: center;

}
.lf1{
    width: 33%;
    float: left;
    line-height: 55px;
}
.lf2{
    width: 33%;
    float: left;
    line-height: 55px;
}
.lf3{
    width: 33%;
    float: left;
    line-height: 55px;
}
.lfoot>.lf1>a{
    text-decoration: none;
    color: rgb(199, 210, 214);

}
.lfoot>.lf1>a:hover{
    color: black;
    font-size: 20px;
}
.hl1{
    background-color: #1199c4;
    height: 50px;
    width: 220px;
    position: fixed;

}
.hl1>a{
    line-height: 50px;
    text-decoration: none;
    text-align: center;
    padding: 0 22px;
    font-size: 22px;
    font-weight: 700;
    height: auto;
    color: white;
    float: left;
    display: block !important;
}
*{
    box-sizing: border-box;
}
.fh{
    margin-left: 220px;
    /* display: block; */
    overflow: visible;
    height: auto;
    /* display: inline-table */

}
#form{
    /* display: inline-block; */

    /* height: 55px;
    width: 120px; */
    margin-top: 10px ;
    margin-bottom: 10px;
    width: auto;
    /* display: inline-block; */
    float: left !important;
    width: auto;

padding-top: 0;

padding-bottom: 0;

margin-right: 0;

margin-left: 0;

border: 0;

-webkit-box-shadow: none;

box-shadow: none;

}
#inp{
    border-radius: 550px;
    padding: 5px 10px;
    /* float: left; */

}
button{
    padding: 4px;
    border-radius: 6px;
    background: 0 0;
}

header{
    position: fixed;
width: 1350px;
}

header>ul{
    float: right !important;
    list-style: none;
}
header>ul>li{
    float: left;
    display: block;
}
header>ul>li>a{
    text-decoration: none;
    line-height: 50px;
    font-size: 20px;
    padding: 5px;
}
header>ul>li>a:hover{
    background-color: rgb(95, 202, 235);
}
.ahead{
    list-style-type: none;
    margin: 12px 12px;
    border:2px solid #dee5e7;
    height: 33px;
    border-radius: 12px;
    padding: 0 13px;
}
a{
    text-decoration: none;
    font-size: 22px;
}
ol>li{
    float: left;
}

.fx{
    float: right;
    margin-right: 12px;
}
body{
    padding:0 100px;
    background-color: #B3CEBC;
}

section{
    margin: 10px 22px;
}

.ss{
    margin: 10px auto;
    text-align: center;
    border: 1px solid rgb(134, 233, 233);
    border-radius: 10px;
}
section>img{
    margin-top: 8px;

}
section>.ss>p{
    font-size: 18px;
    font-weight: 12px;
    display: inline-block;
    margin-top: 12px;
    margin-bottom: 10px;
}
.left{
    margin-top: 49.5px;
    position: fixed;
}
.right{
    margin-top:50.5px;
    width: 320px;
    float: right;
}
article{
    margin-left: 240px;
    text-align: center;
}
.rhead{
    height: 10px;
    box-sizing: border-box;
}
/* .rhead>ul{
    list-style-type: none;
    text-align: center;
   width: 100%;

}
.rhead>ul>li{
    float: left;
    margin: 10px 5px;

}
.rhead>ul>li>a{
    font-size: 17px;
    background-color: rgb(216, 241, 237);
    line-height: 10px;
}
.rhead>ul>li>a:hover{
    font-size:19px ;
} */
main{
    width: 1350px;
}
.contain{
    margin-top: 60px;
    margin-bottom: 5px;
    border-top: 1px solid black;
    padding-top: 6px;
    padding-left: 8px;

}点击 "运行实例" 按钮查看在线实例

十、总结
增长因子适用场景:1.弹性容器设置了自定义宽度;2.弹性元素设置了自定义宽度;3.弹性容器不允许换行。4.弹性元素总宽度在主轴方向上小于弹性容器宽度,有剩余空间;用flex-gorw设置。
缩减因子使用场景:1. 弹性元素设置了自定义宽度2. 弹性容器设置了自定义宽度3. 弹性元素总宽度在主轴上超过了弹性容器的宽度4. 弹性容器不允许换行。用flex-shrink设置。
增长因子与缩减因子在弹性元素的宽度不同时,计算方法是不同的;
元素基准使用场景:flex-basis 属性定义了在分配多余空间之前,项目占据的主轴空间(main size),浏览器根据这个属性,计算主轴是否有多余空间1. 没有为弹性元素设置宽度2. 为元素设置的宽度不满足当前需求3.为每个弹性元素设置初始值/状态
flex:可简化flex-grow flex-shrink fllex-basis这三个属性例如flex:0 0 auto,表示不增长、不缩减、宽度自动 ;
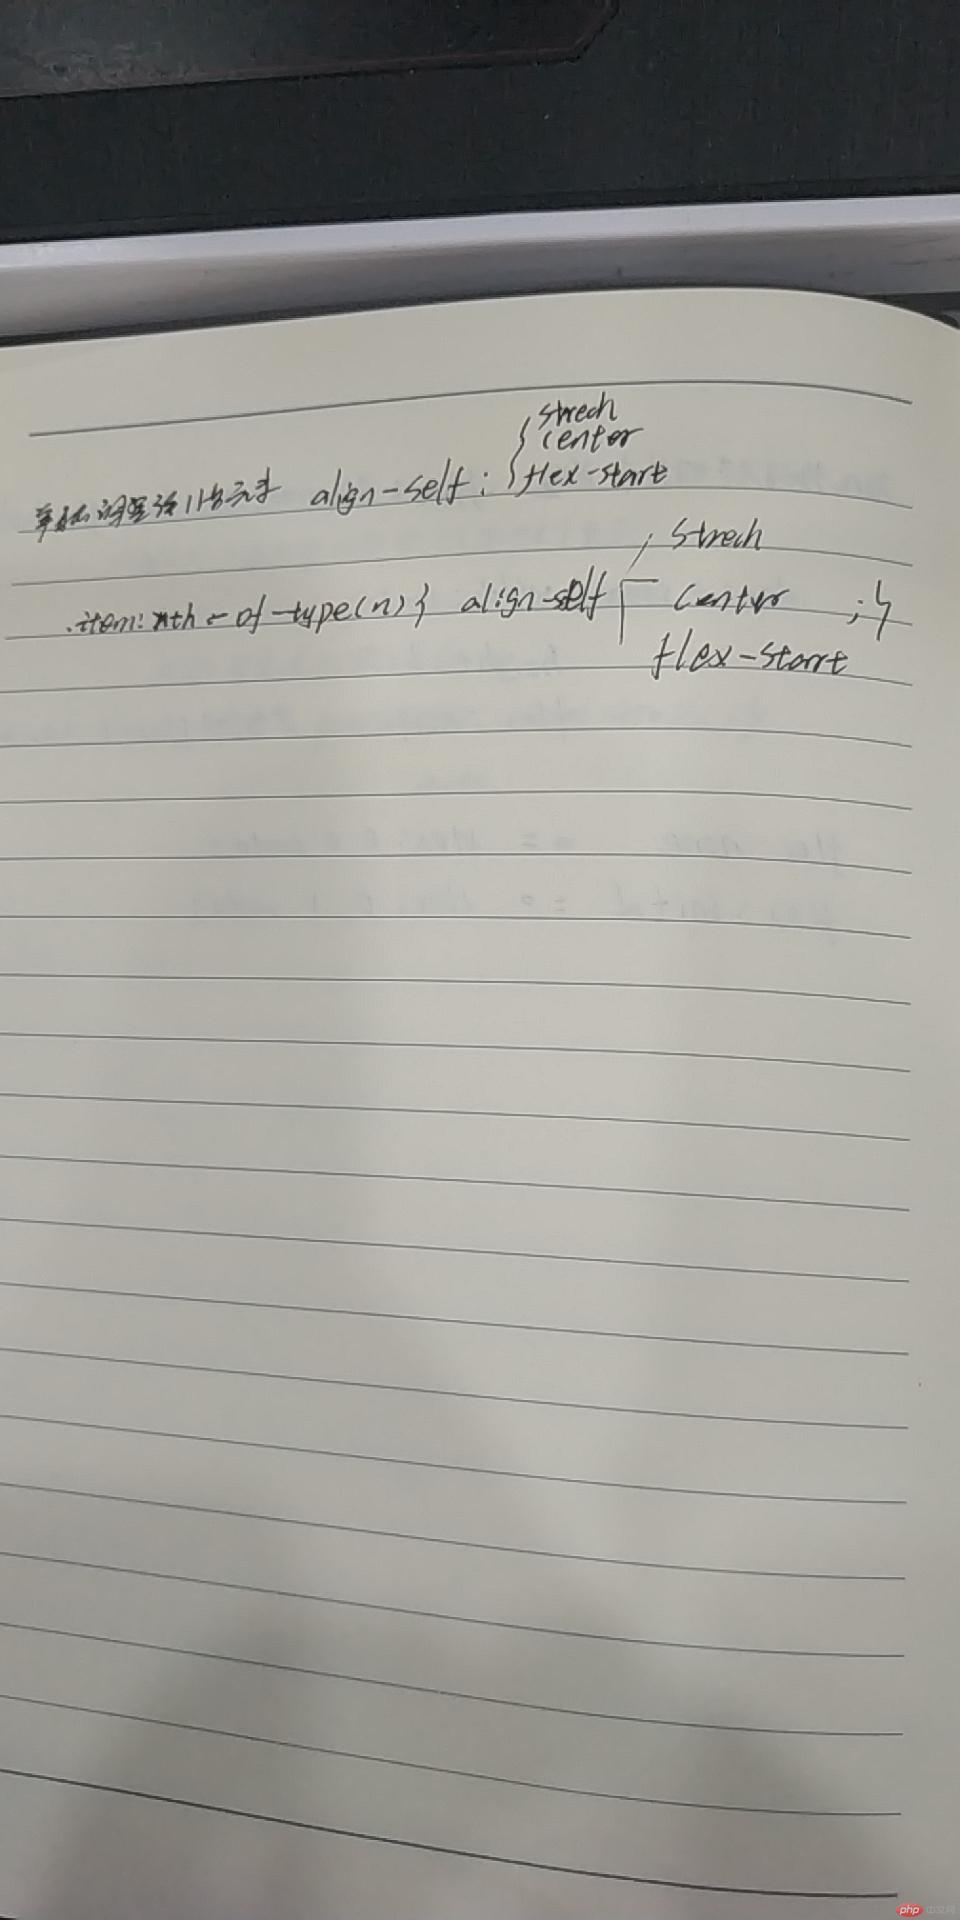
单独调整一个元素用align-self,属性值有flex-start、center、stretch;
order属性设置或检索弹性盒模型对象的子元素出现的順序;
最后应用已学知识做了一个简单的首页,flex真的很强大。